Note
Access to this page requires authorization. You can try signing in or changing directories.
Access to this page requires authorization. You can try changing directories.
Important
Azure Lab Services will be retired on June 28, 2027. For more information, see the retirement guide. To simplify your migration, Microsoft has published automation scripts to help you clean up Lab Services resources, these are available in the Azure Lab Services Retirement Scripts GitHub repository.
Important
The information in this article applies to lab accounts. Azure Lab Services lab plans replace lab accounts. Learn how you can get started by creating a lab plan. For existing lab account customers, we recommend that you migrate from lab accounts to lab plans.
When you're creating a lab, there might be some resources that need to be shared among all the students in a lab. For example, you have a licensing server or SQL Server for a database class. This article will discuss the steps to enable the shared resource for a lab. We’ll also talk about how to limit access to the shared resource.
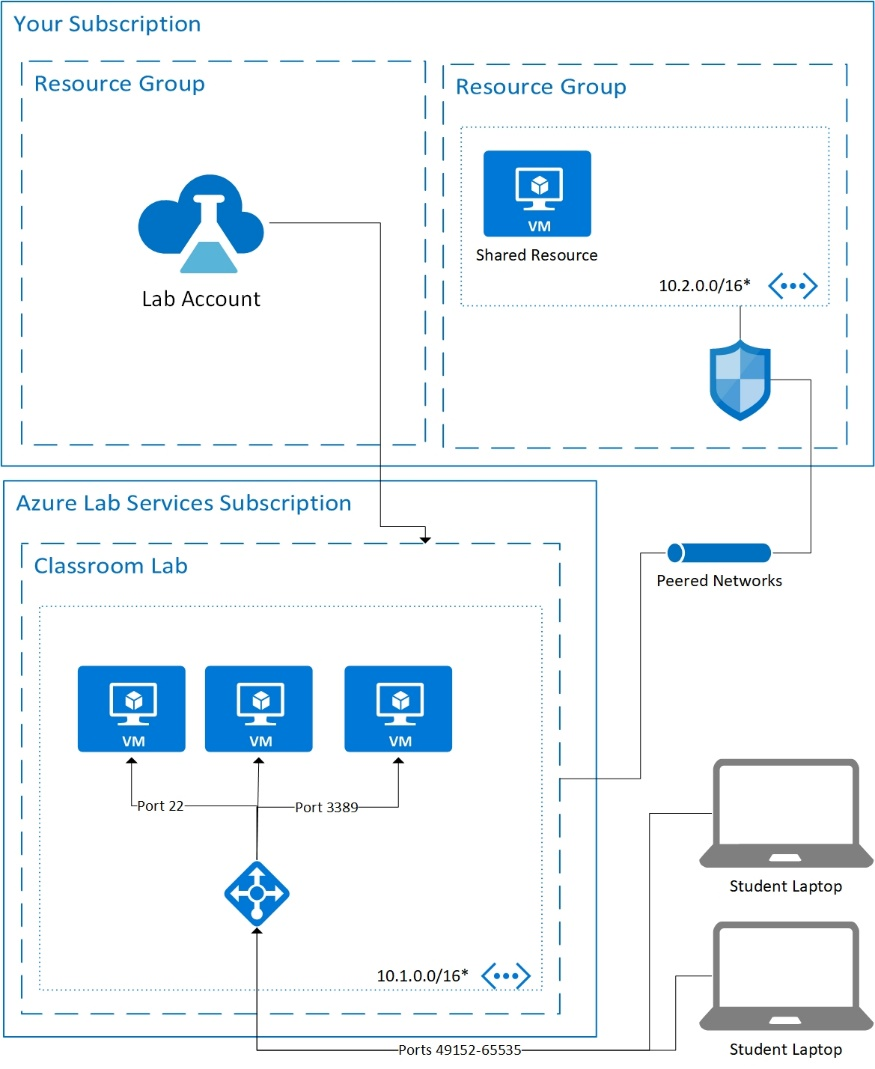
Architecture
As shown in the diagram below we'll have a lab account with a lab. The lab account will have the vnet peering settings so the virtual network for the lab is connected to the network of the shared resource. In the diagram below, there are two virtual networks with non-overlapping IP ranges. These IP ranges are just example ranges. Also, the shared resource virtual network is in the same subscription as the lab account.
Set up shared resource
The virtual network for the shared resource must be created before the lab is created. For more information on how to create a virtual network, see create a virtual network. Planning out virtual network ranges so they don’t overlap with the ip address of the lab machines is important. For more information about planning your network, see the plan virtual networks article. In the example, the shared resource is in a virtual network with the range 10.2.0.0/16. If not done already, create a subnet to hold the shared resource. In the example, we use the 10.2.0.0/24 range, but your range might be different depending on the needs of your network.
The shared resource can be software running on a virtual machine or an Azure provided service. The shared resource should be available through private IP address. By making the shared resource available through private IP only, you limit access to that shared resource.
The diagram also shows a network security group (NSG) which can be used to restrict traffic coming from the student VM. For example, you can write a security rule that states traffic from the student VM's IP addresses can only access one shared resource and nothing else. For more information on how to set security rules, see manage network security group. If you want to restrict access, to a shared resource of a specific lab, get the IP address for the lab from the lab settings of the lab. And then, set an inbound rule to allow access only from that IP address. Don’t forget to allow ports 49152 to 65535 for that IP address. Optionally, you can find the private IP address of the student’s VMs by using the virtual machine pool page.
If your shared resource is an Azure virtual machine running necessary software, you might have to modify the default firewall rules for the virtual machine.
Tips for shared resources - License server
One of the most common shared resources is a License server, here are a few tips on how to be successful with setting one up.
Server region
The License server must be connected to the virtual network that is peered to the lab. As the license server needs to be located in the same region as the lab account.
Static private IP and MAC address
By default virtual machines have a dynamic private ip. Before you setup any software, set the private ip to static. The private IP and the MAC address are now set to be static.
Control Access
Controlling access to the license server is key. When the VM is set up, access will still be needed for maintenance, troubleshooting, and updating. Following are a few ways for controlling access:
- Setting up Just in Time (JIT) access within Microsoft Defender for Cloud.
- Setting up a Network Security Group to restrict access.
- Setup Bastion to allow secure access to the license server.
Lab Account
To use a shared resource, the lab account must be set up to use a peered virtual network. In this case, we'll be peering to the virtual network that holds the shared resource.
Warning
The lab for your class must be created after the lab account is peered to the shared resource virtual network.
Template machine
When your lab plan/lab account is set to use advanced networking, the template machine should now have access to the shared resource. You might have to update the firewall rules, depending on the shared resource being accessed.
Next steps
As an administrator, configure virtual network peering on your lab account.