Note
Access to this page requires authorization. You can try signing in or changing directories.
Access to this page requires authorization. You can try changing directories.
Applies to: Azure Logic Apps (Consumption + Standard)
When you need AI-powered automation that runs independently, create autonomous agentic workflows in Azure Logic Apps. These workflows use agent loops and large language models (LLMs) to iteratively process, make decisions, and complete tasks without human intervention. These workflows work well for automation that might run a long time, require stronger governance, isolation, or can support automated rollback or compensation strategies.
The following example workflow uses an autonomous agent loop to get the current weather and send email notifications:

This guide shows how to create a Consumption or Standard logic app that uses the Autonomous Agents workflow type. This workflow runs without human interaction and uses tools that you build to complete tasks. For a high-level overview about agentic workflows, see AI agentic workflows in Azure Logic Apps.
Important
Consumption autonomous agentic workflows are in preview and subject to the Supplemental Terms of Use for Microsoft Azure Previews.
Prerequisites
Based on whether you want to create a Consumption or Standard logic app, the following prerequisites apply:
An Azure account and subscription. Get a free Azure account.
A Consumption logic app resource that uses the workflow type named Autonomous Agents. See Create Consumption logic app workflows in the Azure portal.
Note
You can use only the Azure portal to build autonomous agentic workflows, not Visual Studio Code.
Consumption autonomous agentic workflows don't require that you manually set up a separate AI model. Your workflow automatically includes an Agent action that uses an Azure OpenAI Service model hosted in Microsoft Foundry. Consumption autonomous agentic workflows support only specific models, which depend on your logic app region. For more information, see Supported models.
To follow along with the examples, you need an email account to send email.
The examples in this guide use an Outlook.com account. For your own scenarios, you can use any supported email service or messaging app in Azure Logic Apps, such as Office 365 Outlook, Microsoft Teams, Slack, and so on. The setup for other email services or apps is similar to the examples, but has minor differences.
Supported Azure OpenAI Service models for agentic workflows
The following list specifies the AI models that you can use with agentic workflows:
Your agent loop automatically uses one of the following Azure OpenAI Service models:
- gpt-4o-mini
- gpt-5o-mini
Important
The AI model that your agent loop uses can originate from any region, so data residency for a specific region isn't guaranteed for data that the model handles.
Billing
Consumption: Billing uses the pay-as-you-go model. Agent loop pricing is based on the number of tokens that each agent action uses and appears as Enterprise Units on your bill. For specific pricing information see Azure Logic Apps pricing.
Standard: Although agentic workflows don't incur extra charges, AI model usage incurs charges. For more information, see the Azure Pricing calculator.
Limitations and known issues
The following table describes current limitations and known issues in this release, based on your logic app resource type.
| Logic app | Limitations or known issues |
|---|---|
| Both | To create tools for your agent, the following limitations apply: - You can add only actions, not triggers. - A tool must start with an action and always contains at least one action. - A tool works only inside the agent loop where that tool exists. - Control flow actions aren't supported. |
| Consumption | - You can create Consumption agentic workflows only in the Azure portal, not Visual Studio Code. - The AI model that your Agent action uses can come from any region, so data residency for a specific region isn't guaranteed for data that the model handles. - The Agent action is throttled based on the number of tokens used. |
| Standard | - Unsupported workflow types: Stateless Note: Foundry projects require that you use managed identity authentication. - For general limits in Azure OpenAI Service, Foundry, and Azure Logic Apps, see: - Azure OpenAI Service quotas and limits - Azure OpenAI in Foundry Models quotas and limits - Azure Logic Apps limits and configuration |
Create an autonomous agentic workflow
The following section shows how to start creating your autonomous agentic workflow.
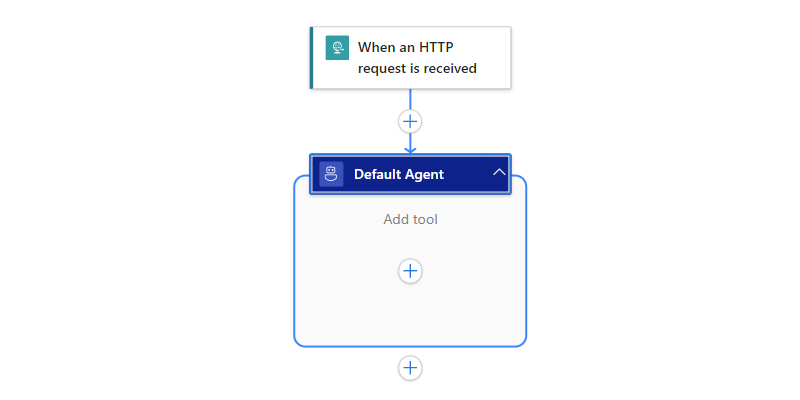
The Autonomous Agents workflow type creates a partial workflow that starts with the Request trigger. The workflow also includes an empty Default Agent action.
To open this partial workflow, follow these steps:
In the Azure portal, open your Consumption logic app resource.
On the resource sidebar, under Development Tools, select the designer to open the partial agentic workflow.
The designer shows a partial workflow with the trigger named When an HTTP request is received. Under the trigger, an empty Agent action named Default Agent appears. For this scenario, you don't need any other trigger setup.
Continue to the next section to set up your agent loop.


Note
If you try to save the workflow now, you get an error that workflow validation failed.
In a Standard workflow, the designer toolbar also shows a red dot on the Errors button. The designer alerts you to this error condition because the agent loop requires setup before you can save any changes. However, you don't have to set up the agent loop now. You can continue to create your workflow. Just remember to set up the agent loop before you save your workflow.

Set up or view the AI model
To set up or view the AI model for your agent loop, follow the steps based on your logic app type:
By default, your agent loop automatically uses the Azure OpenAI model available in your logic app's region. Some regions support gpt-4o-mini, while others support gpt-5o-mini.
To view the model that your agent loop uses, follow these steps:
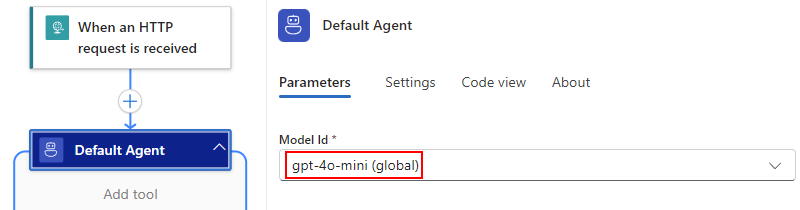
On the designer, select the title bar on the Default Agent action to open the information pane.
On the Parameters tab, the Model Id parameter shows the Azure OpenAI model that the workflow uses, for example:
Continue to the next section to rename the agent loop.


Rename the agent loop action
Update the agent loop name to clearly identify the agent's purpose by following these steps:
On the designer, select the agent loop action title bar to open the information pane.
On the information pane, select the agent loop name, and enter the new name, such as
Weather agent.
Continue to the next section to provide instructions for the agent loop.

Set up agent loop instructions
The agent loop requires instructions that describe the roles that the agent loop can play and the tasks that the agent loop can perform. To help the agent loop learn and understand these responsibilities, include the following information:
- Workflow structure
- Available actions
- Any restrictions or limitations
- Interactions for specific scenarios or special cases
For the best results, provide prescriptive instructions and be prepared to iteratively refine your instructions.
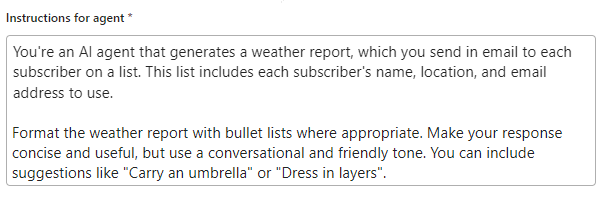
In the Instructions for agent box, enter the instructions that the agent loop needs to understand its role and tasks.
For this example, the weather agent example uses the following sample instructions where you later provide a subscriber list with your own email address for testing:
You're an AI agent that generates a weather report, which you send in email to each subscriber on a list. This list includes each subscriber's name, location, and email address to use.

Format the weather report with bullet lists where appropriate. Make your response concise and useful, but use a conversational and friendly tone. You can include suggestions like "Carry an umbrella" or "Dress in layers".
Here's an example:
Optionally, provide user instructions that the agent loop uses as prompts.
For the best results, make each user instruction focus on a specific task, for example:
On the agent loop information pane, under the User instructions section, in the User instructions Item - 1 box, enter the prompt for the agent loop.
To add another instruction, select Add new item.
In the User instructions item - 2 box, enter another prompt for the agent loop.
Repeat until you finish adding all the prompts that you want.
On the designer toolbar, select Save.

Check for errors
To make sure your workflow doesn't have errors at this stage, follow these steps:
On the designer toolbar, select Run > Run.
On the workflow sidebar, under Development Tools, select Run history.
On the Run history page, in the runs table, select the latest workflow run.
Note
If the page doesn't show any runs, on the toolbar, select Refresh.
If the Status column shows a Running status, the agentic workflow is still working.
The monitoring view opens and shows the workflow operations with their status. The Agent log pane is open and shows the agent loop instructions that you provided earlier. The pane also shows the agent loop's response.
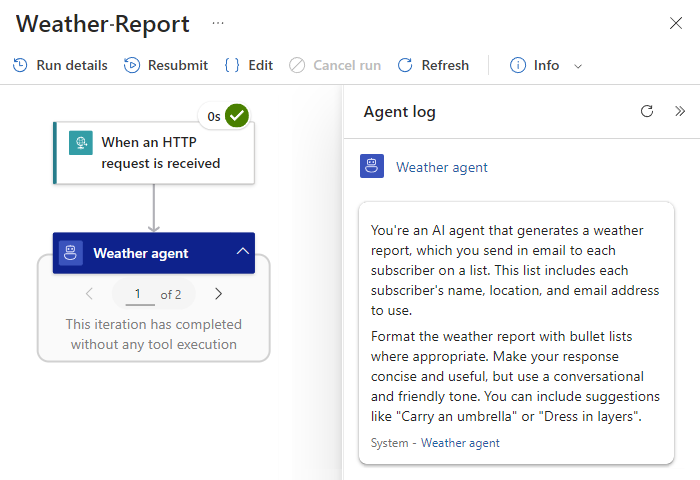
The agent loop doesn't have any tools to use at this time, which means that the agent loop can't actually take any specific actions, such as send email to a subscriber list, until you create tools that the agent loop needs to complete tasks.
Return to the designer. On the monitoring view toolbar, select Edit.


Create or connect to a knowledge base
Optionally, in Standard agentic workflows, to help your agent loop answer questions and complete tasks related to a specific domain, create a knowledge base or connect to an existing knowledge base for your agent loop to use. A knowledge base is a logical container that organizes related knowledge sources such as documents or files.
Your organization generates data from documents, spreadsheets, APIs, and internal systems. When you use the Knowledge Base-as-a-Service (KBaaS) capability in Azure Logic Apps, you can convert this content into structured and more searchable information that your agent loop can use.
Return to the workflow designer and select the agent loop title bar.
On the agent loop information pane, on the Parameters tab, in the Knowledge base section, select Create.
Follow the steps to create the knowledge base connection.
Follow the steps to add knowledge artifacts to the knowledge base.
Follow the steps to add the knowledge base as a tool for your agent loop.
Create a 'Get weather' tool
For an agent loop to run prebuilt actions available in Azure Logic Apps, you must create one or more tools for the agent loop to use. A tool must contain at least one action and only actions. The agent loop calls the tool by using specific arguments.
In this example, the agent loop needs a tool that gets the weather forecast. You can build this tool by following these steps:
On the designer, inside the agent loop and under Add tool, select the plus sign (+) to open the pane where you can browse available actions.
On the Add an action pane, follow the general steps for your logic app to add an action that's best for your scenario.
This example uses the MSN Weather action named Get current weather.
After you select the action, both the Tool container and the selected action appear in the agent loop action on the designer. Both information panes also open at the same time.
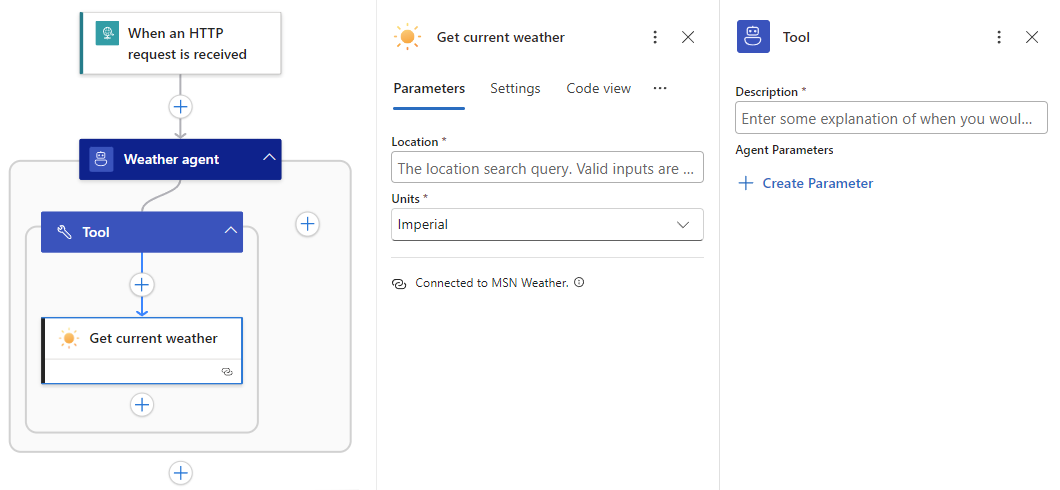
On the tool information pane, rename the tool to describe its purpose. For this example, use
Get weather.On the Details tab, for Description, enter the tool description. For this example, use
Get the weather for the specified location.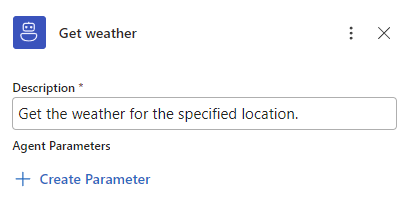
Under Description, the Agent Parameters section applies only for specific use cases. For more information, see Create agent parameters.
Continue to the next section to learn more about agent parameters, their use cases, and how to create them, based on these use cases.


Create agent parameters for 'Get current weather' action
Actions usually have parameters that require you to specify the values to use. Actions in tools are almost the same except for one difference. You can create agent parameters that the agent loop uses to specify the parameter values for actions in tools. You can specify model-generated outputs, values from nonmodel sources, or a combination. For more information, see Agent parameters.
The following table describes the use cases for creating agent parameters and where to create them, based on the use case:
| To | Where to create agent parameter |
|---|---|
| Use model-generated outputs only. Share with other actions in the same tool. |
Start from the action parameter. For detailed steps, see Use model-generated outputs only. |
| Use nonmodel values. | No agent parameters needed. This experience is the same as the usual action setup experience in Azure Logic Apps but is repeated for convenience in Use values from nonmodel sources. |
| Use model-generated outputs with nonmodel values. Share with other actions in the same tool. |
Start from the tool, in the Agent Parameters section. For detailed steps, see Use model outputs and nonmodel values. |
Use model-generated outputs only
For an action parameter that uses only model-generated outputs, create an agent parameter by following these steps:
In the tool, select the action to open the information pane.
For this example, the action is Get current weather.
On the Parameters tab, select inside the parameter box to show the parameter options.
On the right edge of the Location box, select the stars button.
This button has the following tooltip: Select to generate the agent parameter.

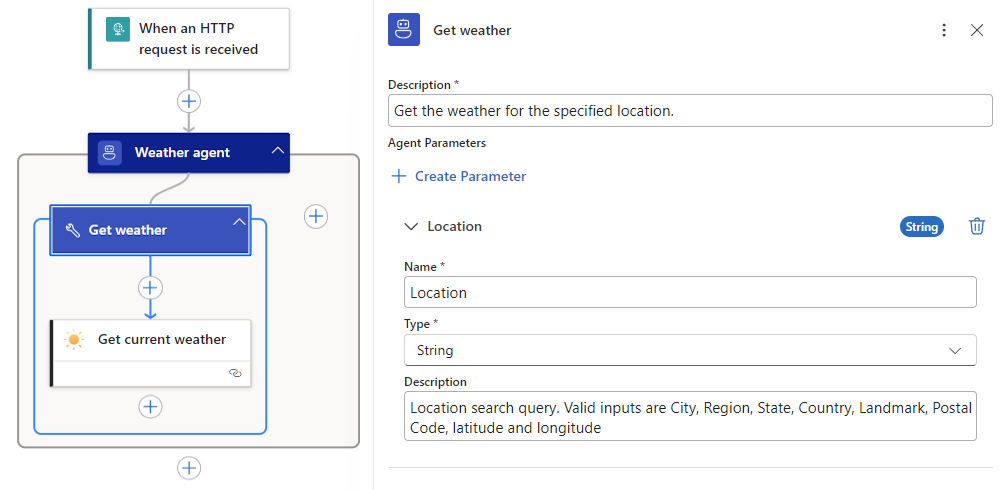
The Create agent parameter window shows the Name, Type, and Description fields, which are prepopulated from the source action parameter.
The following table describes the fields that define the agent parameter:
Parameter Value Description Name <agent-parameter-name> The agent parameter name. Type <agent-parameter-data-type> The agent parameter data type. Description <agent-parameter-description> The agent parameter description that easily identifies the parameter's purpose. Note
Microsoft recommends that you follow the action's Swagger definition. For example, for the Get current weather action, which comes from the MSN Weather "shared" connector hosted and managed by global, multitenant Azure, see the MSN Weather connector technical reference article.
When you're ready, select Create.
The following example shows the Get current weather action with the Location agent parameter:

Save your workflow.


Use values from nonmodel sources
For an action parameter value that uses only nonmodel values, choose the option that best fits your use case:
Use outputs from earlier operations in the workflow
To browse and select from these outputs, follow these steps:
Select inside the parameter box, and then select the lightning icon to open the dynamic content list.
From the list, in the trigger or action section, select the output that you want.
Save your workflow.
Use results from expressions
To create an expression, follow these steps:
Select inside the parameter box, and then select the function icon to open the expression editor.
Select from available functions to create the expression.
Save your workflow.
For more information, see Reference guide to workflow expression functions in Azure Logic Apps.
Use model outputs and nonmodel values
Some scenarios might need to specify an action parameter value that uses both model-generated outputs with nonmodel values. For example, you might want to create an email body that uses static text, nonmodel outputs from earlier operations in the workflow, and model-generated outputs.
For these scenarios, create the agent parameter on the tool by following these steps:
On the designer, select the tool where you want to create the agent parameter.
On the Details tab, under Agent Parameters, select Create Parameter.
Expand New agent parameter, and provide the following information, but match the action parameter details.
For this example, the example action is Get current weather.
Note
Microsoft recommends that you follow the action's Swagger definition. For example, to find this information for the Get current weather action, see the MSN Weather connector technical reference article. The example action is provided by the MSN Weather managed "shared" connector, which is hosted and run in global, multitenant Azure.
Parameter Value Description Name <agent-parameter-name> The agent parameter name. Type <agent-parameter-data-type> The agent parameter data type. Description <agent-parameter-description> The agent parameter description that easily identifies the parameter's purpose. You can choose from the following options or combine them to provide a description:
- Plain literal text with details such as the parameter's purpose, permitted values, restrictions, or limits.
- Outputs from earlier operations in the workflow. To browse and choose these outputs, select inside the Description box, and then select the lightning icon to open the dynamic content list. From the list, select the output that you want.
- Results from expressions. To create an expression, select inside the Description box, and then select the function icon to open the expression editor. Select from available functions to create the expression.When you're done, under Agent Parameters, the new agent parameter appears.
On the designer, in the tool, select the action to open the action information pane.
On the Parameters tab, select inside the parameter box to show the parameter options, and then select the robot icon.
From the Agent parameters list, select the agent parameter that you defined earlier.
The finished Get current weather tool looks like the following example:
Save your workflow.

Create a 'Send email' tool
For many scenarios, an agent loop needs more than one tool. In this example, the agent loop needs a tool that sends the weather report in email.
To build this tool, follow these steps:
On the designer, in the agent loop action, next to the existing tool, select the plus sign (+) to add an action.
On the Add an action pane, follow these general steps to select another action for your new tool.
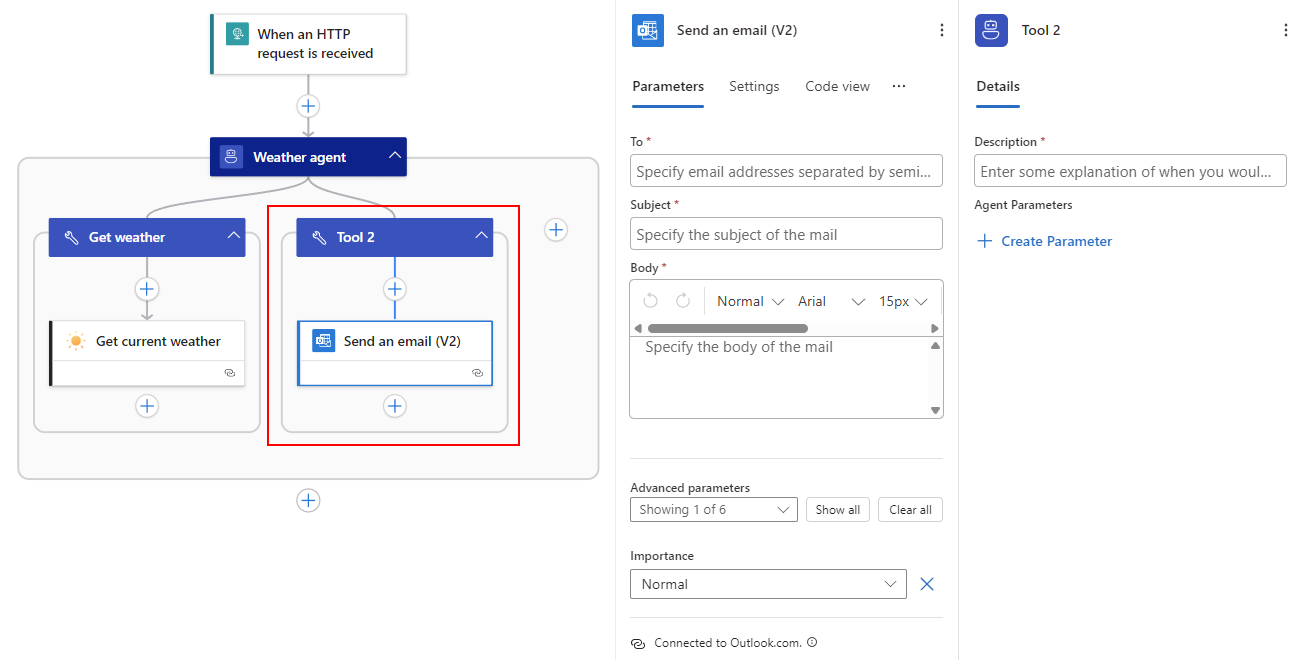
This example uses the Outlook.com action named Send an email (V2).
Like before, after you select the action, both the new Tool and action appear inside the agent loop action on the designer. Both information panes open at the same time.
On the tool information pane, rename the tool to describe its purpose. For this example, use
Send email.On the Details tab, for Description, enter the tool description. For this example, use
Send current weather by email.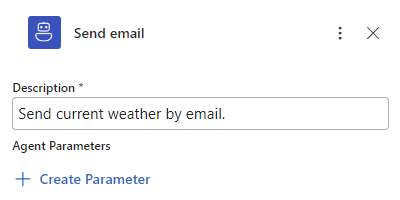
Save your workflow.


Create agent parameters for 'Send an email (V2)' action
Except for the different agent parameters to set up for the Send an email (V2) action, the steps in this section are nearly the same as Create agent parameters for the 'Get current weather' action.
Follow the earlier general steps to create agent parameters for the parameter values in the Send an email (V2) action.
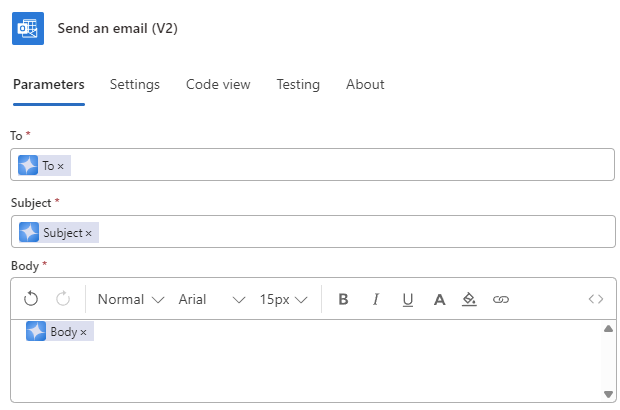
The action needs three agent parameters named To, Subject, and Body. For the action's Swagger definition, see Send an email (V2).
When you finish, the example action uses the previously defined agent parameters as shown in the following image:
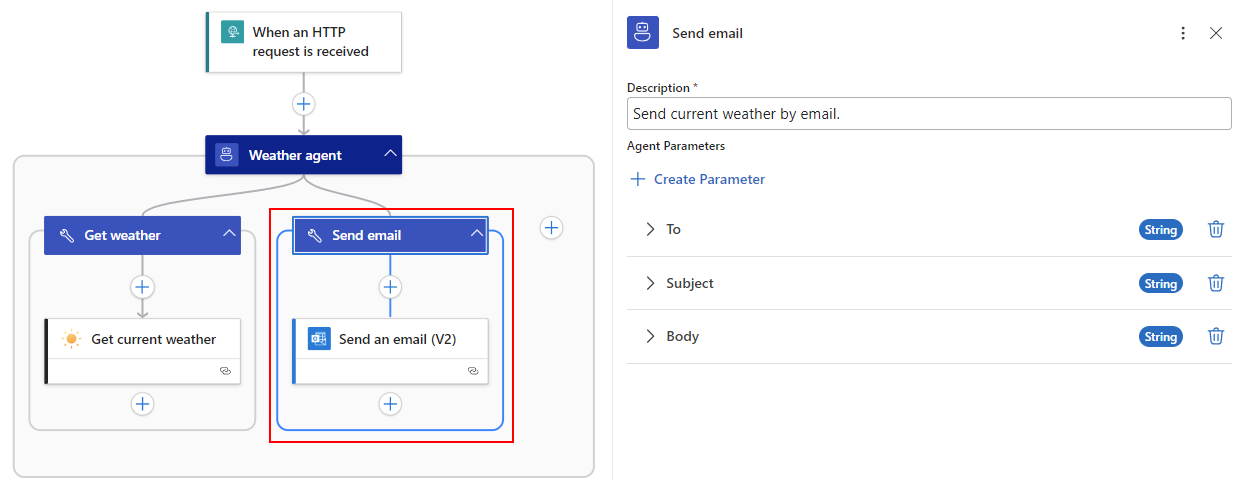
The finished Send email tool looks like the following example:
Save your workflow.


Create a subscriber list tool
Finally, create a tool named Get subscribers to provide a subscriber list for the agent parameter values to use. This tool uses the Compose action to supply the subscriber name, email address, and location. Or, you might source these inputs from blob storage or a database. Azure Logic Apps offers many options that you can use as data sources.
For this example, follow these steps:
Rename the tool to
Get subscribers.In the Get subscribers tool, use the following description:
Get the list of subscribers, including their name, location, and email address. To generate the weather report, use the location for each subscriber. To send the weather report, use the email address for each subscriber.Rename the Compose action to
Subscriber list. In the Input box, use the following JSON array but replace the sample subscriber data with the data that you want to use for testing. For example, replace the email addresses with your own so you get the weather for different locations.[ { "Name": "Fabrikam", "Email": "FabrikamGoods@outlook.com", "Location": "Boston" }, { "Name": "Contoso", "Email": "ContosoGoods@outlook.com", "Location": "Jaipur" }, { "Name": "Sophie Owen", "Email": "sophieowen@outlook.com", "Location": "Seattle" } ]The finished Get subscribers tool looks like the following example:

Save your workflow, then test the workflow to make sure everything works the way that you expect.
You should get an email with the weather for each location.

Best practices for agent loops and tools
The following sections provide recommendations, best practices, and other guidance that can help you build better agent loops and tools.
Agent loops
The following guidance provides best practices for agent loops.
Prototype agent loops and tools with 'Compose' actions
Rather than use actual actions and live connections to prototype your agent loops and tools, use Compose actions to "mock" or simulate the actual actions. This approach provides the following benefits:
Compose actions don't produce side effects, which make these actions useful for ideation, design, and testing.
You can draft and refine agent loop instructions, prompts, tool names and descriptions plus agent parameters and descriptions - all without having to set up and use live connections.
When you confirm that your agent loop and tools work with only the Compose actions, you're ready to swap in the actual actions.
When you switch over to the actual actions, you have to reroute or recreate your agent parameters to work with the actual actions, which might take some time.
Manage chat history context length
The agent loop maintains the chat history or context, including tool invocations, based on the current limit on the number of tokens or messages to keep and pass into the model for the next interaction. Over time, the agent loop history grows and eventually exceeds your model's context length limit, or the maximum number of input tokens. Models differ in their context lengths.
For example, gpt-4o supports 128,000 input tokens where each token has 3-4 characters. When the agent loop history approaches the model's context length, consider dropping stale or irrelevant messages to stay below the limit.
Here are some approaches to reduce your agent loop history:
Reduce the size of results from tools by using the Compose action. For more information, see Tools - Best practices.
Carefully craft your agent loop instructions and prompts to control the model's behavior.
Experimental capability: You have the option to try chat reduction so you can reduce the maximum number of tokens or messages to keep in chat history and pass into the model.
The agent loop has almost the same advanced parameters as the Azure OpenAI built-in, service provider connector, except for the Agent History Reduction Type advanced parameter, which exists only on the agent action. This parameter controls the history that the agent loop maintains, based on the maximum number of tokens or messages.
This capability is in active development and might not work for all scenarios. You can change the Agent History Reduction Type option to reduce the limit on tokens or messages. You then specify the numerical limit that you want.
To try the capability, follow these steps:
On the designer, select the agent action's title bar to open the information pane.
On the Parameters tab, find the Advanced parameters section.
Check whether the parameter named Agent History Reduction Type exists. If not, open the Advanced parameters list, and select that parameter.
From the Agent History Reduction Type list, select one of the following options:
Option Description Token count reduction Shows the parameter named Maximum Token Count. Specifies the maximum number of tokens in agent loop history to keep and pass into the model for the next interaction. The default differs based on the currently used model in Azure OpenAI Service. The default limit is 128,000. Message count reduction Shows the parameter named Message Count Limit. Specifies the maximum number of messages in agent loop history to keep and pass into the model for the next interaction. No default limit exists.
Tools
The following guidance provides best practices for tools.
The name is the most important value for a tool. Make sure the name is succinct and descriptive.
The tool description provides useful and helpful context for the tool.
Both the tool name and description have character limits.
Some limits are enforced by the model in Azure OpenAI Service at run time, rather than when you save the changes in the agent loop in the workflow.
Too many tools in the same agent loop can have a negative effect on agent loop quality.
A good general guideline recommends that an agent loop includes no more than 10 tools. However, this guidance varies based on the model that you use from Azure OpenAI Service.
In tools, actions don't need to have all their inputs come from the model.
You can finely control which action inputs come from non-model sources and which inputs come from the model. For example, suppose a tool has an action that sends email. You can provide a plain and mostly static email body but use model-generated outputs for part of that email body.
Customize or transform tool results before you pass them to the model.
You can change the results from a tool before they pass into the model by using the Compose action. This approach provides the following benefits:
Improve response quality by reducing irrelevant context that passes into the model. You send only the fields that you need from a large response.
Reduce billing charges for tokens that pass into the model and avoid exceeding the model's limit on context length, the maximum number of tokens that pass into the model. You send only the fields that you need.
Combine the results from multiple actions in the tool.
You can mock the tool results to simulate the expected results from actual actions. Mock actions leave data unchanged at the source and don't incur charges for resource usage outside Azure Logic Apps.
Agent parameters
The following guidance provides best practices for agent parameters.
The name is the most important value for an agent parameter. Make sure the name is succinct and descriptive.
The agent parameter description provides useful and helpful context for the tool.
Troubleshoot problems
This section describes guidance to help troubleshoot errors or problems that you might encounter when you build or run agentic workflows.
Review tool execution data
The workflow run history provides useful information that helps you learn what happened during a specific run. For an agentic workflow, you can find tool execution inputs and outputs for a specific agent loop iteration.
On the workflow menu, under Tools, select Run history to open the Run history page.
On the Run history tab, in the Identifier column, select the workflow run that you want.
The monitoring view opens to show the status for each step.
Select the agent action that you want to inspect. To the right side, the Agent log pane appears.
This pane shows the agent log, including tool executions during the interaction.
To get tool execution data at a specific point, find that point in the agent log, and select the tool execution reference, for example:

This action moves you to the matching tool in monitoring view. The agent action shows the current iteration count.
In monitoring view, select the agent action or the action with the inputs, outputs, and properties that you want to review.
The following example shows a selected action for the previously selected tool execution:

If you select the agent, you can review the following information that passes into the model and returns from the model, for example:
- Input messages passed into the model.
- Output messages returned from the model.
- Tools that the model asked the agent loop to call.
- Tool results that passed back into the model.
- Number of tokens that each request used.
To review a different agent loop iteration, in the agent, select the left or right arrow.


Logs in Application Insights
If you set up Application Insights or advanced telemetry for your workflow, you can review the logs for agent loop events, like any other action. For more information, see Enable and view enhanced telemetry in Application Insights for Standard workflows in Azure Logic Apps.
Model maximum context length exceeded
If your agent's log history exceeds the model's context length, or the maximum number of input tokens, you get an error that looks like the following example:
This model's maximum context length is 4097 tokens. However, you requested 4927 tokens (3927 in the messages, 1000 in the completion). Please reduce the length of the messages or completion.
Try reducing the limit on the number of tokens or messages that your agent loop keeps in the log and passes into the model for the next interaction. For this example, you might select Token count reduction and set Maximum Token Count to a number below the error's stated maximum context length, which is 4097.
For more information, see Manage chat history context length.
Clean up example resources
If you don't need the resources that you created for the examples, make sure to delete the resources so that you don't continue to get charged. You can either follow these steps to delete the resource group that contains these resources, or you can delete each resource individually.
In the Azure search box, enter resource groups, and select Resource groups.
Find and select the resource groups that contain the resources for this example.
On the Overview page, select Delete resource group.
When the confirmation pane appears, enter the resource group name, and select Delete.