Note
Access to this page requires authorization. You can try signing in or changing directories.
Access to this page requires authorization. You can try changing directories.
Applies to: Azure Logic Apps (Standard)
Note
This preview feature is subject to the Supplemental Terms of Use for Microsoft Azure Previews.
When your team needs to migrate workloads from legacy platforms like BizTalk Server to the cloud, you might find the process complex, time-consuming, and challenging. To help simplify and ease this task, the Azure Logic Apps Migration Agent in Visual Studio Code automates this process through five guided stages.
This quickstart shows how to migrate an example integration workload from BizTalk Server to Standard workflows in Azure Logic Apps by using the Azure Logic Apps Migration Agent in Visual Studio Code. You learn how to install the extension, open your source project, and follow the agent as it walks you through the migration stages: Discovery, Planning, Conversion, Validation, and Deployment.
Note
Although the migration agent runs almost autonomously, it might prompt you to allow running specific commands for required tasks. To let the agent continue, select Allow.
For more information, see Migration automation from integration platforms to Azure Logic Apps.
Prerequisites
Before you start, make sure to meet the following requirements:
| Requirement | Purpose |
|---|---|
| Azure subscription - Get a free account | Deployment to Azure (Stage 5) |
| Azure CLI | Azure resource provisioning and deployment |
| Visual Studio Code 1.85.0 or later | Local development experience |
| Azure Logic Apps Migration Agent extension | Required extension with migration agent for Visual Studio Code |
| Azure Logic Apps (Standard) extension | Required dependency for the Azure Logic Apps Migration Agent extension |
| Azure Functions extension | Local functions runtime and development tasks |
| Azure Functions Core Tools | Local runtime host for Azure Logic Apps (Standard) |
| GitHub Copilot subscription | AI-powered analysis, planning, and conversion |
| Docker Desktop | Local connector resource deployment for testing and running connections |
| Folder with BizTalk Server projects | Folder that contains integration project folders with source artifacts and files. For example, a BizTalk project folder includes files with the following file name extensions: .btproj, .odx, .btm, .xsd, and .btp. |
1: Install the Migration Agent extension
Open Visual Studio Code.
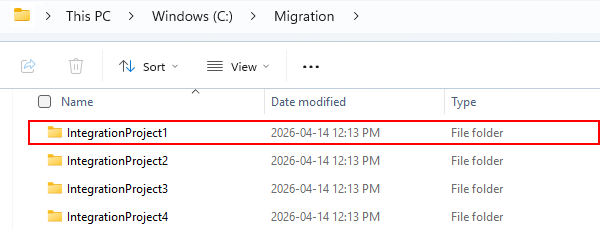
Optionally, but recommended, open Visual Studio Code from the folder or directory where your integration projects exist, for example, C:\Migration\<project-folders>.
On the Activity Bar, select Extensions. (Keyboard: Ctrl+Shift+X)
In the Extensions: Marketplace search box, find the Azure Logic Apps Migration Agent extension, and select Install.
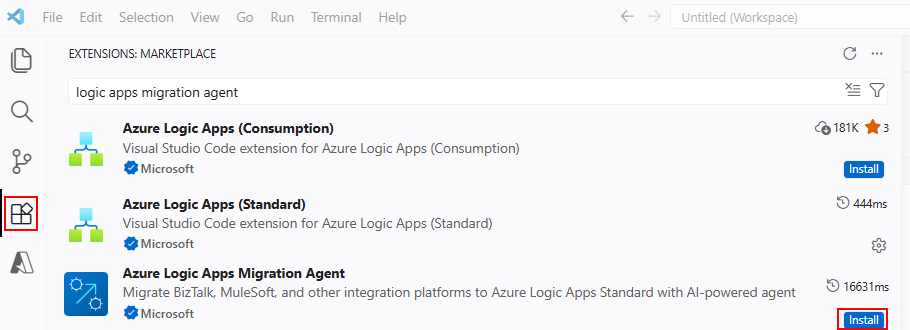
After installation completes, the Activity Bar shows the icon for the Azure Logic Apps Migration Agent (
 ).
).


2: Select your source folder
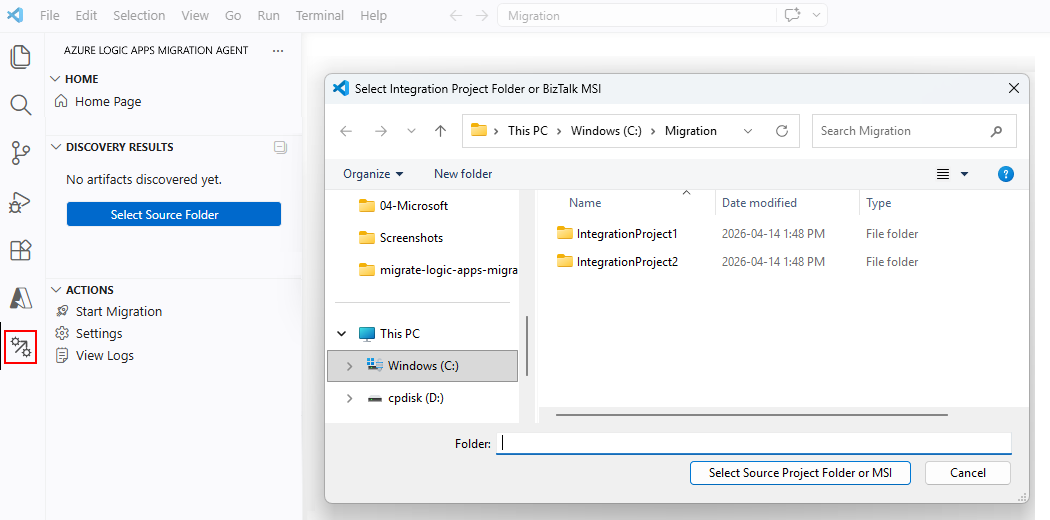
In Visual Studio Code, on the Activity Bar, select the Azure Logic Apps Migration Agent icon (
).In the Azure Logic Apps Migration Agent window, in the Discovery Results section, choose Select Source Folder.
Tip
To run this action as a command, open the Command Palette (Keyboard: Ctrl+Shift+P). Enter and run Azure Logic Apps Migration Agent: Select Source Folder.
Find and select the source folder that contains your BizTalk, MuleSoft, or other integration projects, and then select Select Source Project Folder or MSI.
The extension automatically detects the source platform and begins the migration workflow, starting with the discovery stage.
Follow the agent as it walks you through each migration stage, starting with the Discovery stage.

Migration stage 1: Discovery
In this stage, the migration agent finds and catalogs the integration artifacts in your source project. During the discovery stage, the migration agent performs the following actions in the described order with occasional input from you. For more information, see Migration agent: Discovery stage.
Step 1: Detect the source platform
The migration agent determines your source platform, based on file patterns, such as BizTalk Server (.btproj) files.
The following screenshot shows the identified platform with example detected artifacts and dependencies:

Step 2: Scan source files
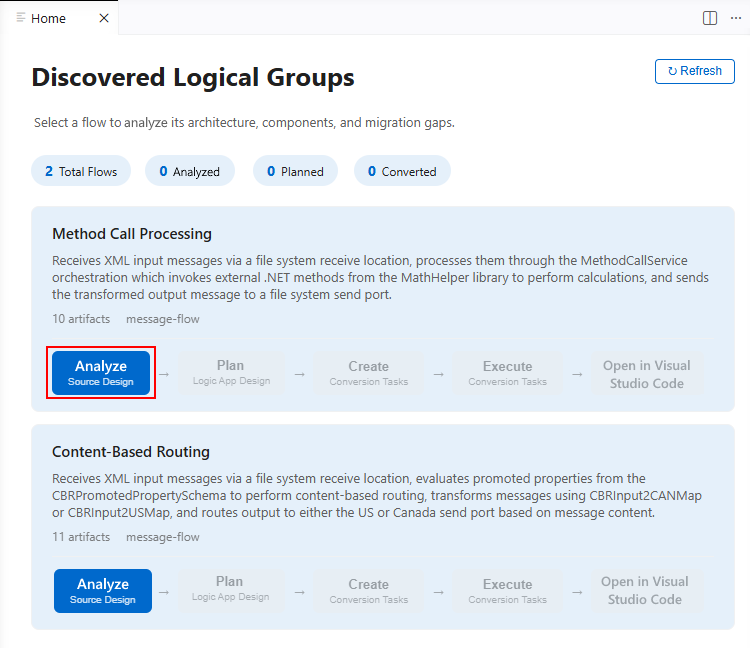
The migration agent scans the detected source files by using the built-in parser for your platform. After the scan completes, the @migration-analyser Copilot agent analyzes the discovered artifacts and detects logical flow groups, which are sets of artifacts that work together.
The following screenshot shows how each example integration project maps to a logical flow group:

Generated logical flows don't always reflect a 1:1 relationship with legacy integration applications. The migration agent infers the flows that best reflect the legacy system's integration artifacts, such as BizTalk workloads, as Standard workflows in Azure Logic Apps.
Tip
To edit these logical flows so they map 1:1 to your integration workloads, use GitHub Copilot and specify that flows must map to your BizTalk applications. However, consider that optimal for BizTalk isn't the same as optimal for Standard workflows in Azure Logic Apps. This concept is one of the first paradigm changes in modernization.
Step 3: Analyze source design
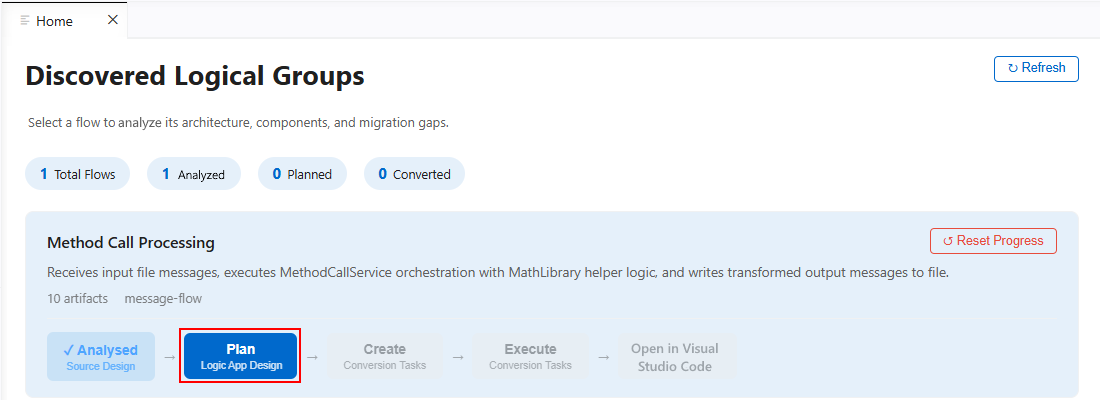
After the migration agent completes scanning and shows the resulting logical flow groups, follow these steps:
On the Home tab, for the logical flow group you want, select Analyze Source Design, for example:
The agent performs the following tasks:
Builds an artifact inventory that includes orchestrations, schemas, maps, pipelines, and bindings.
Generates a dependency graph that shows the relationships between artifacts.
To generate the dependency graph, the migration agent runs the following tasks:
- Generates architecture (Mermaid) diagrams that show message flows and components.
- Identifies missing dependencies.
- Performs a gap analysis for features.
- Detects integration patterns such as publish-subscribe, request-reply, and batch.
- Proposes mappings for Azure Logic Apps or other services alternatives.
- Generates a discovery report based on the findings.
After the migration agent successfully generates the dependency graph, the flow visualizer opens and shows the following interactive tabs:
- Architecture Diagram
- Message Flow
- Components
- Missing Dependencies
- Gap Analysis
- Patterns
- Learn BizTalk
The following example shows a sample generated flow visualization:
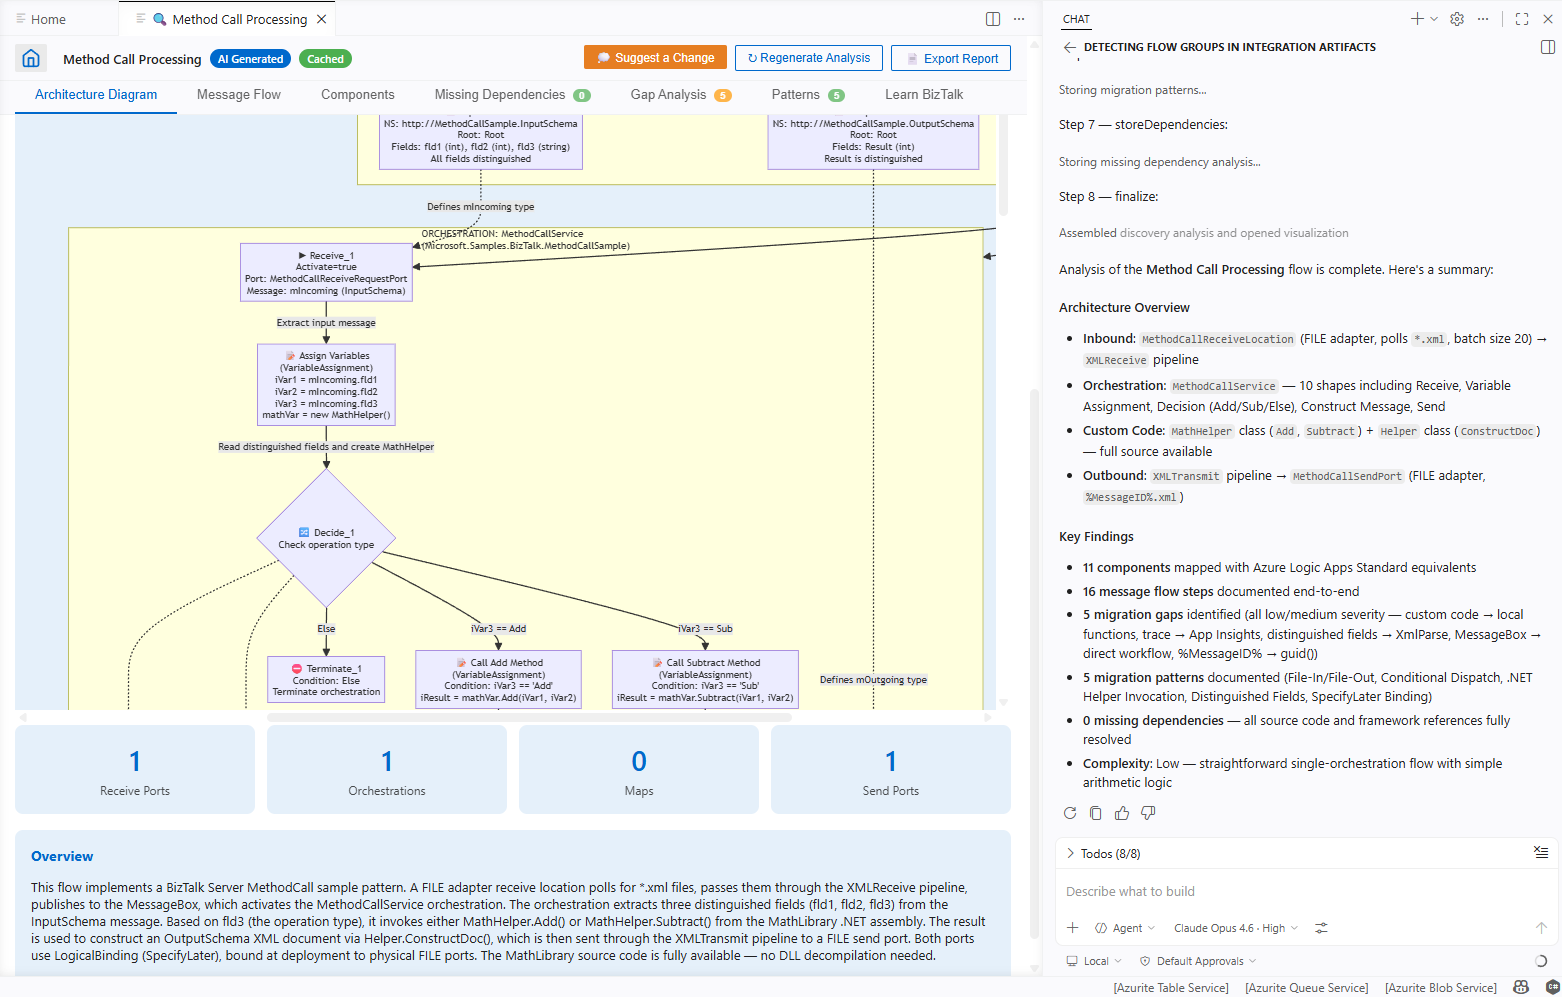
For more information, see Source design analysis and results.
To review the analysis results, select a tab to review the related information.


Step 4: Update or export the analysis
After you review the analysis results, on the flow visualizer title bar, select one of the following actions:
Action Description Suggest a Change Request direct changes to the analysis.
Tip: To discuss potential updates or corrections to any flow group, in the flow visualizer, use the Copilot chat window. Select a flow group and ask the@migration-analyseragent questions about the detected architecture. Provide information about any missing gaps, and then regenerate the analysis.Regenerate Analysis After you update the analysis, such as add a missing dependency, artifact, or specification, rerun the analysis. Export Report Generate a report with the discovery results in a shareable format. Or, to analyze more flows, select the Home tab or the home page icon.
When you finish, go to the next section for the Planning stage.
Migration stage 2: Planning
After you finish your analysis, start the Planning stage by creating a migration roadmap to follow. For more information, see Migration agent stage 2: Planning.
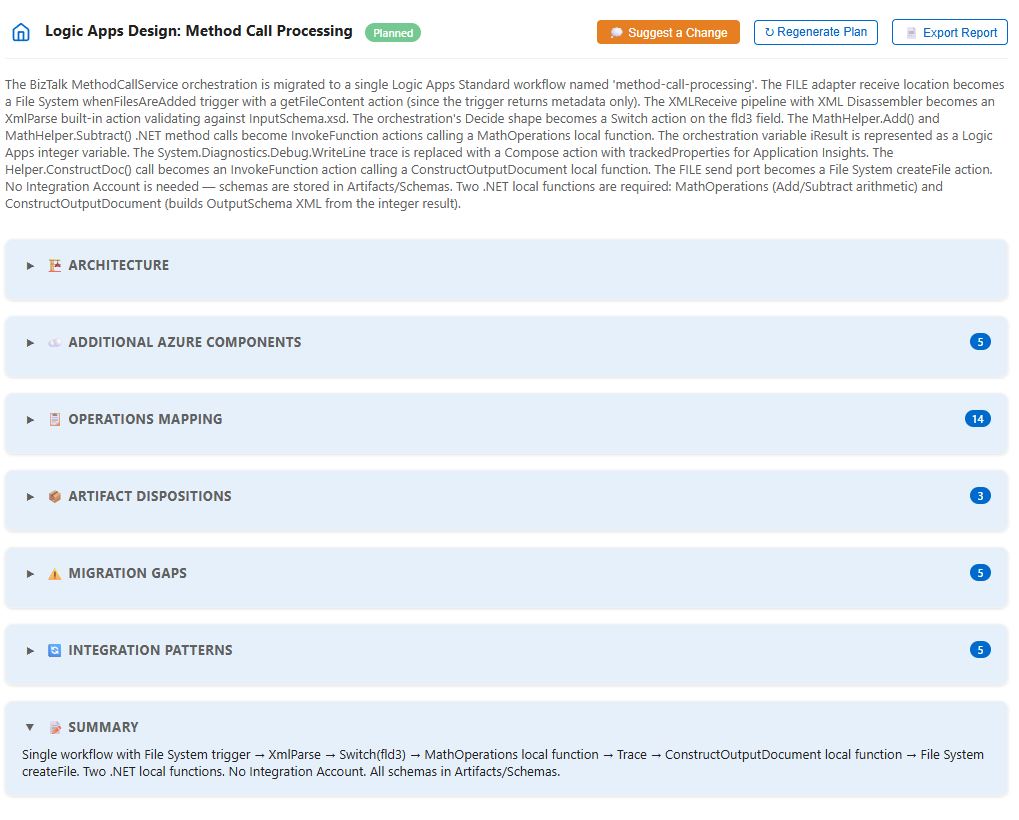
On the Home tab, choose the logical flow group you want, and select Plan Logic App Design.
The
@migration-planneragent generates a migration plan that usually includes the following sections:- Architecture
- Additional Azure components
- Operations mapping
- Artifact dispositions
- Migration gaps
- Integration patterns
- Summary
- Effort estimates
- Task plans
The following example shows a sample generated migration plan:
For more information, see Planning stage action.
Before you continue to the Conversion stage, review each plan carefully. Make any updates as necessary.
The accuracy of your plan greatly affects the quality of the conversion output.
To help you determine whether the plan needs any updates, interact with the
@migration-plannerGitHub Copilot agent by using Copilot chat to complete the following tasks:- Ask questions about specific mappings.
- Request alternative approaches for gap resolution.
- Adjust effort estimates.
- Request plan modifications before moving on to conversion.
When you're ready, continue to the Conversion stage by selecting Home Page or returning to the Home tab.


Migration stage 3: Conversion
When you're satisfied with your migration plan, start the Conversion stage to create and run conversion tasks that transform source artifacts into Standard workflows, connections, and other supporting files for Azure Logic Apps.
3.1: Create conversion tasks
On the Home tab, for your logical flow, select Create Conversion Tasks.
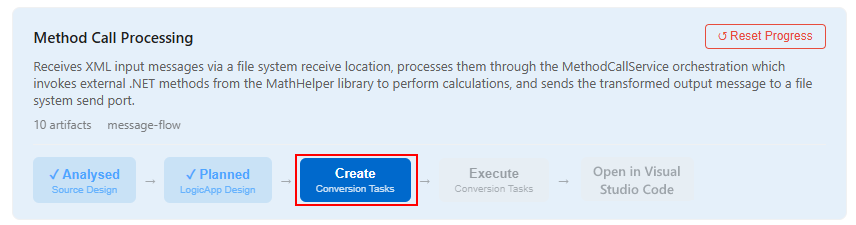
The
@migration-converteragent creates the conversion tasks, which vary based on your specific logical flow group. The following list describes sample conversion tasks for a logical flow group namedMethod Call Processing:Step Task Description 1 Scaffold Logic Apps Project Creates the Standard logic app project structure with the required folder hierarchy and files. 2 Convert Input Schema Migrates the InputSchema.xsd file from BizTalk format, which is UTF-16 with BizTalk annotations, to standard XSD, which is UTF-8 without BizTalk annotations. 3 Convert Output Schema Migrates the OutputSchema.xsd file from BizTalk format, which is UTF-16 with BizTalk annotations, to standard XSD, which is UTF-8 without BizTalk annotations. 4 Generate <connector-name> Connections Creates or updates the connections.json file that contains the configurations for each required connection. 5 Generate <workflow-name> Workflow Creates the workflow.json file that contains the Standard workflow definition in Azure Logic Apps for the logical flow group. 6 Generate Local Functions (<function-names>) Creates .NET 8 local functions for custom logic in the source code. 7 Validate Runtime (func start) Validates the logic app project by running func startto confirm that all functions and workflows are ready.8 E2E Testing (Happy Path & Error Path) Runs end-to-end tests for the happy path, error path, and field-level validation. 9 Black Box Tests (Optional) Runs tests that use external test data that you provide. 10 Cloud Deployment & Testing (Optional) Deploys to Azure and runs cloud E2E tests. The following example shows sample generated conversion tasks for the
Method Call Processinglogical flow group: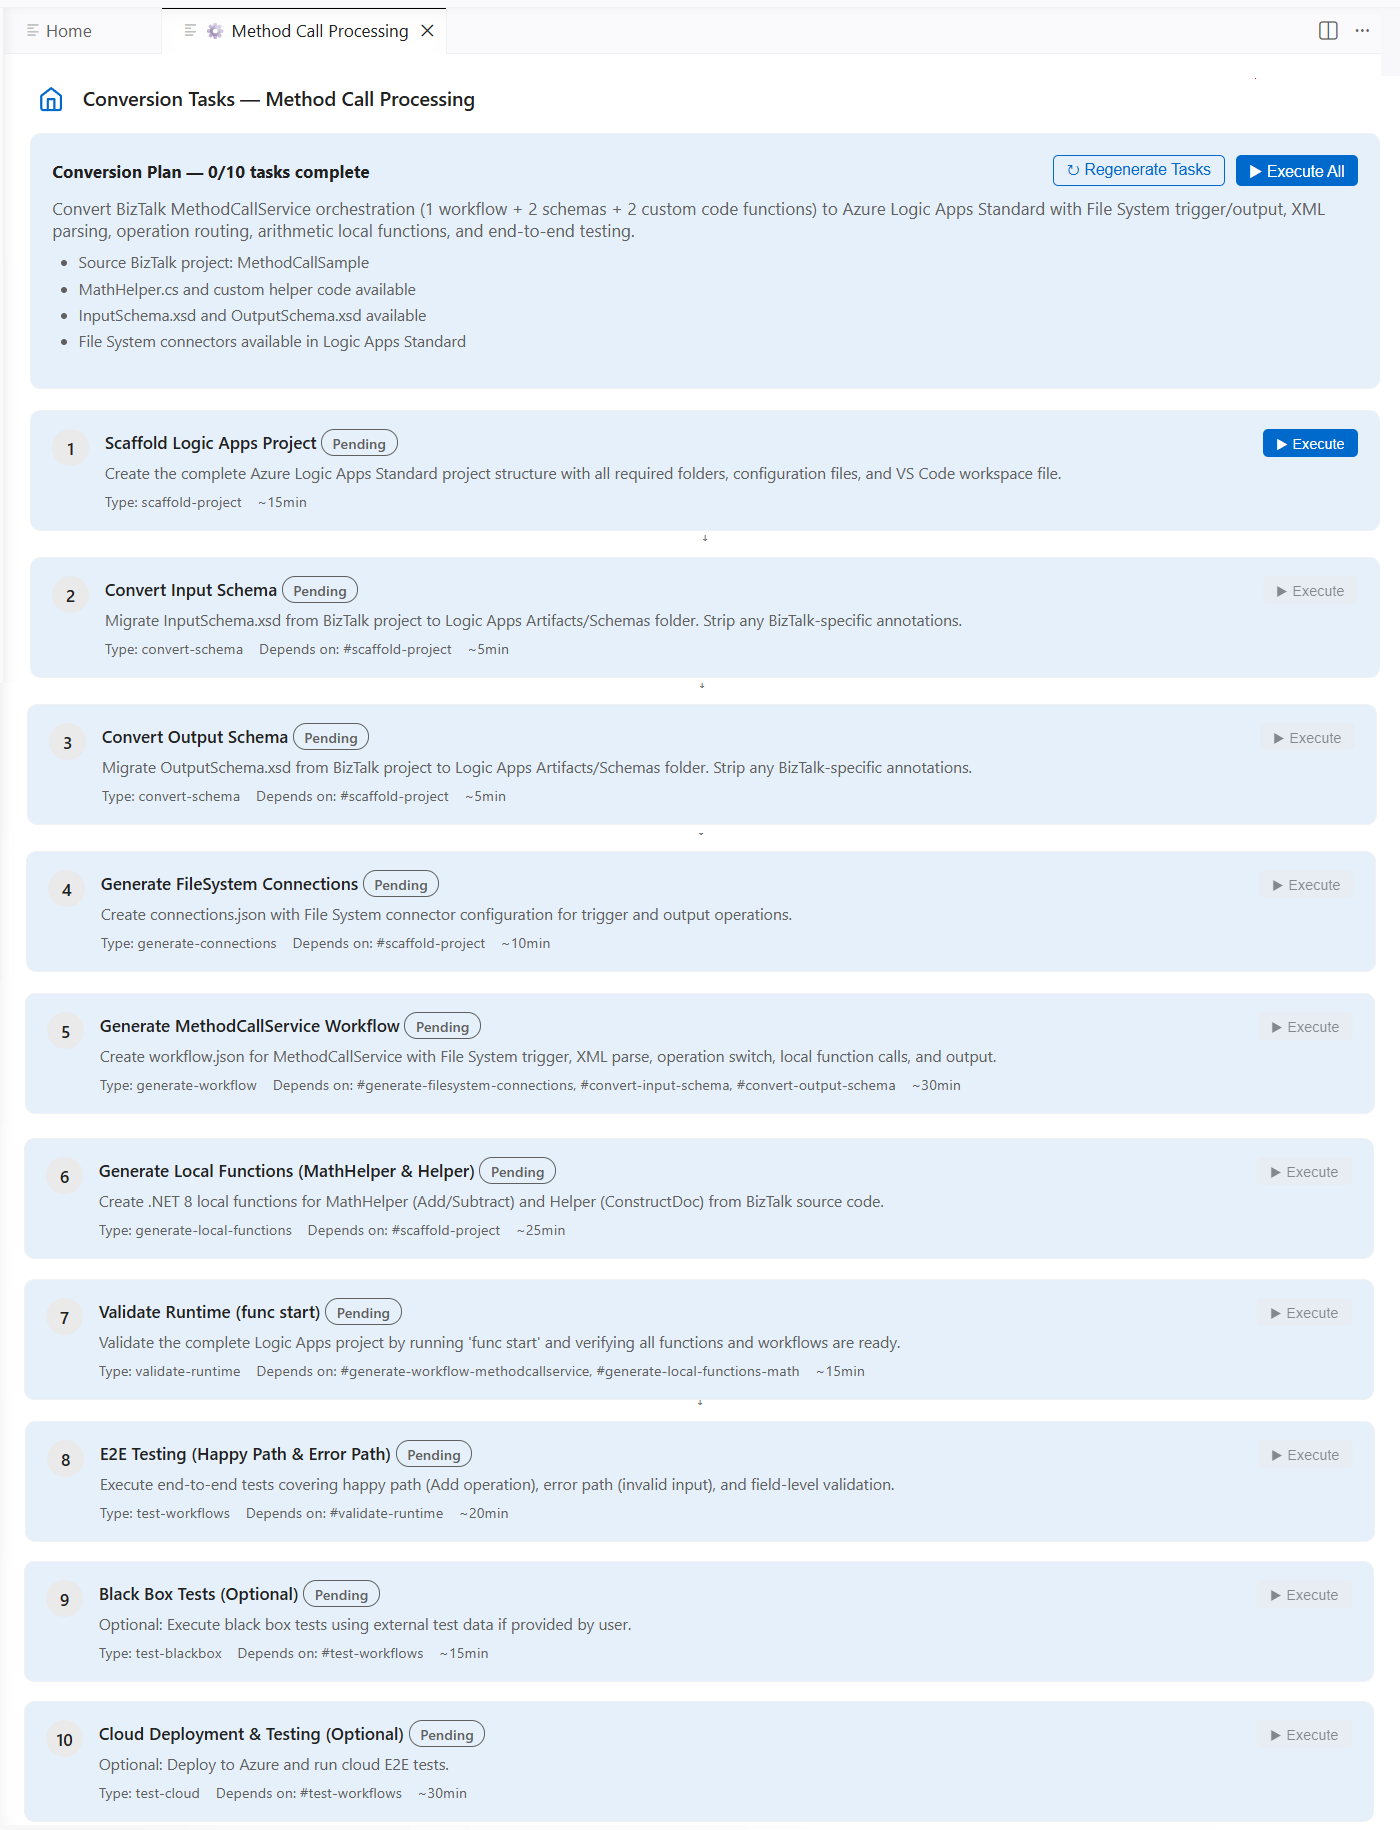
For the next section, select the Home Page or return to the Home tab.


3.2: Run the conversion tasks
To have the
@migration-converteragent to run each conversion task, select Execute, but stop before Cloud Deployment & Testing. Or, select Execute All, which works the same as selecting Execute Conversion Tasks on the Home tab.Note
During conversion task execution, the agent might prompt you for access or permissions to edit files. Review the available options and respond appropriately.
For the next section, select the Home Page or return to the Home tab.
3.3 Check output for completeness and quality
The @migration-converter agent produces ready-to-run Standard workflow definitions and deployable project artifacts. This agent uses the no-stubs-code-generation skill to make sure all generated code is complete, fully functional, and that no stub implementations, placeholder code, or TODO comments exist.
To prepare the generated output for the Validation stage where you locally run the workflows for testing, make sure that you manually inspect the workflow definitions, connections, and any generated .NET local functions for inaccuracies.
Important
As a best practice, always review any AI generated outputs before you use them. Such outputs might include incorrect information.
To review the generated output, follow these steps:
On the Home tab, for your logical flow, select Open in Visual Studio Code.
In your migration folder, go to the out directory, and select the generated solution folder, for example:
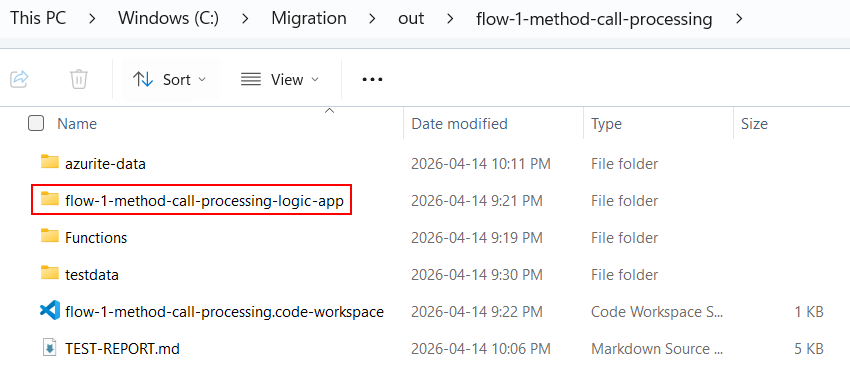
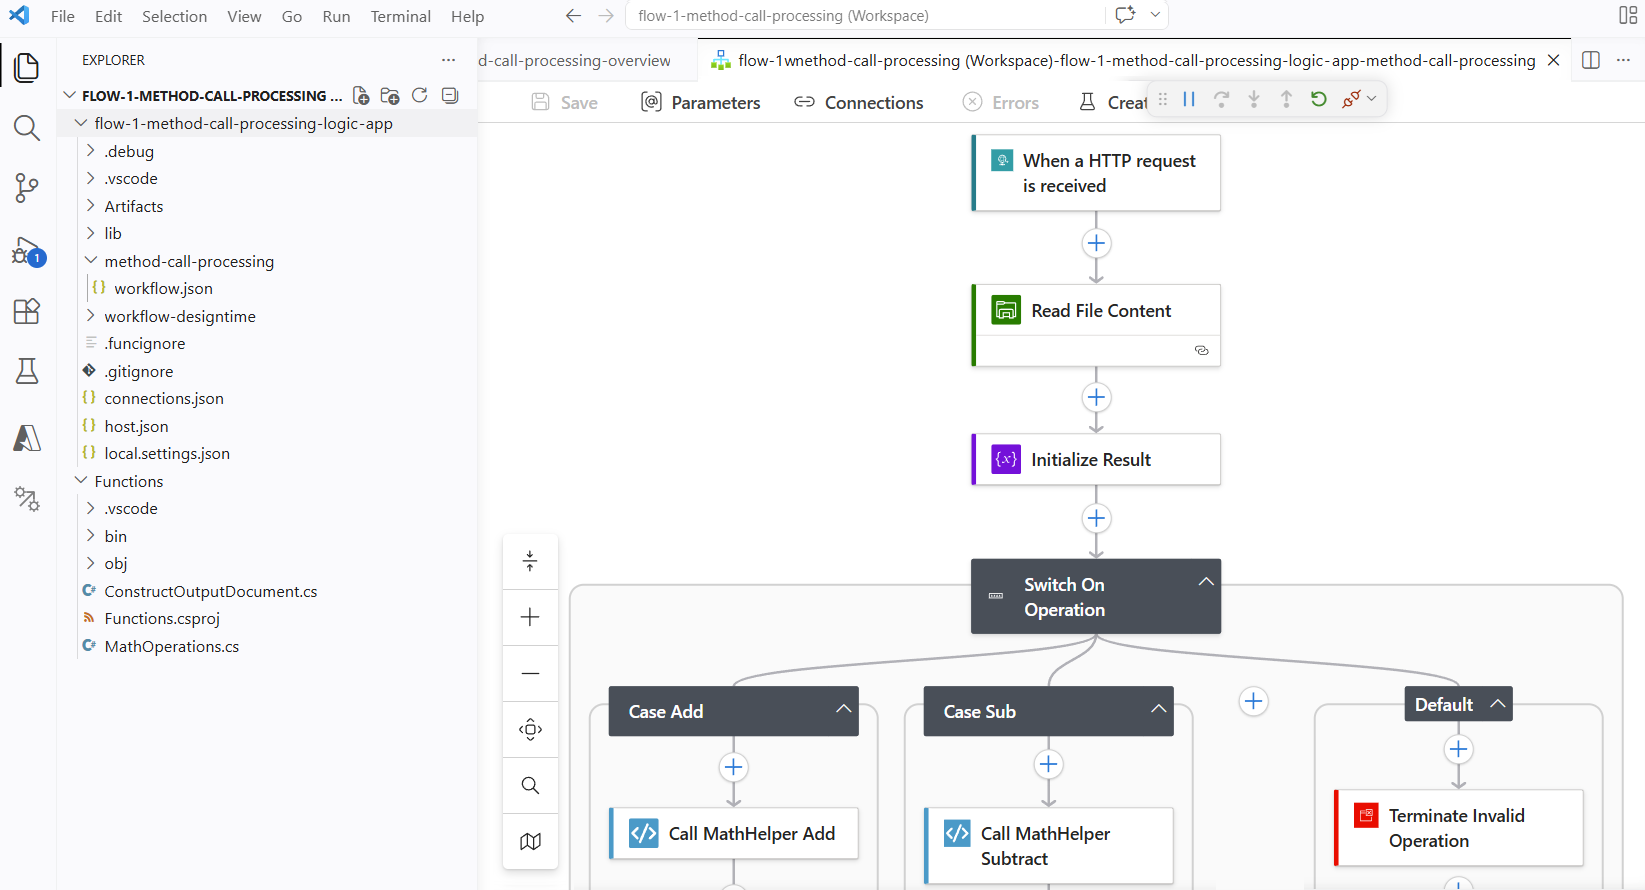
Inspect each
workflow.jsonfile to verify that the trigger and actions match the source behavior.Tip
To ask questions about the generated output, request modifications, or regenerate specific workflows, interact with the
@migration-converteragent by using Copilot chat.Check the
connections.jsonfile for the correct connector configurations.Review any generated .NET local functions for correctness.

Migration stage 4: Validation
For the Validation stage, test the generated workflows against your source specifications. You can bring your own test cases and specifications. The @migration-converter agent provides runtime validation and testing guidance. Your goal is to confirm that your converted workflows perform as expected and matches the source flow behavior.
Tip
To help you easily make direct comparisons, keep the test data and expected outputs for your source platform readily available during validation.
For example, the migration plan provides optional black box testing capability for you to use external inputs:

Requirements for locally testing your workflows
Before you start the validation steps, make sure the following requirements are installed for testing:
| Requirement | Purpose |
|---|---|
| Azure Logic Apps (Standard) extension | Required extension dependency |
| Azure Functions Core Tools | Local runtime host for Azure Logic Apps (Standard) |
| Docker Desktop | Local connector resource deployment for testing and running connections |
Locally test your workflows
To locally run the generated workflows, follow these steps:
On the Home tab, for your logical flow, select Open in Visual Studio Code.
In your migration folder, go to the out directory, and select the generated solution folder.
Open the generated logic app project folder.
Check that Docker Desktop is running.
On the Run menu, select Start Debugging (Keyboard: F5) to locally start the runtime for Azure Logic Apps.
The runtime starts and the workflows become available at local endpoints.
Use sample input data to send test requests or trigger a workflow.
Compare the generated workflow behavior against the source behavior to identify any discrepancies or inaccuracies.
The following checklist describes behaviors for you to verify:
- All triggers correctly fire with the expected input formats.
- Action sequences run in the correct order.
- Data transformations produce the expected output.
- Conditional logic correctly branches with the expected results based on input data.
- Loop constructs process all items as expected.
- Error handling scopes appropriately catch and handle exceptions.
- Connection configurations resolve to the correct endpoints.
- .NET local functions return the expected results.
Investigate and fix any discrepancies or problems that you find.
Tip
To help you through the resolution process, discuss the discrepancy or problem with the
@migration-converteragent through Copilot chat.- In Copilot chat, describe the expected behavior versus the actual behavior.
- Review the agent's suggested fixes.
- If you accept the agent's recommendations and make the changes, ask the agent to regenerate the updated parts of the workflow.
Migration stage 5: Deployment
The Deployment stage deploys your migrated Standard solution to Azure Logic Apps in the Azure portal.
Requirements for deploying your workflows
Before you start the deployment steps, make sure to meet the following requirements:
| Requirement | Purpose |
|---|---|
| Azure CLI | Provisions and deploys Azure resources. |
| Azure subscription | Your target subscription to use for deployment. |
| Contributor access | Role-based access to create resources in the target resource group. |
Make sure you finished migration agent stages 1 (Discovery) through 4 (Validation), including locally running the generated workflows and confirming their behavior match the source behavior.
Step 1: Set up extension settings for deployment
In Visual Studio Code, open the extension settings. From the File menu, go to Preferences > Settings > Extensions > Azure Logic Apps Migration Agent.
Update the following deployment setting values as appropriate:
Setting name JSON name Description Default Action Location logicAppsMigrationAssistant.azure.locationThe Azure region for provisioning resources. eastusChange this value to the region you want. Resource Group logicAppsMigrationAssistant.azure.resourceGroupThe Azure resource group for provisioning and testing. integration-migration-tool-test-rgChange this value to the resource group name you want. Subscription ID logicAppsMigrationAssistant.azure.subscriptionIdThe Azure subscription ID for deployment. (empty) Enter the GUID for your Azure subscription. Deployment Model logicAppsMigrationAssistant.deploymentModelThe target deployment model for Azure Logic Apps (Standard). workflow-service-planIf appropriate, change this value to hybrid.
Step 2: Start the deployment process
Follow these steps to begin deployment to Azure:
Sign in to Azure CLI with your Azure subscription, for example:
az loginFrom the Azure Logic Apps Migration Agent window, go to the migration plan, and run the Cloud Deployment & Testing task by selecting Execute:

The migration agent provisions the necessary infrastructure and deploys your Standard logic app resource and workflows by using the Azure CLI.
The following example shows a sample completely migrated solution:


Step 3: Verify the deployment
After deployment completes, verify that your Standard workflows appear in the Azure portal.
In the Azure portal search box, enter
logic apps, and then select Logic apps.On the Logic apps page, select your Standard logic app resource.
On the logic app sidebar, under Workflows, expand Workflows. On the Workflows page, confirm that all the expected workflows appear. Confirm that their State is Enabled.
Note
For any disabled workflow, select the workflow checkbox. On the Workflows toolbar, select Enable.
Test each workflow with sample inputs to make sure they work as expected.
To find any runtime errors or performance problems, go to the Application Insights page for your Standard logic app resource.
On the logic app sidebar, under Monitoring, select Application Insights.
Under Link to an Application Insights resource, select the link to the Application Insights resource.
For more information, see View workflow metrics in Application Insights.
Reset the migration
You can restart your migration from the beginning. The following command clears the migration state and lets you start again with the Discovery stage.
In Visual Studio Code, open the Command Palette (Keyboard: Ctrl+Shift+P).
At the prompt, enter Azure Logic Apps Migration Agent: Reset Migration.
Related content
- Migration automation from integration platforms to Azure Logic Apps
- Migration agent stage 1: Discovery
- Migration agent stage 2: Planning
- Migration agent stage 3: Conversion
- Migration agent stage 4: Validation
- Migration agent stage 5: Deployment
- Extend the migration agent by creating custom parsers for unsupported integration platforms