Note
Access to this page requires authorization. You can try signing in or changing directories.
Access to this page requires authorization. You can try changing directories.
APPLIES TO:
 Azure CLI ml extension v2 (current)
Python SDK azure-ai-ml v2 (current)
Azure CLI ml extension v2 (current)
Python SDK azure-ai-ml v2 (current)
In this article you learn:
- How to read data from Azure storage in an Azure Machine Learning job.
- How to write data from your Azure Machine Learning job to Azure Storage.
- The difference between mount and download modes.
- How to use user identity and managed identity to access data.
- Mount settings available in a job.
- Optimum mount settings for common scenarios.
- How to access V1 data assets.
Prerequisites
An Azure subscription. If you don't have an Azure subscription, create a free account before you begin. Try the free or paid version of Azure Machine Learning.
The azure-identity Python package (
pip install azure-identity).The Azure CLI with the ml extension v2 (
az extension add -n ml).An Azure Machine Learning workspace.
An Azure Machine Learning compute target (for example, a compute cluster named
cpu-cluster).
Quickstart
Before you explore the detailed options available to you when you access data, we first describe the relevant code snippets for data access.
Read data from Azure storage in an Azure Machine Learning job
In this example, you submit an Azure Machine Learning job that accesses data from a public blob storage account. However, you can adapt the snippet to access your own data in a private Azure Storage account. Update the path as described here. Azure Machine Learning seamlessly handles authentication to cloud storage, with Microsoft Entra passthrough. When you submit a job, you can choose:
- User identity: Passthrough your Microsoft Entra identity to access the data
- Managed identity: Use the managed identity of the compute target to access data
- None: Don't specify an identity to access the data. Use None when using credential-based (key/SAS token) datastores or when accessing public data
Tip
If you use keys or SAS tokens to authenticate, we recommend creating an Azure Machine Learning datastore. The runtime automatically connects to storage without exposing your credentials.
from azure.ai.ml import command, Input, MLClient
from azure.ai.ml.entities import Data, UserIdentityConfiguration, ManagedIdentityConfiguration
from azure.ai.ml.constants import AssetTypes, InputOutputModes
from azure.identity import DefaultAzureCredential

# Set your subscription, resource group and workspace name:
subscription_id = "<SUBSCRIPTION_ID>"
resource_group = "<RESOURCE_GROUP>"
workspace = "<AML_WORKSPACE_NAME>"

# connect to the AzureML workspace
ml_client = MLClient(
    DefaultAzureCredential(), subscription_id, resource_group, workspace
)

# ==============================================================
# Set the URI path for the data.
# Supported `path` formats for input include:
# local: `./<path>
# Blob: wasbs://<container_name>@<account_name>.blob.core.windows.net/<path>
# ADLS: abfss://<file_system>@<account_name>.dfs.core.windows.net/<path>
# Datastore: azureml://datastores/<data_store_name>/paths/<path>
# Data Asset: azureml:<my_data>:<version>
# Supported `path` format for output is:
# Datastore: azureml://datastores/<data_store_name>/paths/<path>
# We set the input path to a file on a public blob container
# ==============================================================
path = "wasbs://data@azuremlexampledata.blob.core.windows.net/titanic.csv"


# ==============================================================
# What type of data does the path point to? Options include:
# data_type = AssetTypes.URI_FILE # a specific file
# data_type = AssetTypes.URI_FOLDER # a folder
# data_type = AssetTypes.MLTABLE # an mltable
# The path we set above is a specific file
# ==============================================================
data_type = AssetTypes.URI_FILE

# ==============================================================
# Set the mode. The popular modes include:
# mode = InputOutputModes.RO_MOUNT # Read-only mount on the compute target
# mode = InputOutputModes.DOWNLOAD # Download the data to the compute target
# ==============================================================
mode = InputOutputModes.RO_MOUNT

# ==============================================================
# You can set the identity you want to use in a job to access the data. Options include:
# identity = UserIdentityConfiguration() # Use the user's identity
# identity = ManagedIdentityConfiguration() # Use the compute target managed identity
# ==============================================================
# This example accesses public data, so we don't need an identity.
# You also set identity to None if you use a credential-based datastore
identity = None

# Set the input for the job:
inputs = {
    "input_data": Input(type=data_type, path=path, mode=mode)
}

# This command job uses the head Linux command to print the first 10 lines of the file
job = command(
    command="head ${{inputs.input_data}}",
    inputs=inputs,
    environment="azureml://registries/azureml/environments/sklearn-1.1/versions/4",
    compute="cpu-cluster",
    identity=identity,
)

# Submit the command
ml_client.jobs.create_or_update(job)
Write data from your Azure Machine Learning job to Azure Storage
In this example, you submit an Azure Machine Learning job that writes data to your default Azure Machine Learning Datastore. You can optionally set the name value of your data asset to create a data asset in the output.
from azure.ai.ml import command, Input, Output, MLClient
from azure.ai.ml.constants import AssetTypes, InputOutputModes
from azure.identity import DefaultAzureCredential

# Set your subscription, resource group and workspace name:
subscription_id = "<SUBSCRIPTION_ID>"
resource_group = "<RESOURCE_GROUP>"
workspace = "<AML_WORKSPACE_NAME>"

# connect to the AzureML workspace
ml_client = MLClient(
    DefaultAzureCredential(), subscription_id, resource_group, workspace
)

# ==============================================================
# Set the URI path for the data.
# Supported `path` formats for input include:
# local: `./<path>
# Blob: wasbs://<container_name>@<account_name>.blob.core.windows.net/<path>
# ADLS: abfss://<file_system>@<account_name>.dfs.core.windows.net/<path>
# Datastore: azureml://datastores/<data_store_name>/paths/<path>
# Data Asset: azureml:<my_data>:<version>
# Supported `path` format for output is:
# Datastore: azureml://datastores/<data_store_name>/paths/<path>
# As an example, we set the input path to a file on a public blob container
# As an example, we set the output path to a folder in the default datastore
# ==============================================================
input_path = "wasbs://data@azuremlexampledata.blob.core.windows.net/titanic.csv"
output_path = "azureml://datastores/workspaceblobstore/paths/quickstart-output/titanic.csv"

# ==============================================================
# What type of data are you pointing to?
# AssetTypes.URI_FILE (a specific file)
# AssetTypes.URI_FOLDER (a folder)
# AssetTypes.MLTABLE (a table)
# The path we set above is a specific file
# ==============================================================
data_type = AssetTypes.URI_FILE

# ==============================================================
# Set the input mode. The most commonly-used modes:
# InputOutputModes.RO_MOUNT
# InputOutputModes.DOWNLOAD
# Set the mode to Read Only (RO) to mount the data
# ==============================================================
input_mode = InputOutputModes.RO_MOUNT

# ==============================================================
# Set the output mode. The most commonly-used modes:
# InputOutputModes.RW_MOUNT
# InputOutputModes.UPLOAD
# Set the mode to Read Write (RW) to mount the data
# ==============================================================
output_mode = InputOutputModes.RW_MOUNT

# Set the input and output for the job:
inputs = {
    "input_data": Input(type=data_type, path=input_path, mode=input_mode)
}

outputs = {
    "output_data": Output(type=data_type,
                          path=output_path,
                          mode=output_mode,
                          # optional: if you want to create a data asset from the output,
                          # then uncomment `name` (`name` can be set without setting `version`, and in this way, we will set `version` automatically for you)
                          # name = "<name_of_data_asset>", # use `name` and `version` to create a data asset from the output
                          # version = "<version>",
                  )
}

# This command job copies the data to your default Datastore
job = command(
    command="cp ${{inputs.input_data}} ${{outputs.output_data}}",
    inputs=inputs,
    outputs=outputs,
    environment="azureml://registries/azureml/environments/sklearn-1.1/versions/4",
    compute="cpu-cluster",
)

# Submit the command
ml_client.jobs.create_or_update(job)
The Azure Machine Learning data runtime
When you submit a job, the Azure Machine Learning data runtime controls the data load, from the storage location to the compute target. The Azure Machine Learning data runtime is optimized for speed and efficiency for machine learning tasks. The key benefits include:
- Data loads written in the Rust language, a language known for high speed and high memory efficiency. For concurrent data downloads, Rust avoids Python Global Interpreter Lock (GIL) issues
- Light weight; Rust has no dependencies on other technologies - for example JVM. As a result, the runtime installs quickly, and it doesn't drain extra resources (CPU, Memory) on the compute target
- Multi-process (parallel) data loading
- Prefetches data as a background task on one or more CPUs, to enable better utilization of GPUs when doing deep-learning
- Seamless authentication handling to cloud storage
- Provides options to mount data (stream) or download all the data. For more information, visit the Mount (streaming) and Download sections.
- Seamless integration with fsspec - a unified pythonic interface to local, remote, and embedded file systems and byte storage.
Tip
We suggest that you apply the Azure Machine Learning data runtime, instead of creation of your own mounting/downloading capability in your training (client) code. We have observed storage throughput constraints when the client code uses Python to download data from storage, because of Global Interpreter Lock (GIL) issues.
Paths
When you provide a data input or output to a job, you must specify a path parameter that points to the data location. This table shows the different data locations that Azure Machine Learning supports and provides path parameter examples:
| Location | Examples | Input | Output |
|---|---|---|---|
| A path on your local computer | ./home/username/data/my_data |
Y | N |
| A path on a public HTTP(S) server | https://raw.githubusercontent.com/pandas-dev/pandas/main/doc/data/titanic.csv |
Y | N |
| A path on Azure Storage | wasbs://<container_name>@<account_name>.blob.core.windows.net/<path>abfss://<file_system>@<account_name>.dfs.core.windows.net/<path> |
Y, only for identity-based authentication | N |
| A path on an Azure Machine Learning datastore | azureml://datastores/<data_store_name>/paths/<path> |
Y | Y |
| A path to a data asset | azureml:<my_data>:<version> |
Y | N, but you can use name and version to create a data asset from output |
Modes
When you run a job with data inputs/outputs, you can select from these mode options:
ro_mount: Mount storage location, as read-only on the local disk (SSD) compute target.rw_mount: Mount storage location, as read-write on the local disk (SSD) compute target.download: Download the data from the storage location to the local disk (SSD) compute target.upload: Upload data from the compute target to the storage location.eval_mount/eval_download: These modes are unique to MLTable. In some scenarios, an MLTable can yield files that might be located in a storage account different from the storage account that hosts the MLTable file. Or, an MLTable can subset or shuffle the data located in the storage resource. That view of the subset/shuffle becomes visible only when the Azure Machine Learning data runtime evaluates the MLTable file. For example, this diagram shows how an MLTable used witheval_mountoreval_downloadcan take images from two different storage containers and an annotations file located in a different storage account, and then mount/download to the filesystem of the remote compute target.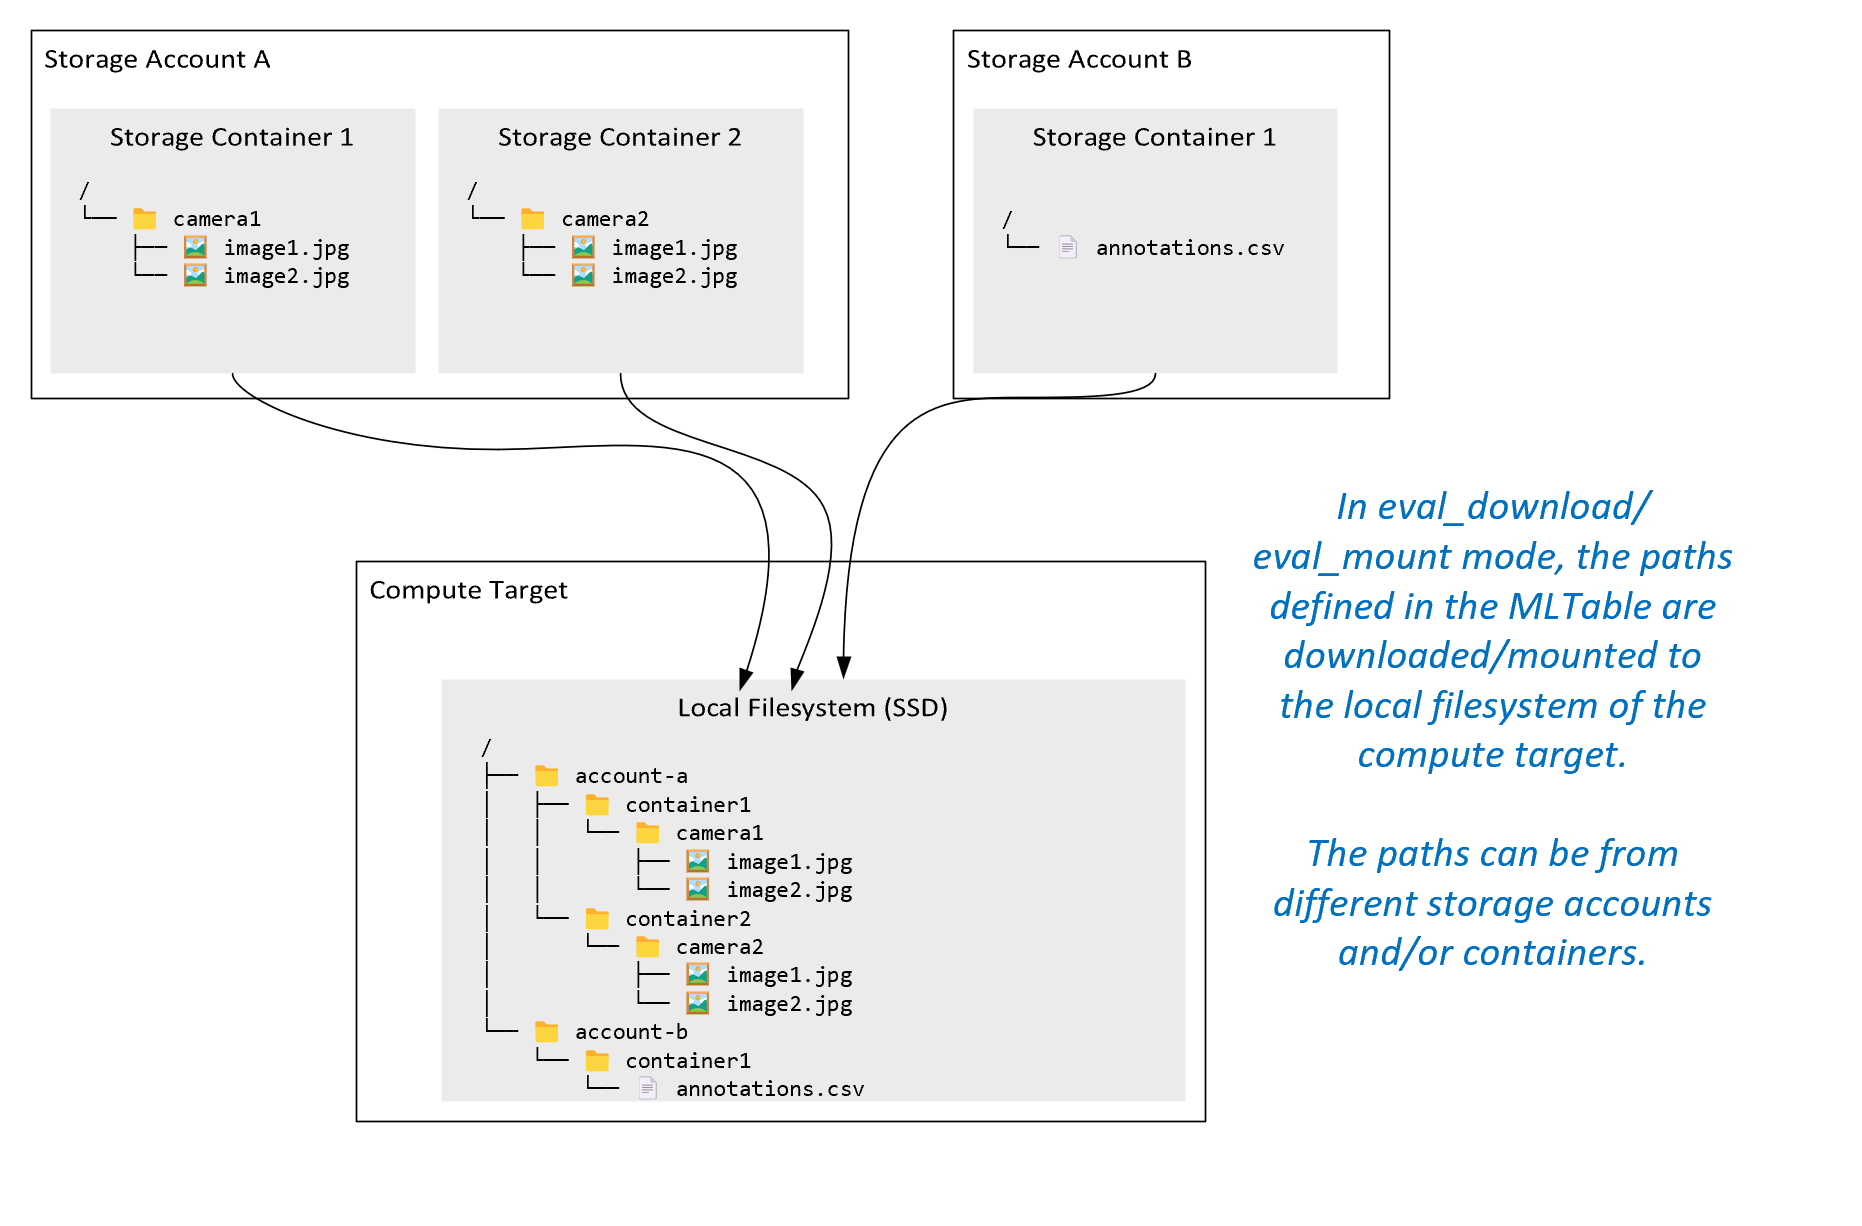
The
camera1folder,camera2folder andannotations.csvfile are then accessible on the compute target's filesystem in the folder structure:/INPUT_DATA ├── account-a │ ├── container1 │ │ └── camera1 │ │ ├── image1.jpg │ │ └── image2.jpg │ └── container2 │ └── camera2 │ ├── image1.jpg │ └── image2.jpg └── account-b └── container1 └── annotations.csvdirect: You might want to read data directly from a URI through other APIs, rather than go through the Azure Machine Learning data runtime. For example, you might want to access data on an s3 bucket (with a virtual-hosted–style or path-stylehttpsURL) using the boto s3 client. You can obtain the URI of the input as a string with thedirectmode. You see use of the direct mode in Spark Jobs, because thespark.read_*()methods know how to process the URIs. For non-Spark jobs, it is your responsibility to manage access credentials. For example, you must explicitly make use of compute MSI, or otherwise broker access.

This table shows the possible modes for different type/mode/input/output combinations:
| Type | Input/Output | upload |
download |
ro_mount |
rw_mount |
direct |
eval_download |
eval_mount |
|---|---|---|---|---|---|---|---|---|
uri_folder |
Input | ✓ | ✓ | ✓ | ||||
uri_file |
Input | ✓ | ✓ | ✓ | ||||
mltable |
Input | ✓ | ✓ | ✓ | ✓ | ✓ | ||
uri_folder |
Output | ✓ | ✓ | |||||
uri_file |
Output | ✓ | ✓ | |||||
mltable |
Output | ✓ | ✓ | ✓ |
Download
In download mode, all the input data is copied to the local disk (SSD) of the compute target. The Azure Machine Learning data runtime starts the user training script, once all the data is copied. When the user script starts, it reads data from the local disk, just like any other files. When the job finishes, the data is removed from the disk of the compute target.
| Advantages | Disadvantages |
|---|---|
| When training starts, all the data is available on the local disk (SSD) of the compute target, for the training script. No Azure storage / network interaction is required. | The dataset must completely fit on a compute target disk. |
| After the user script starts, there are no dependencies on storage / network reliability. | The entire dataset is downloaded (if training needs to randomly select only a small portion of a data, much of the download is then wasted). |
| Azure Machine Learning data runtime can parallelize the download (significant difference on many small files) and max network / storage throughput. | The job waits until all data downloads to the local disk of the compute target. For a submitted deep-learning job, the GPUs idle until data is ready. |
| No unavoidable overhead added by the FUSE layer (roundtrip: user space call in user script → kernel → user space fuse daemon → kernel → response to user script in user space) | Storage changes aren't reflected on the data after download is done. |
When to use download
- The data is small enough to fit on the compute target's disk without interference with other training
- The training uses most or all of the dataset
- The training reads files from a dataset more than once
- The training must jump to random positions of a large file
- It's OK to wait until all the data downloads before training starts
Available download settings
You can tune the download settings with these environment variables in your job:
| Environment Variable Name | Type | Default Value | Description |
|---|---|---|---|
RSLEX_DOWNLOADER_THREADS |
u64 | NUMBER_OF_CPU_CORES * 4 |
Number of concurrent threads download can use |
AZUREML_DATASET_HTTP_RETRY_COUNT |
u64 | 7 | Number of retry attempts of individual storage / http request to recover from transient errors. |
In your job, you can change the above defaults by setting the environment variables - for example:
For brevity, we only show how to define the environment variables in the job.
from azure.ai.ml import command

env_var = {
"RSLEX_DOWNLOADER_THREADS": 64,
"AZUREML_DATASET_HTTP_RETRY_COUNT": 10
}

job = command(
        environment_variables=env_var
)
Download performance metrics
The VM size of your compute target has an effect on the download time of your data. Specifically:
- The number of cores. The more cores available, the more concurrency and therefore faster download speed.
- The expected network bandwidth. Each VM in Azure has a maximum throughput from the Network Interface Card (NIC).
Note
For A100 GPU VMs, the Azure Machine Learning data runtime can saturate the NIC (Network Interface Card) when downloading data to the compute target (~24 Gbit/s): The theoretical maximum throughput possible.
This table shows the download performance the Azure Machine Learning data runtime can handle for a 100-GB file on a Standard_D15_v2 VM (20cores, 25 Gbit/s Network throughput):
| Data structure | Download only (secs) | Download and calculate MD5 (secs) | Throughput Achieved (Gbit/s) |
|---|---|---|---|
| 10 x 10 GB Files | 55.74 | 260.97 | 14.35 Gbit/s |
| 100 x 1 GB Files | 58.09 | 259.47 | 13.77 Gbit/s |
| 1 x 100 GB File | 96.13 | 300.61 | 8.32 Gbit/s |
We can see that a larger file, broken up into smaller files, can improve download performance due to parallelism. We recommend that you avoid files that become too small (less than 4 MB) because the time needed for storage request submissions increases, relative to time spent downloading the payload. For more information, read Many small files problem.
Mount (streaming)
In mount mode, the Azure Machine Learning data capability uses the FUSE (filesystem in user space) Linux feature, to create an emulated filesystem. Instead of downloading all the data to the local disk (SSD) of the compute target, the runtime can react to the user's script actions in real-time. For example, "open file", "read 2-KB chunk from position X", "list directory content".
| Advantages | Disadvantages |
|---|---|
| Data that exceeds the compute target local disk capacity can be used (not limited by compute hardware) | Added overhead of the Linux FUSE module. |
| No delay at the start of training (unlike download mode). | Dependency on user's code behavior (if the training code that sequentially reads small files in a single thread mount also requests data from storage, it might not maximize the network or storage throughput). |
| More available settings to tune for a usage scenario. | No windows support. |
| Only data needed for training is read from storage. |
When to use Mount
- The data is large, and it doesn't fit on the compute target local disk.
- Each individual compute node in a cluster doesn't need to read the entire dataset (random file or rows in csv file selection, etc.).
- Delays waiting for all data to download before training starts can become a problem (idle GPU time).
Available mount settings
You can tune the mount settings with these environment variables in your job:
| Env variable name | Type | Default value | Description |
|---|---|---|---|
DATASET_MOUNT_ATTRIBUTE_CACHE_TTL |
u64 | Not set (cache never expires) | Time, in milliseconds, needed to keep the getattr call results in cache, and to avoid subsequent requests of this info from storage again. |
DATASET_RESERVED_FREE_DISK_SPACE |
u64 | 150 MB | Intended for a system configuration, to keep compute healthy. No matter what values the other settings have, Azure Machine Learning data runtime doesn't use the last RESERVED_FREE_DISK_SPACE bytes of disk space. |
DATASET_MOUNT_CACHE_SIZE |
usize | Unlimited | Controls how much disk space mount can use. A positive value sets absolute value in bytes. Negative value sets how much of a disk space to leave free. This table provides more disk cache options. Supports KB, MB and GB modifiers for convenience. |
DATASET_MOUNT_FILE_CACHE_PRUNE_THRESHOLD |
f64 | 1.0 | Volume mount starts cache pruning when cache is filled up to AVAILABLE_CACHE_SIZE * DATASET_MOUNT_FILE_CACHE_PRUNE_THRESHOLD. Should be between 0 and 1. Setting it < 1 triggers background cache pruning earlier. AVAILABLE_CACHE_SIZE isn't an environment variable you can modify or view directly. In this context, it refers to the "number of bytes the system calculates as available for caching." This value depends on factors such as disk size, the amount of disk space required for system health, and configurations set in environment variables (like DATASET_RESERVED_FREE_DISK_SPACE and DATASET_MOUNT_CACHE_SIZE). |
DATASET_MOUNT_FILE_CACHE_PRUNE_TARGET |
f64 | 0.7 | Pruning cache tries to free at least (1-DATASET_MOUNT_FILE_CACHE_PRUNE_TARGET) of a cache space. |
DATASET_MOUNT_READ_BLOCK_SIZE |
usize | 2 MB | Streaming read block size. When file is large enough, request at least DATASET_MOUNT_READ_BLOCK_SIZE of data from storage, and cache even when fuse requested read operation was for less. |
DATASET_MOUNT_READ_BUFFER_BLOCK_COUNT |
usize | 32 | Number of blocks to prefetch (reading block k triggers background prefetching of blocks k+1, ..., k.+DATASET_MOUNT_READ_BUFFER_BLOCK_COUNT) |
DATASET_MOUNT_READ_THREADS |
usize | NUMBER_OF_CORES * 4 |
Number of background prefetching threads. |
DATASET_MOUNT_BLOCK_BASED_CACHE_ENABLED |
bool | false | Enable block-based caching. |
DATASET_MOUNT_MEMORY_CACHE_SIZE |
usize | 128 MB | Applies to block-based caching only. Size of RAM block-based caching can use. A value of 0 disables memory caching completely. |
DATASET_MOUNT_BLOCK_FILE_CACHE_ENABLED |
bool | true | Applies to block-based caching only. When set to true, block-based caching uses local hard drive to cache blocks. |
DATASET_MOUNT_BLOCK_FILE_CACHE_MAX_QUEUE_SIZE |
usize | 512 MB | Applies to block-based caching only. Block-based caching writes cached block to a local disk in a background. This setting controls how much memory mount can use to store blocks waiting for flush to the local disk cache. |
DATASET_MOUNT_BLOCK_FILE_CACHE_WRITE_THREADS |
usize | NUMBER_OF_CORES * 2 |
Applies to block-based caching only. Number of background threads block-based caching uses to write downloaded blocks to the local disk of the compute target. |
DATASET_UNMOUNT_TIMEOUT_SECONDS |
u64 | 30 | Time in seconds for unmount to (gracefully) finish all pending operations (for example, flush calls) before forcefully terminating the mount message loop. |
In your job, you can change the above defaults by setting the environment variables, for example:
from azure.ai.ml import command

env_var = {
"DATASET_MOUNT_BLOCK_FILE_CACHE_ENABLED": True
}

job = command(
        environment_variables=env_var
)
Block-based open mode
Block-based open mode splits each file into blocks of a predefined size (except for the last block). A read request from a specified position requests a corresponding block from storage, and returns the requested data immediately. A read also triggers background prefetching of N next blocks, using multiple threads (optimized for sequential read). Downloaded blocks are cached in two layer cache (RAM and local disk).
| Advantages | Disadvantages |
|---|---|
| Fast data delivery to the training script (less blocking for chunks that weren't yet requested). | Random reads may waste forward-prefetched blocks. |
| More work offloads to background threads (prefetching / caching). The training can then proceed. | Added overhead to navigate between caches, compared to direct reads from a file on a local disk cache (for example, in whole-file cache mode). |
| Only requested data (plus prefetching) is read from storage. | |
| For small enough data, fast RAM-based cache is used. |
When to use block-based open mode
Recommended for most scenarios except when you need fast reads from random file locations. In those cases, use Whole file cache open mode.
Whole file cache open mode
When a file under a mount folder is opened (for example, f = open(path, args)) in whole file mode, the call is blocked until the entire file is downloaded into a compute target cache folder on the disk. All subsequent read calls redirect to the cached file, so no storage interaction is needed. If cache doesn't have enough available space to fit the current file, mount tries to prune by deleting the least-recently used file from the cache. In cases where the file can't fit on disk (with respect to cache settings), the data runtime falls back to streaming mode.
| Advantages | Disadvantages |
|---|---|
| No storage reliability / throughput dependencies after the file is opened. | Open call is blocked until the entire file is downloaded. |
| Fast random reads (reading chunks from random places of the file). | The entire file is read from storage, even when some portions of the file may not be needed. |
When to use it
When random reads are needed for relatively large files that exceed 128 MB.
Usage
Set environment variable DATASET_MOUNT_BLOCK_BASED_CACHE_ENABLED to false in your job:
from azure.ai.ml import command

env_var = {
"DATASET_MOUNT_BLOCK_BASED_CACHE_ENABLED": False
}

job = command(
        environment_variables=env_var
)
Mount: Listing files
When working with millions of files, avoid a recursive listing - for example ls -R /mnt/dataset/folder/. A recursive listing triggers many calls to list the directory contents of the parent directory. It then requires a separate recursive call for each directory inside, at all child levels. Typically, Azure Storage allows only 5,000 elements to be returned per single list request. As a result, a recursive listing of 1M folders containing 10 files each requires 1,000,000 / 5000 + 1,000,000 = 1,000,200 requests to storage. In comparison, 1,000 folders with 10,000 files would only need 1,001 requests to storage for a recursive listing.
Azure Machine Learning mount handles listing in a lazy manner. Therefore, to list many small files, it's better to use an iterative client library call (for example, os.scandir() in Python) instead of a client library call that returns the full list (for example, os.listdir() in Python). An iterative client library call returns a generator, meaning that it doesn't need to wait until the entire list loads. It can then proceed faster.
This table compares the time needed for the Python os.scandir() and os.listdir() functions to list a folder that contains ~4M files in a flat structure:
| Metric | os.scandir() |
os.listdir() |
|---|---|---|
| Time to get first entry (secs) | 0.67 | 553.79 |
| Time to get first 50k entries (secs) | 9.56 | 562.73 |
| Time to get all entries (secs) | 558.35 | 582.14 |
Optimum mount settings for common scenarios
For certain common scenarios, we show the optimal mount settings you need to set in your Azure Machine Learning job.
Reading large file sequentially one time (processing lines in csv file)
Include these mount settings in the environment_variables section of your Azure Machine Learning job:
Note
To use serverless compute, delete compute="cpu-cluster", in this code.
from azure.ai.ml import command

env_var = {
  "DATASET_MOUNT_BLOCK_BASED_CACHE_ENABLED": True, # Enable block-based caching
  "DATASET_MOUNT_BLOCK_FILE_CACHE_ENABLED": False, # Disable caching on disk
  "DATASET_MOUNT_MEMORY_CACHE_SIZE": 0, # Disabling in-memory caching

  # Increase the number of blocks used for prefetch. This leads to use of more RAM (2 MB * #value set).
  # Can adjust up and down for fine-tuning, depending on the actual data processing pattern.
  # An optimal setting based on our test ~= the number of prefetching threads (#CPU_CORES * 4 by default)
  "DATASET_MOUNT_READ_BUFFER_BLOCK_COUNT": 80,
}

job = command(
        environment_variables=env_var
)
Reading large file one time from multiple threads (processing partitioned csv file in multiple threads)
Include these mount settings in the environment_variables section of your Azure Machine Learning job:
from azure.ai.ml import command

env_var = {
  "DATASET_MOUNT_BLOCK_BASED_CACHE_ENABLED": True, # Enable block-based caching
  "DATASET_MOUNT_BLOCK_FILE_CACHE_ENABLED": False, # Disable caching on disk
  "DATASET_MOUNT_MEMORY_CACHE_SIZE": 0, # Disabling in-memory caching
}

job = command(
        environment_variables=env_var
)
Reading millions of small files (images) from multiple threads one time (single epoch training on images)
Include these mount settings in the environment_variables section of your Azure Machine Learning job:
from azure.ai.ml import command

env_var = {
  "DATASET_MOUNT_BLOCK_BASED_CACHE_ENABLED": True, # Enable block-based caching
  "DATASET_MOUNT_BLOCK_FILE_CACHE_ENABLED": False, # Disable caching on disk
  "DATASET_MOUNT_MEMORY_CACHE_SIZE": 0, # Disabling in-memory caching
}

job = command(
        environment_variables=env_var
)
Reading millions of small files (images) from multiple threads multiple times (multiple epochs training on images)
Include these mount settings in the environment_variables section of your Azure Machine Learning job:
from azure.ai.ml import command

env_var = {
  "DATASET_MOUNT_BLOCK_BASED_CACHE_ENABLED": True, # Enable block-based caching
}

job = command(
        environment_variables=env_var
)
Reading large file with random seeks (like serving file database from mounted folder)
Include these mount settings in the environment_variables section of your Azure Machine Learning job:
from azure.ai.ml import command

env_var = {
  "DATASET_MOUNT_BLOCK_BASED_CACHE_ENABLED": False, # Disable block-based caching
}

job = command(
        environment_variables=env_var
)
Diagnosing and solving data loading bottlenecks
When an Azure Machine Learning job executes with data, the mode of an input determines how bytes are read from storage and cached on the compute target local SSD disk. For download mode, all the data caches on disk before the user code starts its execution. Several factors affect maximum download speeds:
- Number of parallel threads
- Number of files
- File size
For mount mode, the user code must start to open files before the data starts to cache. Different mount settings result in different reading and caching behavior. Various factors affect the speed that data loads from storage:
- Data locality to compute: Your storage and compute target locations should be the same. If your storage and compute target are located in different regions, performance degrades because data must transfer across regions. For more information about how to ensure that your data colocates with compute, visit Colocate data with compute.
- The compute target size: Small computes have lower core counts (less parallelism) and smaller expected network bandwidth compared to larger compute sizes - both factors affect data loading performance.
- For example, if you use a small VM size, such as
Standard_D2_v2(2 cores, 1,500 Mbps NIC), and you try to load 50,000 MB (50 GB) of data, the best achievable data loading time would be ~270 secs (assuming you saturate the NIC at 187.5-MB/s throughput). In contrast, aStandard_D5_v2(16 cores, 12,000 Mbps) would load the same data in ~33 secs (assuming you saturate the NIC at 1500-MB/s throughput).
- For example, if you use a small VM size, such as
- Storage tier: For most scenarios - including Large Language Models (LLM) - standard storage provides the best cost/performance profile. However, if you have many small files, premium storage offers a better cost/performance profile. For more information, read Azure Storage options.
- Storage load: If the storage account is under high load - for example, many GPU nodes in a cluster requesting data - then you risk hitting the egress capacity of storage. For more information, read Storage load. If you have many small files that need access in parallel, you might hit the request limits of storage. Read up-to-date information on the limits for both egress capacity and storage requests in Scale targets for standard storage accounts.
- Data access pattern in user code: When you use mount mode, data is fetched based on the open/read actions in your code. For example, when reading random sections of a large file, the default data prefetching settings of mounts can lead to downloads of blocks that won't be read. You might need to tune some settings to reach maximum throughput. For more information, read Optimum mount settings for common scenarios.
Using logs to diagnose issues
To access the logs of the data runtime from your job:
- Select Outputs+Logs tab from the job page.
- Select the system_logs folder, followed by data_capability folder.
- You should see two log files:
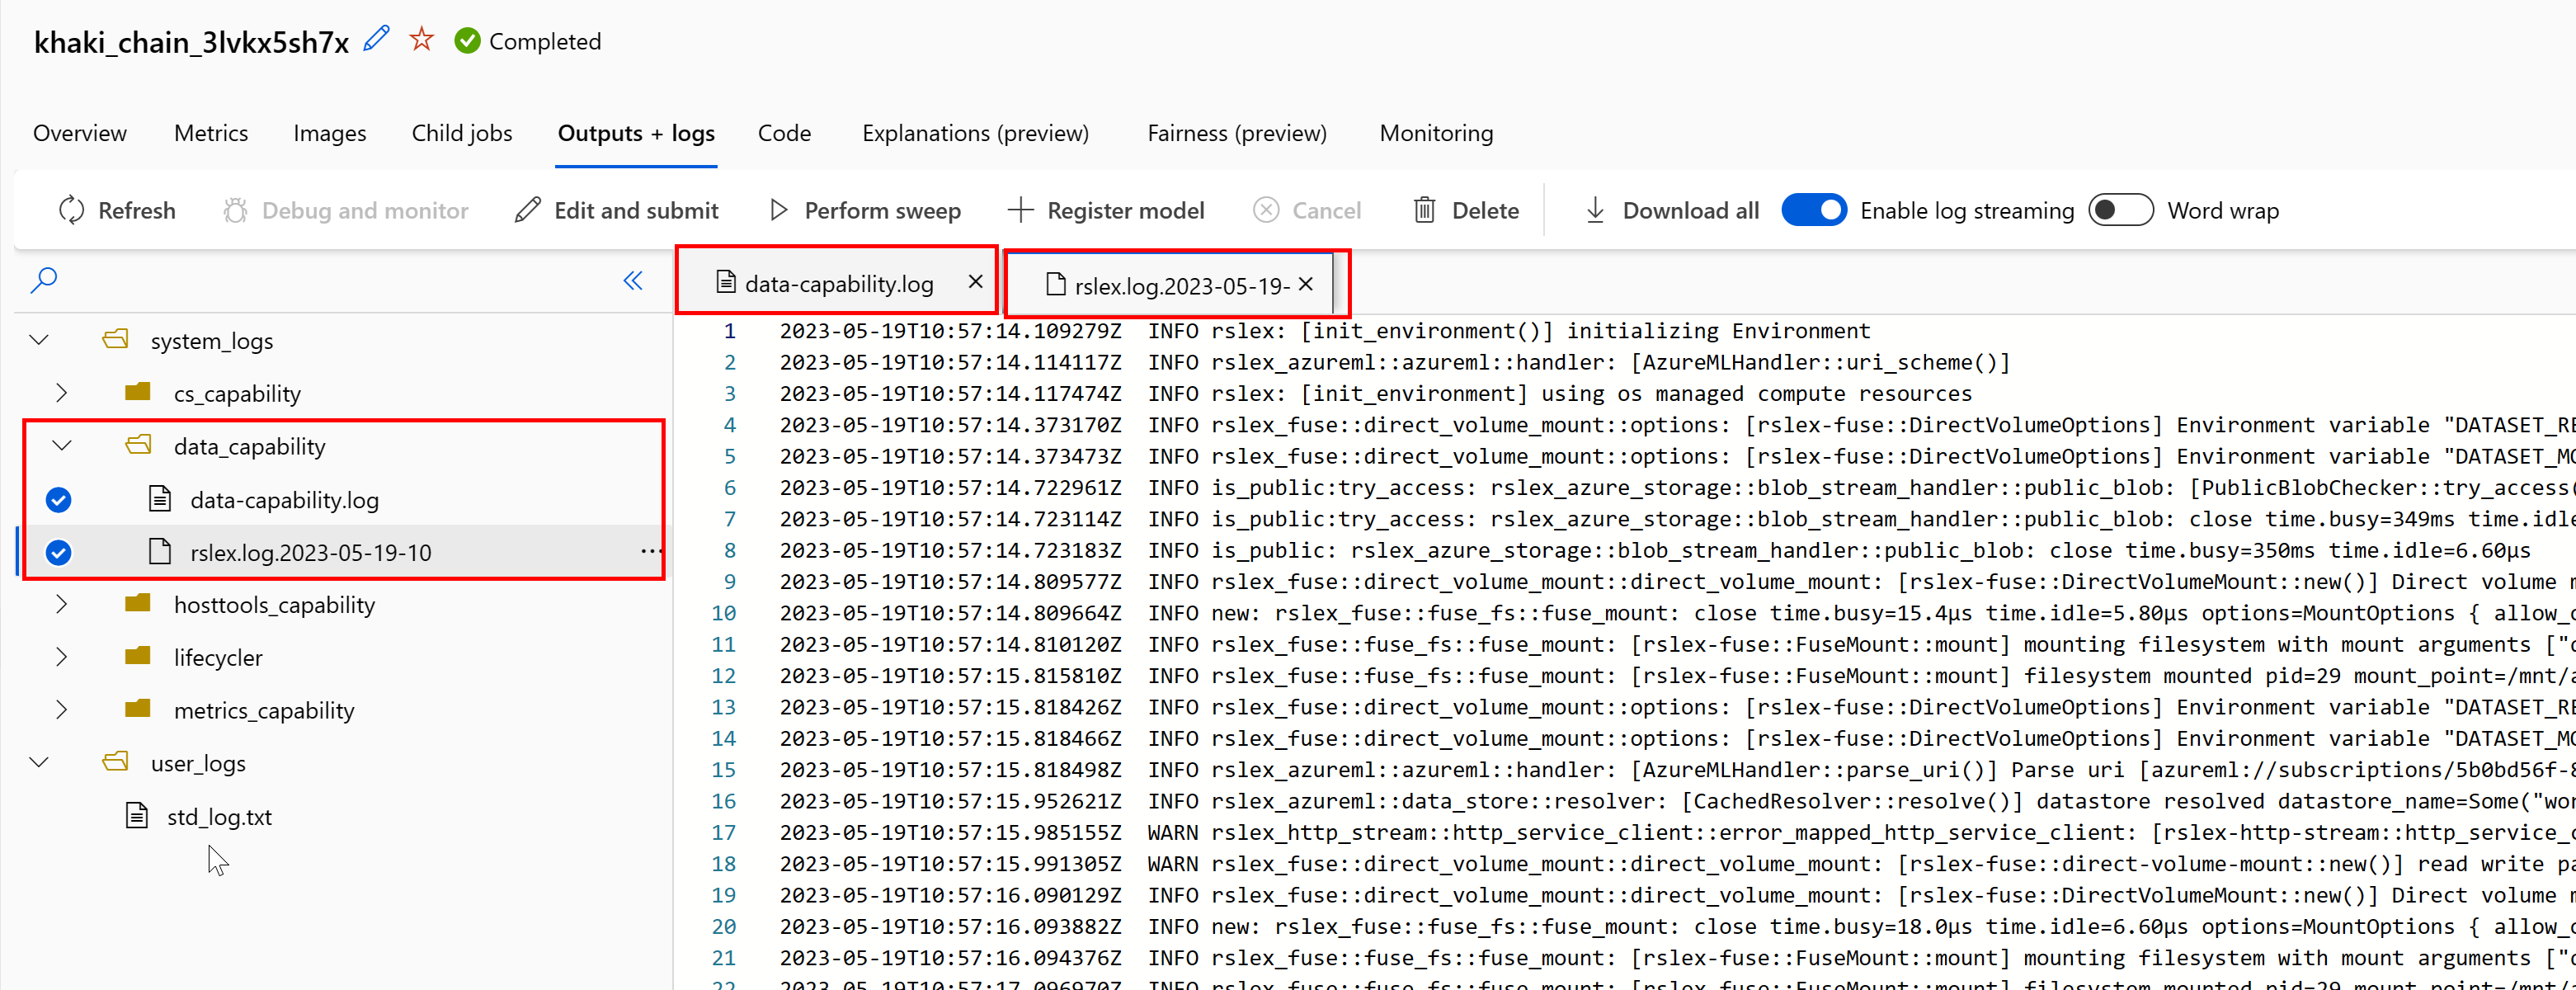

The log file data-capability.log shows the high-level information about the time spent on key data loading tasks. For example, when you download data, the runtime logs the download activity start and finish times:
INFO 2023-05-18 17:14:47,790 sdk_logger.py:44 [28] - ActivityStarted, download
INFO 2023-05-18 17:14:50,295 sdk_logger.py:44 [28] - ActivityCompleted: Activity=download, HowEnded=Success, Duration=2504.39 [ms]
If the download throughput is a fraction of the expected network bandwidth for the VM size, you can inspect the log file rslex.log.<TIMESTAMP>. This file contains all the fine-grain logging from the Rust-based runtime; for example, parallelization:
2023-05-18T14:08:25.388670Z  INFO copy_uri:copy_uri:copy_dataset:write_streams_to_files:collect:reduce:reduce_and_combine:reduce:get_iter: rslex::prefetching: close time.busy=23.2µs time.idle=1.90µs sessionId=012ea46a-341c-4258-8aba-90bde4fdfb51 source=Dataset[Partitions: 1, Sources: 1] file_name_column=None break_on_first_error=true skip_existing_files=false parallelization_degree=4 self=Dataset[Partitions: 1, Sources: 1] parallelization_degree=4 self=Dataset[Partitions: 1, Sources: 1] parallelization_degree=4 self=Dataset[Partitions: 1, Sources: 1] parallelization_degree=4 i=0 index=0
2023-05-18T14:08:25.388731Z  INFO copy_uri:copy_uri:copy_dataset:write_streams_to_files:collect:reduce:reduce_and_combine:reduce: rslex::dataset_crossbeam: close time.busy=90.9µs time.idle=9.10µs sessionId=012ea46a-341c-4258-8aba-90bde4fdfb51 source=Dataset[Partitions: 1, Sources: 1] file_name_column=None break_on_first_error=true skip_existing_files=false parallelization_degree=4 self=Dataset[Partitions: 1, Sources: 1] parallelization_degree=4 self=Dataset[Partitions: 1, Sources: 1] parallelization_degree=4 self=Dataset[Partitions: 1, Sources: 1] parallelization_degree=4 i=0
2023-05-18T14:08:25.388762Z  INFO copy_uri:copy_uri:copy_dataset:write_streams_to_files:collect:reduce:reduce_and_combine:combine: rslex::dataset_crossbeam: close time.busy=1.22ms time.idle=9.50µs sessionId=012ea46a-341c-4258-8aba-90bde4fdfb51 source=Dataset[Partitions: 1, Sources: 1] file_name_column=None break_on_first_error=true skip_existing_files=false parallelization_degree=4 self=Dataset[Partitions: 1, Sources: 1] parallelization_degree=4 self=Dataset[Partitions: 1, Sources: 1] parallelization_degree=4 self=Dataset[Partitions: 1, Sources: 1] parallelization_degree=4
The rslex.log file provides details about all the file copying, whether or not you chose the mount or download modes. It also describes the Settings (environment variables) used. To start debugging, check whether you set the Optimum mount settings for common scenarios.
Monitor Azure storage
In the Azure portal, you can select your Storage account, and then Metrics, to see the storage metrics:

You then plot the SuccessE2ELatency with SuccessServerLatency. If the metrics show high SuccessE2ELatency and low SuccessServerLatency, you have limited available threads, or you run low on resources such as CPU, memory, or network bandwidth, you should:
- Use monitoring view in the Azure Machine Learning studio to check the CPU and memory utilization of your job. If you're low on CPU and memory, consider increasing the compute target VM size.
- Consider increasing
RSLEX_DOWNLOADER_THREADSif you're downloading and you don't utilize the CPU and memory. If you use mount, you should increaseDATASET_MOUNT_READ_BUFFER_BLOCK_COUNTto do more prefetching, and increaseDATASET_MOUNT_READ_THREADSfor more read threads.
If the metrics show low SuccessE2ELatency and low SuccessServerLatency, but the client experiences high latency, you have a delay in the storage request that reaches the service. You should check:
- Whether the number of threads used for mount/download (
DATASET_MOUNT_READ_THREADS/RSLEX_DOWNLOADER_THREADS) is set too low, relative to the number of cores available on the compute target. If the setting is too low, increase the number of threads. - Whether the number of retries for downloading (
AZUREML_DATASET_HTTP_RETRY_COUNT) is set too high. If so, decrease the number of retries.
Monitor disk usage during a job
From the Azure Machine Learning studio, you can also monitor the compute target disk IO and usage during your job execution. Navigate to your job, and select the Monitoring tab. This tab provides insights on the resources of your job, on a 30 day rolling basis. For example:

Note
Job monitoring supports only compute resources that Azure Machine Learning manages. Jobs with a runtime of less than 5 minutes will not have enough data to populate this view.
Azure Machine Learning data runtime doesn't use the last RESERVED_FREE_DISK_SPACE bytes of disk space, to keep the compute healthy (the default value is 150MB). If your disk is full, your code is writing files to disk without declaring the files as an output. Therefore, check your code to make sure that data isn't being written erroneously to temporary disk. If you must write files to temporary disk, and that resource is becoming full, consider:
- Increasing the VM Size to one that has a larger temporary disk
- Setting a TTL on the cached data (
DATASET_MOUNT_ATTRIBUTE_CACHE_TTL), to purge your data from disk
Colocate data with compute
Caution
If your storage and compute are in different regions, your performance degrades because data must transfer across regions. This increases costs. Make sure that your storage account and compute resources are in the same region.
If your data and Azure Machine Learning Workspace are stored in different regions, we recommend that you copy the data to a storage account in the same region with the azcopy utility. AzCopy uses server-to-server APIs, so that data copies directly between storage servers. These copy operations don't use the network bandwidth of your computer. You can increase the throughput of these operations with the AZCOPY_CONCURRENCY_VALUE environment variable. To learn more, see Increase concurrency.
Storage load
A single storage account can become throttled when it comes under high load, when:
- Your job uses many GPU nodes
- Your storage account has many concurrent users/apps that access the data as you run your job
This section shows the calculations to determine if throttling might become an issue for your workload, and how to approach reductions of throttling.
Calculate bandwidth limits
An Azure Storage account has a default egress limit of 120 Gbit/s. Azure VMs have different network bandwidths, which have an effect on the theoretical number of compute nodes needed to hit the maximum default egress capacity of storage:
| Size | GPU Card | vCPU | Memory: GiB | Temp storage (SSD) GiB | Number of GPU Cards | GPU memory: GiB | Expected network bandwidth (Gbit/s) | Storage Account Egress Default Max (Gbit/s)* | Number of Nodes to hit default egress capacity |
|---|---|---|---|---|---|---|---|---|---|
| Standard_ND96asr_v4 | A100 | 96 | 900 | 6000 | 8 | 40 | 24 | 120 | 5 |
| Standard_ND96amsr_A100_v4 | A100 | 96 | 1900 | 6400 | 8 | 80 | 24 | 120 | 5 |
| Standard_NC6s_v3 | V100 | 6 | 112 | 736 | 1 | 16 | 24 | 120 | 5 |
| Standard_NC12s_v3 | V100 | 12 | 224 | 1474 | 2 | 32 | 24 | 120 | 5 |
| Standard_NC24s_v3 | V100 | 24 | 448 | 2948 | 4 | 64 | 24 | 120 | 5 |
| Standard_NC24rs_v3 | V100 | 24 | 448 | 2948 | 4 | 64 | 24 | 120 | 5 |
| Standard_NC4as_T4_v3 | T4 | 4 | 28 | 180 | 1 | 16 | 8 | 120 | 15 |
| Standard_NC8as_T4_v3 | T4 | 8 | 56 | 360 | 1 | 16 | 8 | 120 | 15 |
| Standard_NC16as_T4_v3 | T4 | 16 | 110 | 360 | 1 | 16 | 8 | 120 | 15 |
| Standard_NC64as_T4_v3 | T4 | 64 | 440 | 2880 | 4 | 64 | 32 | 120 | 3 |
Both the A100/V100 SKUs have a maximum network bandwidth per node of 24 Gbit/s. If each node that reads data from a single account can read close to the theoretical maximum of 24 Gbit/s, egress capacity would occur with five nodes. Use of six or more compute nodes would start to degrade data throughput across all nodes.
Important
If your workload needs more than six nodes of A100/V100, or you believe you'll exceed the default egress capacity of storage (120Gbit/s), contact support (via the Azure portal) and request a storage egress limit increase.
Scaling across multiple storage accounts
You might exceed the maximum egress capacity of storage, and/or you might hit the request rate limits. If these issues occur, we suggest that you contact support first, to increase these limits on the storage account.
If you can't increase the maximum egress capacity or request rate limit, you should consider replicating the data across multiple storage accounts. Copy the data to multiple accounts with Azure Data Factory, Azure Storage Explorer, or azcopy, and mount all the accounts in your training job. Only the data accessed on a mount is downloaded. Therefore, your training code can read the RANK from the environment variable, to pick which of the multiple inputs mounts from which to read. Your job definition passes in a list of storage accounts:
$schema: https://azuremlschemas.azureedge.net/latest/commandJob.schema.json
code: src
command: >-
  python train.py
  --epochs ${{inputs.epochs}}
  --learning-rate ${{inputs.learning_rate}}
  --data ${{inputs.cifar_storage1}}, ${{inputs.cifar_storage2}}
inputs:
  epochs: 1
  learning_rate: 0.2
  cifar_storage1:
    type: uri_folder
    path: azureml://datastores/storage1/paths/cifar
  cifar_storage2:
    type: uri_folder
    path: azureml://datastores/storage2/paths/cifar
environment: azureml:AzureML-pytorch-1.9-ubuntu18.04-py37-cuda11-gpu@latest
compute: azureml:gpu-cluster
distribution:
  type: pytorch
  process_count_per_instance: 1
resources:
  instance_count: 2
display_name: pytorch-cifar-distributed-example
experiment_name: pytorch-cifar-distributed-example
description: Train a basic convolutional neural network (CNN) with PyTorch on the CIFAR-10 dataset, distributed via PyTorch.
Your training python code can then use RANK to get the storage account specific to that node:
import argparse
import os

parser = argparse.ArgumentParser()
parser.add_argument('--data', nargs='+')
args = parser.parse_args()

world_size = int(os.environ["WORLD_SIZE"])
rank = int(os.environ["RANK"])
local_rank = int(os.environ["LOCAL_RANK"])

data_path_for_this_rank = args.data[rank]
Many small files problem
Reading files from storage involves making requests for each file. The request count per file varies, based on file sizes and the settings of the software that handles the file reads.
Files are read in blocks of 1-4 MB in size. Files smaller than a block are read with a single request (GET file.jpg 0-4MB), and files larger than a block have one request made per block (GET file.jpg 0-4MB, GET file.jpg 4-8 MB). This table shows that files smaller than a 4-MB block result in more storage requests compared to larger files:
| # Files | File Size | Total data size | Block size | # Storage requests |
|---|---|---|---|---|
| 2,000,000 | 500KB | 1 TB | 4 MB | 2,000,000 |
| 1,000 | 1 GB | 1 TB | 4 MB | 256,000 |
For small files, the latency interval mostly involves handling the requests to storage, instead of data transfers. Therefore, we offer these recommendations to increase the file size:
- For unstructured data (images, video, etc.), archive (zip/tar) small files together, to store them as a larger file that can be read in multiple chunks. These larger archived files can be opened in the compute resource, and PyTorch Archive DataPipes can extract the smaller files.
- For structured data (CSV, parquet, etc.), examine your ETL process, to make sure that it coalesces files to increase size. Spark has
repartition()andcoalesce()methods to help increase file sizes.
If you can't increase your file sizes, explore your Azure Storage options.
Azure Storage options
Azure Storage offers two tiers - standard and premium:
| Storage | Scenario |
|---|---|
| Azure Blob - Standard (HDD) | Your data is structured in larger blobs - images, video, etc. |
| Azure Blob - Premium (SSD) | High transaction rates, smaller objects, or consistently low storage latency requirements |
Tip
For "many" small files (KB magnitude), we recommend use of premium (SSD) because the cost of storage is less than the costs of running GPU compute.
Read V1 data assets
This section explains how to read V1 FileDataset and TabularDataset data entities in a V2 job.
Read a FileDataset
In the Input object, specify the type as AssetTypes.MLTABLE and mode as InputOutputModes.EVAL_MOUNT:
Note
To use serverless compute, delete compute="cpu-cluster", in this code.
For more information about the MLClient object, MLClient object initialization options, and how to connect to a workspace, visit Connect to a workspace.
from azure.ai.ml import command
from azure.ai.ml.entities import Data
from azure.ai.ml import Input
from azure.ai.ml.constants import AssetTypes, InputOutputModes
from azure.ai.ml import MLClient

ml_client = MLClient.from_config(credential=DefaultAzureCredential())

filedataset_asset = ml_client.data.get(name="<filedataset_name>", version="<version>")

my_job_inputs = {
    "input_data": Input(
            type=AssetTypes.MLTABLE,
            path=filedataset_asset.id,
            mode=InputOutputModes.EVAL_MOUNT
    )
}

job = command(
    code="./src",  # Local path where the code is stored
    command="ls ${{inputs.input_data}}",
    inputs=my_job_inputs,
    environment="<environment_name>:<version>",
    compute="cpu-cluster",
)

# Submit the command
returned_job = ml_client.jobs.create_or_update(job)
# Get a URL for the job status
returned_job.services["Studio"].endpoint
Read a TabularDataset
In the Input object, specify the type as AssetTypes.MLTABLE, and mode as InputOutputModes.DIRECT:
Note
To use serverless compute, delete compute="cpu-cluster", in this code.
from azure.ai.ml import command
from azure.ai.ml.entities import Data
from azure.ai.ml import Input
from azure.ai.ml.constants import AssetTypes, InputOutputModes
from azure.ai.ml import MLClient

ml_client = MLClient.from_config(credential=DefaultAzureCredential())

filedataset_asset = ml_client.data.get(name="<tabulardataset_name>", version="<version>")

my_job_inputs = {
    "input_data": Input(
            type=AssetTypes.MLTABLE,
            path=filedataset_asset.id,
            mode=InputOutputModes.DIRECT
    )
}

job = command(
    code="./src",  # Local path where the code is stored
    command="python train.py --inputs ${{inputs.input_data}}",
    inputs=my_job_inputs,
    environment="<environment_name>:<version>",
    compute="cpu-cluster",
)

# Submit the command
returned_job = ml_client.jobs.create_or_update(job)
# Get a URL for the status of the job
returned_job.services["Studio"].endpoint
Cleanup
If you created Azure resources for this tutorial that you no longer need, remove them to avoid incurring costs:
Scale your compute cluster down to zero nodes, or delete it if you no longer need it:
az ml compute update --name cpu-cluster --resource-group <RESOURCE_GROUP> --workspace-name <AML_WORKSPACE_NAME> --min-instances 0Delete any output data assets or storage containers that you created during testing.