Note
Access to this page requires authorization. You can try signing in or changing directories.
Access to this page requires authorization. You can try changing directories.
APPLIES TO:  Python SDK azure-ai-ml v2 (current)
Note
For a tutorial that uses SDK v1 to build a pipeline, see Tutorial: Build an Azure Machine Learning pipeline for image classification.
A machine learning pipeline splits a complete machine learning task into a multistep workflow. Each step is a manageable component that you can develop, optimize, configure, and automate individually. Well-defined interfaces connect steps. The Azure Machine Learning pipeline service orchestrates all the dependencies between pipeline steps.
The benefits of using a pipeline are standardized MLOps practice, scalable team collaboration, training efficiency, and cost reduction. To learn more about the benefits of pipelines, see What are Azure Machine Learning pipelines.
In this tutorial, you use Azure Machine Learning to create a production-ready machine learning project, using Azure Machine Learning Python SDK v2. After this tutorial, you're able to use the Azure Machine Learning Python SDK to:
- Get a handle to your Azure Machine Learning workspace
- Create Azure Machine Learning data assets
- Create reusable Azure Machine Learning components
- Create, validate, and run Azure Machine Learning pipelines
During this tutorial, you create an Azure Machine Learning pipeline to train a model for credit default prediction. The pipeline handles two steps:
- Data preparation
- Training and registering the trained model
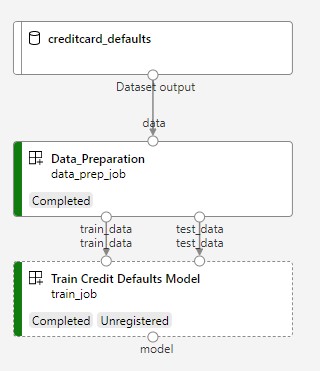
The next image shows a simple pipeline as you see it in the Azure studio after you submit it.
The two steps are data preparation and training.
This video shows how to get started in Azure Machine Learning studio so that you can follow the steps in the tutorial. The video shows how to create a notebook, create a compute instance, and clone the notebook. The following sections also describe these steps.
Prerequisites
-
To use Azure Machine Learning, you need a workspace. If you don't have one, complete Create resources you need to get started to create a workspace and learn more about using it.
Important
If your Azure Machine Learning workspace is configured with a managed virtual network, you might need to add outbound rules to allow access to the public Python package repositories. For more information, see Scenario: Access public machine learning packages.
-
Sign in to the studio and select your workspace if it's not already open.
Complete the tutorial Upload, access and explore your data to create the data asset you need in this tutorial. Make sure you run all the code to create the initial data asset. You can explore the data and revise it if you want, but you only need the initial data for this tutorial.
-
Open or create a notebook in your workspace:
- If you want to copy and paste code into cells, create a new notebook.
- Or, open tutorials/get-started-notebooks/pipeline.ipynb from the Samples section of studio. Then select Clone to add the notebook to your Files. To find sample notebooks, see Learn from sample notebooks.
Set your kernel and open in Visual Studio Code (VS Code)
On the top bar above your opened notebook, create a compute instance if you don't already have one.

If the compute instance is stopped, select Start compute and wait until it's running.

Wait until the compute instance is running. Then make sure that the kernel, found on the top right, is
Python 3.10 - SDK v2. If not, use the dropdown list to select this kernel.
If you don't see this kernel, verify that your compute instance is running. If it is, select the Refresh button on the top right of the notebook.
If you see a banner that says you need to be authenticated, select Authenticate.
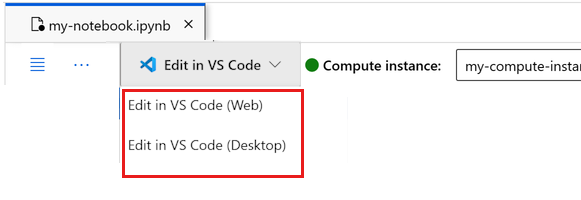
You can run the notebook here, or open it in VS Code for a full integrated development environment (IDE) with the power of Azure Machine Learning resources. Select Open in VS Code, then select either the web or desktop option. When launched this way, VS Code is attached to your compute instance, the kernel, and the workspace file system.


Important
The rest of this tutorial contains cells of the tutorial notebook. Copy and paste them into your new notebook, or switch to the notebook now if you cloned it.
Set up the pipeline resources
You can use the Azure Machine Learning framework from the Azure CLI, Python SDK, or studio interface. In this example, you use the Azure Machine Learning Python SDK v2 to create a pipeline.
Before you create the pipeline, you need these resources:
- The data asset for training
- The software environment to run the pipeline
- A compute resource where the job runs
Create handle to workspace
Before you use the code, you need a way to reference your workspace. Create ml_client as a handle to the workspace. You then use ml_client to manage resources and jobs.
In the next cell, enter your Subscription ID, Resource Group name, and Workspace name. To find these values:
- In the upper right Azure Machine Learning studio toolbar, select your workspace name.
- Copy the value for workspace, resource group, and subscription ID into the code. You need to copy one value, close the area, and paste, then return for the next value.
from azure.ai.ml import MLClient
from azure.identity import DefaultAzureCredential, InteractiveBrowserCredential

# authenticate
try:
    credential = DefaultAzureCredential()
    credential.get_token("https://management.azure.com/.default")
except Exception:
    credential = InteractiveBrowserCredential()

SUBSCRIPTION = "<SUBSCRIPTION_ID>"
RESOURCE_GROUP = "<RESOURCE_GROUP>"
WS_NAME = "<AML_WORKSPACE_NAME>"
# Get a handle to the workspace
ml_client = MLClient(
    credential=credential,
    subscription_id=SUBSCRIPTION,
    resource_group_name=RESOURCE_GROUP,
    workspace_name=WS_NAME,
)
SDK Reference:
Note
Creating MLClient doesn't connect to the workspace. The client initialization is lazy. It waits for the first time it needs to make a call. Initialization happens in the next code cell.
Verify the connection by making a call to ml_client. Since this call is the first time that you make a call to the workspace, you might be asked to authenticate.
# Verify that the handle works correctly.
# If you get an error here, modify your SUBSCRIPTION, RESOURCE_GROUP, and WS_NAME in the previous cell.
ws = ml_client.workspaces.get(WS_NAME)
print(ws.location, ":", ws.resource_group)
SDK Reference:
Access the registered data asset
Start by getting the data you previously registered in Tutorial: Upload, access and explore your data in Azure Machine Learning.
Note
Azure Machine Learning uses a Data object to register a reusable definition of data and consume data within a pipeline.
# get a handle of the data asset and print the URI
credit_data = ml_client.data.get(name="credit-card", version="initial")
print(f"Data asset URI: {credit_data.path}")
SDK Reference:
Create a job environment for pipeline steps
So far, you created a development environment on the compute instance, your development machine. You also need an environment to use for each step of the pipeline. Each step can have its own environment, or you can use some common environments for multiple steps.
In this example, you create a conda environment for your jobs, using a conda yaml file. First, create a directory to store the file in.
import os

dependencies_dir = "./dependencies"
os.makedirs(dependencies_dir, exist_ok=True)
Now, create the file in the dependencies directory.
%%writefile {dependencies_dir}/conda.yaml
name: model-env
channels:
  - conda-forge
dependencies:
    - python=3.10
  - numpy=1.21.2
  - pip=21.2.4
  - scikit-learn=0.24.2
  - scipy=1.7.1
  - pandas>=1.1,<1.2
  - pip:
    - inference-schema[numpy-support]==1.3.0
    - xlrd==2.0.1
    - mlflow== 2.4.1
    - azureml-mlflow==1.51.0
The specification contains some usual packages that you use in your pipeline (numpy, pip), together with some Azure Machine Learning specific packages (azureml-mlflow).
The Azure Machine Learning packages aren't required to run Azure Machine Learning jobs. By adding these packages, you can interact with Azure Machine Learning for logging metrics and registering models, all inside the Azure Machine Learning job. You use them in the training script later in this tutorial.
Use the yaml file to create and register this custom environment in your workspace:
from azure.ai.ml.entities import Environment

custom_env_name = "aml-scikit-learn"

pipeline_job_env = Environment(
    name=custom_env_name,
    description="Custom environment for Credit Card Defaults pipeline",
    tags={"scikit-learn": "0.24.2"},
    conda_file=os.path.join(dependencies_dir, "conda.yaml"),
    image="mcr.microsoft.com/azureml/openmpi4.1.0-ubuntu22.04:latest",
    version="0.2.0",
)
pipeline_job_env = ml_client.environments.create_or_update(pipeline_job_env)

print(
    f"Environment with name {pipeline_job_env.name} is registered to workspace, the environment version is {pipeline_job_env.version}"
)
SDK Reference:
Build the training pipeline
Now that you have all the assets required to run your pipeline, it's time to build the pipeline itself.
Azure Machine Learning pipelines are reusable ML workflows that usually consist of several components. The typical life cycle of a component is:
- Write the YAML specification of the component, or create it programmatically by using
ComponentMethod. - Optionally, register the component with a name and version in your workspace to make it reusable and shareable.
- Load that component from the pipeline code.
- Implement the pipeline by using the component's inputs, outputs, and parameters.
- Submit the pipeline.
You can create a component in two ways: programmatic definition and YAML definition. The next two sections walk you through creating a component both ways. You can either create the two components by trying both options or pick your preferred method.
Note
In this tutorial, for simplicity, you use the same compute for all components. However, you can set different computes for each component. For example, you can add a line like train_step.compute = "cpu-cluster". To view an example of building a pipeline with different computes for each component, see the Basic pipeline job section in the cifar-10 pipeline tutorial.
Create component 1: data prep (using programmatic definition)
Start by creating the first component. This component handles the preprocessing of the data. The preprocessing task is performed in the data_prep.py Python file.
First, create a source folder for the data_prep component:
import os

data_prep_src_dir = "./components/data_prep"
os.makedirs(data_prep_src_dir, exist_ok=True)
This script performs the simple task of splitting the data into train and test datasets. Azure Machine Learning mounts datasets as folders to the computes. You created an auxiliary select_first_file function to access the data file inside the mounted input folder.
MLFlow is used to log the parameters and metrics during your pipeline run.
%%writefile {data_prep_src_dir}/data_prep.py
import os
import argparse
import pandas as pd
from sklearn.model_selection import train_test_split
import logging
import mlflow


def main():
    """Main function of the script."""

    # input and output arguments
    parser = argparse.ArgumentParser()
    parser.add_argument("--data", type=str, help="path to input data")
    parser.add_argument("--test_train_ratio", type=float, required=False, default=0.25)
    parser.add_argument("--train_data", type=str, help="path to train data")
    parser.add_argument("--test_data", type=str, help="path to test data")
    args = parser.parse_args()

    # Start Logging
    mlflow.start_run()

    print(" ".join(f"{k}={v}" for k, v in vars(args).items()))

    print("input data:", args.data)

    credit_df = pd.read_csv(args.data, header=1, index_col=0)

    mlflow.log_metric("num_samples", credit_df.shape[0])
    mlflow.log_metric("num_features", credit_df.shape[1] - 1)

    credit_train_df, credit_test_df = train_test_split(
        credit_df,
        test_size=args.test_train_ratio,
    )

    # output paths are mounted as folder, therefore, we are adding a filename to the path
    credit_train_df.to_csv(os.path.join(args.train_data, "data.csv"), index=False)

    credit_test_df.to_csv(os.path.join(args.test_data, "data.csv"), index=False)

    # Stop Logging
    mlflow.end_run()


if __name__ == "__main__":
    main()
Now that you have a script that can perform the desired task, create an Azure Machine Learning Component from it.
Use the general purpose CommandComponent that can run command line actions. This command line action can directly call system commands or run a script. The inputs and outputs are specified on the command line by using the ${{ ... }} notation.
from azure.ai.ml import command
from azure.ai.ml import Input, Output

data_prep_component = command(
    name="data_prep_credit_defaults",
    display_name="Data preparation for training",
    description="reads a .xl input, split the input to train and test",
    inputs={
        "data": Input(type="uri_folder"),
        "test_train_ratio": Input(type="number"),
    },
    outputs=dict(
        train_data=Output(type="uri_folder", mode="rw_mount"),
        test_data=Output(type="uri_folder", mode="rw_mount"),
    ),
    # The source folder of the component
    code=data_prep_src_dir,
    command="""python data_prep.py \
            --data ${{inputs.data}} --test_train_ratio ${{inputs.test_train_ratio}} \
            --train_data ${{outputs.train_data}} --test_data ${{outputs.test_data}} \
            """,
    environment=f"{pipeline_job_env.name}:{pipeline_job_env.version}",
)
SDK Reference:
Optionally, register the component in the workspace for future reuse.
# Now register the component to the workspace
data_prep_component = ml_client.create_or_update(data_prep_component.component)

# Create and register the component in your workspace
print(
    f"Component {data_prep_component.name} with Version {data_prep_component.version} is registered"
)
SDK Reference:
Create component 2: training (using yaml definition)
The second component you create consumes the training and test data, trains a tree based model, and returns the output model. Use Azure Machine Learning logging capabilities to record and visualize the learning progress.
You used the CommandComponent class to create your first component. This time, you use the yaml definition to define the second component. Each method has its own advantages. A yaml definition can be checked in along the code and provides readable history tracking. The programmatic method using CommandComponent can be easier with built-in class documentation and code completion.
Create the directory for this component:
import os

train_src_dir = "./components/train"
os.makedirs(train_src_dir, exist_ok=True)
Create the training script in the directory:
%%writefile {train_src_dir}/train.py
import argparse
from sklearn.ensemble import GradientBoostingClassifier
from sklearn.metrics import classification_report
import os
import pandas as pd
import mlflow


def select_first_file(path):
    """Selects first file in folder, use under assumption there is only one file in folder
    Args:
        path (str): path to directory or file to choose
    Returns:
        str: full path of selected file
    """
    files = os.listdir(path)
    return os.path.join(path, files[0])


# Start Logging
mlflow.start_run()

# enable autologging
mlflow.sklearn.autolog()

os.makedirs("./outputs", exist_ok=True)


def main():
    """Main function of the script."""

    # input and output arguments
    parser = argparse.ArgumentParser()
    parser.add_argument("--train_data", type=str, help="path to train data")
    parser.add_argument("--test_data", type=str, help="path to test data")
    parser.add_argument("--n_estimators", required=False, default=100, type=int)
    parser.add_argument("--learning_rate", required=False, default=0.1, type=float)
    parser.add_argument("--registered_model_name", type=str, help="model name")
    parser.add_argument("--model", type=str, help="path to model file")
    args = parser.parse_args()

    # paths are mounted as folder, therefore, we are selecting the file from folder
    train_df = pd.read_csv(select_first_file(args.train_data))

    # Extracting the label column
    y_train = train_df.pop("default payment next month")

    # convert the dataframe values to array
    X_train = train_df.values

    # paths are mounted as folder, therefore, we are selecting the file from folder
    test_df = pd.read_csv(select_first_file(args.test_data))

    # Extracting the label column
    y_test = test_df.pop("default payment next month")

    # convert the dataframe values to array
    X_test = test_df.values

    print(f"Training with data of shape {X_train.shape}")

    clf = GradientBoostingClassifier(
        n_estimators=args.n_estimators, learning_rate=args.learning_rate
    )
    clf.fit(X_train, y_train)

    y_pred = clf.predict(X_test)

    print(classification_report(y_test, y_pred))

    # Registering the model to the workspace
    print("Registering the model via MLFlow")
    mlflow.sklearn.log_model(
        sk_model=clf,
        registered_model_name=args.registered_model_name,
        artifact_path=args.registered_model_name,
    )

    # Saving the model to a file
    mlflow.sklearn.save_model(
        sk_model=clf,
        path=os.path.join(args.model, "trained_model"),
    )

    # Stop Logging
    mlflow.end_run()


if __name__ == "__main__":
    main()
As you can see in this training script, after the model is trained, the model file is saved and registered to the workspace. Now you can use the registered model in inferencing endpoints.
For the environment of this step, you use one of the built-in (curated) Azure Machine Learning environments. The tag azureml tells the system to look for the name in curated environments.
First, create the yaml file describing the component:
%%writefile {train_src_dir}/train.yml
# <component>
name: train_credit_defaults_model
display_name: Train Credit Defaults Model
# version: 1 # Not specifying a version will automatically update the version
type: command
inputs:
  train_data:
    type: uri_folder
  test_data:
    type: uri_folder
  learning_rate:
    type: number
  registered_model_name:
    type: string
outputs:
  model:
    type: uri_folder
code: .
environment:
  # for this step, we'll use an AzureML curate environment
  azureml://registries/azureml/environments/sklearn-1.0/labels/latest
command: >-
  python train.py
  --train_data ${{inputs.train_data}}
  --test_data ${{inputs.test_data}}
  --learning_rate ${{inputs.learning_rate}}
  --registered_model_name ${{inputs.registered_model_name}}
  --model ${{outputs.model}}
# </component>
Now create and register the component. Registering it allows you to reuse it in other pipelines. Anyone else with access to your workspace can also use the registered component.
# importing the Component Package
from azure.ai.ml import load_component

# Loading the component from the yml file
train_component = load_component(source=os.path.join(train_src_dir, "train.yml"))

# Now register the component to the workspace
train_component = ml_client.create_or_update(train_component)

# Create and register the component in your workspace
print(
    f"Component {train_component.name} with Version {train_component.version} is registered"
)
SDK Reference:
Create the pipeline from components
After you define and register your components, start implementing the pipeline.
The Python functions that load_component() returns work like any regular Python function. Use them in a pipeline to call each step.
To code the pipeline, use a specific @dsl.pipeline decorator that identifies the Azure Machine Learning pipelines. In the decorator, specify the pipeline description and default resources like compute and storage. Like a Python function, pipelines can have inputs. You can create multiple instances of a single pipeline with different inputs.
In the following example, use input data, split ratio, and registered model name as input variables. Then, call the components and connect them by using their inputs and outputs identifiers. Access the outputs of each step by using the .outputs property.
# the dsl decorator tells the sdk that we are defining an Azure Machine Learning pipeline
from azure.ai.ml import dsl, Input, Output


@dsl.pipeline(
    compute="serverless",  # "serverless" value runs pipeline on serverless compute
    description="E2E data_perp-train pipeline",
)
def credit_defaults_pipeline(
    pipeline_job_data_input,
    pipeline_job_test_train_ratio,
    pipeline_job_learning_rate,
    pipeline_job_registered_model_name,
):
    # using data_prep_function like a python call with its own inputs
    data_prep_job = data_prep_component(
        data=pipeline_job_data_input,
        test_train_ratio=pipeline_job_test_train_ratio,
    )

    # using train_func like a python call with its own inputs
    train_job = train_component(
        train_data=data_prep_job.outputs.train_data,  # note: using outputs from previous step
        test_data=data_prep_job.outputs.test_data,  # note: using outputs from previous step
        learning_rate=pipeline_job_learning_rate,  # note: using a pipeline input as parameter
        registered_model_name=pipeline_job_registered_model_name,
    )

    # a pipeline returns a dictionary of outputs
    # keys will code for the pipeline output identifier
    return {
        "pipeline_job_train_data": data_prep_job.outputs.train_data,
        "pipeline_job_test_data": data_prep_job.outputs.test_data,
    }
SDK Reference:
Now use your pipeline definition to instantiate a pipeline with your dataset, split rate of choice, and the name you picked for your model.
registered_model_name = "credit_defaults_model"

# Let's instantiate the pipeline with the parameters of our choice
pipeline = credit_defaults_pipeline(
    pipeline_job_data_input=Input(type="uri_file", path=credit_data.path),
    pipeline_job_test_train_ratio=0.25,
    pipeline_job_learning_rate=0.05,
    pipeline_job_registered_model_name=registered_model_name,
)
SDK Reference:
Submit the job
Now submit the job to run in Azure Machine Learning. This time, use create_or_update on ml_client.jobs.
Pass an experiment name. An experiment is a container for all the iterations one does on a certain project. All the jobs submitted under the same experiment name appear next to each other in Azure Machine Learning studio.
After it finishes, the pipeline registers a model in your workspace as a result of training.
# submit the pipeline job
pipeline_job = ml_client.jobs.create_or_update(
    pipeline,
    # Project's name
    experiment_name="e2e_registered_components",
)
ml_client.jobs.stream(pipeline_job.name)
SDK Reference:
You can track the progress of your pipeline by using the link generated in the previous cell. When you first select this link, you might see that the pipeline is still running. When it's complete, you can examine each component's results.
Double-click the Train Credit Defaults Model component.
Two important results you want to see about training:
View your logs:
- Select the Outputs+logs tab.
- Open the folders to
user_logs>std_log.txtThis section shows the script run stdout.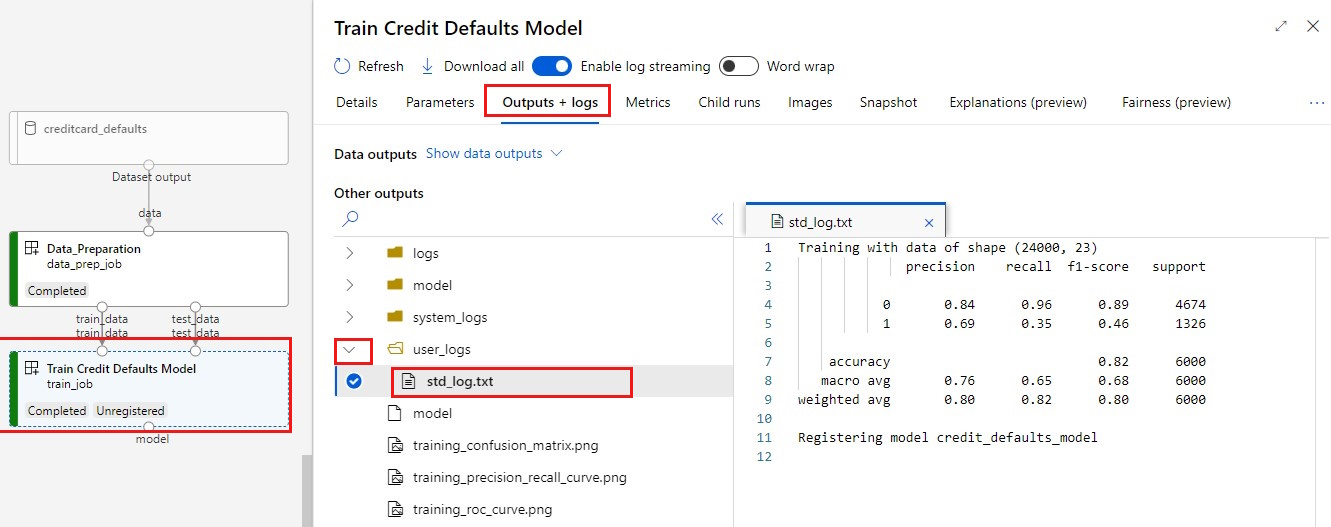
View your metrics: Select the Metrics tab. This section shows different logged metrics. In this example, mlflow
autologgingautomatically logs the training metrics.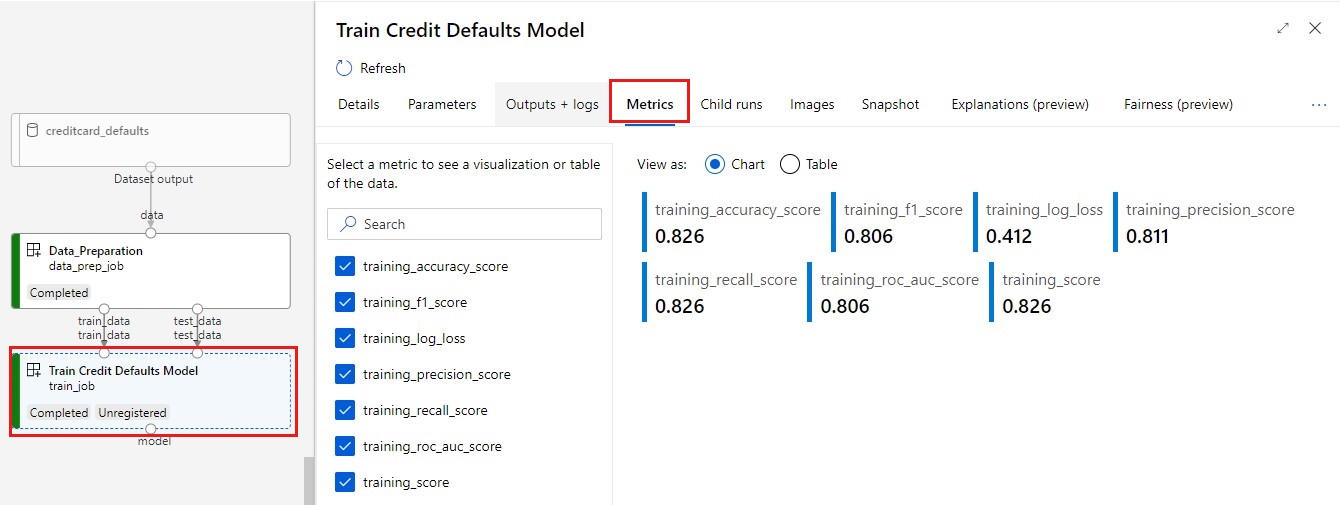


Deploy the model as an online endpoint
For more information about deploying your model to an online endpoint, see Deploy a model as an online endpoint tutorial.
Clean up resources
If you plan to continue to other tutorials, skip to Next step.
Stop compute instance
If you aren't going to use the compute instance now, stop it:
- In the studio, in the left pane, select Compute.
- In the top tabs, select Compute instances.
- Select the compute instance in the list.
- On the top toolbar, select Stop.
Delete all resources
Important
The resources that you created can be used as prerequisites to other Azure Machine Learning tutorials and how-to articles.
If you don't plan to use any of the resources that you created, delete them so you don't incur any charges:
In the Azure portal, in the search box, enter Resource groups and select it from the results.
From the list, select the resource group that you created.
In the Overview page, select Delete resource group.
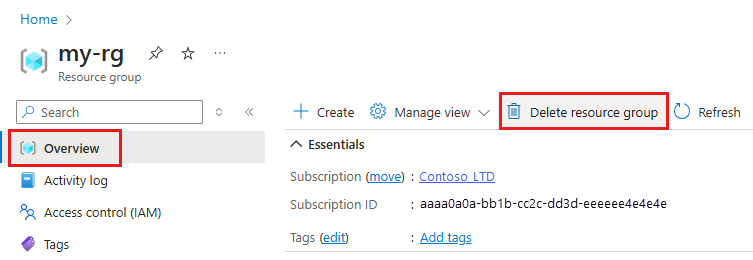
Enter the resource group name. Then select Delete.