Note
Access to this page requires authorization. You can try signing in or changing directories.
Access to this page requires authorization. You can try changing directories.
After creating a wave in Azure Migrate, finalize its workloads and properties. Configure the target Azure service and migration method for each workload before reviewing its execution plan.
Then review and customize the execution plan, including its steps, dependencies, approvals, and step group structure. Configure the required inputs before starting the wave.
Prerequisites
- Have the Azure Migrate Owner or Azure Migrate Execute Expert role on the Azure Migrate project. Either role permits changing workload settings, customizing the execution plan, and configuring inputs.
- Confirm that workload settings are editable. You can't edit them when the wave's Execution status is In progress, or Needs action (when execution is paused) or Completed.
- Migration tools and the Execution agent don't need to be ready to configure the wave or its execution plan. Preparation depends on the selected migration methods. Review the execution prerequisites before starting.
- If you plan to add custom script steps, identify the script's relative path within the host's script store. See Configure a custom script step for the default directories and script preparation.
Configure the wave
Finalize the workloads to include and the wave's properties before customizing its execution plan. Adding or removing workloads, or changing their target Azure services or migration methods, makes an existing execution plan out of date. Regeneration discards all execution-plan customizations, so make these changes first.
Add applications or workloads
- In the Azure Migrate project, go to Execute > Waves, open the wave, and select Overview.
- Select Add, and then choose Applications or Workloads.
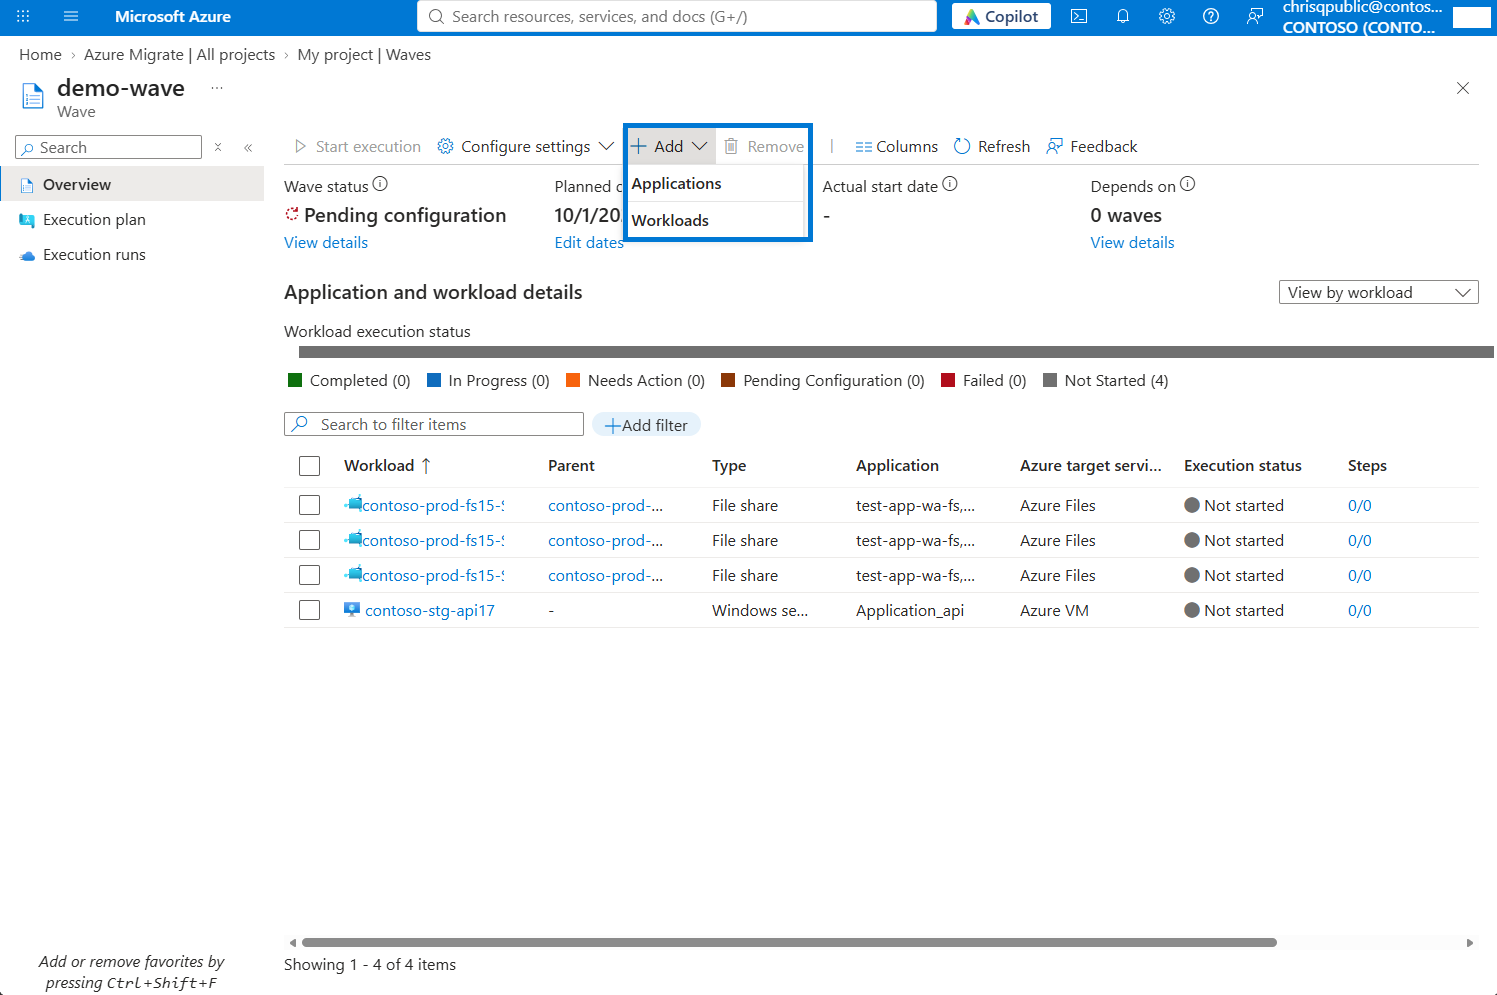
Add applications
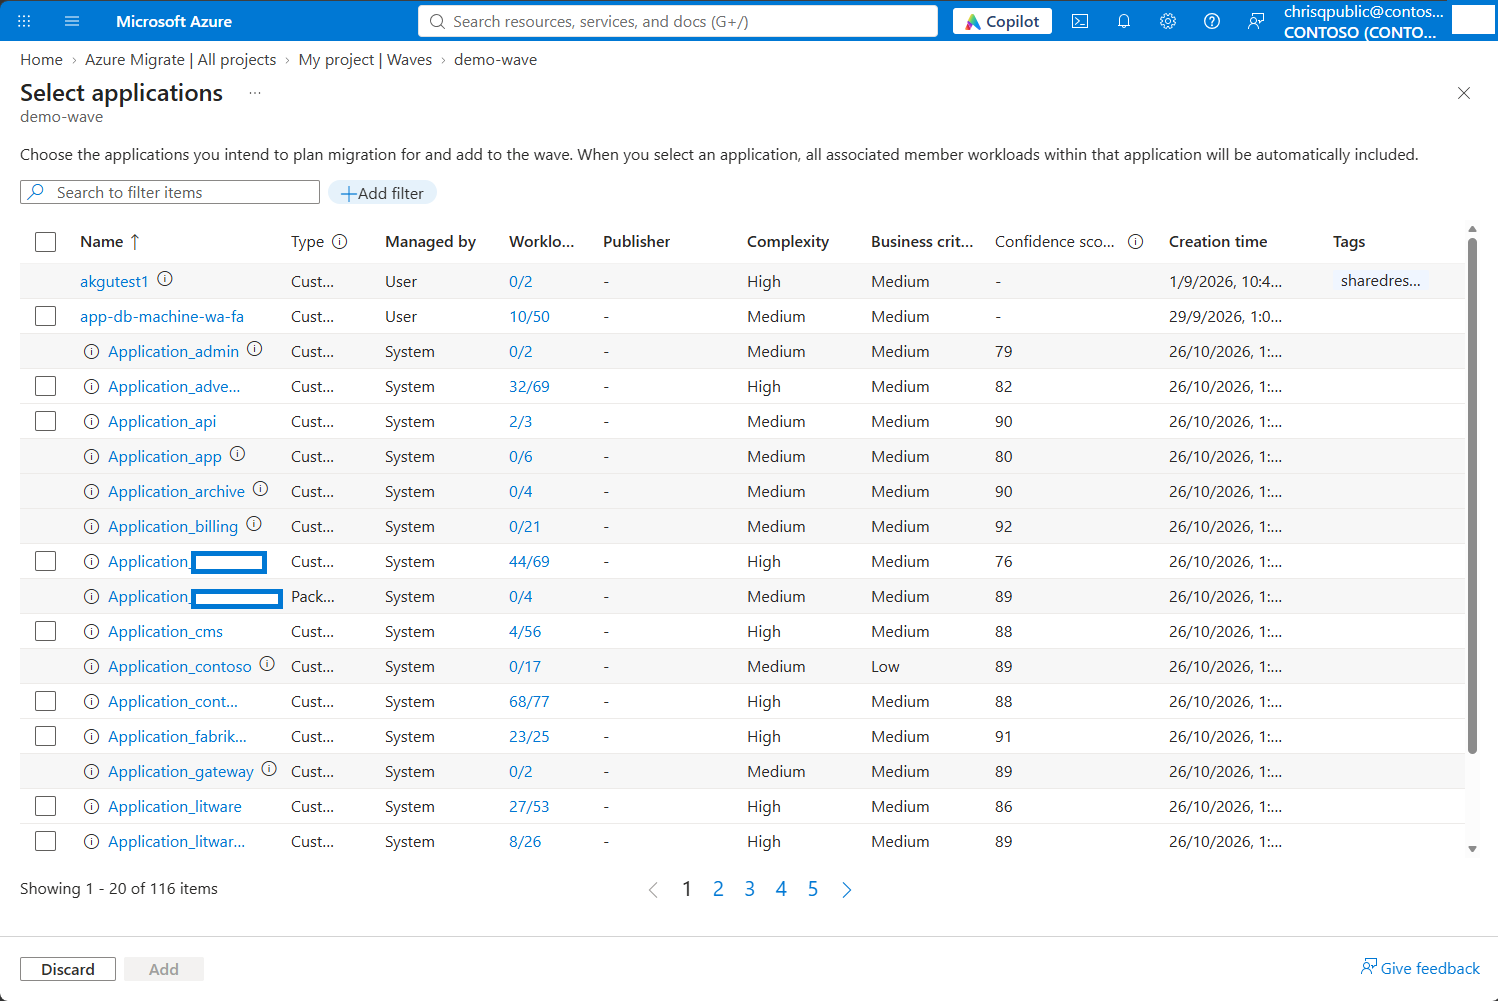
When you add an application, you also add its member workloads that aren't already assigned to another wave. In the Workloads column, a count such as 14/50 means that 14 of the application's 50 workloads aren't assigned to any wave. Applications whose workloads are all assigned to other waves are disabled.
- On Select applications, use search and filters as needed to find the applications you want to add.
- Select the applications and review the Workloads column for their member workloads.
- Select Add. You return to the wave's Overview.
Add individual workloads
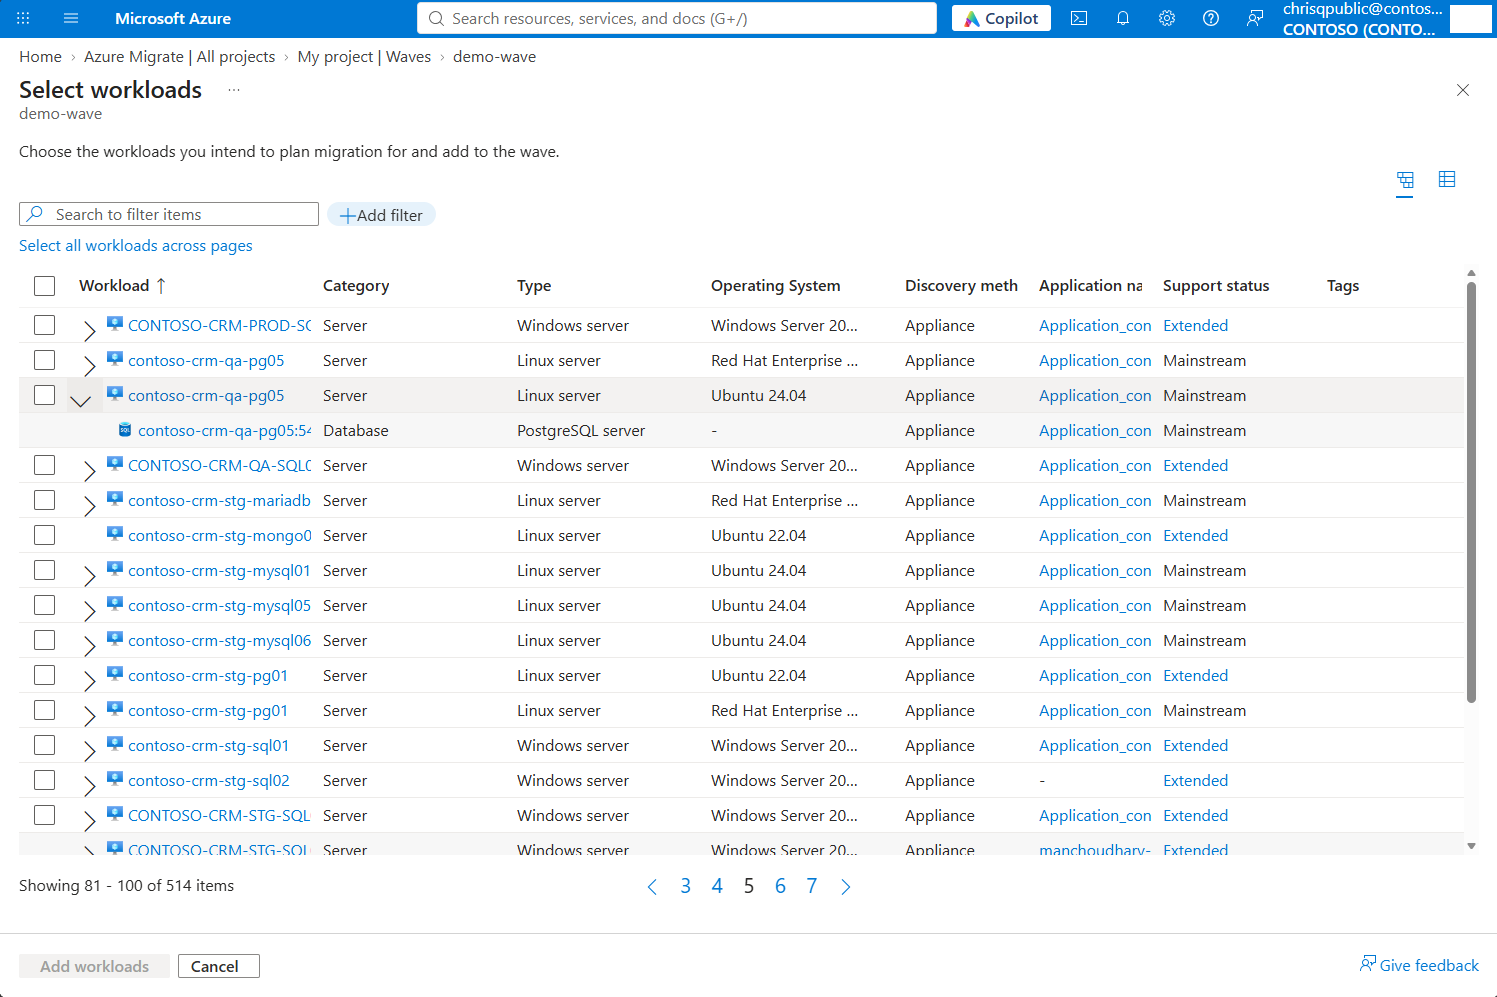
- On Select workloads, use search and filters as needed to find the workloads you want to add.
- Select the workloads by using their checkboxes.
- Select Add workloads. You return to the wave's Overview.
After adding workloads, configure any missing target Azure services and migration methods. If an execution plan already exists, regenerate it before customizing it or starting execution.
Remove applications or workloads
Removal changes only wave membership. It doesn't delete discovered resources or the actual workloads.
If an execution plan already exists, removal makes it out of date. Regeneration discards all execution-plan customizations, so record changes you need to reapply before proceeding.
- Open the wave's Overview.
- Select View by workload and select the workloads to remove. To remove whole applications, select View by application and select the applications instead.
- Select Remove, then confirm Remove in Remove confirmation.
- If an execution plan already exists, open Execution plan and regenerate it before customizing it or starting execution.
Configure workload settings
- In the Azure Migrate project, go to Execute > Waves, open the wave, and select Overview.
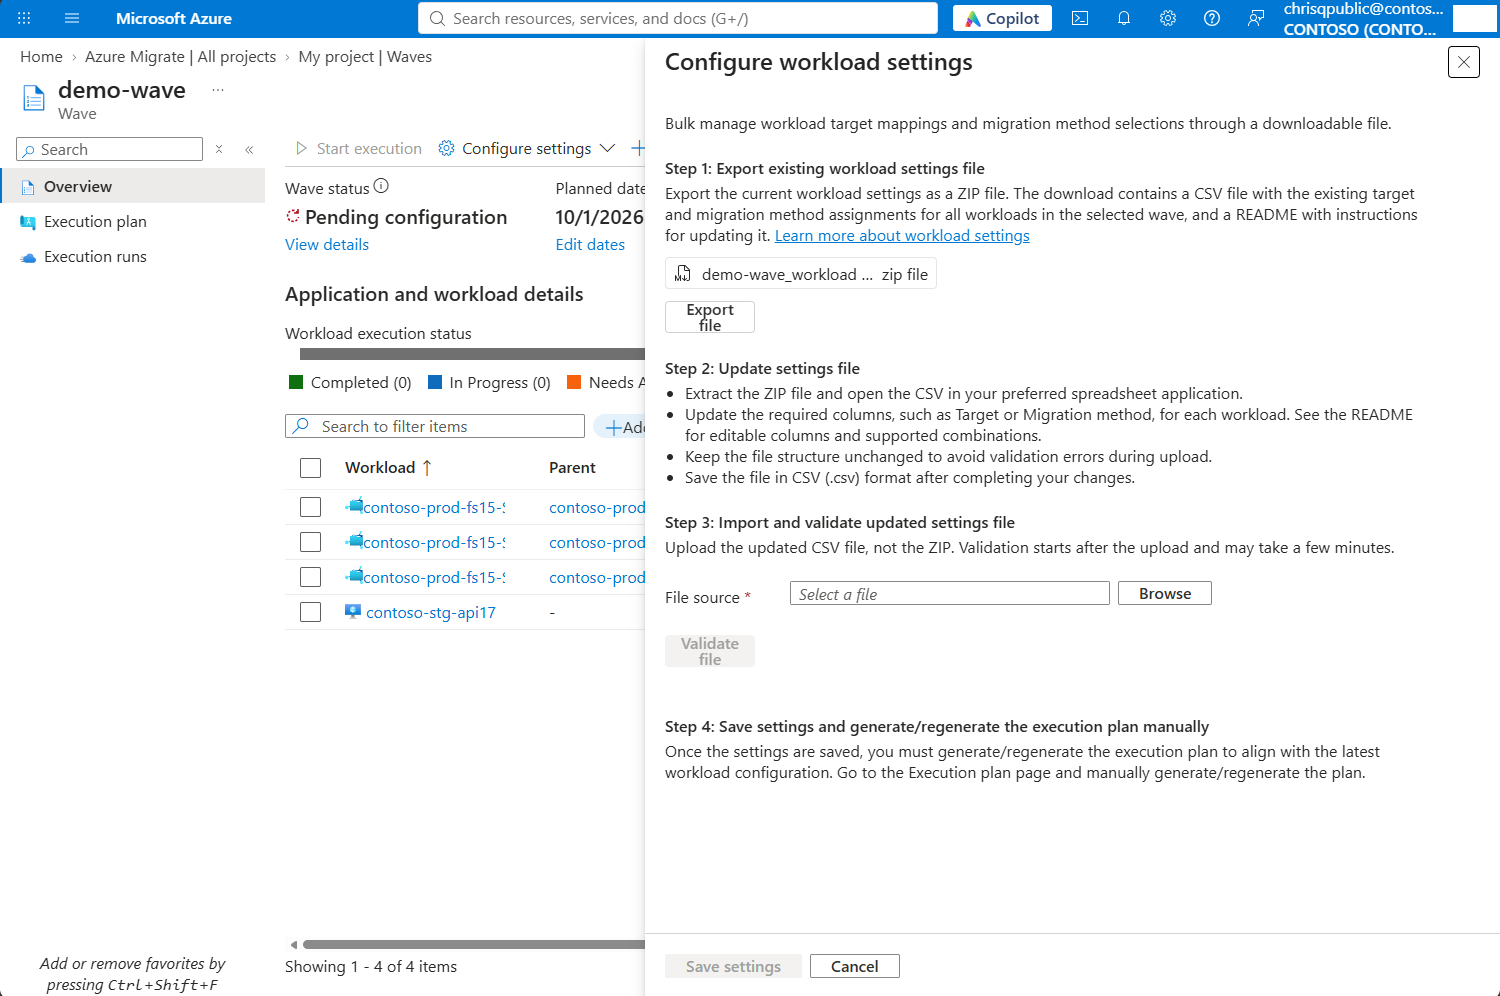
- Select Configure settings > Configure workload settings.
- Select Export file to download a ZIP file the current workload settings in a comma-separated values (CSV) file and a readme file with editing instructions.
- Extract the ZIP file. Follow the readme file to update the target and migration-method columns in the CSV for the workloads you need to configure. Keep the file structure unchanged.
- Save the edited file in CSV format.
- In Configure workload settings, use Browse to upload the edited CSV, not the ZIP.
- Select Validate file. If validation reports errors, download the errors file and use it to correct the settings CSV. Upload the corrected CSV and select Validate file again.
- After validation succeeds, Save settings becomes enabled. Select it to save the workload settings.
- Open Execution plan. The initial plan is generated automatically once every workload has a target Azure service and migration method. If you changed either setting after a plan was generated, regenerate the execution plan before customizing steps or inputs.
Edit wave properties
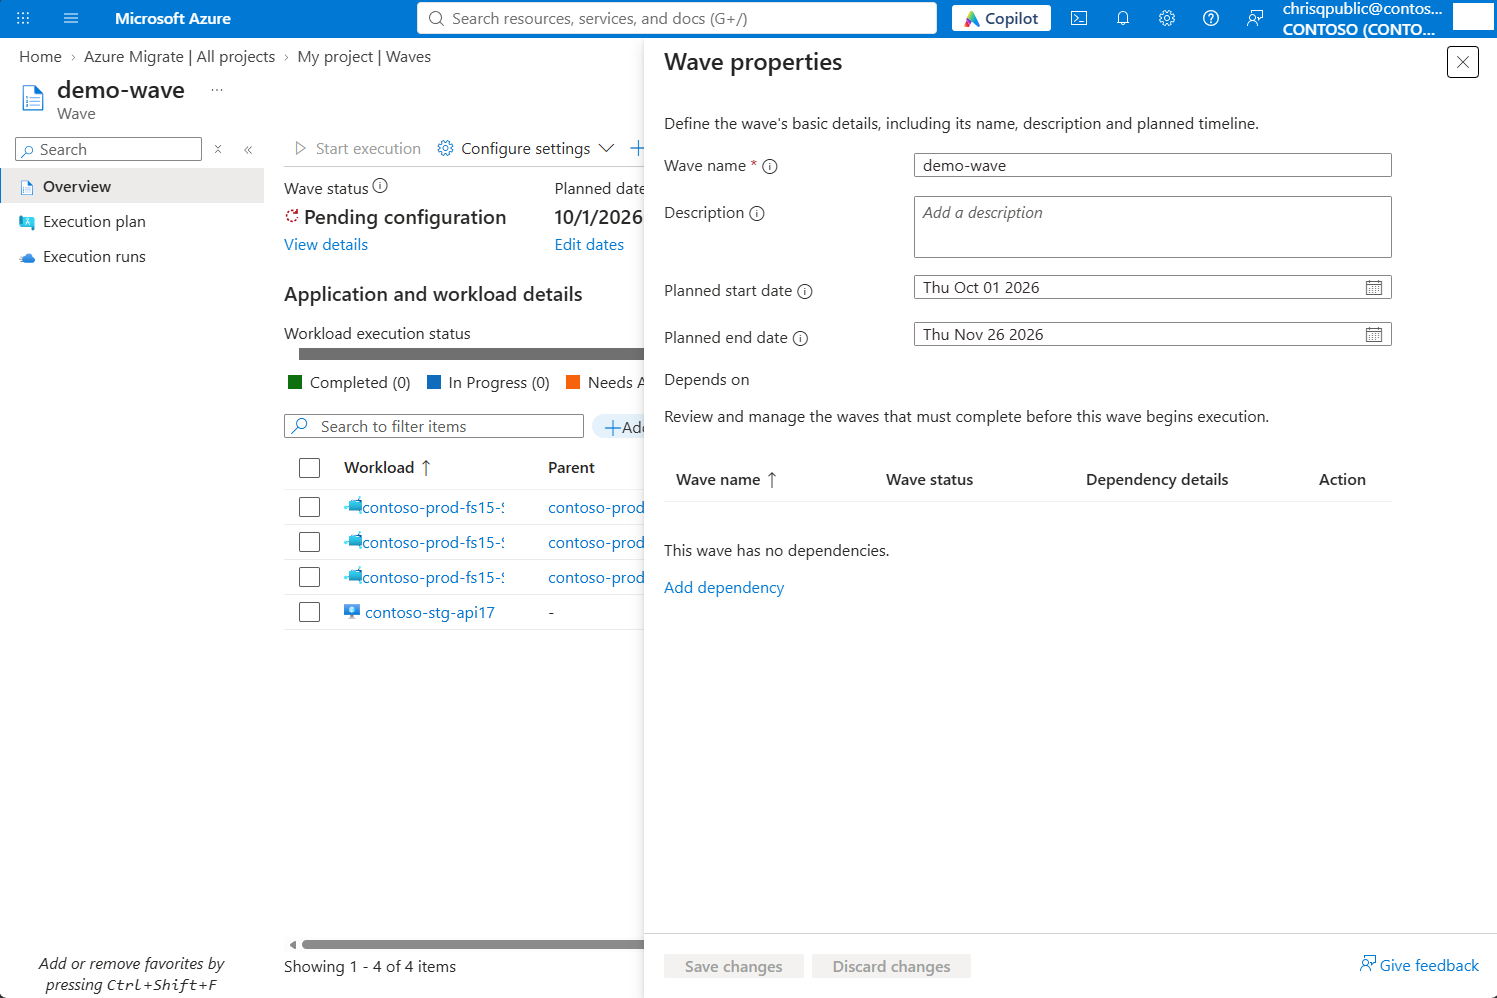
- From the wave's Overview, select Configure settings > Wave properties.
- Review or update the wave's name, description, planned start and end dates, and dependencies.
- Select Save changes to apply the updates. No further confirmation is required.
Changes to wave properties update the wave's metadata and don't require execution-plan regeneration.
Wave-level dependencies don't block execution. If you start a wave before its predecessor waves complete, Azure Migrate shows a warning but allows execution to proceed.
Review the execution plan
Waves you create from a wave plan already have target Azure services and migration methods, so Azure Migrate automatically generates their initial execution plans. For a manually created wave, Azure Migrate automatically generates the initial plan once you configure these settings for every workload. For more details, see When generation happens. The following procedure includes manual generation when automatic generation fails.
- In the Azure Migrate project, select Waves under Execute, open the wave, and select Execution plan. Complete Configure workload settings if requested.
- A banner indicates when generation is in progress; wait for it to finish. If generation fails, a banner indicates the failure. If the execution plan is out of date, a banner indicates the same. Select Generate execution plan or Regenerate plan, as applicable, to try again.
- Once generation completes, review the generated steps. By default, the table shows steps organized per application. Select View by step group if you would rather view steps organized by their step group.
- Review steps and workloads each step applies to. Use filters to view steps for a particular workload or application.
- Confirm that all wave workloads are covered and have the steps for their selected migration methods. If a workload is missing, check that it belongs to the wave and is present in discovered inventory.
- Review generated approval steps and identify additional decisions or external work your process requires.
- Review the Depends on column, especially dependencies across groups, to confirm coordinated cutover points. Open Step details for the dependency's Wait for setting.
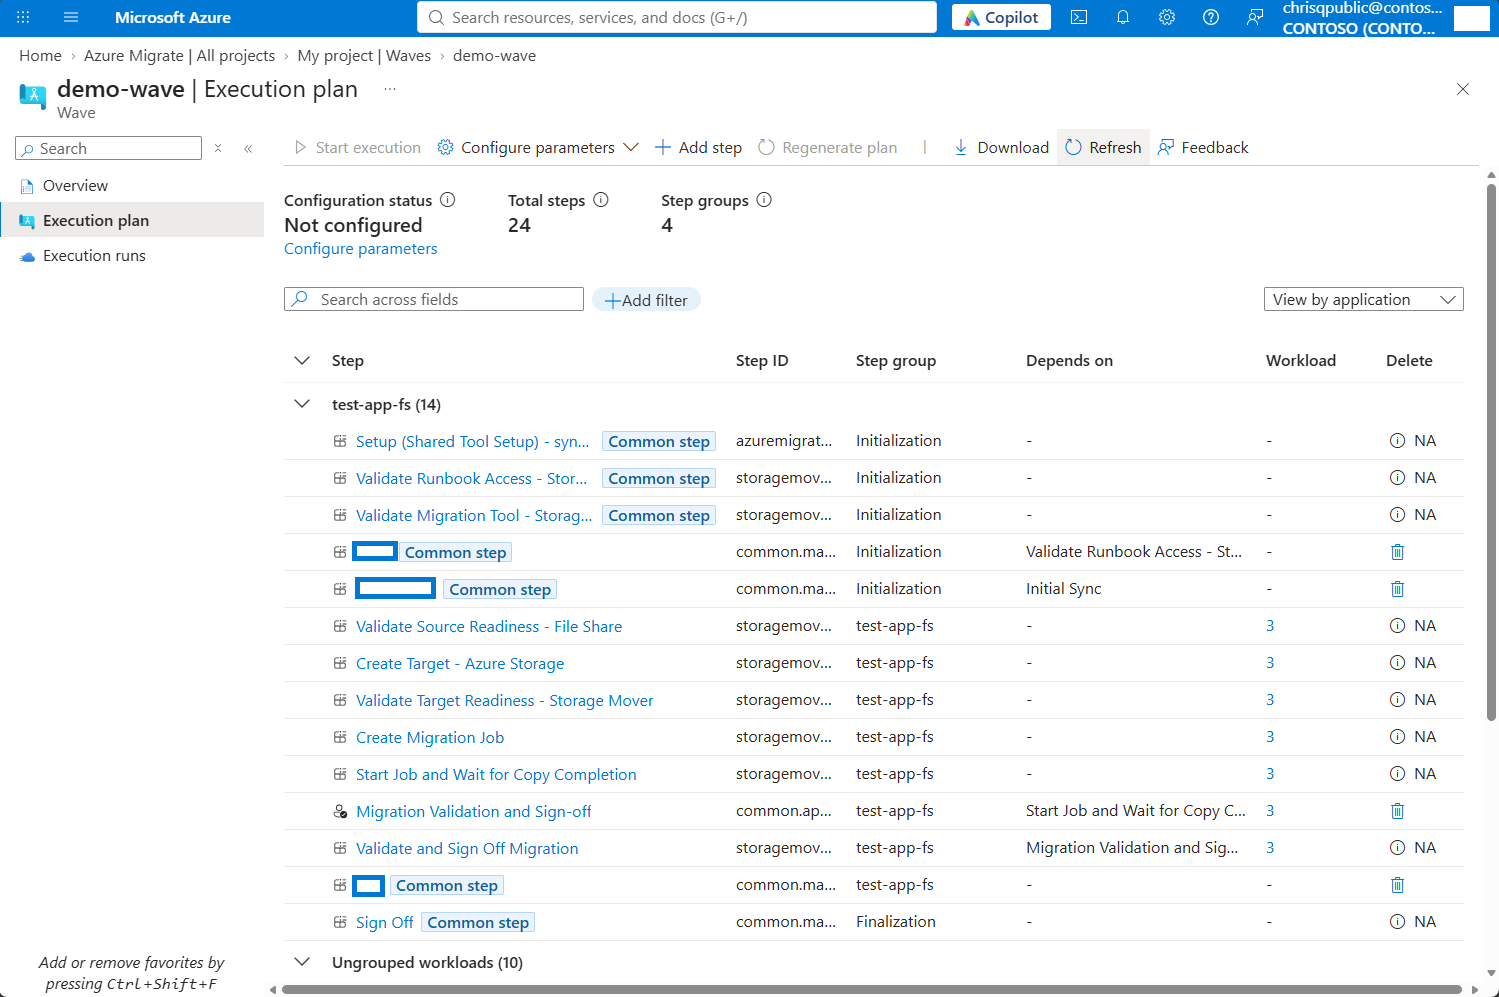
For how Azure Migrate builds the workflow, see Execution plan.
Regenerate the execution plan
If the wave's workloads, target Azure services, or migration methods change after generation, its execution plan becomes out of date and must be regenerated before the wave can execute.
Important
Regeneration creates the execution plan afresh and discards all user edits, including dependency changes on generated steps, added or deleted steps, grouping, names, descriptions, and inputs.
For the lifecycle explanation, see Locking and regeneration.
- Note all customizations you need to reapply.
- On Execution plan, select Regenerate plan and accept the confirmation.
- Review the newly generated execution plan, then follow the customization and input procedures in the following section to reapply your changes.
Add steps if needed
Add the external work, decisions, or scripts your migration process needs before execution starts.
Important
Finalize the workload selection, step group, and, for custom scripts, the relative script path, execution frequency, and execution location before saving. Once you add the step, you can't edit these settings.
- Identify where your process needs an external action, a decision, or a script.
- On Execution plan, select Add step.
- Choose Step type: Manual for external work, Approval for a decision, or Custom script for your own scripts.
- Enter Step name and Description, and then select Step group.
- Configure approval or script settings as described in the following sections.
- If the new step must wait for other work, under Depends On (Steps), select each preceding Step and its Wait for value. Leave predecessors unset to let the step run first or in parallel with the group's initial steps when the group can start. Select Workloads when the step type requires workload scope.
- Select Save to save the step immediately and create a new execution plan version. No further confirmation is required.
- If later work must wait for the new step, open the downstream step's Step details. Under Depends On (Steps), choose the new step and its Wait for value, and then select Save.
Configure an approval step
After choosing Approval and completing the common fields:
- Use Description to explain why this approval exists and what it needs to gate.
- Under Workloads, all workloads are selected by default. Change the selection as needed so that it contains the workloads governed by this decision.
- Under Depends On (Steps), configure any predecessors the approval must wait for and their Wait for values. Then finish the common add-step procedure.
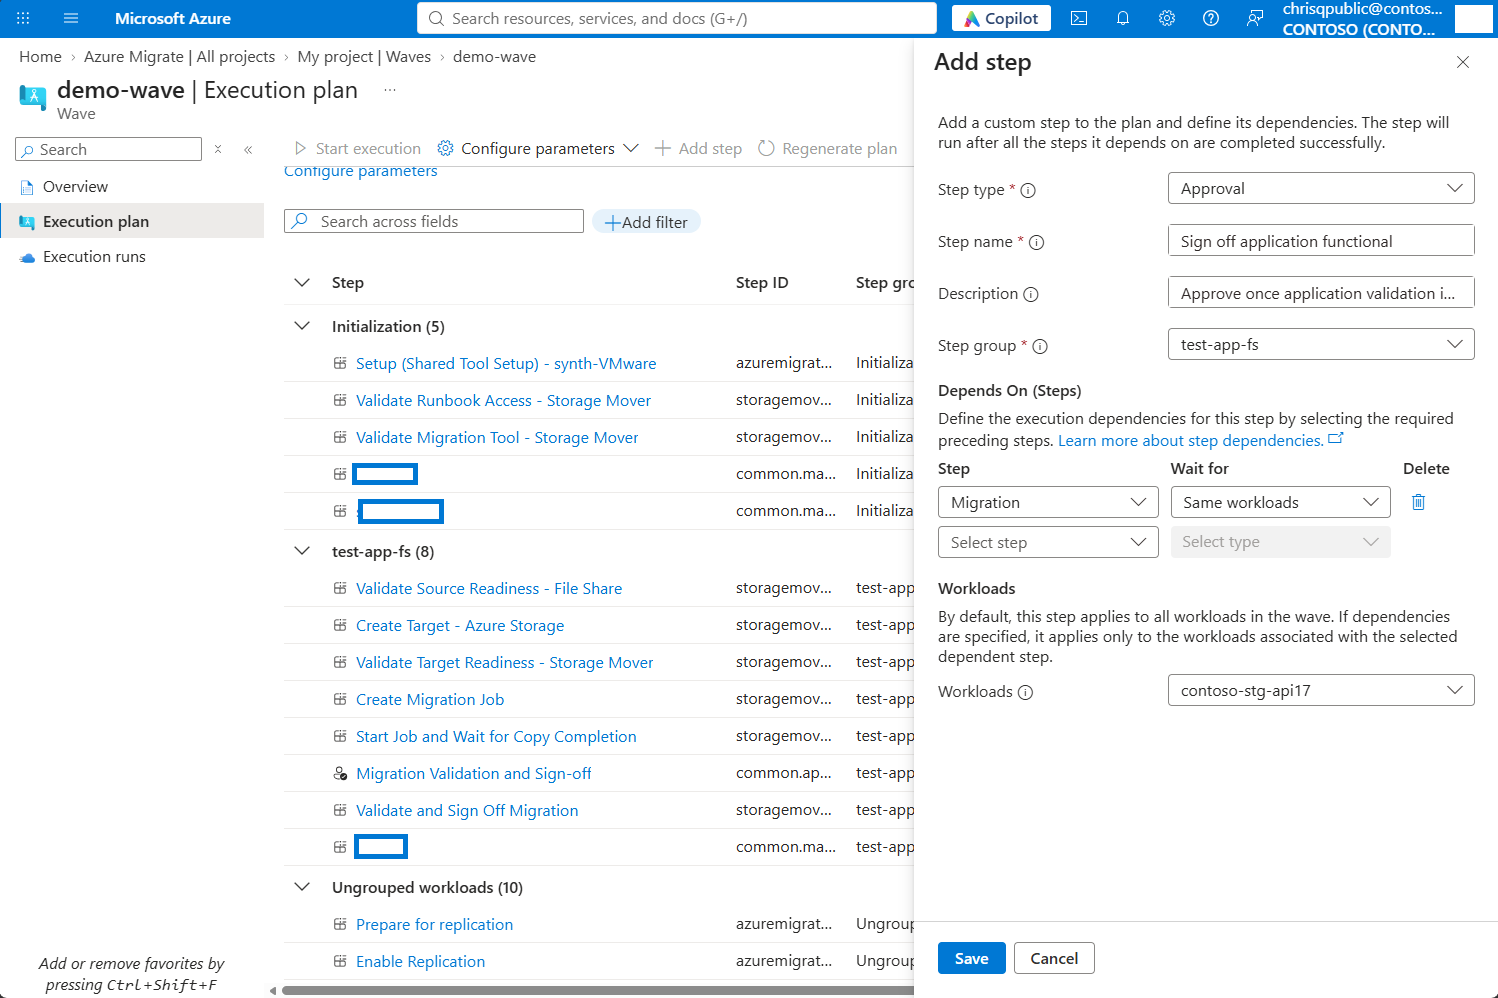
During execution, you can approve one, a few, or all of the ready workloads.
Configure a custom script step
Place the script in the script store folder on Azure Migrate appliance or an execution agent:
| Host operating system | Script store directory |
|---|---|
| Windows | %ProgramData%\Microsoft Azure\ScriptStore\ |
| Linux | /var/opt/microsoft/azuremigrate/scriptstore |
You can place scripts directly in the directory or in subfolders. Reference the script by its path relative to the script store, such as validation\check.ps1 on Windows or validation/check.sh on Linux. PowerShell and Bash are supported; you don't need to specify a script type.
Azure Migrate executes the script as provided; you don't need to add status-reporting code. Exit code 0 means success, and every other exit code means failure.
After choosing Custom script and completing the common fields:
- In Relative script path, enter the script's path relative to the script store. Script content isn't stored in the execution spec.
- Use How often script should run to choose whether the script runs once for the wave or once per workload. For per-workload execution, select the Workloads.
- If you selected once per workload in the previous step, use Where should this script run to choose On source VM or On target VM. If you select On target VM, you must provide the target VM resource ID when you configure inputs and configure a dependency on the step that creates the target VM so that the script runs only after the target VM is available.
- If the script must wait for other work, under Depends On (Steps), choose the preceding step and Wait for value. Otherwise, leave predecessors unset.
- Select Save to add the step. If it must gate later work, use step 8 of the common add-step procedure after saving it.
- Configure the script's required inputs and timeout when you configure inputs. Only custom script steps expose a configurable timeout.
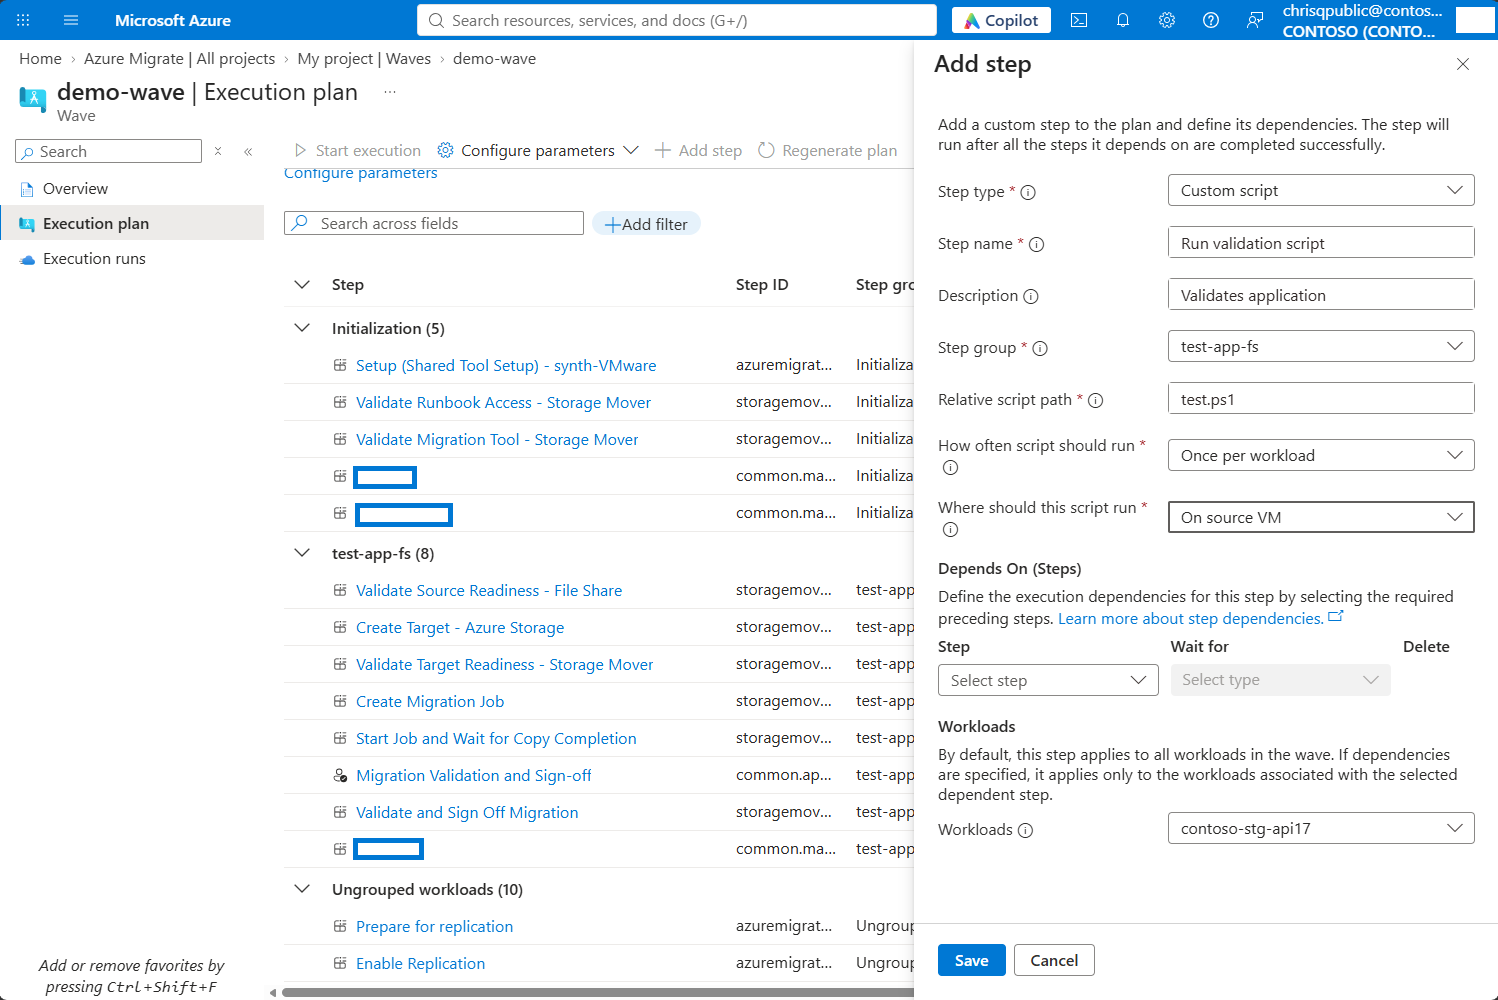
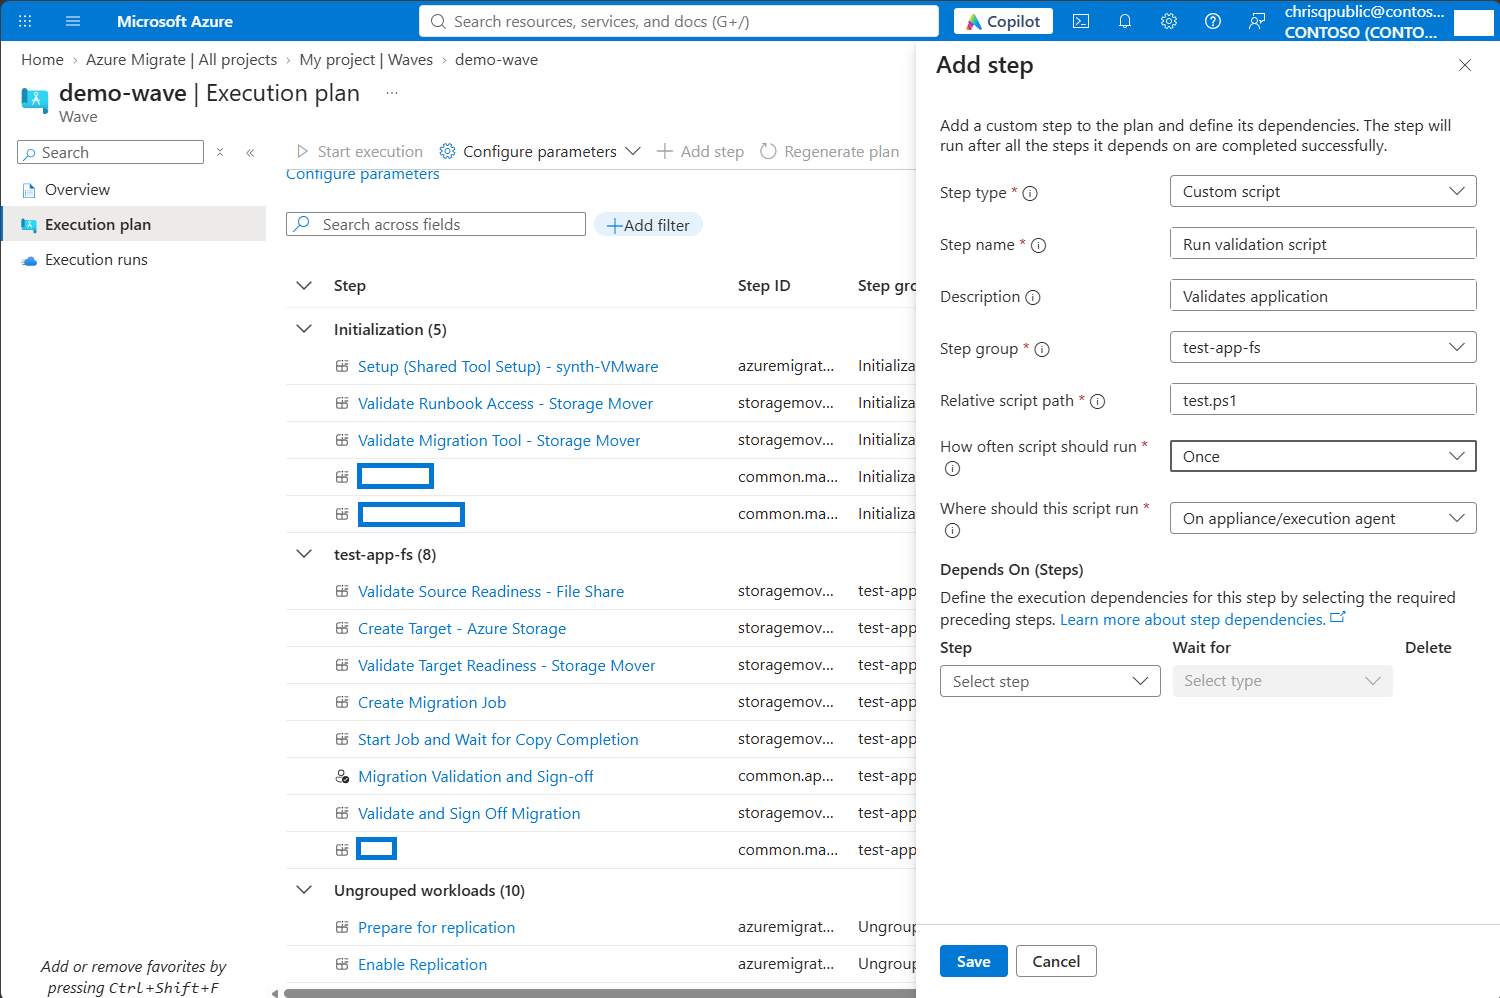
For notifications or logging that must not gate other work, leave the script without dependent steps. The script can still have predecessors. For a required validation check, make the later steps depend on the script. See Custom script step properties.
Remove or update steps
Generated and user-added steps use the same editing controls. Once you add a step, you can't edit its workload selection or step group. For custom scripts, you also can't edit the relative script path, execution frequency, or execution location. Configure input values separately through Configure parameters.
Important
Required steps can't be deleted, and no step can be skipped during execution. Before deleting an optional step, remove dependencies on it from other steps and save those changes.
- Review optional steps, such as a test migration step. After removing any dependencies on an unnecessary step, use its row delete icon, and then select Delete in the Delete step confirmation.
- Select a retained step's name to open Step details. Under Basics, update Name and Description as needed. Type, Step group, and the workload and affected-application counts are read-only. The Parameters section displays input values; use Configure parameters to edit them through the shared input-configuration flow.
- Under Depends On (Steps), choose each preceding Step and its Wait for value to update user-editable dependencies. The Wait for choices are The whole step and Each workload's step completion. System-defined prerequisites are read-only and can't be changed or removed.
- Review the remaining dependencies and workload references. Edits must not create circular dependencies, reference workloads outside the wave, or introduce unsupported steps.
- Select Save in Step details to save workflow edits and create a new execution plan version. Changes to input values update only the parameters file, not the execution spec.
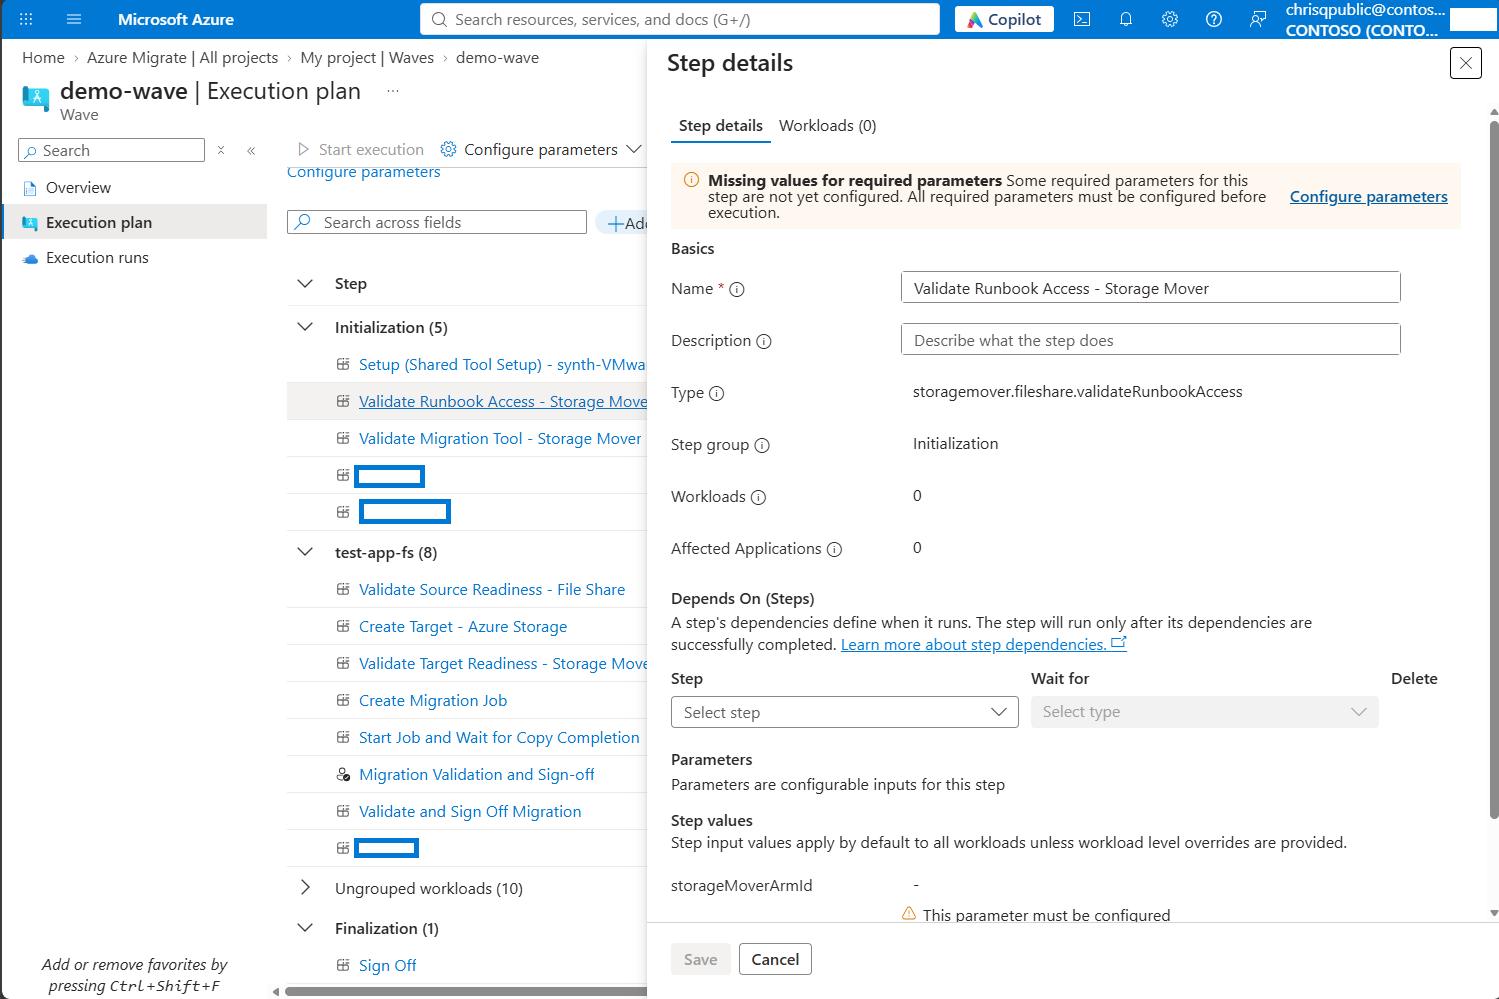
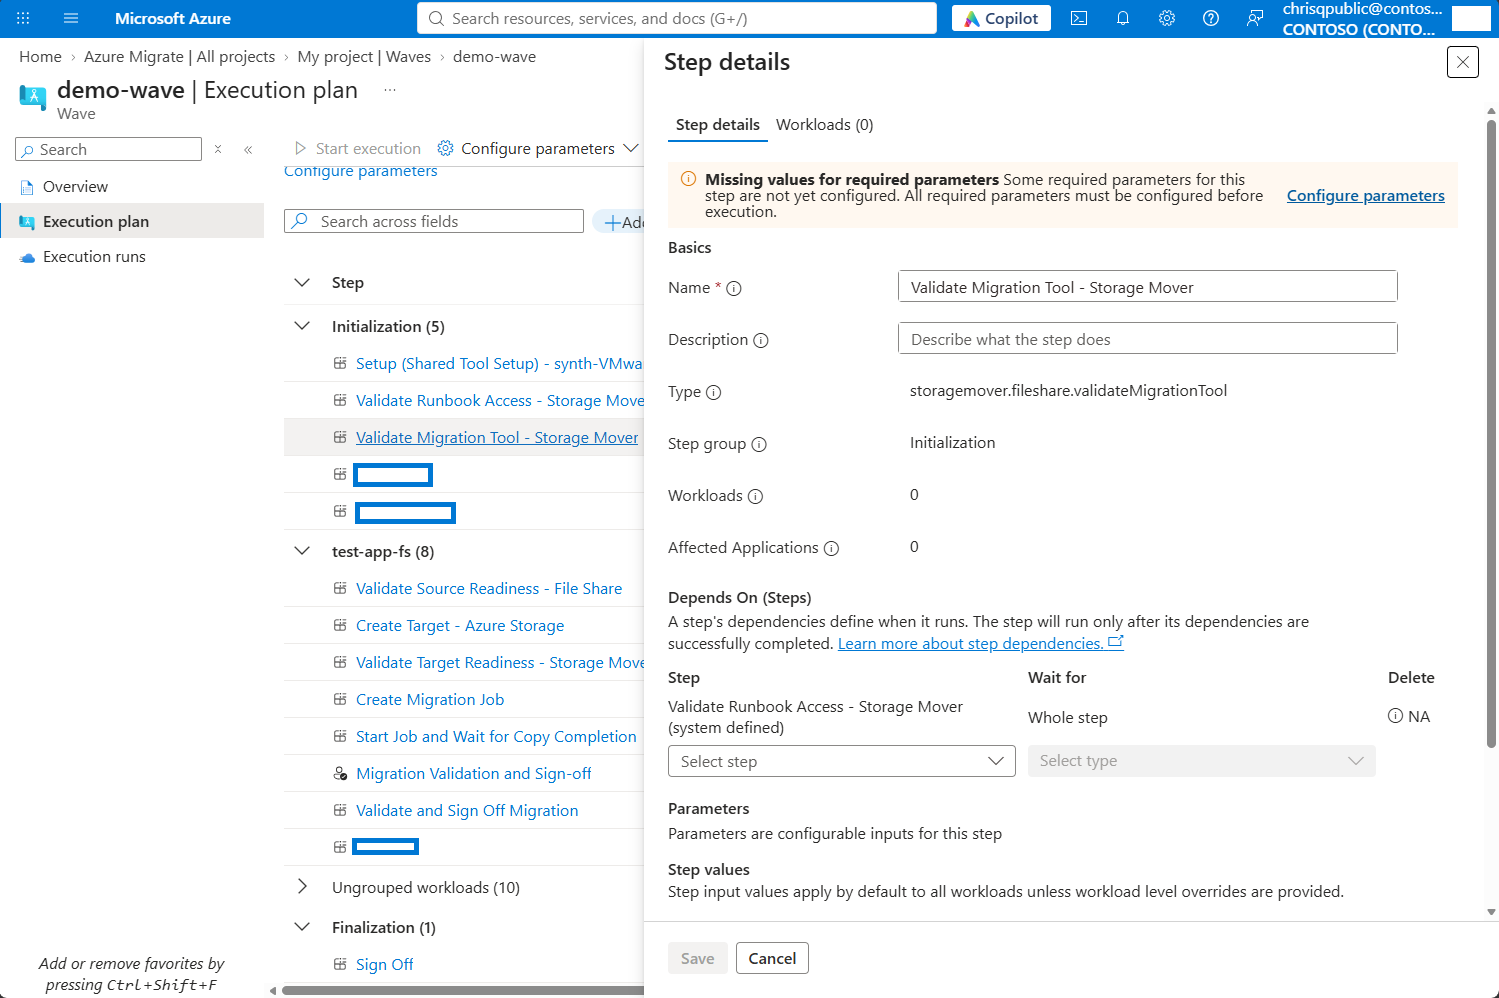
Delete unnecessary optional steps before execution. Retained steps run according to their dependencies and approvals. You can't delete steps or make structural edits while a run is active.
For other edit types and restrictions, see the customization capability matrix.
Review step group organization
Review the groups and their dependencies with the teams responsible for the migration.
- Select View by step group on Execution plan to review the plan's groups.
- Expand each group and review its steps and associated workloads.
- Compare the groups with the default structure and identify the teams responsible for the work.
- Review the Depends on column and open Step details to check cross-group dependencies, especially around cutover.
- Select View by application to review the execution plan from application ownership instead.
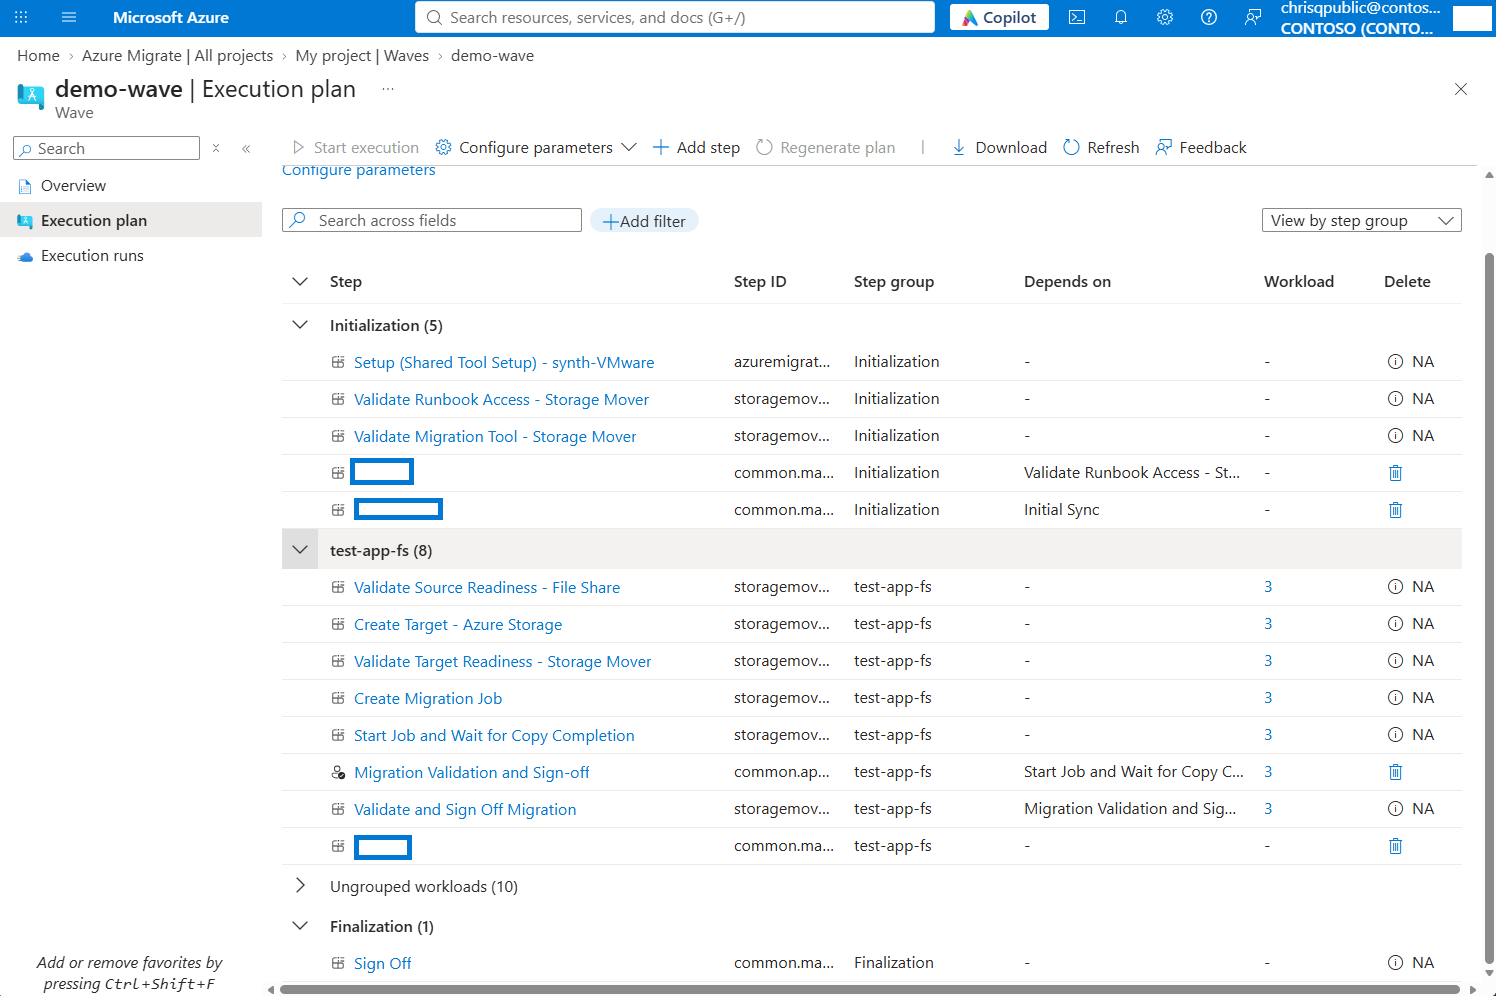
You can split and merge step groups only through Azure CLI and API, not the portal. Azure Migrate preserves dependencies during these operations. For grouping behavior, see Customization concepts.
Configure inputs on every step
The parameters file stores input values separately from the execution spec. Configuring inputs updates that file without changing the spec.
Configuration Status is Not configured or Fully configured. It's separate from the wave's Execution status.
Save incomplete configuration and return to it later as needed. Every value you provide must be valid before saving. Configuration Status remains Not configured while required inputs are missing; saving progress doesn't allow execution to start with incomplete inputs.
- On Execution plan, select Configure parameters.
- Select a step in Configure parameters. Review populated values, correct any that don't match your environment, and fill in the remaining inputs.
- Configure Step inputs. These values apply by default to all workloads associated with the step unless a workload-level override is provided. Expand Optional inputs to configure any optional values your migration requires.
- To provide different values for a workload, use Workload level overrides, select the Workload, and set overrides for the inputs that need different values. Leave other inputs inherited from the step.
- Repeat for every step, including steps you added. Configure inputs across steps in this shared flow rather than configuring each step in a separate session.
- Use Review missing/invalid inputs to identify any remaining input issues and correct them before execution.
- Select Save changes to save your edits across the steps together. Return to Execution plan and check Configuration Status. Once all required inputs are complete and supplied values are valid, it should show Fully configured.
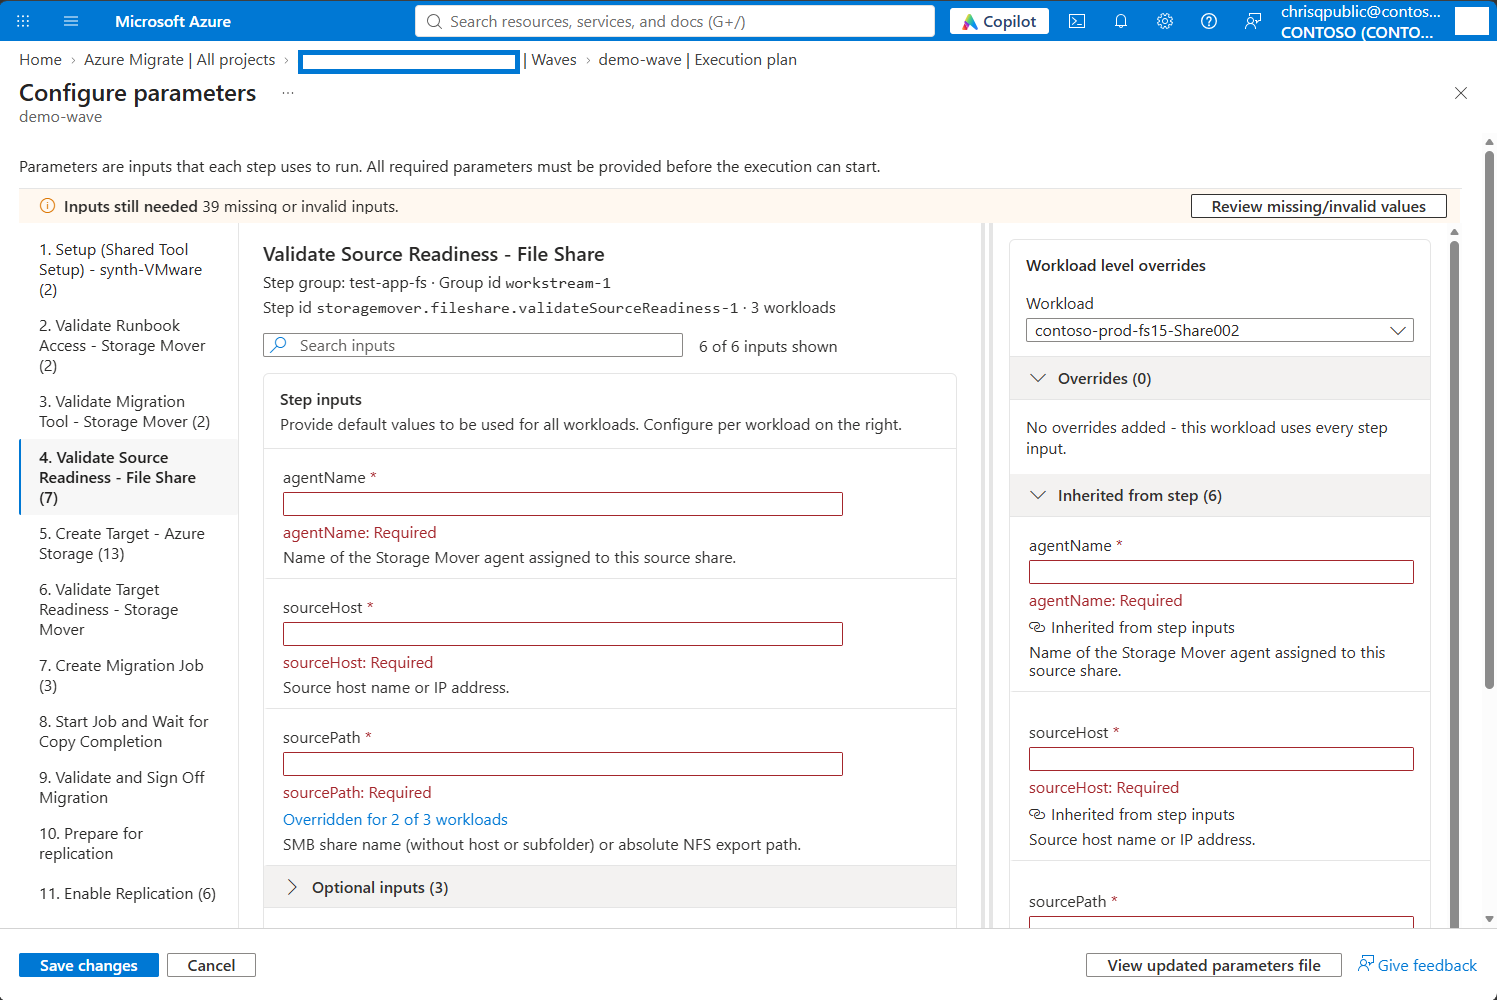
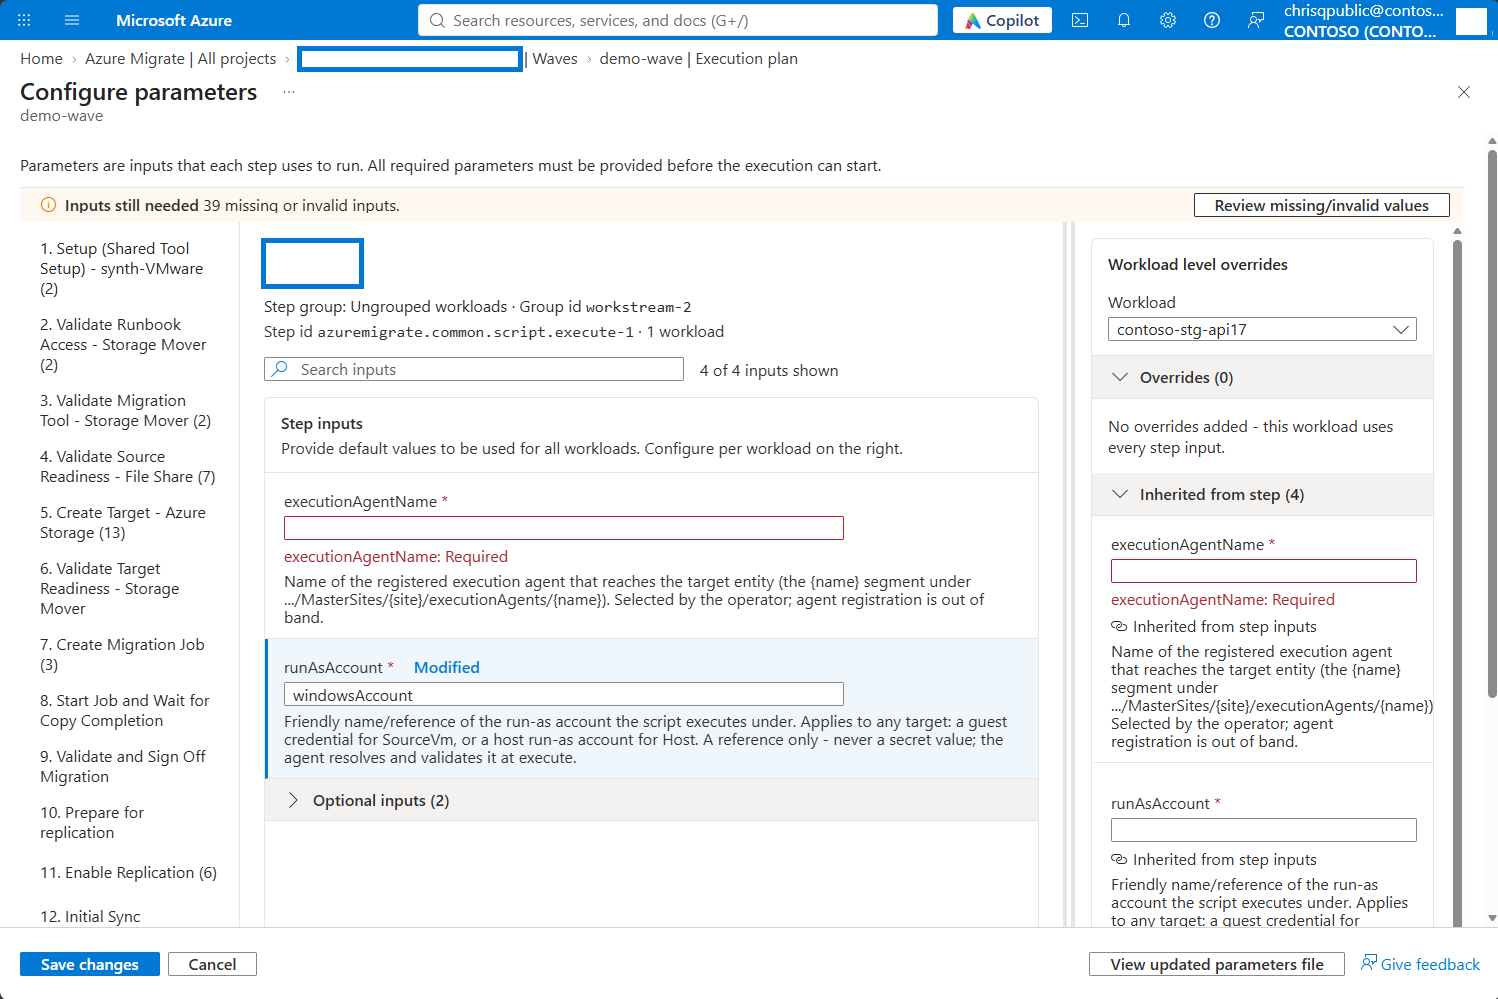
Every required input must be provided and valid before execution starts. Optional inputs can remain unset, but supplied values must pass validation. Partial starts and deferring required inputs aren't supported.
These checks are static, not a verification of live readiness. Live validation happens during wave execution, in initialization for shared checks and in application step groups for some workload-specific checks. For override precedence and validation behavior, see Inputs and configuration.
Confirm readiness with stakeholders
Confirm that the execution plan reflects the agreed migration scope and that the people responsible for its work are ready.
- Review the execution plan with stakeholders, including its steps, dependencies, step group structure, and associated input values you changed.
- Collect any organizational sign-offs required before starting. If a decision must be recorded during execution, add an approval step at the appropriate point.
- Confirm that the people handling approvals and manual work know what's expected.
- Confirm that the execution plan is up to date, all required inputs are complete, and supplied values are valid. Then, execute your wave.
Starting the wave approves its current execution plan. There's no separate approval action or approved-plan state.
If Start execution is disabled, check for missing or invalid parameters, incomplete workload settings, and whether the execution plan is out of date. If regeneration is required, reapply customizations and configure inputs again.