Note
Access to this page requires authorization. You can try signing in or changing directories.
Access to this page requires authorization. You can try changing directories.
This article describes how to set up data-out replication in Azure Database for MySQL Flexible Server by configuring the source and replica servers. This article assumes that you have some prior experience with MySQL servers and databases.
For data-out replication, the source is always Azure Database for MySQL Flexible Server. The replica can be any external MySQL server on other cloud providers, on-premises, or virtual machines. Review the limitations and requirements of Data-out replication before performing the steps in this article.
Note
This article references the term slave, a term that Microsoft no longer uses. When the term is removed from the software, we'll remove it from this article.
Create an Azure Database for MySQL Flexible Server instance to use as a source.
Create a new instance of Azure Database for MySQL Flexible Server (for example, sourceserver.mysql.database.Azure.com). Refer to Quickstart: Create an instance of Azure Database for MySQL with the Azure portal. This server is the "source" server for Data-out replication.
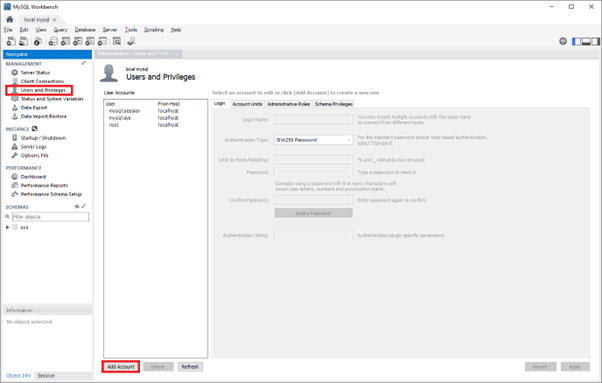
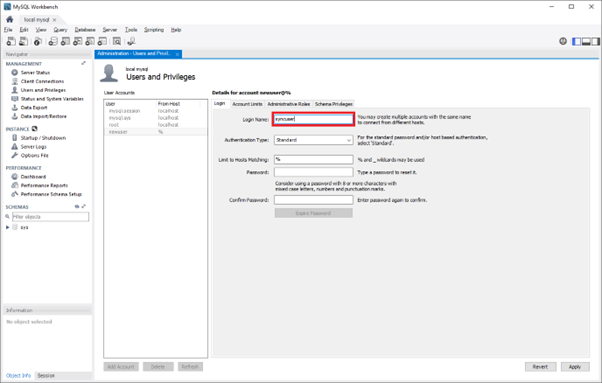
Create duplicate user accounts and corresponding privileges.
- User accounts aren't replicated from the source server to the replica server. Suppose you plan on providing users with access to the replica server. In that case, you must manually create all accounts and corresponding privileges on this newly created Azure Database for MySQL Flexible Server instance.
Configure the source MySQL server
The following steps prepare and configure the Azure Database for MySQL Flexible Server instance acting as the source.
Networking Requirements
Ensure that your network settings are established so that source and replica server can communicate seamlessly.
If the source server is on public access, then ensure that firewall rules allow the replica server IP address. If the replica server is hosted on Azure, please ensure that you select the option of allowing public access from any Azure service from the networking page in the Azure portal. If the source server is on private access, ensure that the replica server can connect to the source through Vnet peering or a VNet-to-VNet VPN gateway connection.Note
For more information - Connectivity and networking concepts for Azure Database for MySQL - Flexible Server.
Turn on binary logging
Check to see if binary logging has been enabled on the source by running the following command:
SHOW VARIABLES LIKE 'log_bin';If the variable log_bin is returned with the value 'ON', binary logging is enabled on your server.
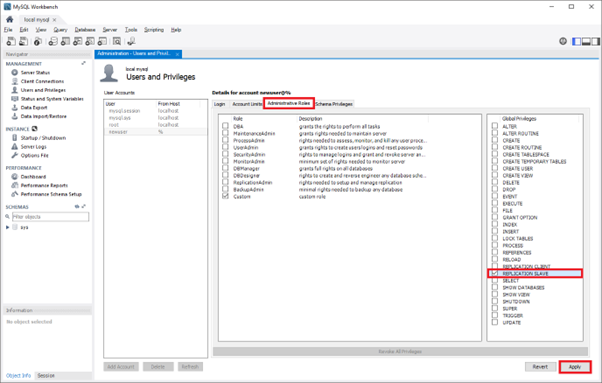
Create a new replication role and set up permission
Create a user account on the configured source server with replication privileges. This can be done through SQL commands or a tool such as MySQL Workbench. Consider whether you plan on replicating with SSL, as this will need to be specified when creating the user. Refer to the MySQL documentation to understand how to add user accounts on your source server.
In the following commands, the new replication role can access the source from any machine, not just the one that hosts the source itself. This is done by specifying "syncuser@'%'" in the create user command. See the MySQL documentation to learn more about setting account names.
There are a few tools you can use to set account names. Select the one that best fits your environment.
Replication with SSL
To require SSL for all user connections, use the following command to create a user:
CREATE USER 'syncuser'@'%' IDENTIFIED BY 'yourpassword';
GRANT REPLICATION SLAVE ON *.* TO ' syncuser'@'%' REQUIRE SSL;
Replication without SSL
If SSL isn't required for all connections, use the following command to create a user:
CREATE USER 'syncuser'@'%' IDENTIFIED BY 'yourpassword';
GRANT REPLICATION SLAVE ON *.* TO ' syncuser'@'%';

Dump and restore the source server.
Skip this section if it's a newly created source server with no existing data to migrate to the replica. You can, at this point, unlock the tables:
SET GLOBAL read_only = OFF;
UNLOCK TABLES;
Follow the below steps if the source server has existing data to migrate to the replica.
Determine which databases and tables you want to replicate into Azure Database for MySQL Flexible Server and perform the dump from the source server. You can use mysqldump to dump databases from your primary server. For more details, visit Dump & Restore. It's unnecessary to dump the MySQL library and test library.
Set the source server to read/write mode.
After dumping the database, change the source Azure Database for MySQL Flexible Server instance to read/write mode.
SET GLOBAL read_only = OFF;
UNLOCK TABLES;
- Restore the dump file to the new server. Restore the dump file to the server created in Azure Database for MySQL Flexible Server. Refer to Dump & Restore for restoring a dump file to an Azure Database for MySQL Flexible Server instance. If the dump file is large, upload it to a virtual machine in Azure within the same region as your replica server. Restore it to the Azure Database for MySQL Flexible Server instance from the virtual machine.
Note
If you want to avoid setting the database to read-only when you dump and restore, you can use mydumper/myloader.
Configure the replica server to start Data-out replication.
Filtering
Suppose data-out replication is being set up between Azure Database for MySQL Flexible Server and an external MySQL on other cloud providers or on-premises. In that case, you must use the replication filter to filter out Azure custom tables on the replica server. This can be achieved by setting Replicate_Wild_Ignore_Table = "mysql.__%" to filter the Azure Database for MySQL Flexible Server mysql internal tables. Refer to MySQL :: MySQL 5.7 Reference Manual :: 13.4.2.2 CHANGE REPLICATION FILTER Statement for more details on modifying this server parameter.
Set the replica server by connecting to it and opening the MySQL shell on the replica server. From the prompt, run the following operation, which configures several MySQL replication settings at the same time:
CHANGE THE REPLICATION SOURCE TO SOURCE_HOST='<master_host>', SOURCE_USER='<master_user>', SOURCE_PASSWORD='<master_password>', SOURCE_LOG_FILE='<master_log_file>', SOURCE_LOG_POS=<master_log_pos>- master_host: hostname of the source server (example – 'source.mysql.database.Azure.com')
- master_user: username for the source server (example - 'syncuser'@'%')
- master_password: password for the source server
- master_log_file: binary log file name from running show master status
- master_log_pos: binary log position from running show master status
Note
To use SSL for the connection, add the attribute SOURCE_SSL=1 to the command. For more information about using SSL in a replication context, visit - https://dev.mysql.com/doc/refman/8.0/en/change-replication-source-to.html
Activate the replica server using the following command.
START REPLICA;At this point, the replica instance begins replicating any changes made to the source server database. You can test this by creating a sample table on your source database and checking whether it gets replicated successfully.
Check replication status.
Call the show slave status\G command on the replica server to view the replication status.
show slave status;If the state of Slave_IO_Running and Slave_SQL_Running are
yesand the value of Seconds_Behind_Master is0, replication is working well. Seconds_Behind_Master indicates how late the replica is. The replica is processing updates if the value isn't0.If the replica server is hosted in an Azure VM, set Allow access to Azure services to ON on the source to allow the source and replica servers to communicate. This setting can be changed from the connection security options. For more information, visit Manage firewall rules for Azure Database for MySQL - Flexible Server using the Azure portal.
If you used mydumper/myloader to dump the database, you could get the master_log_file and master_log_pos from the /backup/metadata file.