Note
Access to this page requires authorization. You can try signing in or changing directories.
Access to this page requires authorization. You can try changing directories.
This article shows you how to create a Site using the Azure portal. A site is the collection of assets that represent one or more instances of nodes in a network service that should be discussed and managed in a similar manner.
A site can represent:
- A physical location such as DC or rack(s).
- A node in the network that needs to be upgraded separately (early or late) vs other nodes.
- Resources serving particular class of audience.
Sites can be within a single Azure region or an on-premises location. If collocated, they can span multiple NFVIs (such as multiple K8s clusters in a single Azure region).
Important
You must create a site prior to creating a site network service.
Prerequisites
- An Azure account with an active subscription. If you don't have an Azure subscription, create a free account before you begin.
- Complete the Quickstart: Prerequisites for Operator and Virtualized Network Function (VNF)
Create a site
Sign in to the Azure portal.
Prior to creating a site, navigate to the resource group you created in the Quickstart: Design a Network Service Design (NSD) for Ubuntu Virtual Machine (VM) as a Virtualized Network Function (VNF) and select Network Service Design Version.

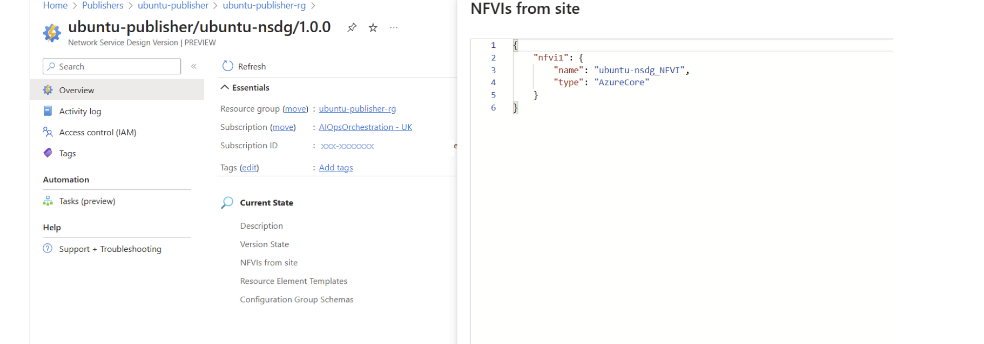
Select NVFI from site, select View value as JSON, and locate the "name" of the NFVI. Note this information. You'll need it in a later step.
Type Sites into the search and select Sites from the results.
Select +Create.
On the Basics tab, enter or select the following information:
Setting Value Subscription Select the Subscription. Resource Group Select OperatorResourceGroup. Name Enter ubuntu-vm-site. This name should be unique in your subscription to avoid confusion when you create the SNS later. Region Select the location you used for your prerequisite resource. 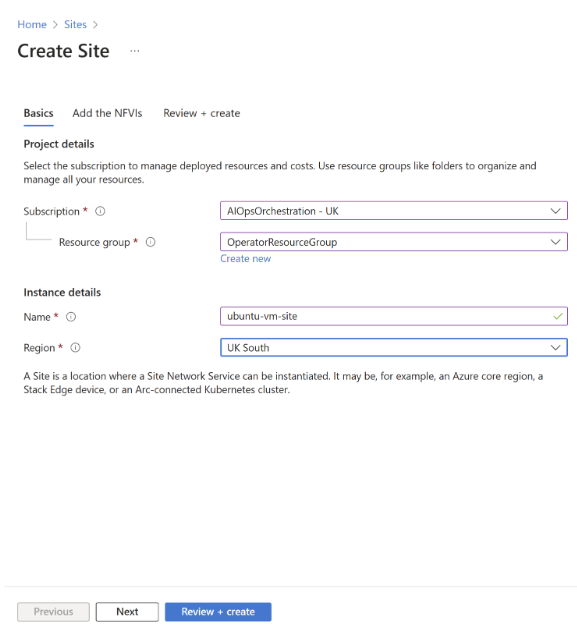


Note
The site must be located in the same region as the prerequisite resources.
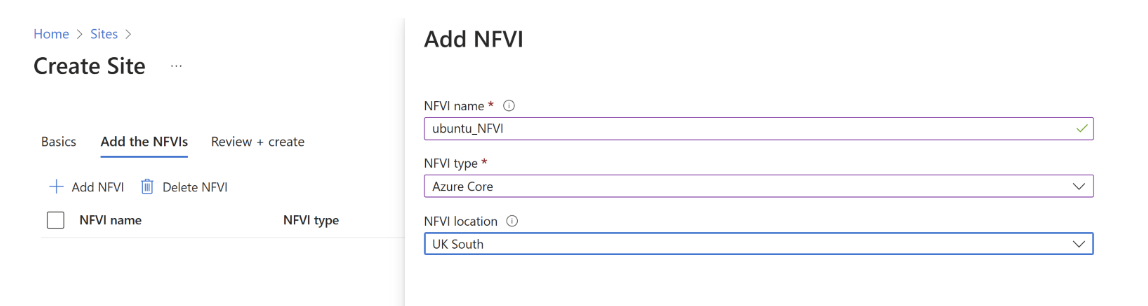
Navigate to the Add NFVI tab of the Create site screen and select + Add NFVI.
Enter the NFVI name you noted earlier. Select NFVI type as "Azure Core", set NFVI location to the location of your resources, and select Add NFVI.
Select Review + create, then select Create.
