Note
Access to this page requires authorization. You can try signing in or changing directories.
Access to this page requires authorization. You can try changing directories.
In this quickstart, you get started with Azure Monitor for SAP solutions by using the Azure portal to deploy resources and configure providers.
Prerequisites
If you don't have an Azure subscription, create a free account before you begin.
Set up a network before you create an Azure Monitor instance.
Create or choose a virtual network for Azure Monitor for SAP solutions that has access to the source SAP system's virtual network.
Create a subnet with an address range of IPv4/25 or larger in the virtual network associated with Azure Monitor for SAP solutions, with subnet delegation assigned to Microsoft.Web/serverFarms.

Create a monitoring resource for Azure Monitor for SAP solutions
Sign in to the Azure portal.
In the search box, search for and select Azure Monitor for SAP solutions.
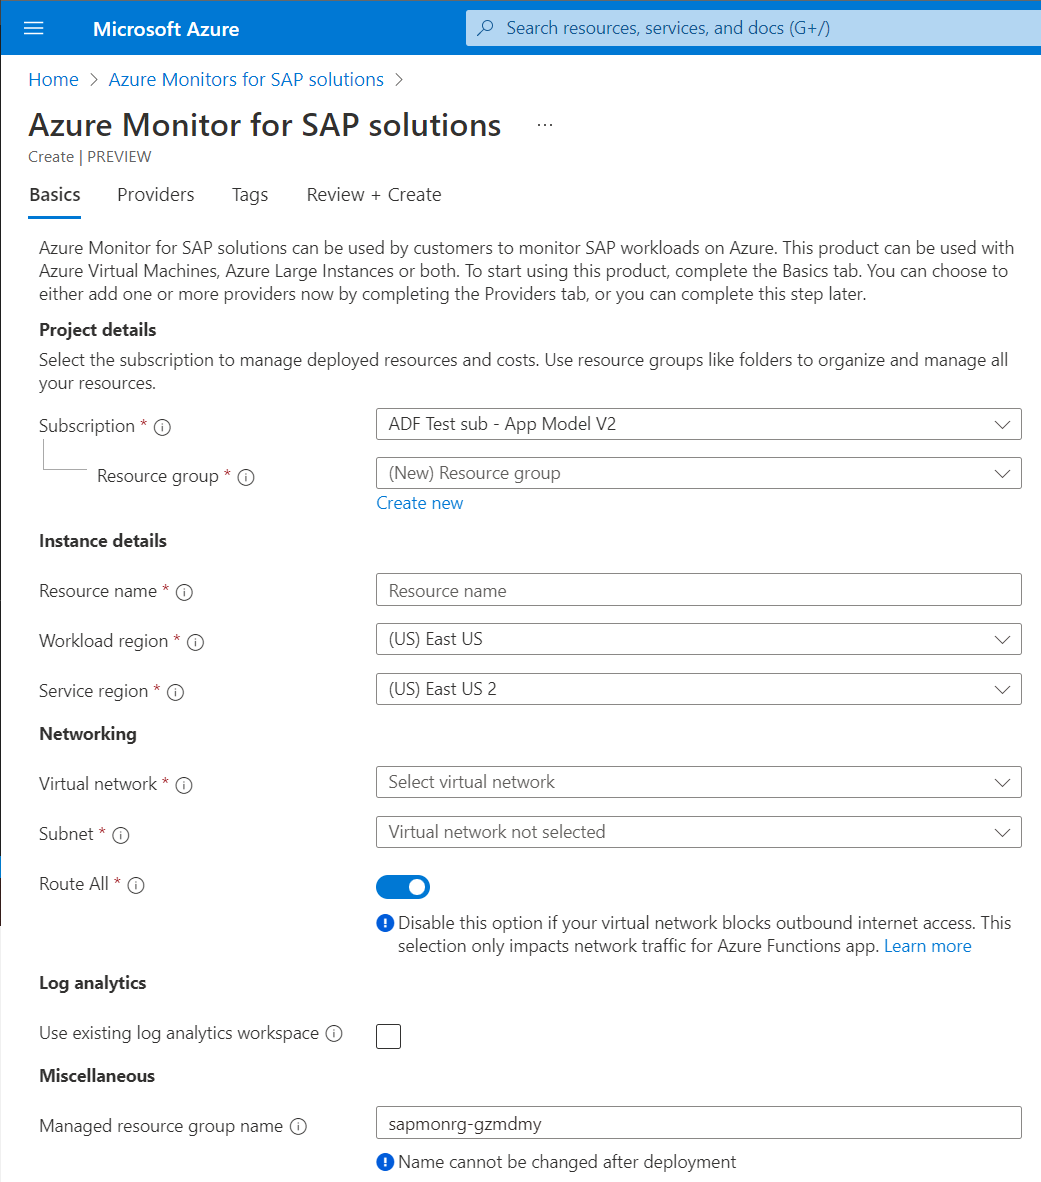
On the Basics tab, provide the required values:
- For Subscription, add the Azure subscription details.
- For Resource group, create a new resource group or select an existing one under the subscription.
- For Resource name, enter the name for the Azure Monitor for SAP solutions instance.
- For Workload region, select the region where the monitoring resources are created. Make sure that it matches the region for your virtual network.
- Service region is where your proxy resource is created. The proxy resource manages all monitoring resources deployed in the workload region. The service region is automatically selected based on your Workload region selection.
- For Virtual network, select a virtual network that has connectivity to your SAP systems for monitoring.
- For Subnet, select a subnet that has connectivity to your SAP systems. You can use an existing subnet or create a new one. It must be an IPv4/25 block or larger.
- For Log analytics, you can use an existing Log Analytics workspace or create a new one. If you create a new workspace, it gets created inside the managed resource group along with other monitoring resources.
- For Managed resource group name, enter a unique name. This name is used to create a resource group that contains all the monitoring resources. You can't change this name after the resource is created.

On the Providers tab, you can start creating providers along with the monitoring resource. You can also create providers later by going to the Providers tab in the Azure Monitor for SAP solutions resource.
On the Tags tab, you can add tags to the monitoring resource. Make sure to add all the mandatory tags if you have a tag policy in place.
On the Review + create tab, review the details then select Create.
Create a provider in Azure Monitor for SAP solutions
To create a provider, see the following articles:
- SAP NetWeaver provider creation
- SAP HANA provider creation
- Microsoft SQL Server provider creation
- IBM Db2 provider creation
- Operating system provider creation
- High-availability provider creation
Next steps
Learn more about Azure Monitor for SAP solutions.