REST Tutorial: Use skillsets to generate searchable content in Azure AI Search
Article
In this tutorial, learn how to call REST APIs that create an AI enrichment pipeline for content extraction and transformations during indexing.
Skillsets add AI processing to raw content, making that content more uniform and searchable. Once you know how skillsets work, you can support a broad range of transformations: from image analysis, to natural language processing, to customized processing that you provide externally.
This tutorial helps you learn how to:
Define objects in an enrichment pipeline.
Build a skillset. Invoke OCR, language detection, entity recognition, and key phrase extraction.
Execute the pipeline. Create and load a search index.
Check the results using full text search.
If you don't have an Azure subscription, open a free account before you begin.
Overview
This tutorial uses a REST client and the Azure AI Search REST APIs to create a data source, index, indexer, and skillset.
The indexer drives each step in the pipeline, starting with content extraction of sample data (unstructured text and images) in a blob container on Azure Storage.
Once content is extracted, the skillset executes built-in skills from Microsoft to find and extract information. These skills include Optical Character Recognition (OCR) on images, language detection on text, key phrase extraction, and entity recognition (organizations). New information created by the skillset is sent to fields in an index. Once the index is populated, you can use the fields in queries, facets, and filters.
You can use a free search service for this tutorial. The free tier limits you to three indexes, three indexers, and three data sources. This tutorial creates one of each. Before starting, make sure you have room on your service to accept the new resources.
Download files
Download a zip file of the sample data repository and extract the contents. Learn how.
Built-in AI enrichment is backed by Azure AI services, including Language service and Azure AI Vision for natural language and image processing. For small workloads like this tutorial, you can use the free allocation of twenty transactions per indexer. For larger workloads, attach an Azure AI Services multi-region resource to a skillset for pay-as-you-go pricing.
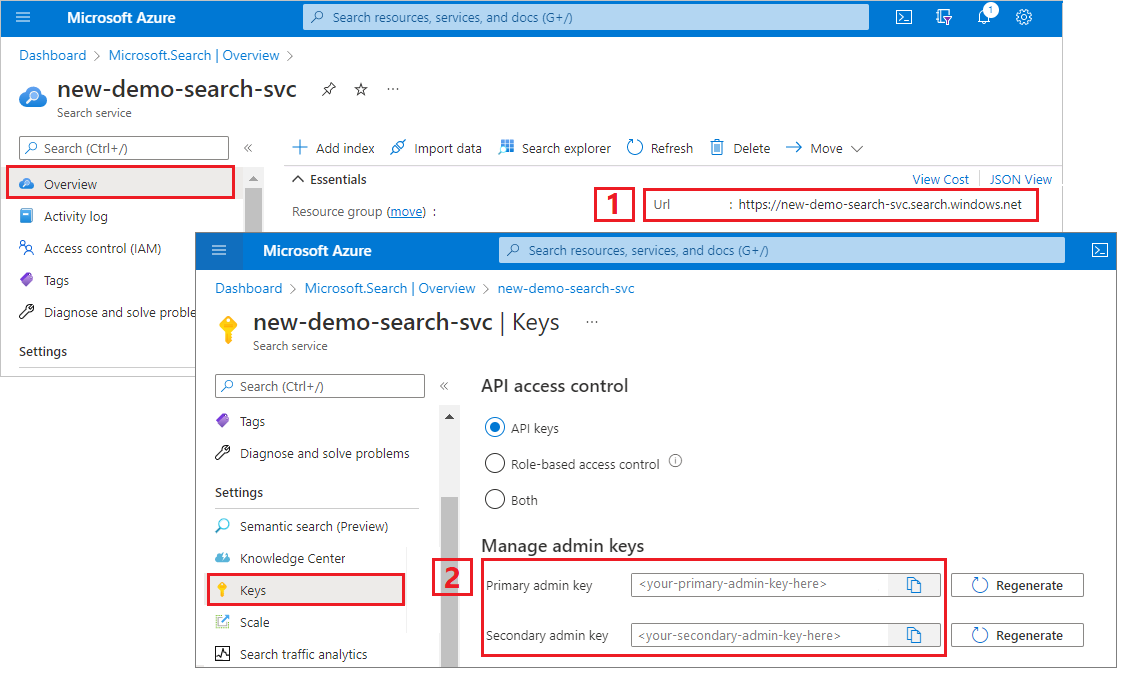
Copy a search service URL and API key
For this tutorial, connections to Azure AI Search require an endpoint and an API key. You can get these values from the Azure portal.
Sign in to the Azure portal, navigate to the search service Overview page, and copy the URL. An example endpoint might look like https://mydemo.search.windows.net.
Under Settings > Keys, copy an admin key. Admin keys are used to add, modify, and delete objects. There are two interchangeable admin keys. Copy either one.
Provide values for the variables: search service endpoint, search service admin API key, an index name, a connection string to your Azure Storage account, and the blob container name.
Create the pipeline
AI enrichment is indexer-driven. This part of the walkthrough creates four objects: data source, index definition, skillset, indexer.
Step 1: Create a data source
Call Create Data Source to set the connection string to the Blob container containing the sample data files.
Creates "merged content" that recombines previously separated content, useful for documents with embedded images (PDF, DOCX, and so forth). Images and text are separated during the document cracking phase. The merge skill recombines them by inserting any recognized text, image captions, or tags created during enrichment into the same location where the image was extracted from in the document. When you're working with merged content in a skillset, this node is inclusive of all text in the document, including text-only documents that never undergo OCR or image analysis.
Breaks large merged content into smaller chunks before calling the key phrase extraction skill. Key phrase extraction accepts inputs of 50,000 characters or less. A few of the sample files need splitting up to fit within this limit.
Each skill executes on the content of the document. During processing, Azure AI Search cracks each document to read content from different file formats. Found text originating in the source file is placed into a generated content field, one for each document. As such, the input becomes "/document/content".
For key phrase extraction, because we use the text splitter skill to break larger files into pages, the context for the key phrase extraction skill is "document/pages/*" (for each page in the document) instead of "/document/content".
Note
Outputs can be mapped to an index, used as input to a downstream skill, or both as is the case with language code. In the index, a language code is useful for filtering. For more information about skillset fundamentals, see How to define a skillset.
Step 3: Create an index
Call Create Index to provide the schema used to create inverted indexes and other constructs in Azure AI Search.
The largest component of an index is the fields collection, where data type and attributes determine content and behavior in Azure AI Search. Make sure you have fields for your newly generated output.
Call Create Indexer to drive the pipeline. The three components you have created thus far (data source, skillset, index) are inputs to an indexer. Creating the indexer on Azure AI Search is the event that puts the entire pipeline into motion.
Expect this step to take several minutes to complete. Even though the data set is small, analytical skills are computation-intensive.
The body of the request includes references to the previous objects, configuration properties required for image processing, and two types of field mappings.
"fieldMappings" are processed before the skillset, sending content from the data source to target fields in an index. You use field mappings to send existing, unmodified content to the index. If field names and types are the same at both ends, no mapping is required.
"outputFieldMappings" are for fields created by skills, after skillset execution. The references to sourceFieldName in outputFieldMappings don't exist until document cracking or enrichment creates them. The targetFieldName is a field in an index, defined in the index schema.
The "maxFailedItems" parameter is set to -1, which instructs the indexing engine to ignore errors during data import. This is acceptable because there are so few documents in the demo data source. For a larger data source, you would set the value to greater than 0.
The "dataToExtract":"contentAndMetadata" statement tells the indexer to automatically extract the values from the blob's content property and the metadata of each object.
The imageAction parameter tells the indexer to extract text from images found in the data source. The "imageAction":"generateNormalizedImages" configuration, combined with the OCR Skill and Text Merge Skill, tells the indexer to extract text from the images (for example, the word "stop" from a traffic Stop sign), and embed it as part of the content field. This behavior applies to both embedded images (think of an image inside a PDF) and standalone image files, for instance a JPG file.
Note
Creating an indexer invokes the pipeline. If there are problems reaching the data, mapping inputs and outputs, or order of operations, they appear at this stage. To re-run the pipeline with code or script changes, you might need to drop objects first. For more information, see Reset and re-run.
Monitor indexing
Indexing and enrichment commence as soon as you submit the Create Indexer request. Depending on skillset complexity and operations, indexing can take a while.
To find out whether the indexer is still running, call Get Indexer Status to check the indexer status.
HTTP
### Get Indexer Status (wait several minutes for the indexer to complete)
GET {{baseUrl}}/indexers/cog-search-demo-idxr/status?api-version=2024-07-01  HTTP/1.1
  Content-Type: application/json
  api-key: {{apiKey}}
Key points:
Warnings are common in some scenarios and don't always indicate a problem. For example, if a blob container includes image files, and the pipeline doesn't handle images, you get a warning stating that images weren't processed.
In this sample, there's a PNG file that contains no text. All five of the text-based skills (language detection, entity recognition of locations, organizations, people, and key phrase extraction) fail to execute on this file. The resulting notification shows up in execution history.
Check results
Now that you've created an index that contains AI-generated content, call Search Documents to run some queries to see the results.
HTTP
### Query the index\
POST {{baseUrl}}/indexes/cog-search-demo-idx/docs/search?api-version=2024-07-01  HTTP/1.1
  Content-Type: application/json
  api-key: {{apiKey}}

  {
    "search": "*",
    "select": "metadata_storage_name,language,organizations",
    "count": true
  }
Filters can help you narrow results to items of interest:
During early stages of development, iteration over the design is common. Reset and rerun helps with iteration.
Takeaways
This tutorial demonstrates the basic steps for using the REST APIs to create an AI enrichment pipeline: a data source, skillset, index, and indexer.
Built-in skills were introduced, along with skillset definition that shows the mechanics of chaining skills together through inputs and outputs. You also learned that outputFieldMappings in the indexer definition is required for routing enriched values from the pipeline into a searchable index on an Azure AI Search service.
Finally, you learned how to test results and reset the system for further iterations. You learned that issuing queries against the index returns the output created by the enriched indexing pipeline.
Clean up resources
When you're working in your own subscription, at the end of a project, it's a good idea to remove the resources that you no longer need. Resources left running can cost you money. You can delete resources individually or delete the resource group to delete the entire set of resources.
You can find and manage resources in the portal, using the All resources or Resource groups link in the left-navigation pane.
Next steps
Now that you're familiar with all of the objects in an AI enrichment pipeline, take a closer look at skillset definitions and individual skills.
This learning path teaches you how to embed Power BI content in apps, develop programmatic solutions using the Power BI REST API and the Power BI Client APIs, enforce row-level security (RLS) for embedded content, automate common Power BI setup tasks, configure a development environment, and determine appropriate licensing.