Note
Access to this page requires authorization. You can try signing in or changing directories.
Access to this page requires authorization. You can try changing directories.
In this article, you build a Security Copilot agent that uses the fictional ISV IdentityDrift with Microsoft Entra ID, Microsoft Defender for Endpoint, and Microsoft Defender for Cloud alerts.
This article is part of a series that walks you through ingesting test data to the data lake, developing an agent, and publishing the example IdentityDrift platform solution. The solution includes a Security Copilot agent that correlates identity, endpoint, and cloud security signals to automate threat investigations.
After completing the steps in this article, you can:
- Create and manage Security Copilot workspaces
- Create and test a Security Copilot agent
Prerequisites
Complete the following how-to tutorials to set up your environment and prepare the agent instructions for the IdentityDrift Investigation Agent:
- Sentinel Data Lake Onboarding
- Ingest Data to Sentinel Data Lake
- Onboarding to Security Copilot for non-Microsoft 365 E5 and E7 customers
- Use an MCP tool in Visual Studio Code
- Use an MCP tool in Microsoft Foundry (preview)
Permissions
- You must have the Security Administrator role to create Secure Compute Units (SCUs). This is a prerequisite to run agents in Security Copilot.
- The Security Operator role is sufficient to create and test agents.
Create a Security Copilot workspace
Follow these steps to create a Security Copilot workspace. This is the environment where you build and run your agent.
- Navigate to Security Copilot
- Sign in with your credentials that have the required permissions
Create SCU capacity and a new workspace
Create the Security Compute Units (SCU) capacity for your workspace. On the home page, Security Copilot prompts you to create capacity.
Select the appropriate Azure Subscription and Resource Group.
Add a Capacity name, select a Prompt evaluation location, and select a Capacity region.
Under Create a new workspace, select 1 or 2 SCUs depending on your requirements.
Select Create.
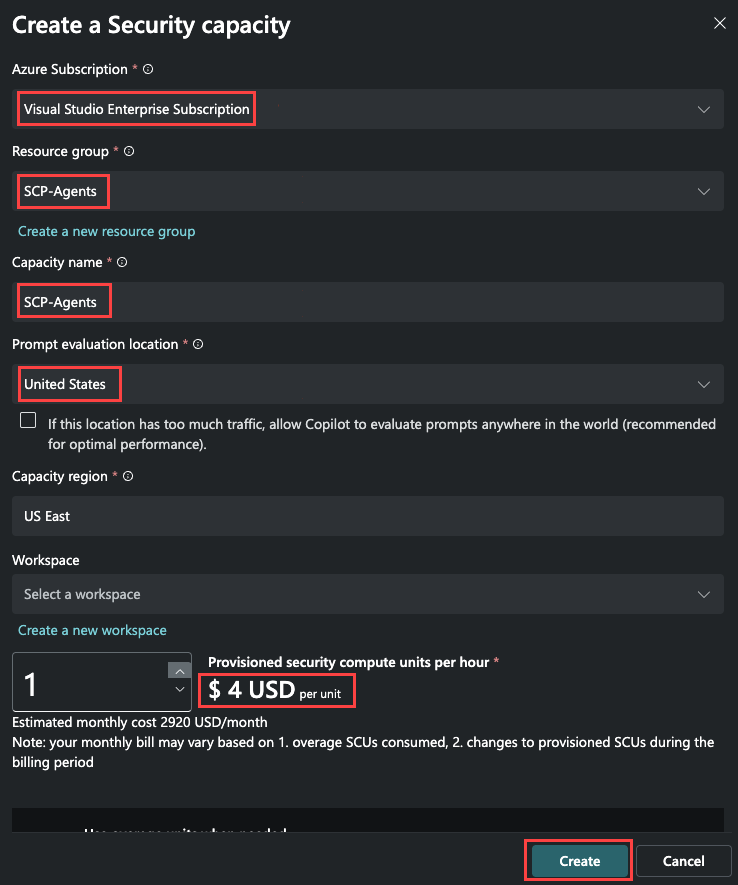
The prices shown in this image are for example purposes only and are not intended to reflect actual prices.Note
Security Compute Units (SCUs) are billed hourly. To optimize costs during testing, delete your SCU capacity when not actively running agents, and recreate it when needed. For more information, see Microsoft Security Copilot Security Compute Units and capacity.
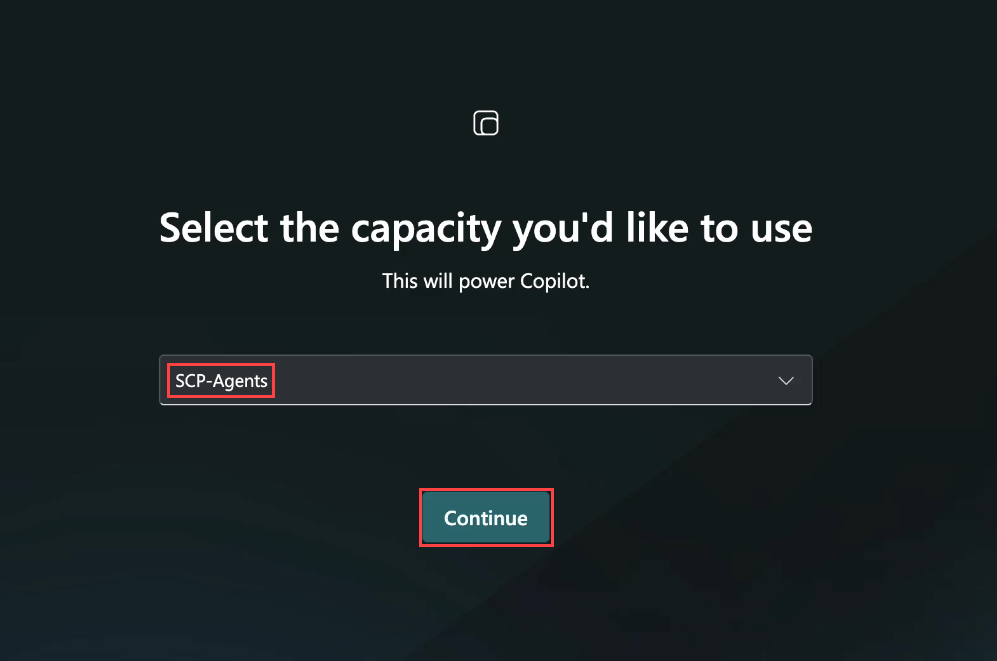
To create a workspace:
Select the SCU capacity name you created in the previous step.
Complete the workspace creation dialog.
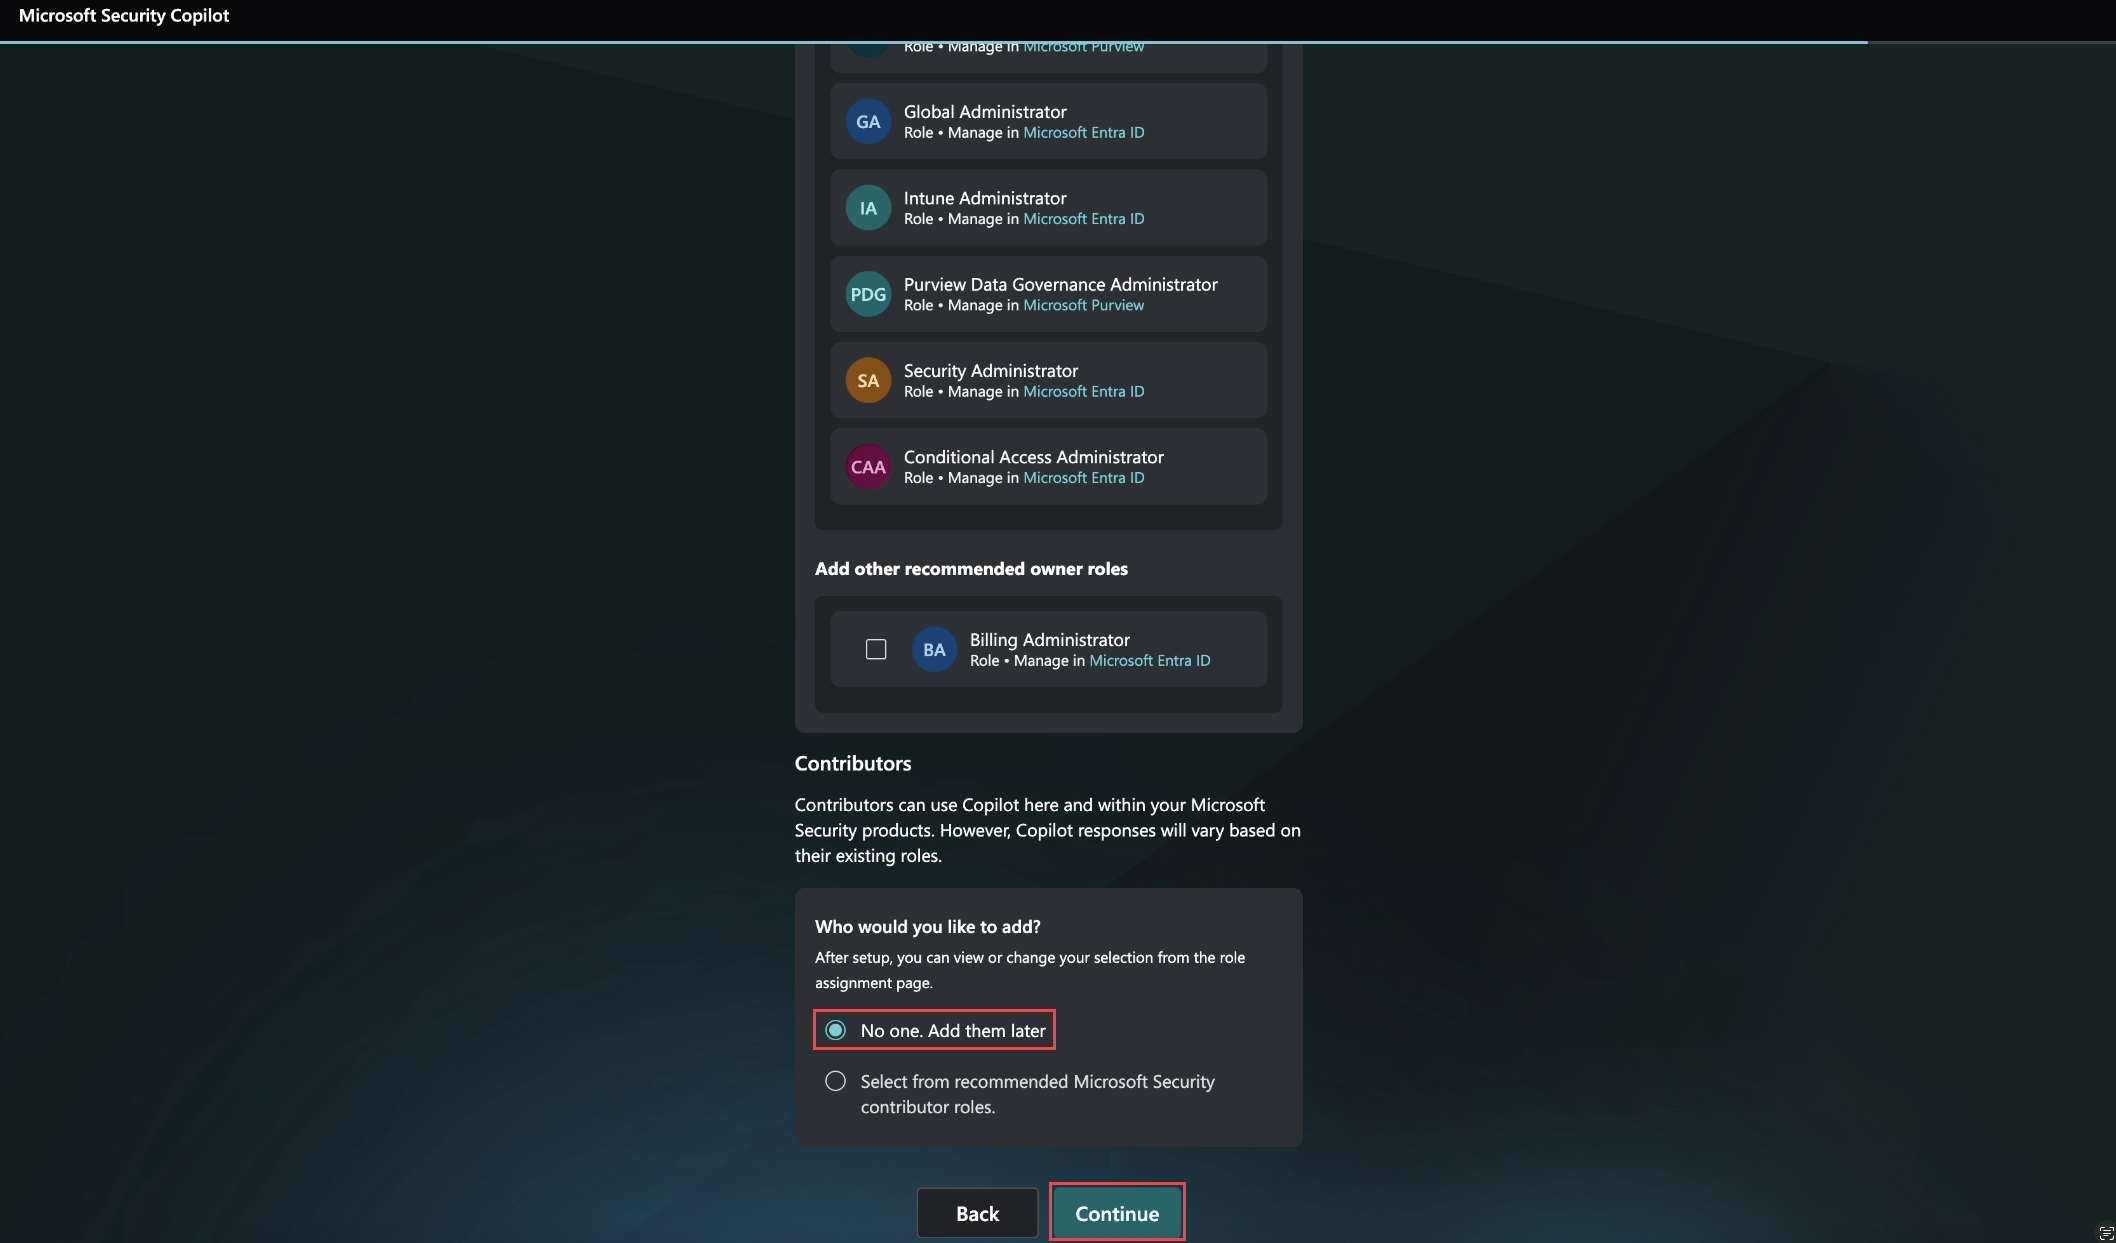
[TIP] During the workspace creation, if you encounter any issues such as a failed to create workspace message, return to the Assign roles step and under Contributors, select No one. Add them later.
Create the IdentityDrift Investigation Agent
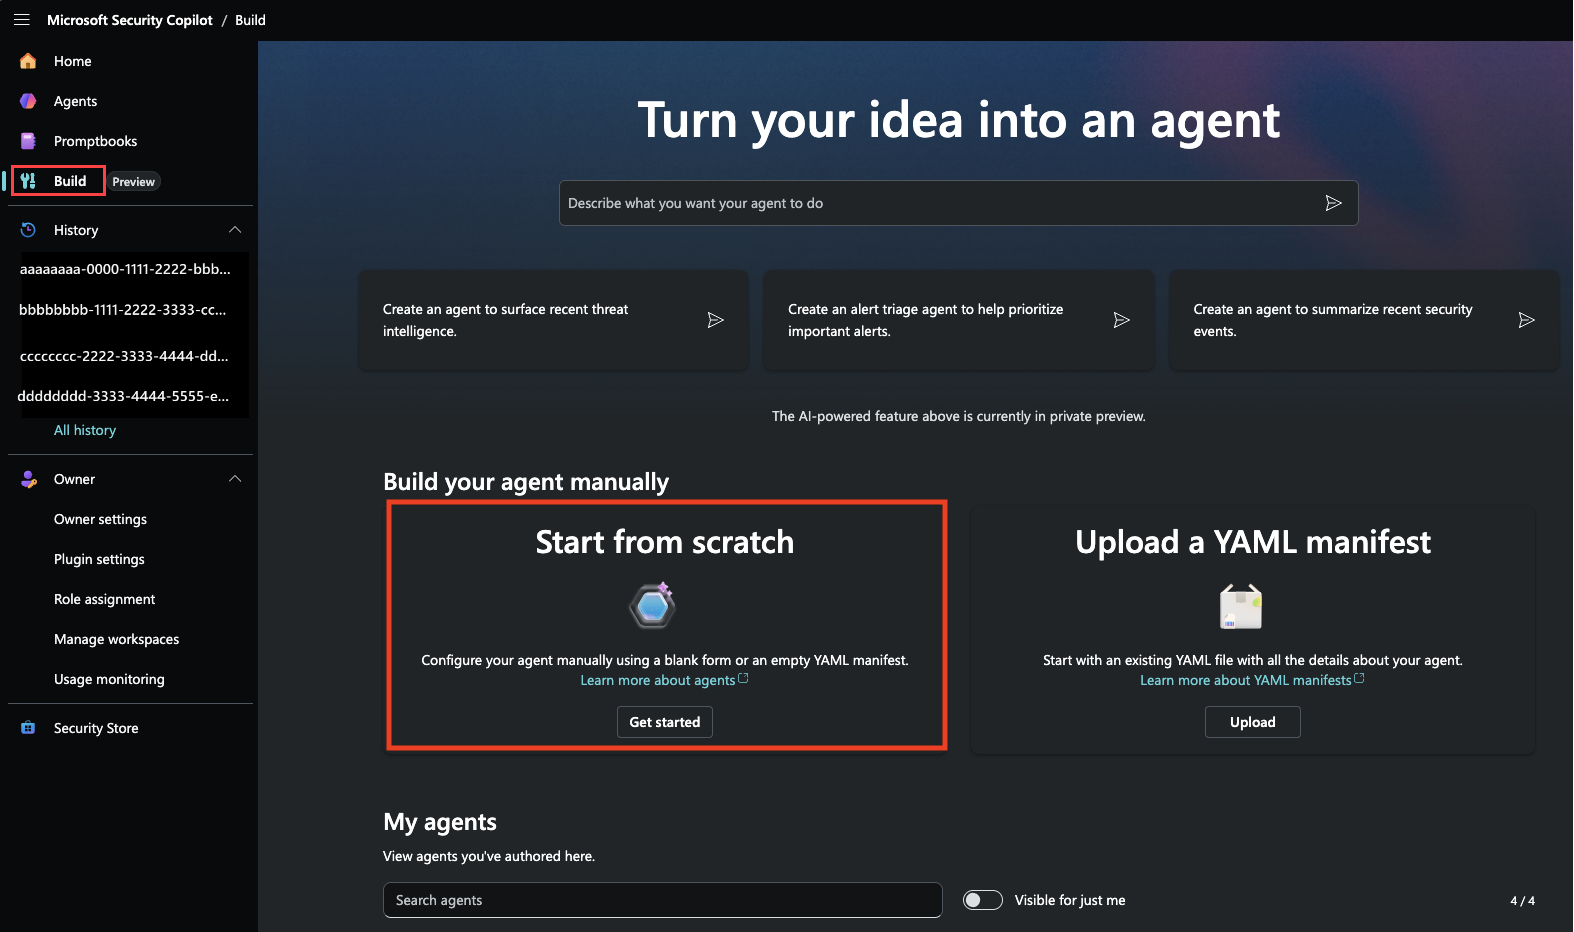
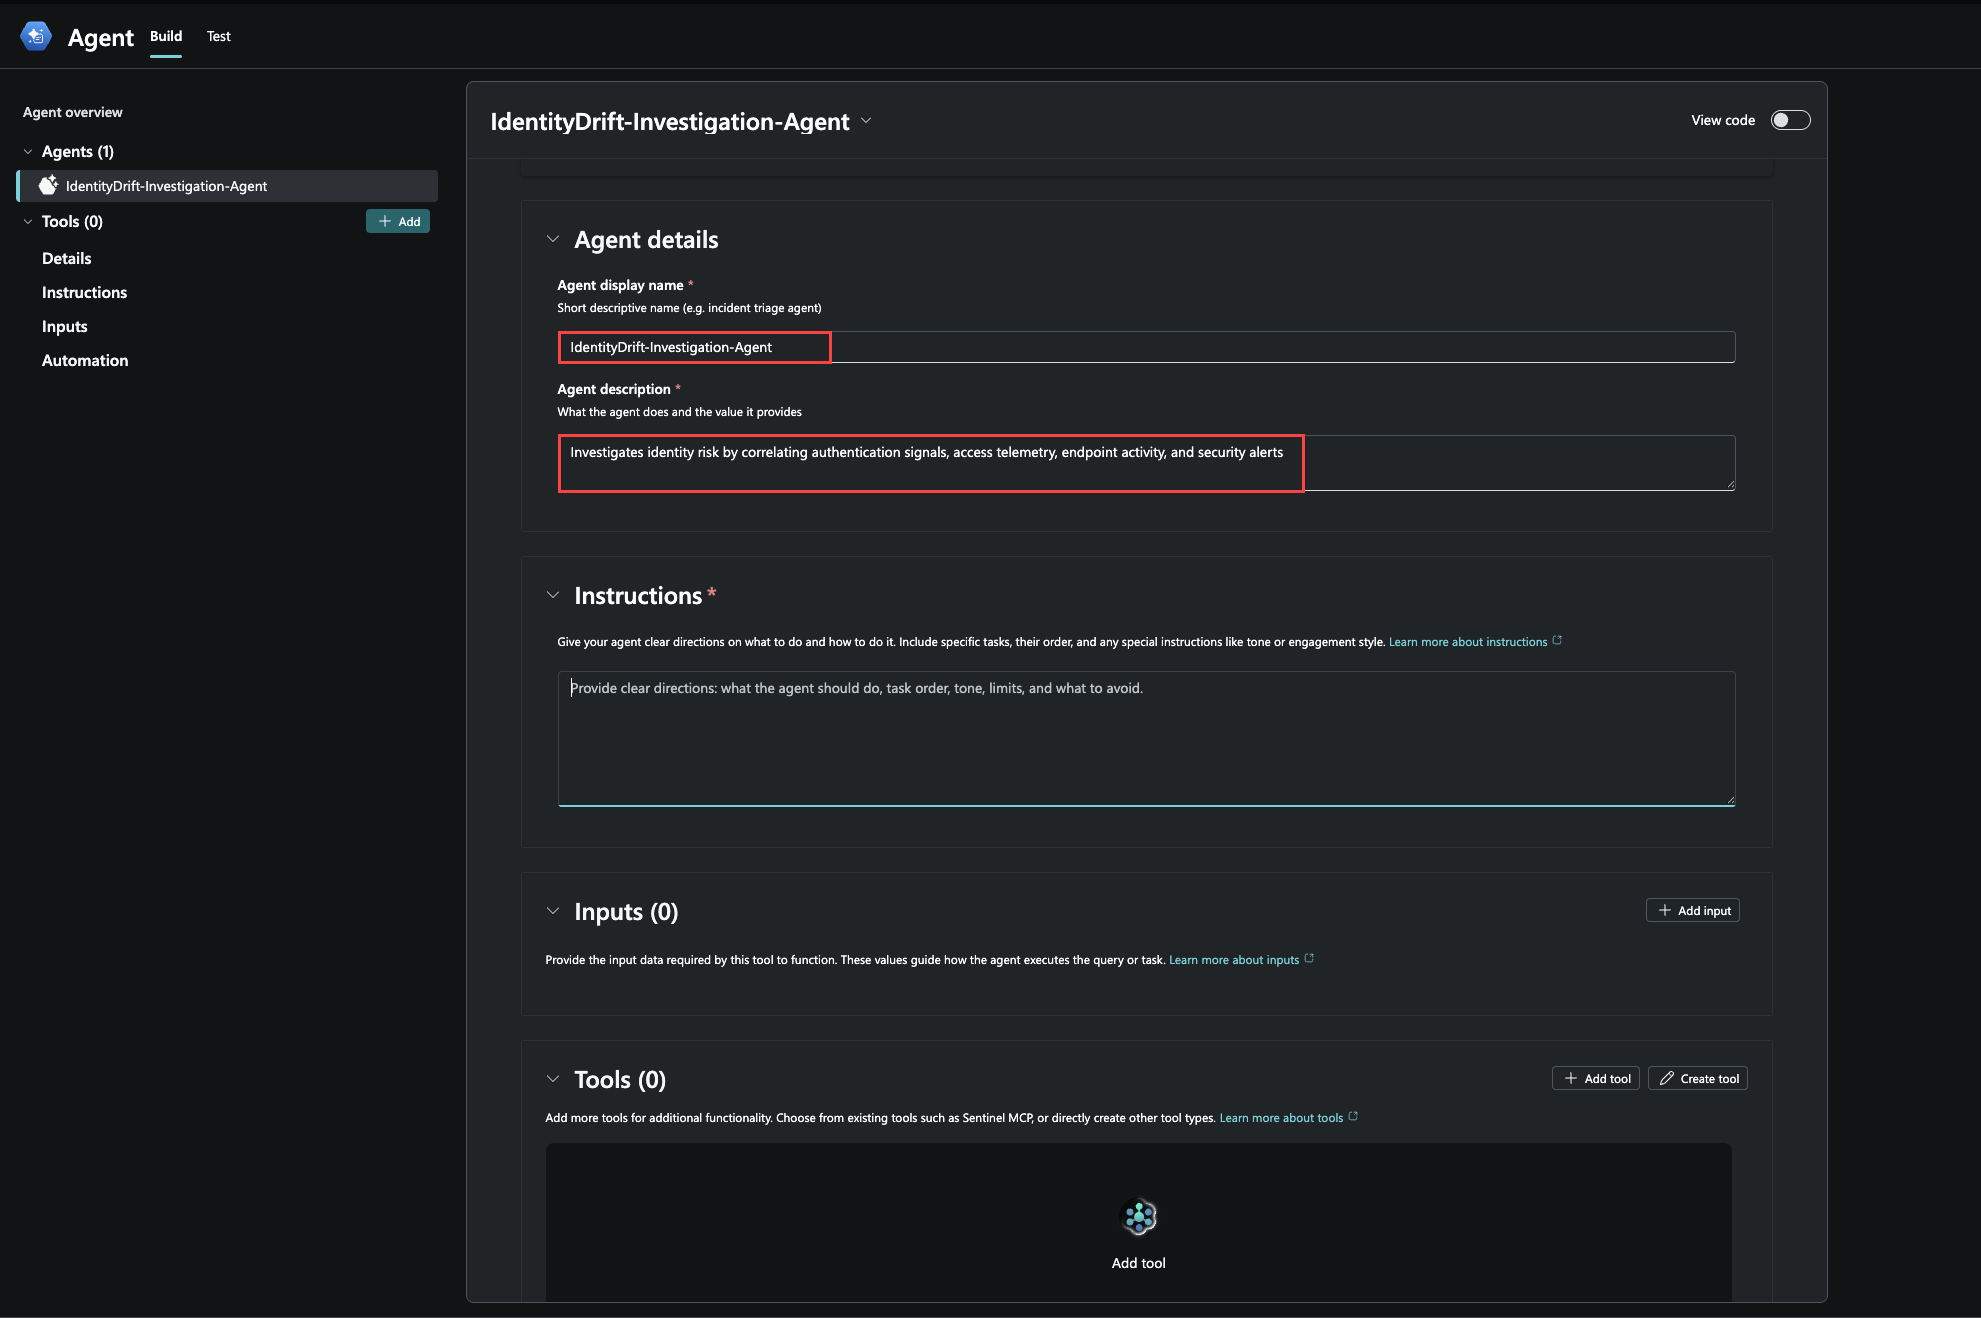
To create the agent in your workspace, select Build and then select Start from scratch
Configure the agent, providing the following details:
Agent display name: Enter
IdentityDrift-Investigation-AgentAgent description: Provide a brief description, for example, Investigate identity risk by correlating authentication signals, access telemetry, endpoint activity, and security alerts
Agent instructions define how the agent behaves. Copy the following instructions and paste them into the Instructions field.
1. UserPrincipalName Input

Ensure to use the UserPrincipalName input throughout the analysis.

2. Global Query Rule (MANDATORY)

Every query MUST filter to the last 24 hours:

| where TimeGenerated > ago(24h)

Never use 7 days, 30 days, or "all time." Always 24h. To avoid oversized responses, summarize and limit outputs (do not return raw     event dumps).

3. Query Data Lake for CommonSecurity_ID_KQL_CL

IMPORTANT:

- Do NOT assume the existence of any specific columns such as Action, EventType, or Application
- Use only columns that exist in the query result
- Prefer the following safe fields when available:
  - TimeGenerated
  - SourceUserName
  - SourceIP
  - DestinationHostName
  - AdditionalExtensions
  - DeviceCustomString1

Search commonsecurity_ID_KQL_CL table records for events that match the provided user input (use SourceUserName as the identifier).

Sample KQL Query (replace {{UserPrincipalName}}):

CommonSecurity_ID_KQL_CL
| where TimeGenerated > ago(24h)
    and SourceUserName has '{{UserPrincipalName}}'
| summarize
    TotalEvents=count(),
    MFA_Approved=countif(DeviceCustomString1 has "Approved"),
    PrivilegedActions=countif(DeviceCustomString1 has "Privilege"),
    SensitiveAccess=countif(DeviceCustomString1 has "Sensitive"),
    Activities=makeset(AdditionalExtensions),
    TargetResources=makeset(DestinationHostName),
    IPs=makeset(SourceIP)
    by SourceUserName

4. Query Data Lake SigninLogs_KQL_CL Table

- Same user input
- Filter last 24 hours
- Extract:
  - Sign-in success vs failure
  - IP diversity
  - Result descriptions

5. Query Data Lake AADRiskyUsers_KQL_CL Table

- Same user input
- Filter last 24 hours
- Extract:
  - RiskLevel
  - RiskState
  - RiskLastUpdatedDateTime

6. Query Data Lake DeviceProcessEvents_KQL_CL Table

- Same user input
- Filter last 24 hours
- Identify suspicious post-authentication activity

Guidance:

- Remove domain from UPN to derive AccountName
- Look for LOLBins in FileName column
  - powershell.exe
  - cmd.exe
  - kubectl.exe
  - az.exe

7. Query Microsoft Defender for Cloud SecurityAlert Table

Query SecurityAlert to identify confirmed runtime threats related to Kubernetes or cloud workloads that may correlate with identity activity.

- Alerts generated by Microsoft Defender for Cloud Kubernetes‑related alert types such as:
  - K8S.NODE_MalwareBlocked
  - K8S.NODE_DriftBlocked

Guidance:

- Filter to last 24 hours
- Do NOT expect user identity fields in SecurityAlert
- Extract:
  - AlertType
  - AlertSeverity
  - CompromisedEntity (ClusterName)
  - Context from ExtendedProperties

8. Correlation & Reasoning

Use the Sentinel Data Exploration MCP tool to correlate activity between CommonSecurity_ID_KQL_CL , SigninLogs_KQL_CL, AADRiskyUsers_KQL_CL,    DeviceProcessEvents_KQL_CL and SecurityAlert_KQL_CL

Match overlapping:

- User identifiers
- IP addresses
- Device names
- Authentication privilege escalation
- Suspicious endpoint execution post authentication compromise

9. Surface Key Insights

Identify:

- Risky sign-ins followed by privileged access
- Unexpected MFA approvals
- Access to vulnerable or high-value workloads
- Privilege escalation preceding endpoint activity and Kubernetes control‑plane actions
- Suspicious endpoint or Kubernetes tooling execution
- Defender for Cloud alerts occurring after identity or control‑plane activity

10. Provide Summary Findings

Summarize:

- MFA outcomes
- Sign-in success vs failure trends
- Identity risk posture
- Privileged access highlights
- Endpoint execution signals
- Defender for Cloud security alerts and their timing

Highlight discrepancies or noteworthy observations across identity, access, and endpoint telemetry.

### Sample Automation Flow (Short Version)

1. Query **CommonSecurity_ID_KQL_CL** for identity access context
2. Query **SigninLogs_KQL_CL** and **AADRiskyUsers_KQL_CL** for authentication and risk posture
3. Query **DeviceProcessEvents_KQL_CL** for endpoint behavior
4. Query **SecurityAlert_KQL_CL** for Defender for Cloud runtime threats
5. Correlate all signals using Sentinel MCP and surface actionable security insights
Open the Inputs section and select Add input.
Define
UserPrincipalNameas the input for the user identity you're investigating.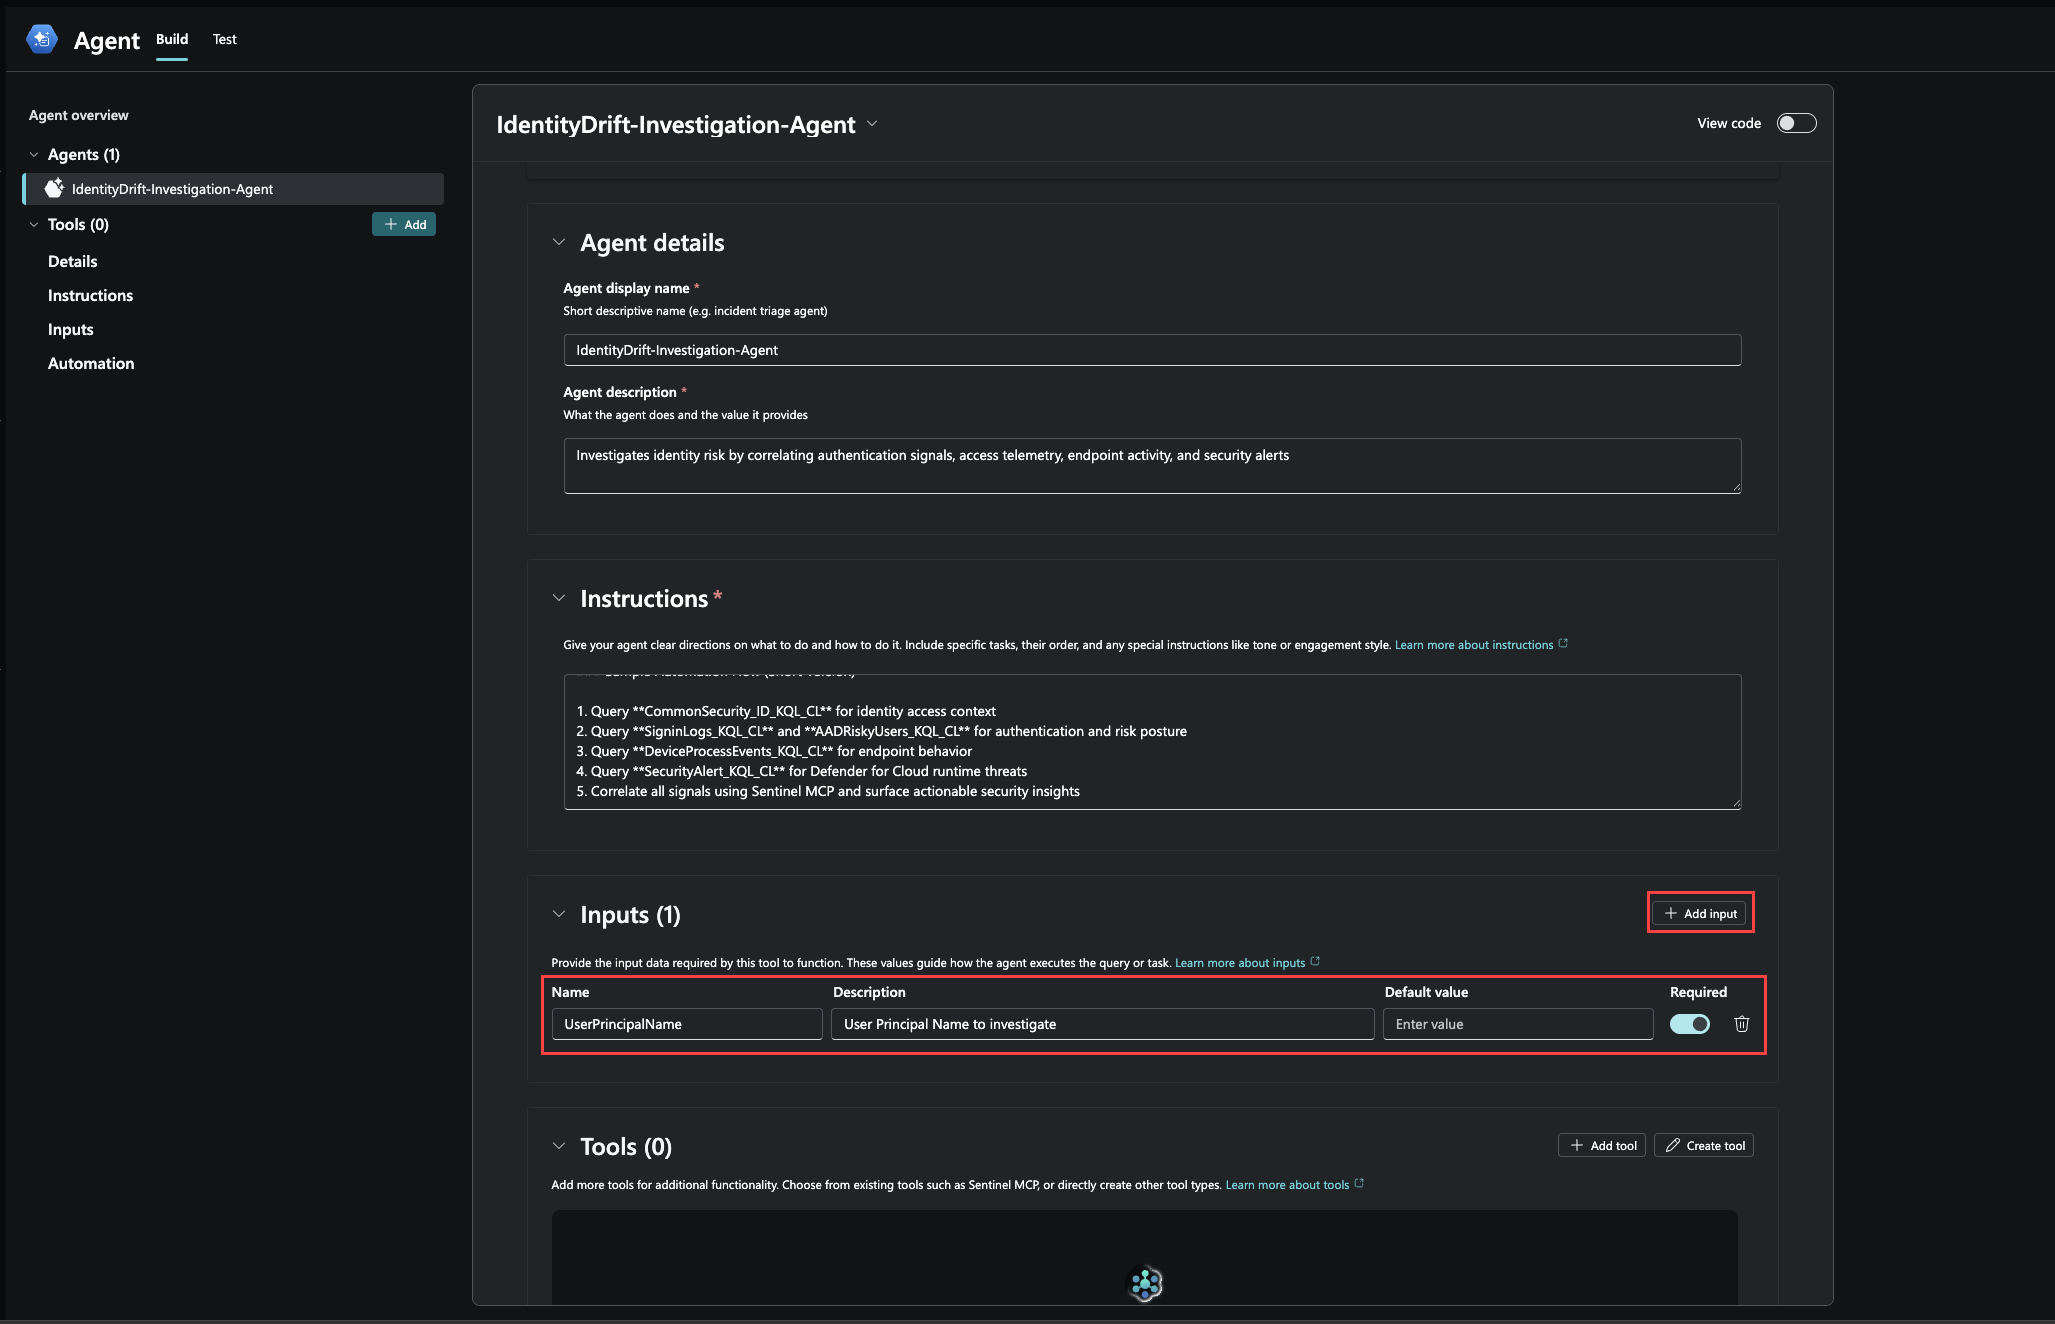
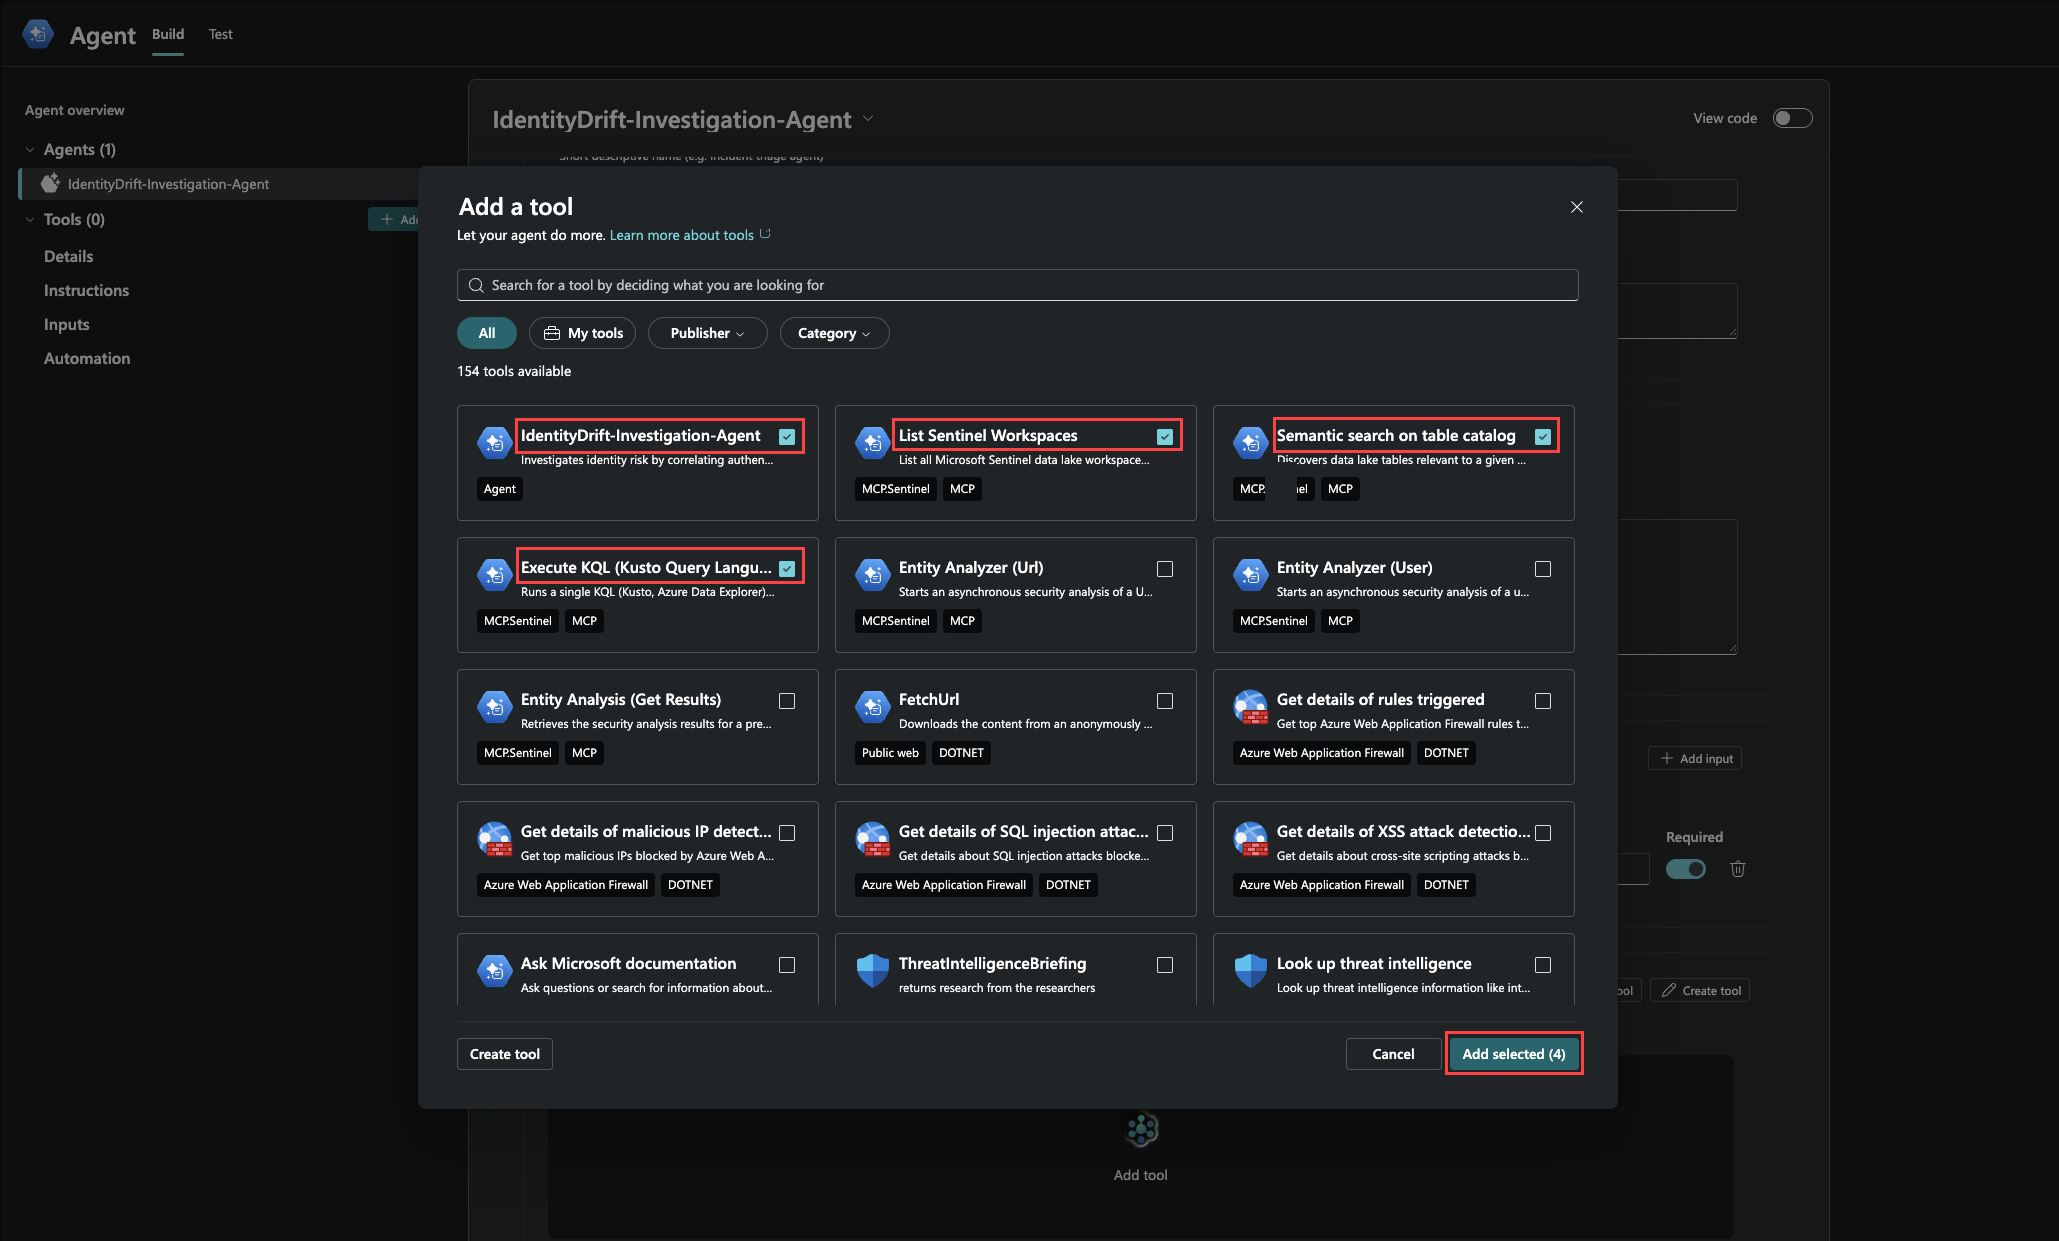
Open the Tools section, select Add tool.
Select the following Sentinel MCP skills and the IdentityDrift-Investigation-Agent:
- List Sentinel Workspaces
- Semantic search on table catalog
- Execute KQL (Kusto Query Language) query
- IdentityDrift-Investigation-Agent
Select Add selected to confirm your tool selection.
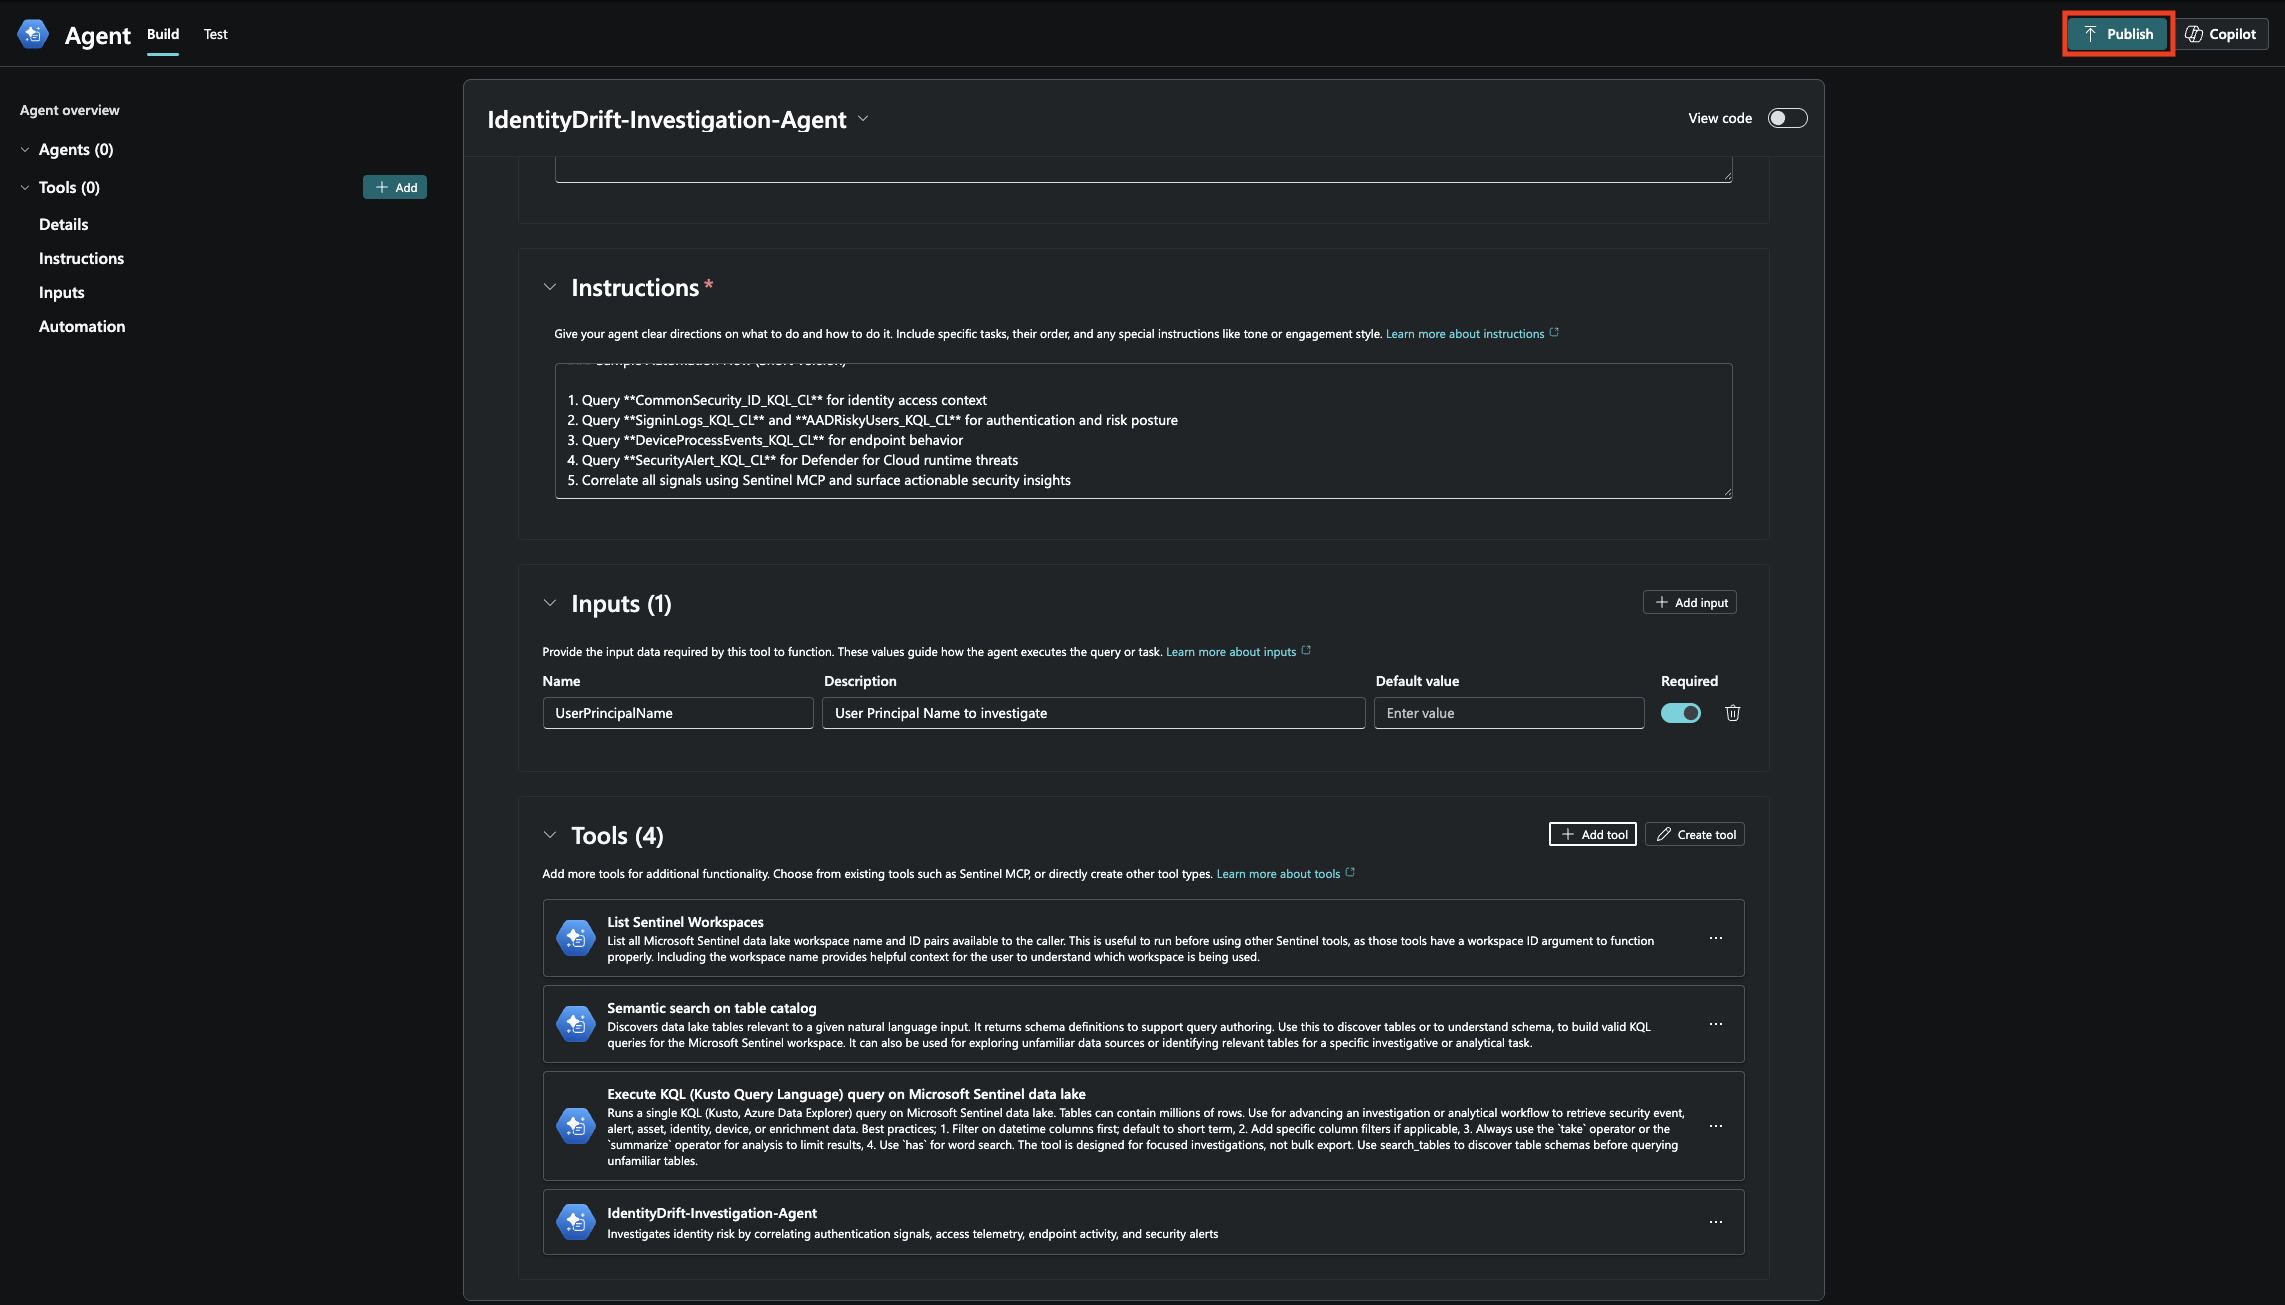
Select Publish and select the appropriate scope:
- Myself – Agent is available only to you
- Everyone in my workspace – Agent is shared with all workspace members
Set up the IdentityDrift Investigation Agent
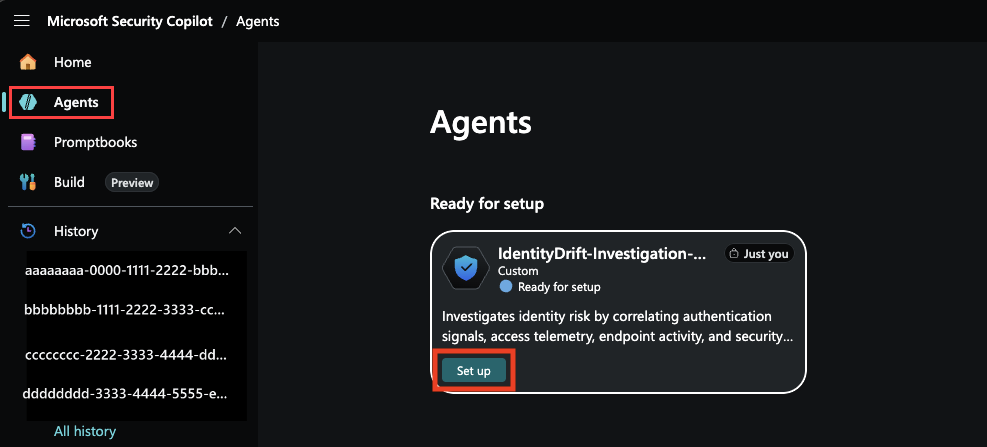
In your Security Copilot workspace, navigate to Agents
Locate and select IdentityDrift-Investigation-Agent.
Select Setup and complete the sign-in to finish the agent setup.
Run the IdentityDrift Investigation Agent
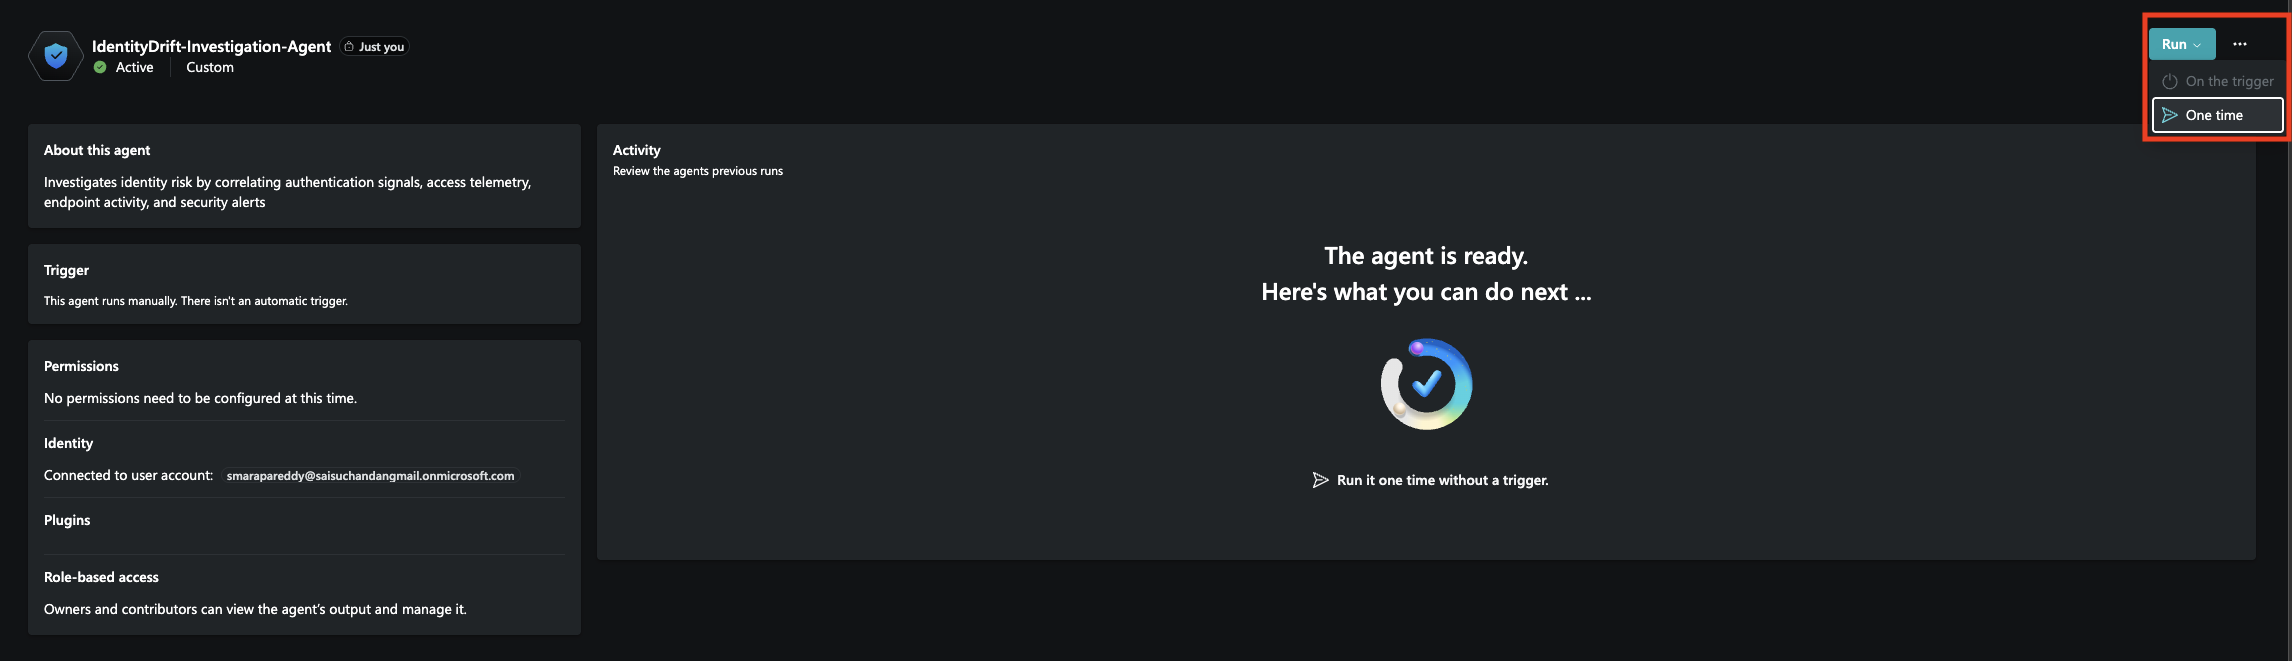
To run the agent, select Run, then select One time, and enter the UserPrincipalName to investigate.
Based on sample data from Ingest Data to Microsoft Sentinel Data Lake, enter the username: u1291@contoso.onmicrosoft.com to run the agent.
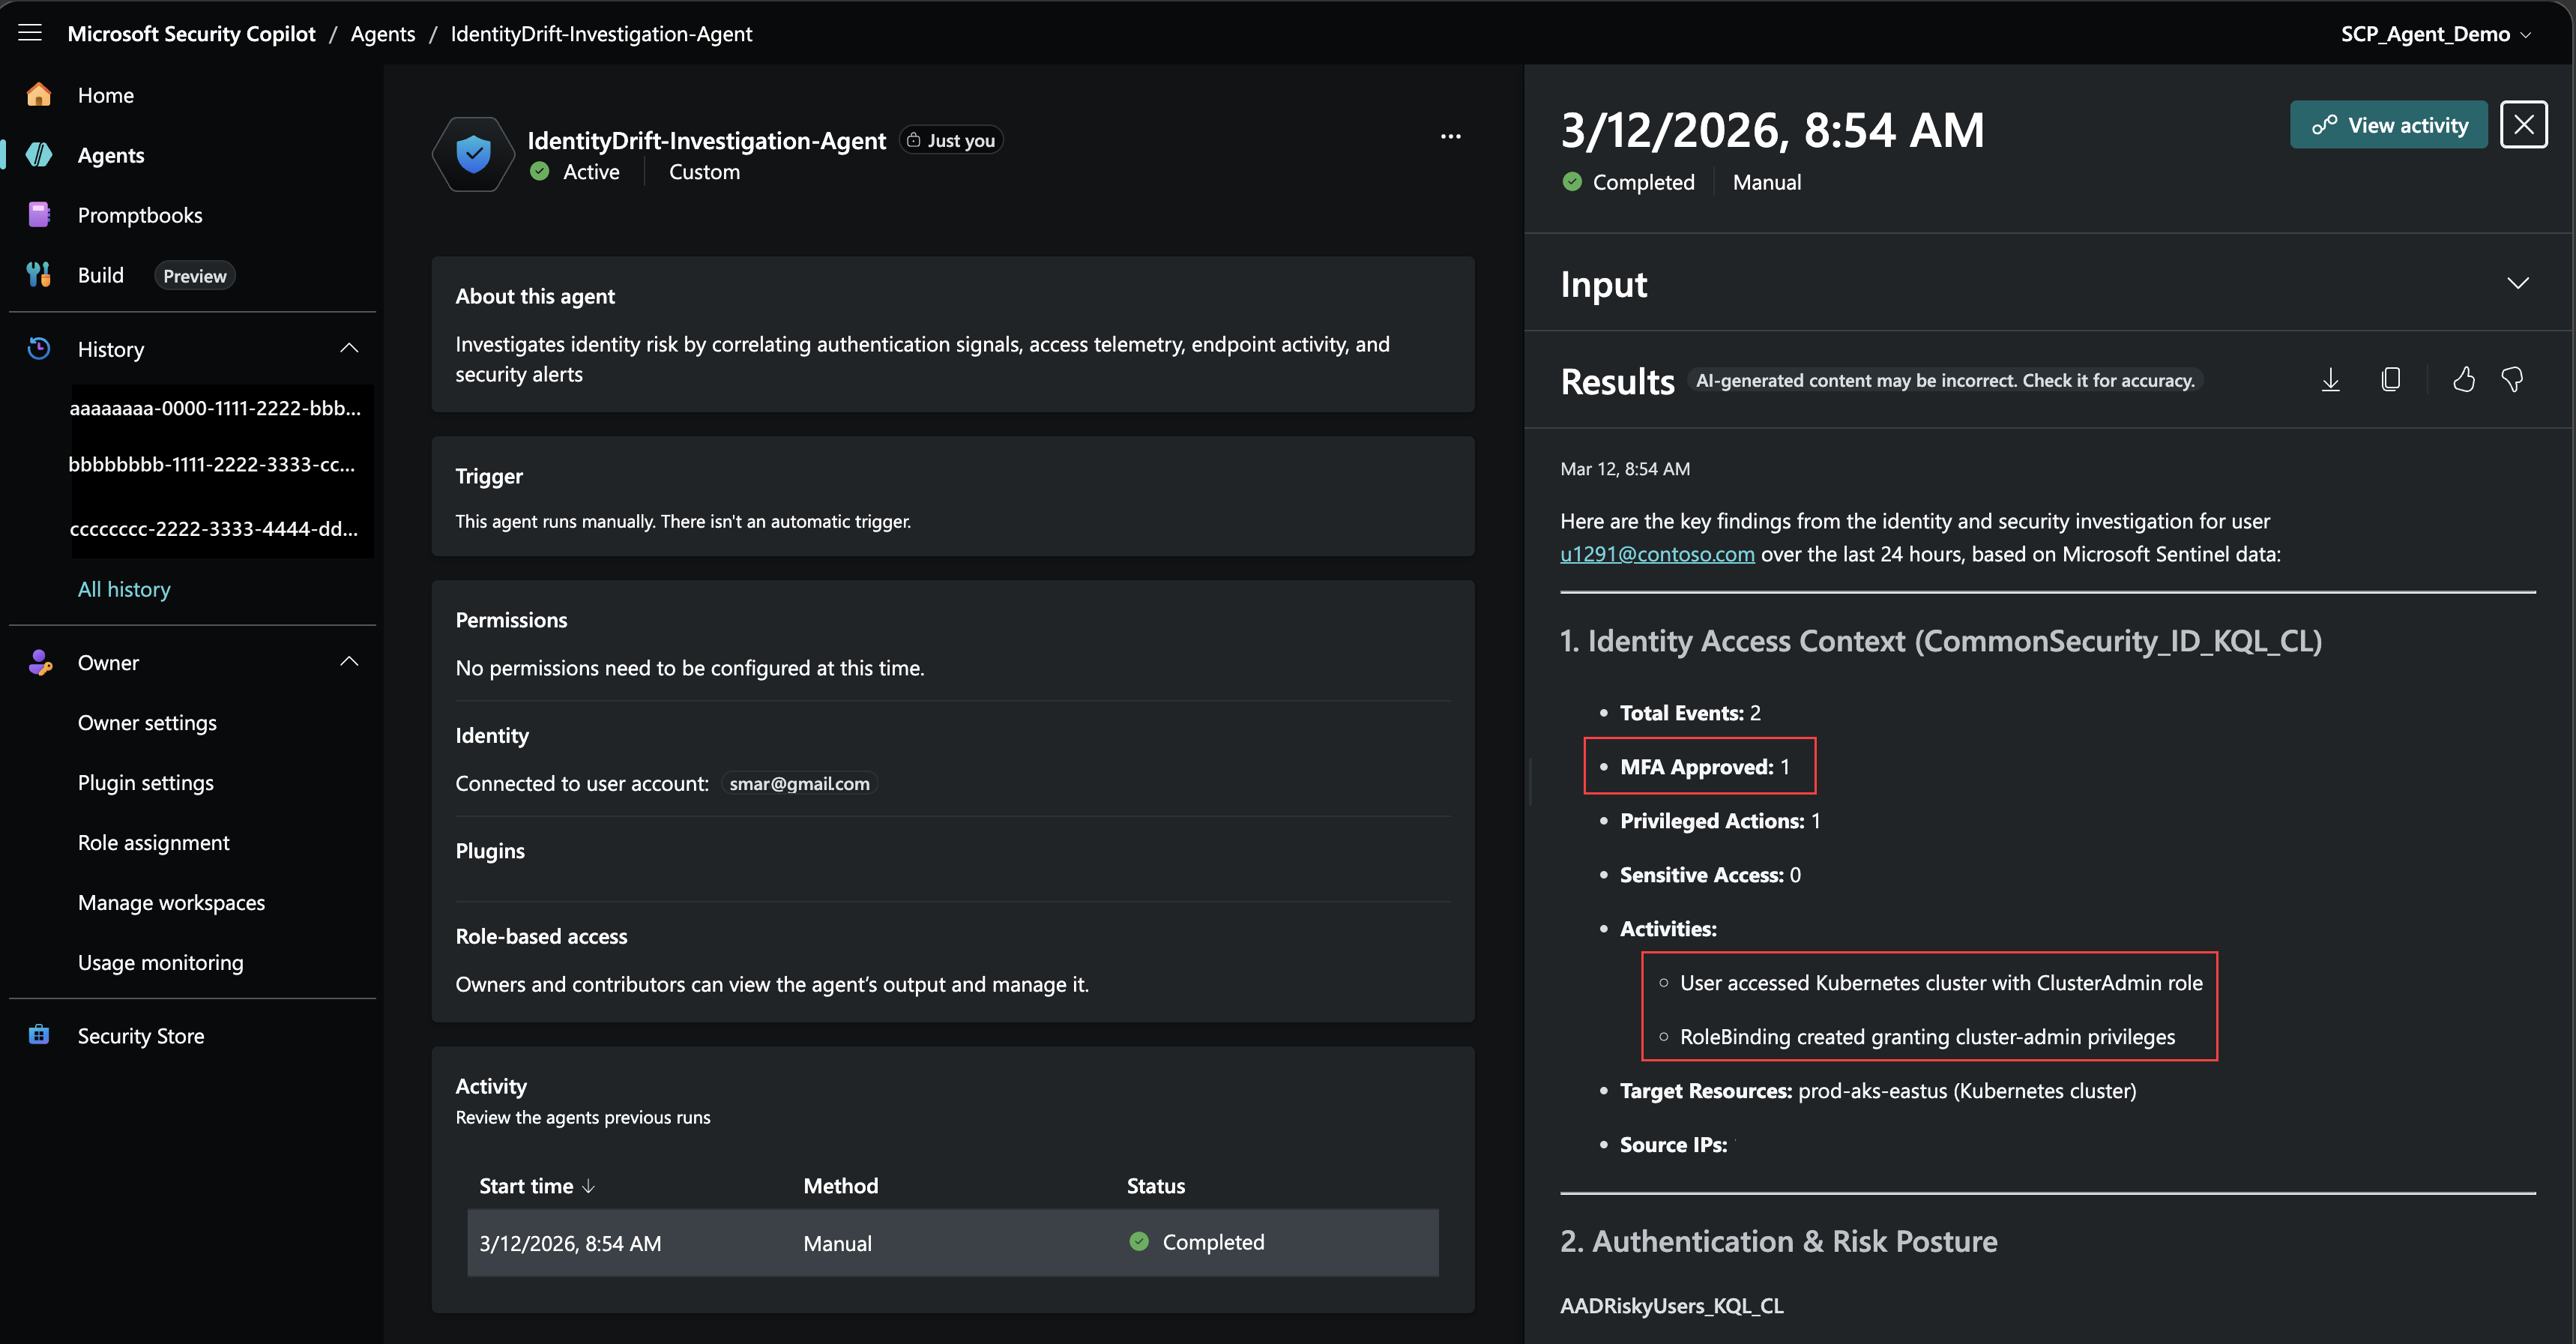
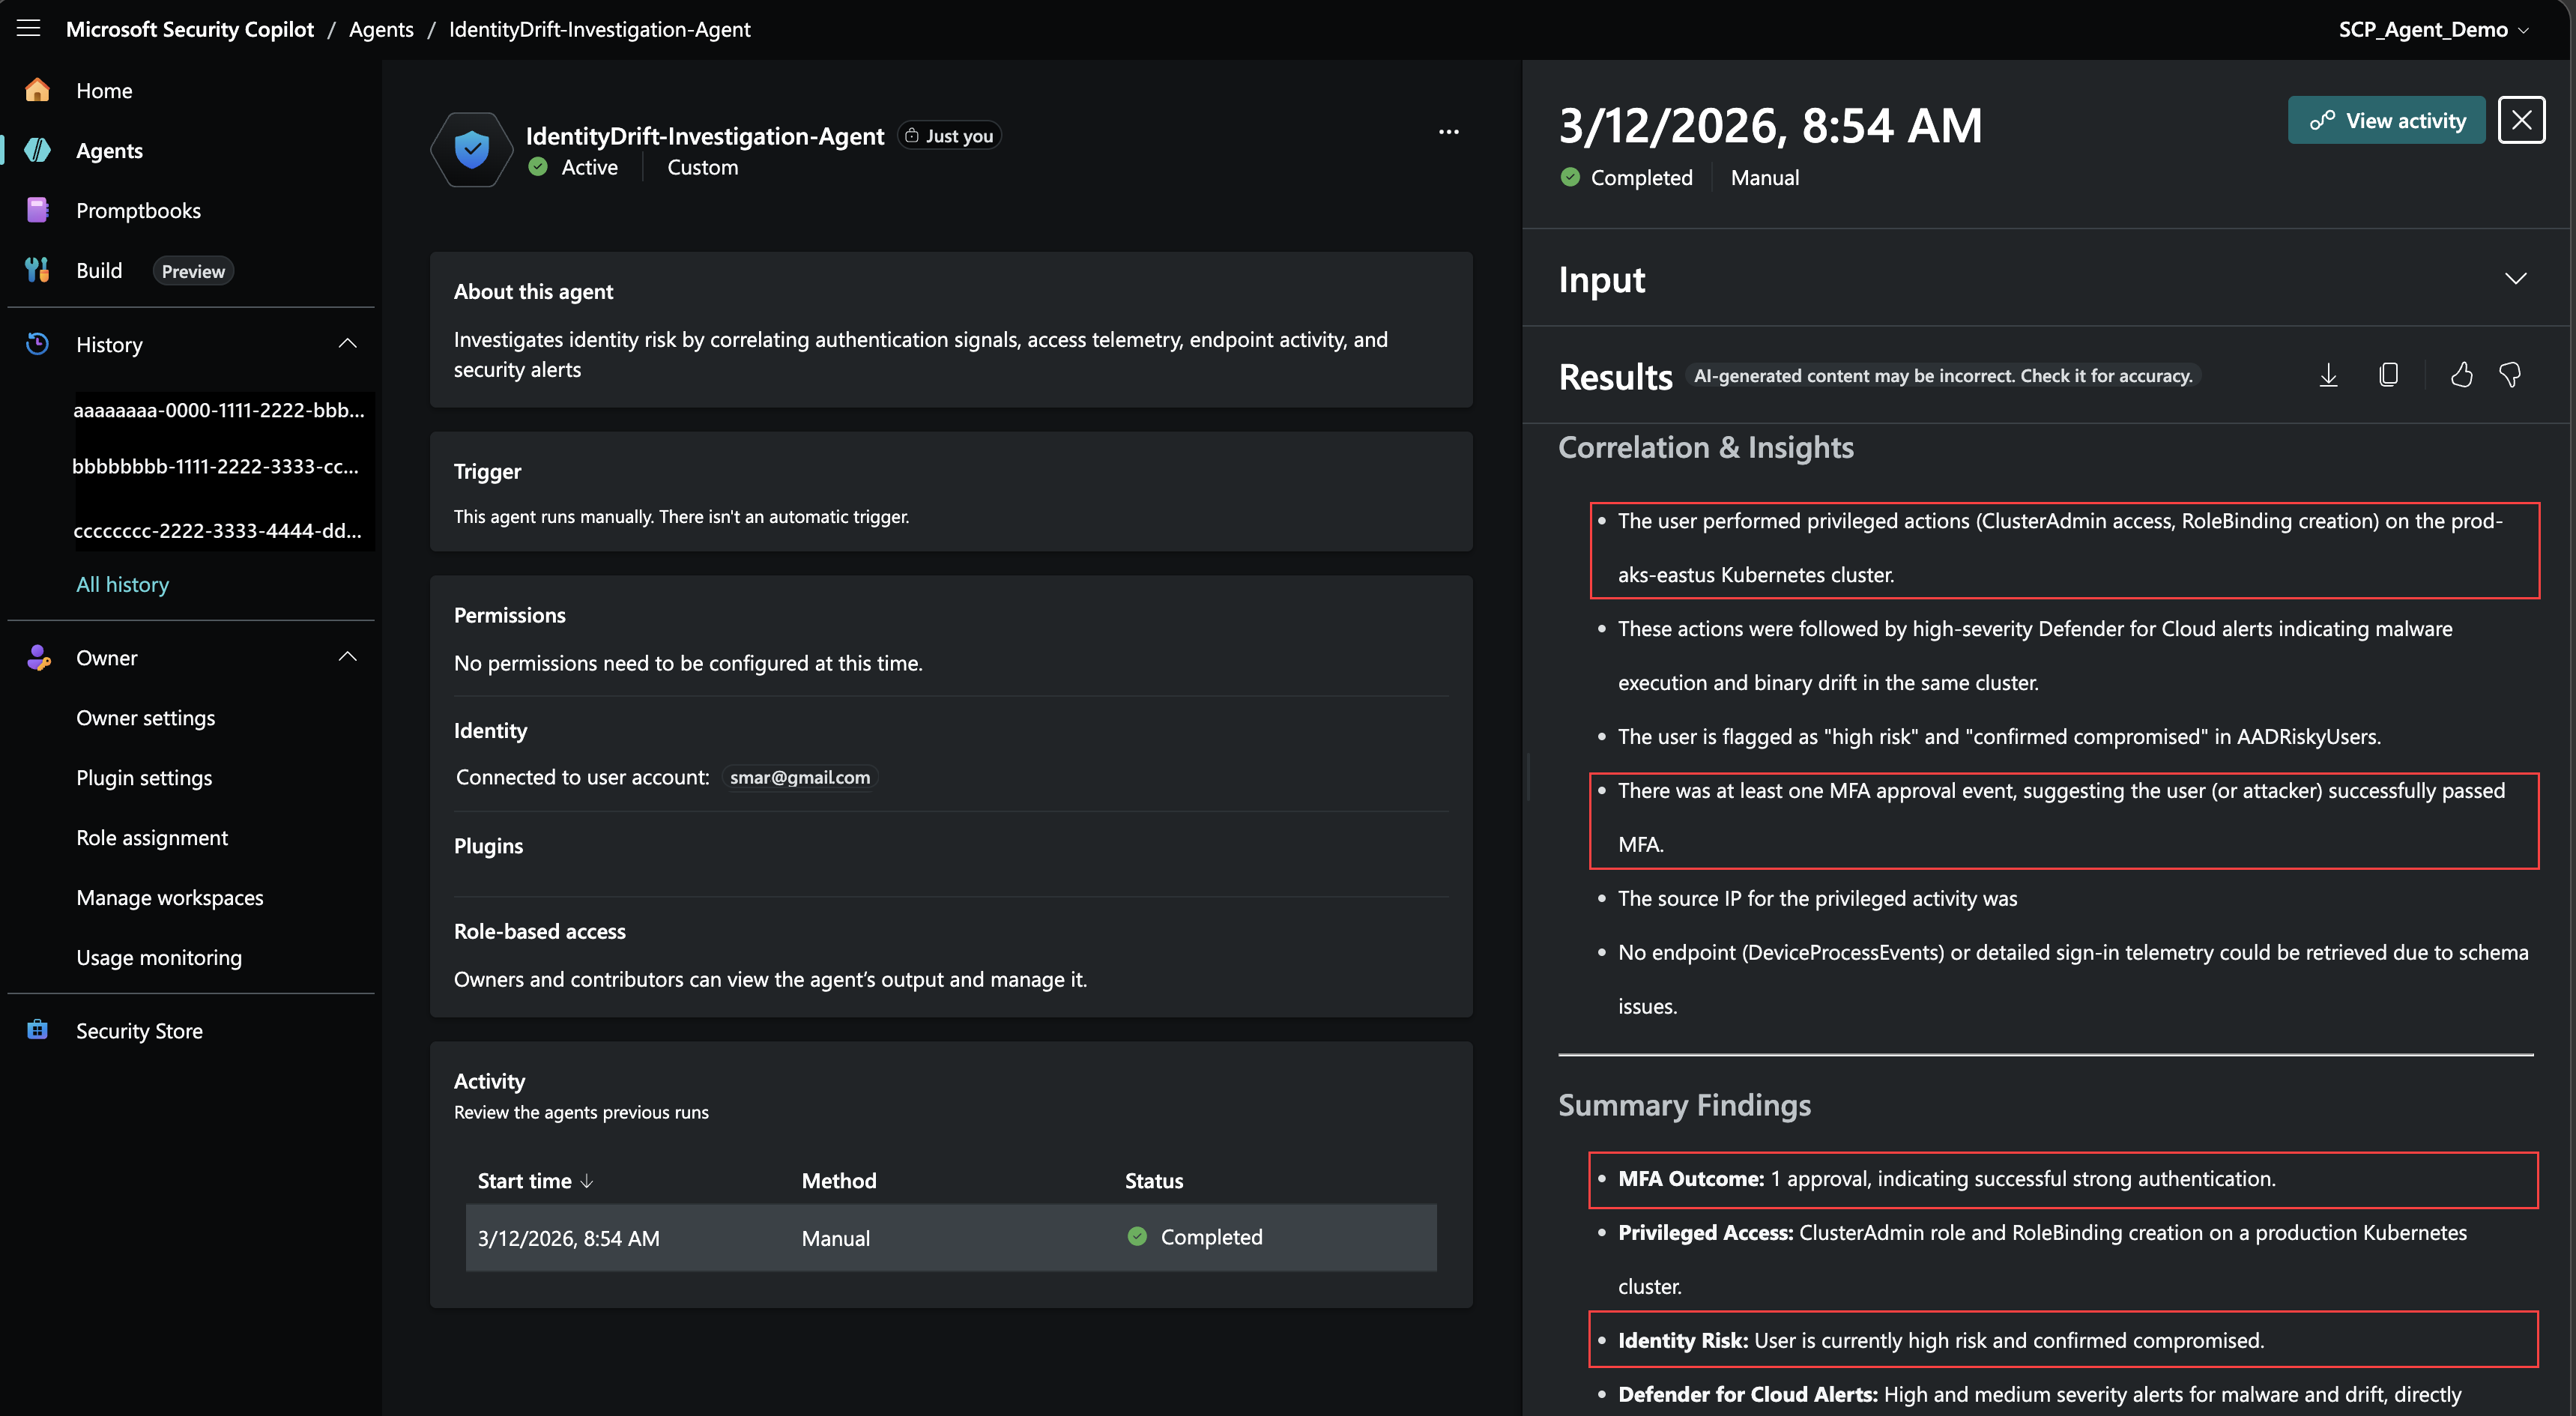
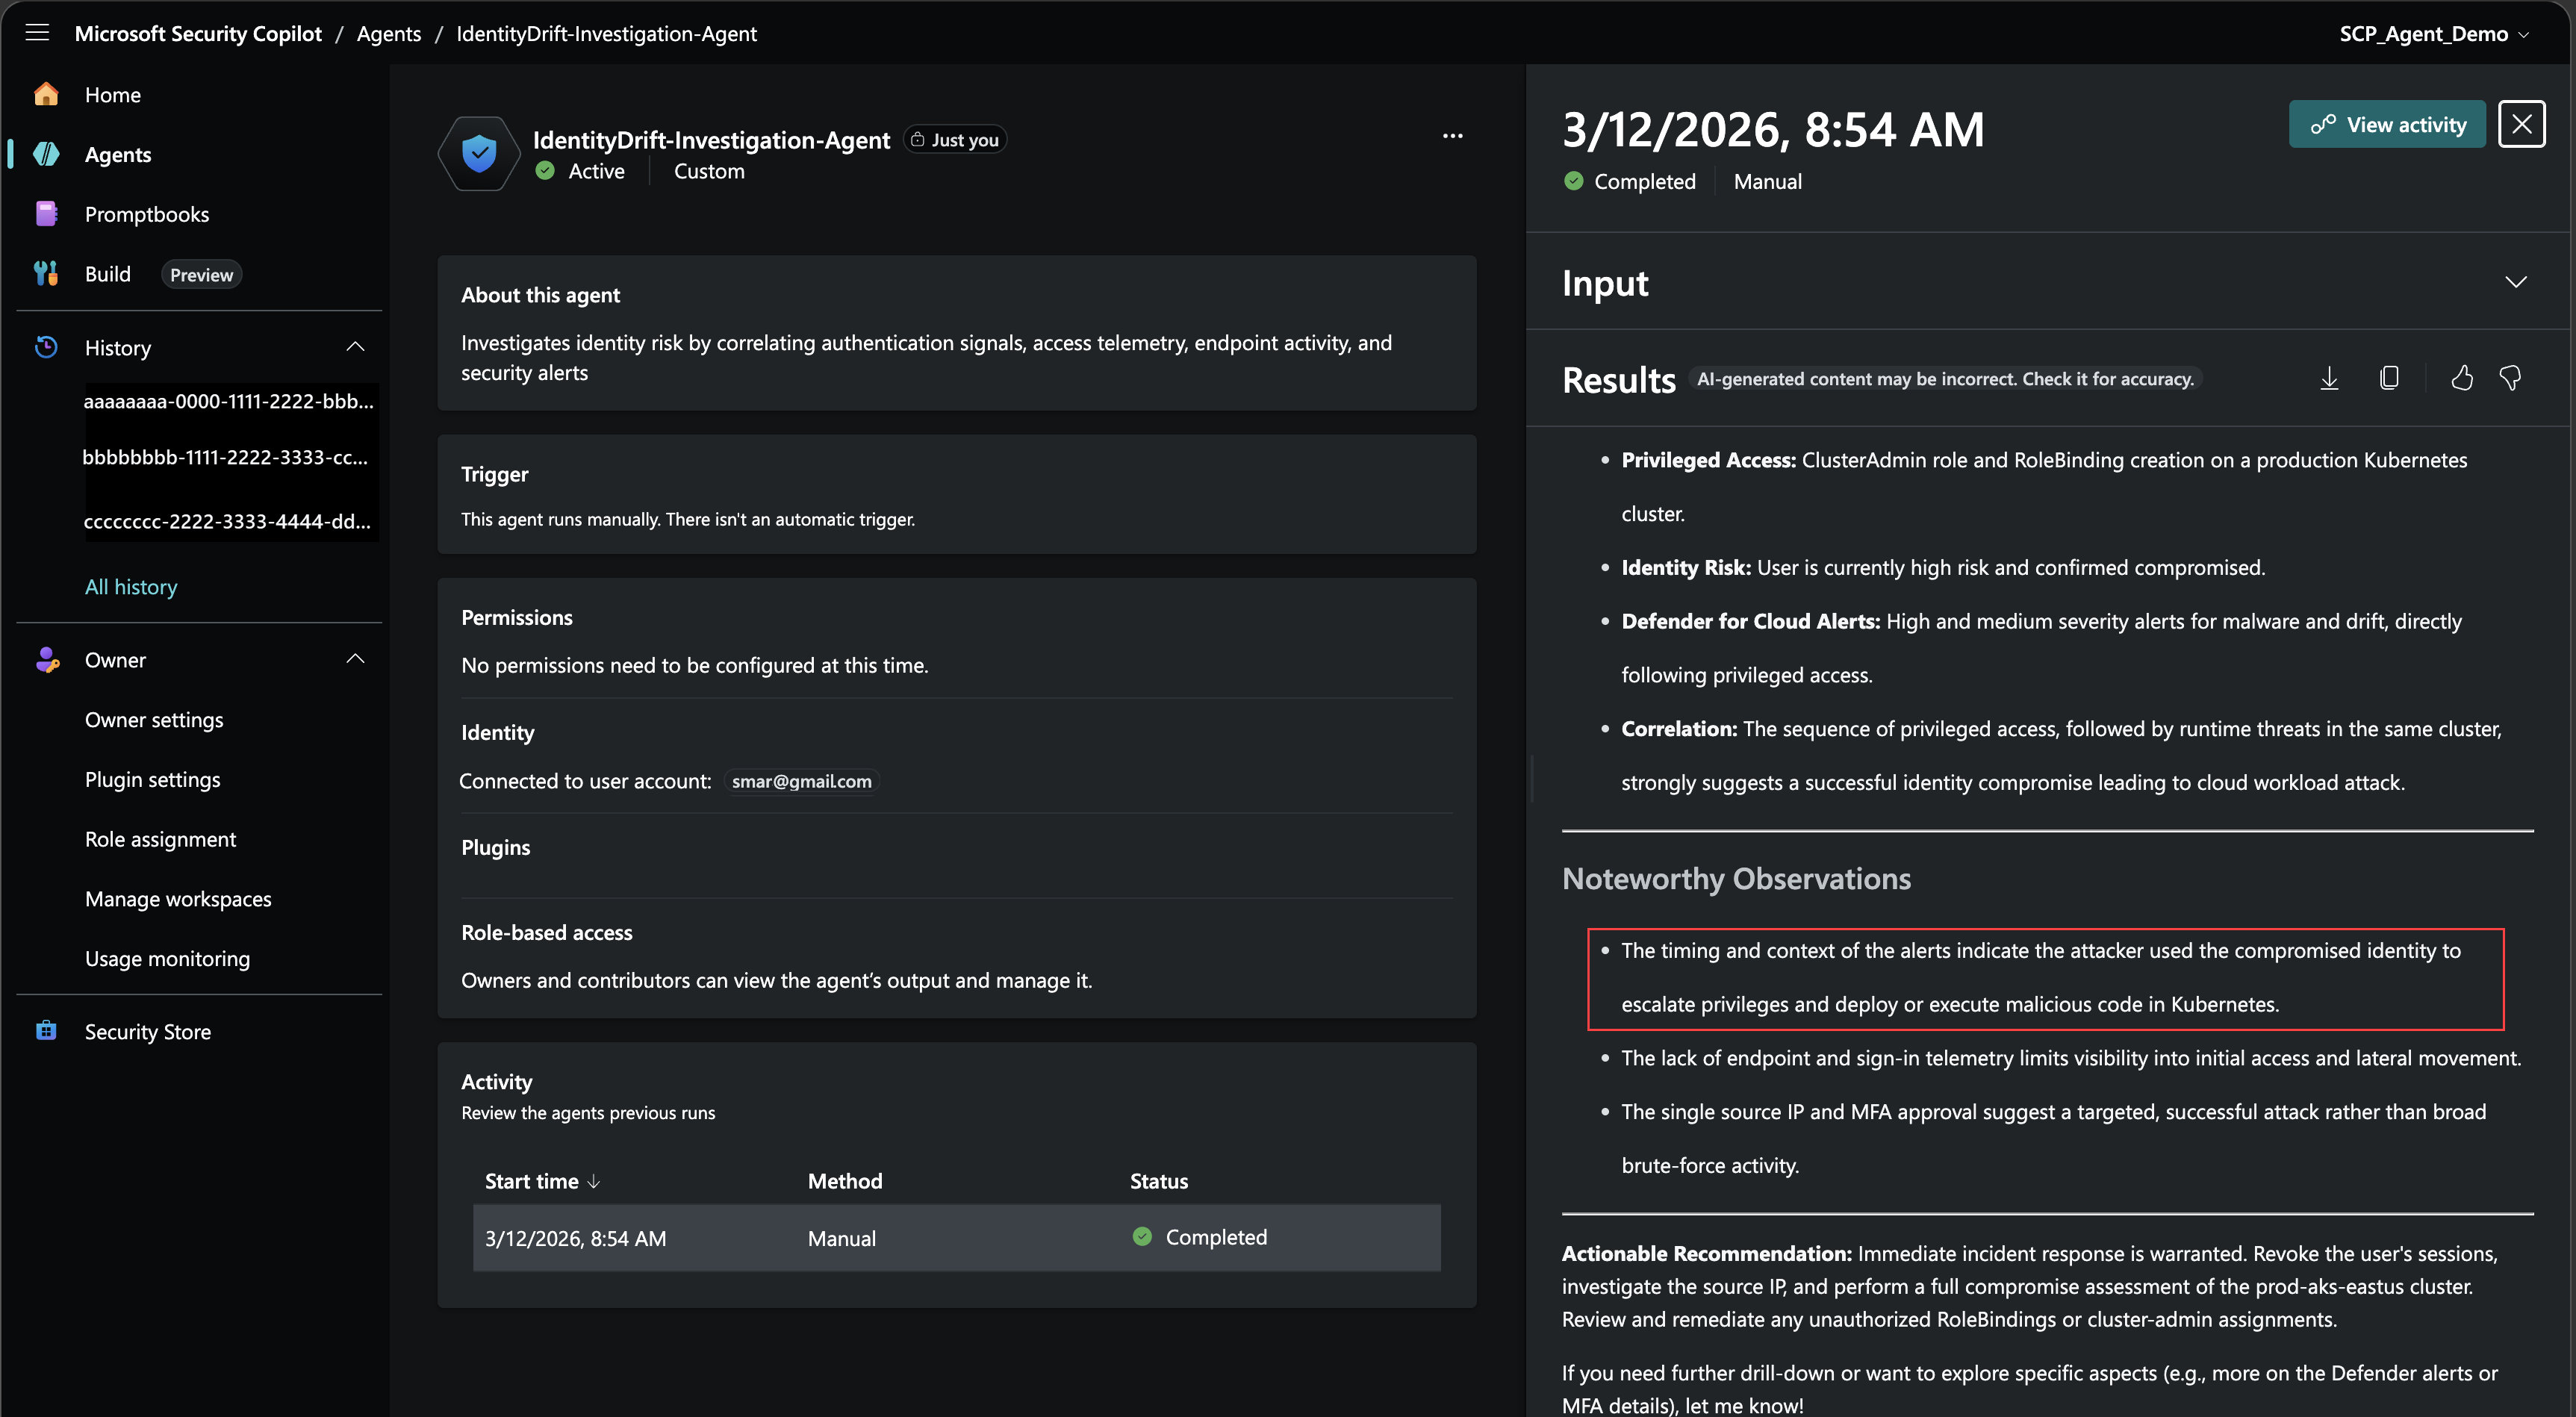
The following images show the results of the agent run, including the Identity Access Context, Authentication and Risk Posture, Correlation and Insights, Summary Findings, Noteworthy Observations, and Actionable Recommendations.
Related content
Continue to Publish your agent to the Security Store