Note
Access to this page requires authorization. You can try signing in or changing directories.
Access to this page requires authorization. You can try changing directories.
Package and publish your Microsoft Security Copilot agent to the Microsoft Security Store. After building and testing your agent, you'll create a deployment package, configure your offer in Microsoft Partner Center, and submit it for review and certification.
This article is part of a series that walks you through ingesting test data to the data lake, developing an agent and publishing the example IdentityDrift platform solution. The solution includes a Security Copilot agent that correlates identity, endpoint, and cloud security signals to automate threat investigations.
Prerequisites
- A working Security Copilot agent
- Microsoft Partner Center account
Publishing overview
Publishing process follows the following flow:
- Agent Development
- Create Deployment Package (.zip)
- Create SaaS Offer in Partner Center
- Configure Offer Metadata & Listing
- Review and publish
- Live in Security Store
Create the deployment package
Create a deployment package for your agent that includes the required manifest files.
Prepare your package structure
Create a folder structure for your agent with the following layout:
agent-package/
├── PackageManifest.yaml (required)
└── YourAgentName/
    └── AgentManifest.yaml (required)
Create PackageManifest.yaml
The manifest file describes your package structure and contents. Create PackageManifest.yaml in the root:
manifest:
  - id: "IdentityDriftInvestigationAgent"
    description: "Agent to investigate Identity Threats"
    type: CopilotAgent
schema:
  version: "1.0.0"
Key fields:
id: Name of your Security Copilot Agent (with no spaces)type:CopilotAgentfor Security Copilot agents (other types:SentinelLake(for notebooks))
Download agent manifest
The AgentManifest.yaml is exported from Microsoft Security Copilot after building and running your agent. Download it from Security Copilot under the agent Build tab and select the agent.
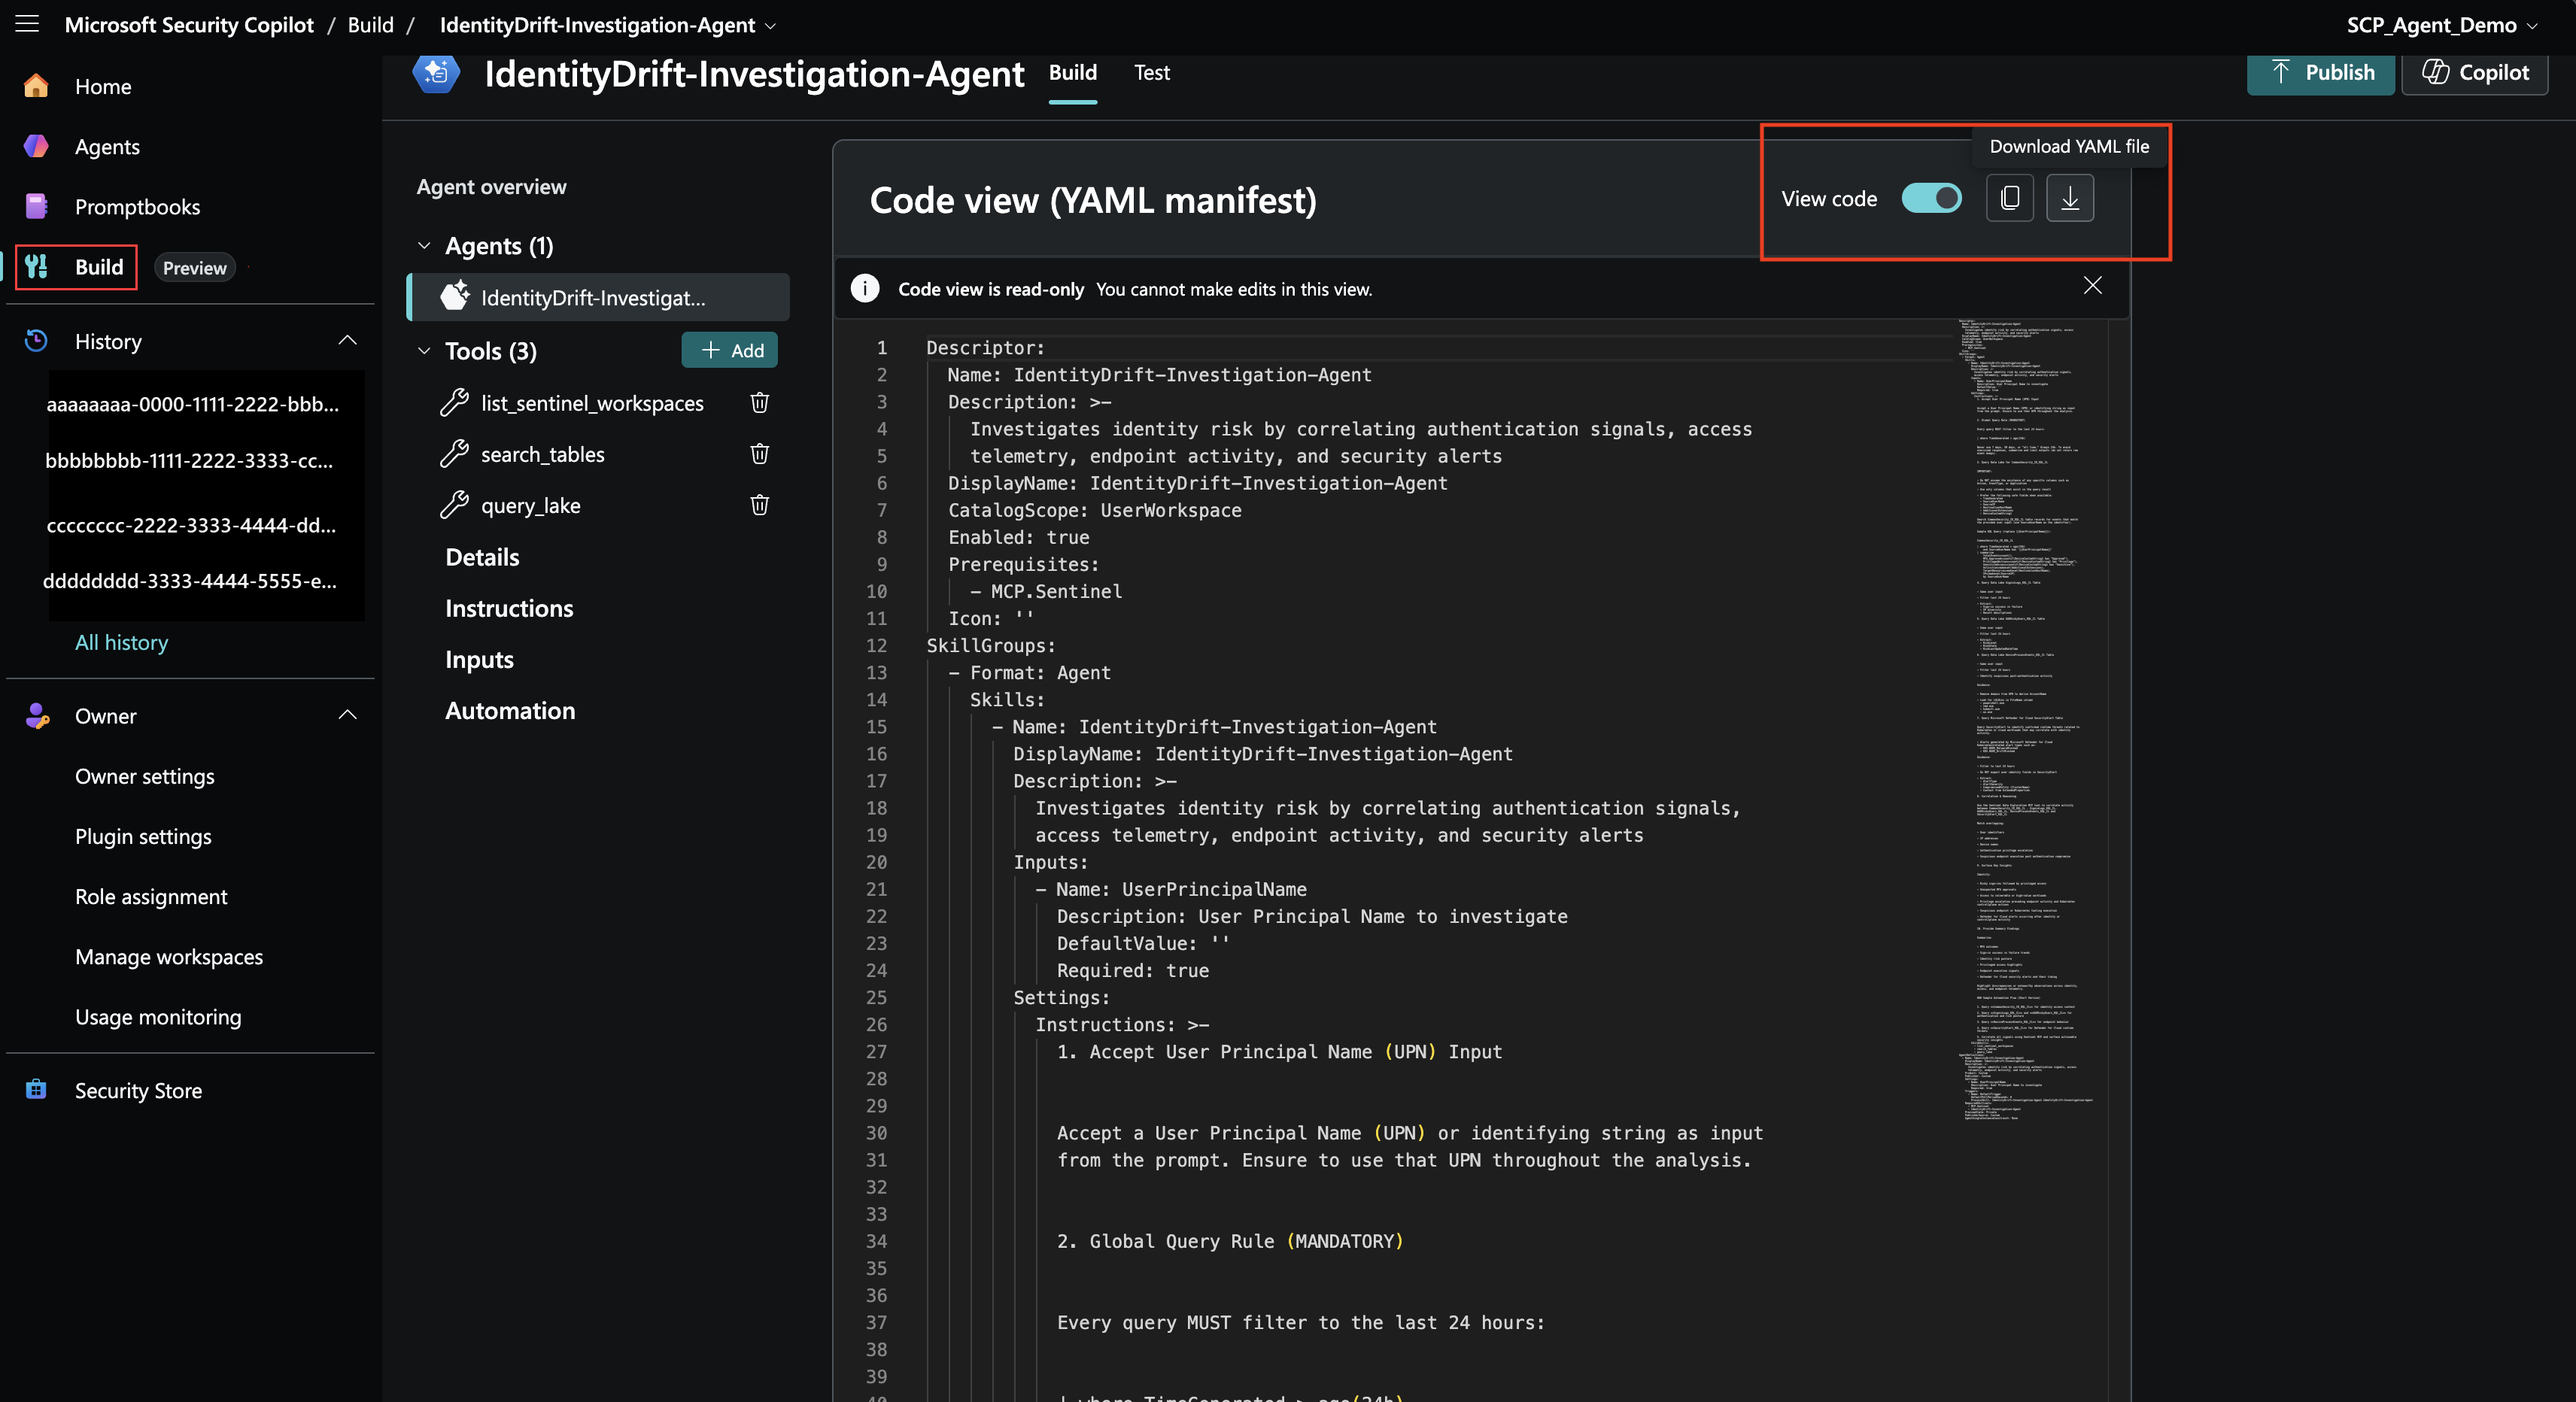
Select to expand: IdentityDrift-Investigation- Agent `AgentManifest.yaml` file.
Descriptor:
  Name: IdentityDrift-Investigation-Agent
  Description: >-
    Investigates identity risk by correlating authentication signals, access
    telemetry, endpoint activity, and security alerts
  DisplayName: IdentityDrift-Investigation-Agent
  CatalogScope: UserWorkspace
  Enabled: true
  Prerequisites:
    - MCP.Sentinel
  Icon: ''
SkillGroups:
  - Format: Agent
    Skills:
      - Name: IdentityDrift-Investigation-Agent
        DisplayName: IdentityDrift-Investigation-Agent
        Description: >-
          Investigates identity risk by correlating authentication signals,
          access telemetry, endpoint activity, and security alerts
        Inputs:
          - Name: UserPrincipalName
            Description: User Principal Name to investigate
            DefaultValue: ''
            Required: true
        Settings:
          Instructions: >-
            1. Accept User Principal Name (UPN) Input
            Accept a User Principal Name (UPN) or identifying string as input
            from the prompt. Ensure to use that UPN throughout the analysis.
            2. Global Query Rule (MANDATORY)
            Every query MUST filter to the last 24 hours:
            | where TimeGenerated > ago(24h)
            Never use 7 days, 30 days, or "all time." Always 24h. To avoid
            oversized responses, summarize and limit outputs (do not return raw
            event dumps).
            3. Query Data Lake for CommonSecurity_ID_KQL_CL
            IMPORTANT:
            - Do NOT assume the existence of any specific columns such as
            Action, EventType, or Application
            - Use only columns that exist in the query result
            - Prefer the following safe fields when available:
              - TimeGenerated
              - SourceUserName
              - SourceIP
              - DestinationHostName
              - AdditionalExtensions
              - DeviceCustomString1

            Search CommonSecurity_ID_KQL_CL table records for events that match
            the provided user input (use SourceUserName as the identifier).

            Sample KQL Query (replace {{UserPrincipalName}}):

            CommonSecurity_ID_KQL_CL

            | where TimeGenerated > ago(24h)
                and SourceUserName has '{{UserPrincipalName}}'
            | summarize
                TotalEvents=count(),
                MFA_Approved=countif(DeviceCustomString1 has "Approved"),
                PrivilegedActions=countif(DeviceCustomString1 has "Privilege"),
                SensitiveAccess=countif(DeviceCustomString1 has "Sensitive"),
                Activities=makeset(AdditionalExtensions),
                TargetResources=makeset(DestinationHostName),
                IPs=makeset(SourceIP)
                by SourceUserName

            4. Query Data Lake SigninLogs_KQL_CL Table
            - Same user input
            - Filter last 24 hours
            - Extract:
              - Sign-in success vs failure
              - IP diversity
              - Result descriptions

            5. Query Data Lake AADRiskyUsers_KQL_CL Table

            - Same user input
            - Filter last 24 hours
            - Extract:
              - RiskLevel
              - RiskState
              - RiskLastUpdatedDateTime

            6. Query Data Lake DeviceProcessEvents_KQL_CL Table
            - Same user input
            - Filter last 24 hours

            - Identify suspicious post-authentication activity

            Guidance:
            - Remove domain from UPN to derive AccountName
            - Look for LOLBins in FileName column
              - powershell.exe
              - cmd.exe
              - kubectl.exe
              - az.exe

            7. Query Microsoft Defender for Cloud SecurityAlert Table

            Query SecurityAlert to identify confirmed runtime threats related to
            Kubernetes or cloud workloads that may correlate with identity
            activity.

            - Alerts generated by Microsoft Defender for Cloud
            Kubernetes‑related alert types such as:
              - K8S.NODE_MalwareBlocked
              - K8S.NODE_DriftBlocked

            Guidance:

            - Filter to last 24 hours

            - Do NOT expect user identity fields in SecurityAlert

            - Extract:
              - AlertType
              - AlertSeverity
              - CompromisedEntity (ClusterName)
              - Context from ExtendedProperties

            8. Correlation & Reasoning

            Use the Sentinel Data Exploration MCP tool to correlate activity
            between CommonSecurity_ID_KQL_CL , SigninLogs_KQL_CL,
            AADRiskyUsers_KQL_CL, DeviceProcessEvents_KQL_CL and
            SecurityAlert_KQL_CL

            Match overlapping:
            - User identifiers

            - IP addresses

            - Device names

            - Authentication privilege escalation

            - Suspicious endpoint execution post authentication compromise

            9. Surface Key Insights

            Identify:

            - Risky sign-ins followed by privileged access

            - Unexpected MFA approvals

            - Access to vulnerable or high-value workloads

            - Privilege escalation preceding endpoint activity and Kubernetes
            control‑plane actions

            - Suspicious endpoint or Kubernetes tooling execution

            - Defender for Cloud alerts occurring after identity or
            control‑plane activity


            10. Provide Summary Findings

            Summarize:

            - MFA outcomes

            - Sign-in success vs failure trends

            - Identity risk posture

            - Privileged access highlights

            - Endpoint execution signals

            - Defender for Cloud security alerts and their timing


            Highlight discrepancies or noteworthy observations across identity,
            access, and endpoint telemetry.


            ### Sample Automation Flow (Short Version)

            1. Query **CommonSecurity_ID_KQL_CL** for identity access context

            2. Query **SigninLogs_KQL_CL** and **AADRiskyUsers_KQL_CL** for
            authentication and risk posture

            3. Query **DeviceProcessEvents_KQL_CL** for endpoint behavior

            4. Query **SecurityAlert_KQL_CL** for Defender for Cloud runtime
            threats

            5. Correlate all signals using Sentinel MCP and surface actionable
            security insights
        ChildSkills:
          - list_sentinel_workspaces
          - search_tables
          - query_lake
AgentDefinitions:
  - Name: IdentityDrift-Investigation-Agent
    DisplayName: IdentityDrift-Investigation-Agent
    Description: >-
      Investigates identity risk by correlating authentication signals, access
      telemetry, endpoint activity, and security alerts
    Product: IdentityDrift
    Publisher: IdentityDrift
    Settings:
      - Name: UserPrincipalName
        Description: User Principal Name to investigate
        Required: true
    Triggers:
      - Name: DefaultTrigger
        DefaultPollPeriodSeconds: 0
        ProcessSkill: IdentityDrift-Investigation-Agent.IdentityDrift-Investigation-Agent
    RequiredSkillsets:
      - MCP.Sentinel
      - IdentityDrift-Investigation-Agent
    PreviewState: Private
    PublisherSource: Custom
    AgentSingleInstanceConstraint: None
Best practices for AgentManifest.yaml
The Security Store review team runs a thorough validation on AgentManifest.yaml before approving offer. The following are the most common failure points observed:
The
productandpublishermust be the ISV name, not generic values. Theproductandpublisherfields underAgentDefinitionsmust reflect the ISV's actual product name and company name. Do NOT leave them as default values like"Custom"after downloading AgentManifest.yaml from Security Copilot.# Incorrect - do not use generic placeholders AgentDefinitions: Product: Custom Publisher: Custom # Correct - use actual ISV product and publisher name AgentDefinitions: Product: Contoso ThreatOps Publisher: Contoso Inc.Settings key names must exactly match skill input names, case-sensitive with no spaces. If your Skill declares an input named
UserPrincipalName, theSettingssection underAgentDefinitionsmust use exactlyUserPrincipalName. Don't useUser Principal Nameoruserprincipalnameor other variation.# Incorrect — Spaces in input names are not allowed. Settings: - Name: User Principal Name # Correct — Matches input key name exactly. No spaces, case-sensitive. Settings: - Name: UserPrincipalNameInput fields must include a
Descriptionproperty. Every input/setting field must have a meaningfulDescriptionthat helps the user understand what value to provide. Without descriptions, users hovering over input fields in Security Copilot see nothing.Skill names must be descriptive and not version labels or random characters. When defining Custom Skills in Security Copilot Agent, skill names like
"Agent v3", or"Skill_01"are rejected because they do not describe what the skill does. Name skills after their action and target, for example,"GetSignInLogsForUser","QueryRiskyUsersTable", or"CorrelateEndpointActivity".RequiredSkillsetsmust include all integrated Microsoft products. If your agent integrates with Microsoft Sentinel Data Exploration or other Sentinel MCP tools, addMCP.SentineltoRequiredSkillsets. This is important not just for standards alignment. WhenMCP.Sentinelis listed, Sentinel visibly appears under the Plugins section in the agent run view.RequiredSkillsets: - MCP.SentinelDon't hardcode time windows in KQL — use input parameters. KQL queries with hardcoded values such as
ago(7d)are flagged as inflexible. Replace them with input parameters so the time window is configurable.# Incorrect — hardcoded time window, inflexible for users and reviewers. Template: >- SigninLogs | where TimeGenerated > ago(7d) ... # Correct — parameterized time window. Template: >- SigninLogs | where TimeGenerated > ago({{TimeRange}}) ...Grammar and spelling audit. The review team checks every text field:
Descriptor.Description,SkillGroupsskill descriptions, input descriptions, andDisplayNamefields. Grammatical errors, for example using redundant phrasing like "for a specific given username", or unnecessary capitalization, are flagged. Run a full grammar check on all YAML text fields before packaging.
Create the ZIP package
For Windows/Linux:
cd agent-package
zip -r agent-package.zip .
For Mac, avoid hidden files:
cd /path/to/agent-package
zip -r agent-package.zip . -x ".*" -x "__MACOSX"
This command creates agent-package.zip while excluding:
- Hidden files (starting with
.) - macOS system folders (
__MACOSX)
Verify package contents:
unzip -l agent-package.zip
You should see:
PackageManifest.yaml
YourAgentName/
YourAgentName/AgentManifest.yaml
Prepare for Partner Center publication
Partner Center is the Microsoft commercial marketplace where you create your offer listing for your Security Copilot agent. Gather the following information and assets:
- Agent name and version. The name must not contain Microsoft product names.
- Agent description of 1-2 sentences describing the agent's purpose and value proposition.
- Agent tasks - a list of what the agent does.
- Agent workflow — explicit inputs and outputs with data sources and table names.
- Marketing or product page URL for the Links section.
- A PDF user guide describing how to install and use the agent from the Security Store.
- ISV Logo (216×216 px) and Agent Screenshots (1280×720 px) showing full agent execution and results.
- Webhook URL for order notifications.
- Pricing model - free or paid.
- SCU consumption estimate.
Prepare the agent description before starting in Partner Center
The Security Store review team requires the offer description to include a structured format covering Agent Tasks, Inputs, and Outputs. The expected format is as follows:
[Agent name] is a security investigation agent that integrates with Microsoft Sentinel to [brief purpose statement].

Agent Tasks:
 - Task 1 (e.g., Identity threat triage)
 - Task 2 (e.g., Authentication analysis)
 - Task 3 (e.g., Cross-telemetry correlation and anomaly detection)

Agent Workflow:
Input:
 - UserPrincipalName (UPN) — the user account to investigate
 - Access to Microsoft Sentinel data lake tables (TableA_CL, TableB_CL, ...)
 - Time range used for queries: TimeGenerated > ago(24h)

 Output:
 - MFA activity summary
 - Sign-in success and failure summary with distinct IP addresses
 - User risk level and risk state summary
 - Suspicious process execution summary
 - Correlated identity-to-endpoint insights
 - Concise triage summary report with investigation-ready findings
Refer to existing published agents in the Security Store such as Silverfort Identity Threat Triage Agent for formatting examples.
Measure SCU consumption
The plan description in Partner Center is required to include an SCU consumption estimate. Before creating your offer in Partner Center, run your agent 3–5 times under typical scenarios and record the SCU usage shown after each run in Security Copilot. Take the average and round up. You will add this to the plan description, for example, "This agent typically consumes 1.0 SCU per analysis run."
Create and configure your offer in Partner Center
Create a new SaaS offer in Microsoft Partner Center and configure the offer metadata, listing, and technical configuration.
Access Microsoft Partner Center
To access Microsoft Partner Center, follow these steps:
- Go to Microsoft Partner Center
- Sign in with your credentials
- Navigate to Marketplace offers
Create new SaaS offer or clone existing offer
To create a new offer, follow these steps:
Select New offer
Select Software as a Service (SaaS) as the offer type
Select Start with a blank offer or Clone an existing offer
Tip
If you have an existing SaaS offer in Partner Center, clone it to reduce setup time. Cloning automatically carries forward your logo, legal documentation, privacy policy links, and other common metadata. You only need to update the Security Copilot agent specific content.
Enter your offer details, using these values as a reference:
- Offer ID:
identity-drift-agent(lowercase, hyphens) - Alias:
IdentityDrift Investigation Agent
- Offer ID:
Select Create
Configure offer setup
Set up your offer in Partner Center by filling in the required fields. For an overview see Publish a Security Copilot Agent in Security Store.
On the Offer setup page enter the following values:
- Would you like to sell through Microsoft?, Select Yes
- Would you like to use Microsoft license management?, Select No
- Customer leads: Optional. Connect your CRM if desired
- Microsoft integrations: Check "My offer integrates with Microsoft Security services"
- Select Save draft
Important
Enable Microsoft Security Services Integration
Checking "My offer integrates with Microsoft Security services" is required. Without enabling this checkbox, the "Microsoft Security services" option won't appear in the left navigation menu of your offer. This is the section where you upload your agent package .zip file.
Fill in the metadata properties
To configure metadata properties, follow these steps:
- Go to Properties
- Under Categories: Select Security or Compliance (primary category)
- Industries: Leave blank
- Legal contract: Choose Standard Contract or provide your own
- Select Save draft
Configure the offer listing
To fill in the offer listing, follow these steps:
- Go to Offer listing in the left menu
- Fill in the required fields as follows:
Search results summary (single line): "Investigation agent that automates security incident investigation and response"
Description: prepared earlier in a structured format outlining agent tasks, inputs, and outputs.
- Add images:
- Logo (216 x 216 px)
- Screenshots (1280 x 720 px)
- Upload the user guide under Product information documents
- Select Save draft
Best practices for offer setup
Important
Agent names must not contain Microsoft product names.
The third-party agent name in Partner Center must not contain any Microsoft product names, including "Security Copilot", "Microsoft Sentinel", "Microsoft Defender", "Entra", etc.
- Incorrect: "Contoso Security Copilot Investigation Agent" - Contains "Security Copilot"
- Correct: "Contoso Identity Threat Triage Agent"
Check all locations including the offer name, the plan name, and the description text.
- Offer listing: links and user guide.
Tip
The following two fields in the offer listing that are commonly missed and cause review failures:
Marketing/Product page link: Under Offer listing > Supplemental product information for customers > Product information links > Links, add the URL to your product marketing page or documentation page.
User guide document: Upload user guide PDF under Offer listing > Supplemental product information for customers > Product information documents. This document must include details for users to learn more about the agent and find instructions to install or use it.
For reference, see the Silverfort Identity Threat Triage Agent User Guide
Screenshots must show full agent execution and results. Screenshots are validated by the review team. Screenshots that show only configuration screens, setup pages, or UI without a running agent are rejected. At least one screenshot must:
- Show the agent actively running and returned results.
- Show the integrated Microsoft product (e.g., Microsoft Sentinel) visibly listed under the Plugins section in the agent view
- Screenshot resolution must be 1280×720 px. Use https://imageresizer.com to resize if needed.
To get Microsoft Sentinel to appear under Plugins, Add
MCP.SentineltoRequiredSkillsetsin yourAgentManifest.yaml.
Add Microsoft Security services metadata
To configure the Microsoft Security services section, follow these steps:
Go to Microsoft Security services in left menu
Configure metadata as follows:
Field Value Integrated Security services Microsoft Security Copilot Microsoft Sentinel (as applicable) Product prerequisites Microsoft Security Copilot Microsoft Sentinel, Microsoft Defender, Microsoft Entra (as applicable) Solution type Deployable solution License management Choose based on your model Check "Security Copilot agent"
Upload Solution Package:
- Select Upload .zip package
- Select your
agent-package.zipfile
Select Save draft
Tip
The Integrated Microsoft Security Products selection must accurately reflect what your agent actually integrates with in the description and in practice. Common mismatches that are hard fails are as follows:
- Agent description mentions Sentinel data lake queries but only "Security Copilot" is selected → Add "Microsoft Sentinel"
- Agent description mentions Defender alerts but "Microsoft Sentinel" is selected → Add "Microsoft Defender"
The selection drives which filter the agent appears under in the Security Store (for example, users filtering by "Microsoft Sentinel" will only see agents that have Microsoft Sentinel selected here).
Add preview audience
To add preview audience members, follow these steps:
- Go to Preview audience in left menu
- Enter Microsoft Entra IDs of internal users who will test:
- Team members
- QA testers
- Select Save draft
Access preview
Invited preview audience members can access the offer listing as follows:
- Users added to preview audience can access:
- Landing page
- Offer listing
- Full deployment flow
- Share preview URL with test audience
- Gather feedback on:
- Listing accuracy
- Deployment steps
- Documentation
Reference: How to preview and test your offer listing for Security Store
Technical configuration
To configure technical settings, follow these steps:
Go to Technical configuration in left menu
Fill in required fields:
Field Value Landing page URL https://securitystore.microsoft.com/mysolutionsConnection webhook Your webhook URL for order/subscription notifications Microsoft Entra tenant ID Your tenant ID Microsoft Entra app ID Your app ID Select Save draft
Technical Configuration is mandatory and blocks submission. Partner Center will block the "Review and Publish" button if the technical configuration is not fully filled in, even if your organization does not plan to use telemetry or license management webhooks. This is a required section for all SaaS offers on the Microsoft commercial marketplace. If you are not ready to implement a webhook:
- Use dummy/placeholder values for the landing page URL, webhook, tenant ID, and app ID
- These values can be updated later by modifying and republishing the same offer
For webhook implementation guidance, see Implementing a webhook on the SaaS service - Marketplace publisher.
Create plan and pricing
Free agents
To configure a free agent plan, follow these steps:
- Go to Plan overview in left menu
- Select Create new plan
- Enter the Plan name:
Identity Drift Investigation Agent plan. Don't include Microsoft product names in plan name. - Enter the Plan description:
Free tier offering of our agent. Include the SCU consumption estimate. - Select Edit Markets
- Select regions where you want to offer (recommend Select all)
- Set Pricing model: Flat rate
- Set Contract duration, Billing Frequency, Price per charge: to $0 USD
- Set Plan visibility to Public (or Private for specific customers)
- Select Save draft
Paid agents
In addition to the steps in the Free agents section, include the following steps to configure a paid agent plan:
- Pricing model: Choose between:
- Flat rate - Fixed monthly/annual fee
- Per user - Price per licensed user
- Contract duration: 1 month, 1 year, 3 years, etc.
- Billing frequency: Monthly or annual
- Price per charge: Set your pricing
- Optional: Check Free trial for 1-month trial period
- Plan visibility: Set to Public (or Private for specific customers)
- Select Save draft
Best practices for plan and pricing
- Plan description must include SCU consumption estimate. The plan description is required to include an estimate of SCU consumption. Add a clear statement such as: "This agent typically consumes 1.0 SCU per analysis run."
To learn more about how to estimate SCU usage, see Manage usage - Microsoft Security Copilot.
The following is a sample full plan description:
The Contoso Identity Threat Triage Agent is available at no cost. This agent typically consumes 1.0 SCU per analysis run. SCU consumption may vary depending on the volume of data in your Microsoft Sentinel workspace and the complexity of the investigation.
Add supplemental content
To add supplemental content, follow these steps:
- Select SaaS Scenarios - SaaS solution is not hosted in Azure.
- In the text box, enter the following note: Offer listing is for Security Copilot Agent in Microsoft Security Store.
- Upload Product documentation and select category Architecture diagram
Publish your agent
Final review checklist
Before publishing, verify:
- All required fields completed
- Offer listing is grammatically correct and accurate
- Agent name does NOT contain Microsoft product names ("Security Copilot", "Microsoft Sentinel", etc.)
- Marketing/product page link added under Offer Listing → Links
- User guide document uploaded under Product information documents
- Logo (216×216 px) and screenshots (1280×720 px)
- At least one screenshot shows full agent execution with integrated product visible under Plugins
- In AgentManifest.yaml file - in AgentDefinition section
productandpublisherfields reflect actual ISV name (not "Custom") - Plan description includes SCU consumption estimate
- Technical configuration has all required values
- ZIP package is valid and up to date
- Terms and privacy policy links work
Submit for publication
To submit your offer for publication, follow these steps:
- Select Review and publish (top right of Partner Center)
- Review all sections
- If all validation passes, select Publish
- Your offer enters automated review process
- After the automated review, select Go Live to move the request to Security Store team for review and certification
Monitor publication status
To monitor the status of your publication, follow these steps:
- Return to Partner Center → Marketplace Offers
- Find your offer
- Review status indicators:
- In review - Being validated by Security Store team
- Changes required - Review feedback received, corrections needed
- Published - Live in Security Store
Verify live listing
Once published, verify your listing at Security Store.
Check:
- Agent description displays correctly
- Screenshots are visible
- Links are working
Troubleshooting
Package zip file rejected or fails validation
| Symptom | Solution |
|---|---|
| Invalid package structure | Verify PackageManifest.yaml is in root directory with correct formatting |
| Hidden files included in ZIP | On Mac, use: zip -r package.zip . -x ".*" -x "__MACOSX" |
| Agent name contains Microsoft product name | Remove "Security Copilot", "Microsoft Sentinel", "Microsoft Defender", "Entra", or any Microsoft product name from the agent name field in Partner Center.- Check all locations: the Offer name, Plan name, and description text body - Resubmit after renaming |
| Screenshots rejected — "do not depict functionality of the agent" | Screenshots must show a full agent execution run, not just configuration or setup pages - At minimum one screenshot must show: (1) agent actively running/returning results, (2) integrated Microsoft product (for example, Microsoft Sentinel) visible under Plugins - Add |
Your agent is now published to the Microsoft Security Store and available for customers. Monitor agent adoption and usage metrics, and use customer feedback to refine agent instructions and expand capabilities.
Related content
For more detailed information, see: