Note
Access to this page requires authorization. You can try signing in or changing directories.
Access to this page requires authorization. You can try changing directories.
As an ISV partner, you can build, test, package, and publish Jupyter notebook analytics solutions to the Microsoft Security Store as SaaS offers. The Microsoft Sentinel data lake supports Jupyter notebooks that run on managed Spark pools against large security datasets. These notebooks are ideal for low-and-slow attack detection, behavioral baselining, AI/ML-based analytics, sensitive-data-path mapping, data visualizations, and enrichments that traditional KQL detections can't express.
A notebook platform solution is typically designed for historical analysis, complex data transformations and recurring data processing workflows It writes output to a custom table in the data lake, where downstream analytic rules, hunting queries, Security Copilot agents, or MCP tools can consume the results of the notebook solution. The .zip package you submit to Partner Center is declared as type SentinelLake and contains the notebooks and optionally an ARM template for downstream Azure resources the notebook needs.
This article walks you through building, testing, packaging, and publishing a Microsoft Sentinel platform - notebook solution to the Microsoft Security Store. After completing this guide, you'll have:
- A working Jupyter notebook that reads data from the Sentinel data lake
- A scheduled job that runs the notebook on a managed Spark pool
- A
SentinelLakepackage zip (PackageManifest+ notebook folder) - A Partner Center SaaS offer listing in the Microsoft Security Store
Prerequisites
Your tenant must be on-boarded to the Microsoft Sentinel data lake. Verify your onboarding status in the Defender portal. Navigate to System > Settings > Microsoft Sentinel > Data lake. The status reads Provisioned if your tenant is ready. For onboarding instructions, see Onboard to the Microsoft Sentinel data lake.
Required permissions
| Operation | Required role |
|---|---|
| Onboarding to the Sentinel data lake | Microsoft Entra ID - Security Administrator or Global Administrator |
| Onboard Sentinel workspace to Defender portal | Subscription Owner, or User Access Administrator at subscription scope and Microsoft Sentinel Contributor at subscription or resource group scope |
| Onboard Sentinel workspace to Data Lake | Subscription Owner or Microsoft Sentinel Contributor at subscription or resource group scope |
| Run notebooks on the data lake | Microsoft Sentinel Reader or Contributor |
| Log Analytics workspace (for write-back to analytics tier) | Log Analytics Contributor assigned to the data-lake managed identity msg-resources-<guid> |
| Microsoft Partner Center | Marketplace Publisher account (one-time; same account used for SCC agent publishing) |
Note
The Subscription Owner role is required for a one-time data lake onboarding task. Use Microsoft Entra Privileged Identity Management (PIM) to temporarily elevate to this role only when needed, then remove access after onboarding completes.
Required tools
- Visual Studio Code.
- Microsoft Sentinel VS Code extension
- GitHub Copilot VS Code extension is recommended speeding up notebook authoring.
- Python 3.10+ installed locally. The Spark kernel runs in Azure but VS Code needs a local interpreter for cell editing.
Process overview
The publishing process starts with local notebook development moving to a packaged SaaS offer discoverable in the Microsoft Security Store.
- Local notebook development (VS Code + Sentinel extension)
- Run interactively against the Sentinel platform
- Test against representative data; validate output table populates
- Schedule as a Job (on-demand or scheduled)
- Package as SentinelLake .zip (PackageManifest.yaml + folder)
- Create SaaS Offer in Microsoft Partner Center
- Upload package, create metadata, plan, and pricing
- Review and Publish, automated review, Go Live
- Live in Microsoft Security Store
Install Visual Studio Code and the Microsoft Sentinel extension
All notebook development happens locally in VS Code with the Microsoft Sentinel extension installed. The Spark kernel runs in Azure—VS Code is the editor and submission client.
Download Visual Studio Code from
https://code.visualstudio.com/and install with default options.Open VS Code > Extensions marketplace (Ctrl+Shift+X or Cmd+Shift+X).
Search for Sentinel and install the Microsoft Sentinel extension (publisher:
ms-security).After installation, the Microsoft Sentinel icon appears in the left toolbar.
(Recommended) Search for GitHub Copilot in the marketplace, install it, and sign in to GitHub when prompted.
Copilot knows the
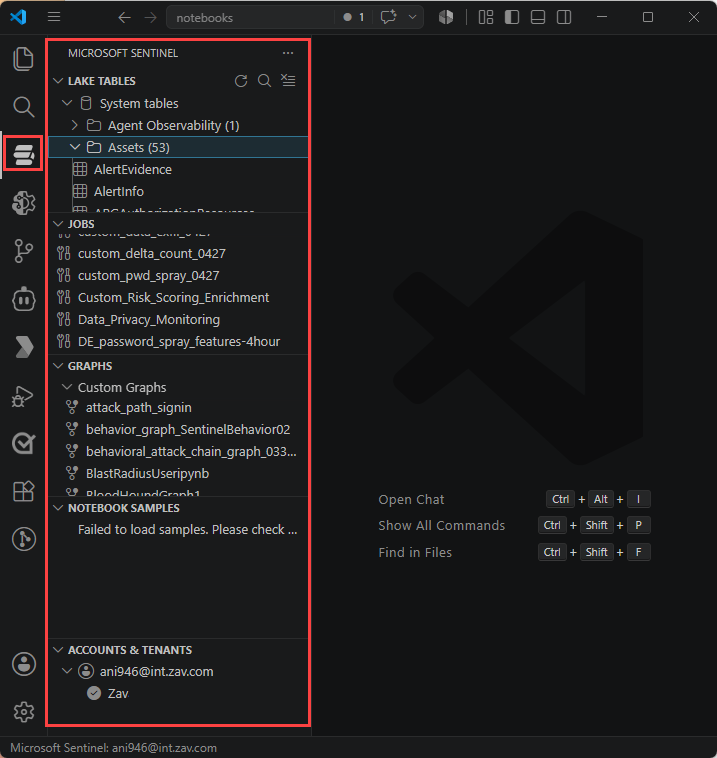
MicrosoftSentinelProviderAPI and autocompletes PySpark transforms.Select the Microsoft Sentinel icon in the left toolbar.
Approve the sign-in dialog, then select the account with Sentinel Reader / Contributor on your workspace.
The left pane shows Lake tables and Jobs, confirming the extension reached the data lake.
Caution
If you have multiple guest tenants signed in, switching accounts at the bottom-left of VS Code kills any active PySpark sessions—you need to restart the kernel after switching. Plan account switches between runs, not during them.
Develop your notebook
Notebooks use this authoring pattern:
- Read a data-lake table into a Spark DataFrame
- Transform with PySpark
- Optionally enrich with external data
- Write results to a custom table that Sentinel can consume
Explore the Lake tables panel
To identify the input tables your notebook uses, explore the Lake tables panel:
- Select the Sentinel icon and expand Lake tables.
- Tables are grouped by database and category (System, Custom, Federated). Select any table to see its column definitions and types.
- Identify the input tables your notebook reads and note the exact names.
Create a new notebook
To create a new Jupyter notebook for your solution, complete the following steps:
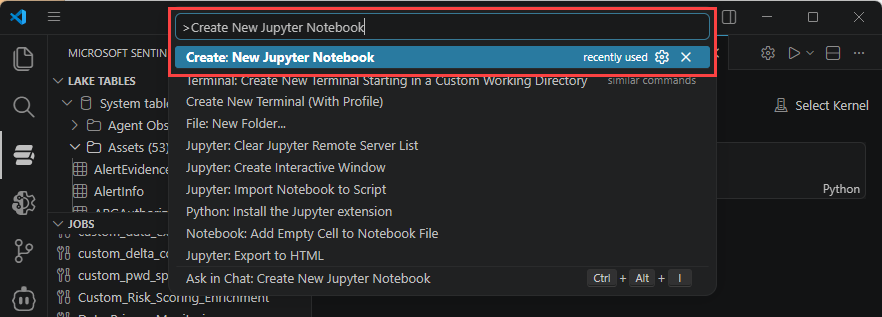
Press Ctrl+Shift+P / Cmd+Shift+P > type Create New Jupyter Notebook, or select File > New File > Jupyter Notebook.
Save the notebook with a descriptive name (for example,
failed-signin-baseline.ipynb).
Read a table
Paste this template into the first cell and replace the table name with yours:
from sentinel_lake.providers import MicrosoftSentinelProvider
data_provider = MicrosoftSentinelProvider(spark)

# Read a table from the data lake
table_name = "EntraGroups"
df = data_provider.read_table(table_name)

# Quick sanity check—show 100 rows
df.select("displayName", "groupTypes", "mail", "tenantId").show(100, truncate=False)
Select a runtime pool and run the cell
To run the cell against the data lake, select a pool and submit:
Select the Run triangle on the cell.
When prompted, choose Microsoft Sentinel as the runtime.

Choose a pool size: Small for exploration, Medium for transforms, Large for ML or aggregations over tens of millions of rows.
The first run takes 3 to 5 minutes to spin up the Spark session. Subsequent cells run in seconds.
Transform and write back to a custom table
The save_as_table() method writes a DataFrame to a custom table in the lake tier (or analytics tier). The destination table is created on first write.
df_transformed = (
    df.filter(df.mail.isNotNull())
    .select("displayName", "groupTypes", "mail", "mailNickname", "description", "tenantId")
)

write_options = {"mode": "overwrite"}
data_provider.save_as_table(
    df_transformed,
    "EntraGroups_Processed_SPRK",
    write_options=write_options,
)
Notebook authoring patterns
The following patterns cover the most common scenarios:
| Pattern | When to use it |
|---|---|
| Baseline + drift | Compute per-user or per-host normal behavior; flag rows that drift from baseline. Classic for failed-signin and process-execution analytics. |
| Cross-table join | Join the lake table you own with built-in tables (SigninLogs, SecurityAlert, DeviceProcessEvents) on shared entities (UPN, host, IP). |
| ML scoring | Train or load a pretrained model in the notebook; score each row; write top-N risky rows to a custom output table for downstream alerting. |
| Visual investigation | Plot timelines, heatmaps, and process trees with matplotlib, or plotly; export the notebook as HTML for hand-off. |
Tip
Use markdown cells liberally to document your code. A Security Store reviewer—and the SOC analyst who runs your notebook—needs to understand what each section does without reading the code. Place a markdown cell above every code block explaining purpose, inputs, outputs, and expected output. Reviewers treat unclear notebooks as a hard fail.
Test the notebook
Testing requires proving the notebook runs end-to-end on realistic data and produces a usable output table.
Smoke test on Small pool
Run the notebook end-to-end to confirm every cell completes without error:
- Restart the kernel to clear any stale state.
- Run all cells from top to bottom—every cell must complete without error.
If a transform cell takes more than 5 minutes on Small, your input filters are too loose. Tighten the date or column projection before scaling up.
Validate the output table
Confirm the output table was created and contains the expected data:
- In the Sentinel extension's Lake tables panel, refresh and confirm your output table appears with the expected schema.
- Run a verification cell:
verify_df = data_provider.read_table("EntraGroups_Processed_SPRK")
print("Row count:", verify_df.count())
verify_df.printSchema()
verify_df.show(5, truncate=False)
Scale test on Medium or Large pool
Verify the notebook produces consistent results on larger pool sizes:
- Rerun the notebook on Medium (and Large if your dataset warrants it).
- Confirm row counts and column distributions match the Small run. If they diverge, you have a non-deterministic transform that needs investigation.
Test edge cases
- Empty input: Point at a table or date range with zero rows. The notebook should fail gracefully or write an empty output—not crash.
- Schema drift: If your input table gains a column, the notebook should still run. Never assume positional order.
Schedule the notebook as a job
Most published notebook solutions run on a schedule—hourly baseline, daily anomaly scan, and so on. The Sentinel extension turns any saved notebook into a scheduled job that runs unattended on a managed Spark pool.
Create the job
To convert the notebook into a scheduled job, complete the following steps:
- Open your notebook in VS Code.
- Select Create schedule Job in the notebook, then choose Use existing notebook when prompted.
For more information, see Create and manage Jupyter notebook jobs.

Configure the job
To configure the scheduled job, fill in the following fields:
- Enter a kebab-case Job name that describes the notebook (for example,
failed-signin-baseline-hourly). - Enter a one-sentence Description covering the job's purpose and output table.
- Select the Spark pool size that you validated during testing. Don't oversize—jobs run on this pool every invocation.
- For the Schedule, choose On demand for manual runs, or Scheduled with a repeat frequency (minute, hourly, daily, weekly, or monthly).
- Select Submit to publish the job.
Verify the job
After submitting, confirm the job is running correctly:
Switch to the Jobs panel in the Sentinel extension—your job should appear.
Select the job > Run now for an immediate validation run.
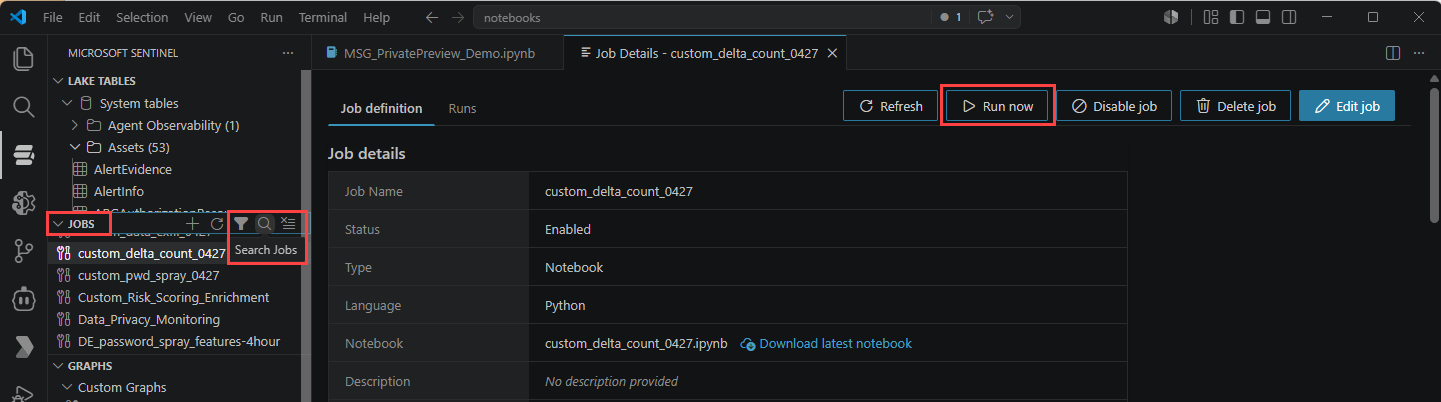
After the run completes, switch to the Run history tab to inspect logs and timing.
Important
Submitted jobs are decoupled from your local .ipynb file. Editing the local file doesn't update the running job. To update a job: open it in the Jobs panel > Download the notebook > edit > Edit job > Submit to upload the updated version.
View the job in the Defender portal
Navigate to Microsoft Sentinel > Data lake exploration > Jobs. You can enable or disable the schedule and view run history here, but can't edit the notebook from the portal.
Package and publish your notebook solution
Once your notebook is tested and materialized, package it for deployment to customers. For detailed packaging instructions, see Package and publish Microsoft Sentinel graph and notebook solutions.
Troubleshooting
Notebook authoring
| Symptom | Likely cause and fix |
|---|---|
MicrosoftSentinelProvider not found |
Extension not signed in, or you opened a non-Spark kernel. Sign in to the Microsoft Sentinel extension and select the Microsoft Sentinel runtime when prompted. |
| Cell hangs at "Starting Spark session" | First-cell startup takes 3 to 5 minutes. After 6 minutes, check the vCore-utilization indicator in the status bar—your pool may be at capacity. Try a smaller pool size. |
save_as_table fails with permission denied on analytics tier |
The data-lake managed identity msg-resources-<guid> doesn't have Log Analytics Contributor on the LogAnalytics workspace, Assign it per the prerequisites and retry. |
| Output table appears in Lake tables panel but is empty | A .filter() likely removed all rows. Add a row count print immediately before save_as_table to localize the issue. |
For more information, see Notebooks troubleshooting.
Job scheduling
| Symptom | Likely cause and fix |
|---|---|
Edits to local .ipynb not reflected in scheduled job |
Submitted jobs are decoupled from the local file. Download the job from VS Code, edit it, then use Edit job > Submit to upload the new version. |
| Job runs but produces no output | Check the Run history tab in the Jobs panel—the run log usually shows the failing cell. The most common cause is the notebook reading from a table the running identity doesn't have access to. |
For more information, see Notebooks troubleshooting.