This article explains how to deploy a small application to run on Azure Spring Apps.
The application code used in this tutorial is a simple app. When you complete this example, the application is accessible online, and you can manage it through the Azure portal.
This article provides the following options for deploying to Azure Spring Apps:
- The Azure portal option is the easiest and the fastest way to create resources and deploy applications with a single click. This option is suitable for Spring developers who want to quickly deploy applications to Azure cloud services.
- The Azure portal + Maven plugin option is a more conventional way to create resources and deploy applications step by step. This option is suitable for Spring developers using Azure cloud services for the first time.
- The Azure Developer CLI option is a more efficient way to automatically create resources and deploy applications through simple commands. The Azure Developer CLI uses a template to provision the Azure resources needed and to deploy the application code. This option is suitable for Spring developers who are familiar with Azure cloud services.
- The Azure portal option is the easiest and the fastest way to create resources and deploy applications with a single click. This option is suitable for Spring developers who want to quickly deploy applications to Azure cloud services.
- The Azure portal + Maven plugin option is a more conventional way to create resources and deploy applications step by step. This option is suitable for Spring developers using Azure cloud services for the first time.
- The Azure CLI option uses a powerful command line tool to manage Azure resources. This option is suitable for Spring developers who are familiar with Azure cloud services.
- The IntelliJ option uses a powerful Java IDE to easily manage Azure resources. This option is suitable for Spring developers who are familiar with Azure cloud services and IntelliJ IDEA.
- The Visual Studio Code option uses a lightweight but powerful source code editor, which can easily manage Azure resources. This option is suitable for Spring developers who are familiar with Azure cloud services and Visual Studio Code.
1. Prerequisites
- An Azure subscription. If you don't have an Azure account, create a free account before you begin.
- An Azure subscription. If you don't have an Azure account, create a free account before you begin.
2. Prepare the Spring project
The Deploy to Azure button in the next section launches an Azure portal experience that downloads a JAR package from the spring-cloud-azure-tools releases page on GitHub. No local preparation steps are needed.
Use the following steps to prepare the project:
Use the following command to clone the Spring Boot sample project for Azure from GitHub.
git clone https://github.com/spring-guides/gs-spring-boot-for-azure.git
Use the following command to move to the project folder:
cd gs-spring-boot-for-azure/complete
Use the following Maven command to build the project:
./mvnw clean package
Run the sample project locally by using the following command:
./mvnw spring-boot:run
Use the following steps to initialize the application from the Azure Developer CLI templates.
Open a terminal, create an empty folder, and then change directory to it.
Use the following command to initialize the project:
azd init --template spring-guides/gs-spring-boot-for-azure
The following list describes the command interactions:
- OAuth2 login: You need to authorize the sign in to Azure based on the OAuth2 protocol.
- Please enter a new environment name: Provide an environment name, which is used as a suffix for the resource group created to hold all Azure resources. This name should be unique within your Azure subscription.
The console outputs messages similar to the following example:
Initializing a new project (azd init)

(✓) Done: Initialized git repository
(✓) Done: Downloading template code to: <your-local-path>
Enter a new environment name: <your-env-name>
SUCCESS: New project initialized!
You can view the template code in your directory: <your-local-path>
Learn more about running 3rd party code on our DevHub: https://aka.ms/azd-third-party-code-notice
3. Prepare the cloud environment
This section describes how to create an Azure Spring Apps service instance and prepare the Azure cloud environment.
This section uses a Deploy to Azure button to launch a deployment experience in the Azure portal. This experience uses an ARM template to create Azure resources.
3.1. Sign in to the Azure portal
Go to the Azure portal and enter your credentials to sign in to the portal. The default view is your service dashboard.
3.2. Create Azure resources
Use the following steps to create all the Azure resources that the app depends on:
Select the following Deploy to Azure button to launch the deployment experience in the Azure portal:

Fill out the form on the Basics tab. Use the following table as a guide for completing the form:
| Setting |
Suggested value |
Description |
| Subscription |
Your subscription name. |
The Azure subscription that you want to use for your server. If you have multiple subscriptions, choose the subscription in which you'd like to be billed for the resource. |
| Resource group |
myresourcegroup |
A new resource group name or an existing one from your subscription. |
| Region |
The region closest to your users. |
The region is used to create the resource group. |
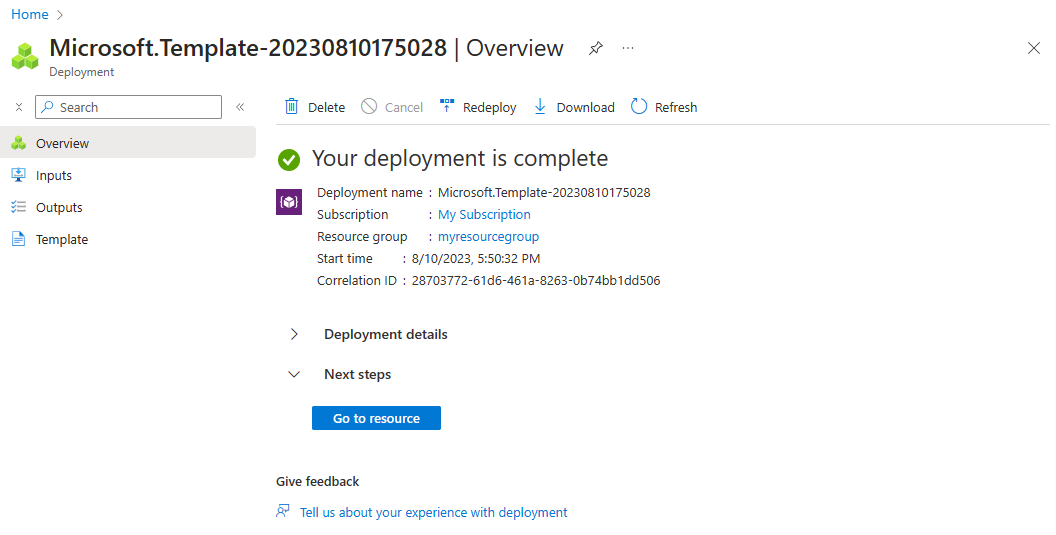
Select Review and Create to review your selections. Then, select Create to deploy the app to Azure Spring Apps.
On the toolbar, select the Notifications icon (a bell) to monitor the deployment process. After the deployment finishes, you can select Pin to dashboard, which creates a tile for this service on your Azure portal dashboard as a shortcut to the service's Overview page. Select Go to resource to open the service's Overview page.
3.1. Sign in to the Azure portal
Open your web browser and go to the Azure portal. Enter your credentials to sign in to the portal. The default view is your service dashboard.
3.2. Create an Azure Spring Apps instance
Use the following steps to create a service instance:
Select Create a resource in the corner of the Azure portal.
Select Compute > Azure Spring Apps.
Fill out the Basics form with the following information:
| Setting |
Suggested Value |
Description |
| Subscription |
Your subscription name |
The Azure subscription that you want to use for your server. If you have multiple subscriptions, choose the subscription in which you'd like to be billed for the resource. |
| Resource group |
myresourcegroup |
A new resource group name or an existing one from your subscription. |
| Name |
myasa |
A unique name that identifies your Azure Spring Apps service. The name must be between 4 and 32 characters long and can contain only lowercase letters, numbers, and hyphens. The first character of the service name must be a letter and the last character must be either a letter or a number. |
| Plan |
Standard |
The pricing plan that determines the resource and cost associated with your instance. |
| Region |
The region closest to your users |
The location that is closest to your users. |
| Zone Redundant |
Unselected |
Indicates whether to create your Azure Spring Apps service in an Azure availability zone. This feature isn't currently supported in all regions. |
Select Review and Create to review your selections. Select Create to provision the Azure Spring Apps instance.
On the toolbar, select the Notifications icon (a bell) to monitor the deployment process. After the deployment is done, you can select Pin to dashboard, which creates a tile for this service on your Azure portal dashboard as a shortcut to the service's Overview page.
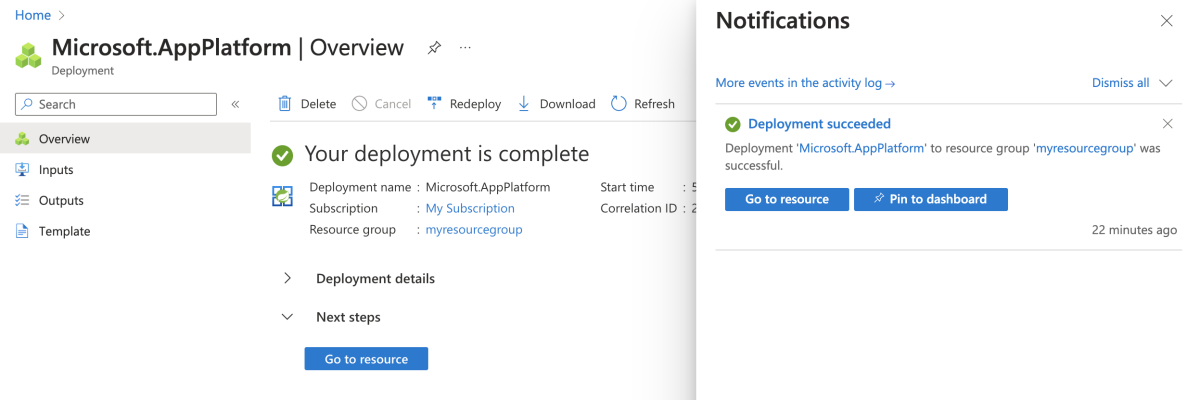
Select Go to resource to go to the Azure Spring Apps Overview page.
Use the following steps to create the required resources:
Use the following command to sign in to Azure with OAuth2. Ignore this step if you already signed in.
azd auth login
The console outputs messages similar to the following example:
Logged in to Azure.
Use the following command to set the template using the Standard plan:
azd env set PLAN standard
Use the following command to package a deployable copy of your application, provision the template's infrastructure to Azure, and then deploy the application code to those newly provisioned resources:
azd provision
The following list describes the command interactions:
- Select an Azure Subscription to use: Use arrows to move, type to filter, then press Enter.
- Select an Azure location to use: Use arrows to move, type to filter, then press Enter.
The console outputs messages similar to the ones in the following example:
SUCCESS: Your application was provisioned in Azure in xx minutes xx seconds.
You can view the resources created under the resource group rg-<your-environment-name>-<random-string>> in Azure portal:
https://portal.azure.com/#@/resource/subscriptions/<your-subscription-id>/resourceGroups/rg-<your-environment-name>/overview
Note
This may take a while to complete. You see a progress indicator as it provisions Azure resources.
4. Deploy the app to Azure Spring Apps
The Deploy to Azure button in the previous section launches an Azure portal experience that includes application deployment, so nothing else is needed.
Use the following steps to deploy using the Maven plugin for Azure Spring Apps:
Navigate to the complete directory, and then run the following command to configure the app in Azure Spring Apps:
./mvnw com.microsoft.azure:azure-spring-apps-maven-plugin:1.19.0:config
The following list describes the command interactions:
- OAuth2 login: You need to authorize the sign in to Azure based on the OAuth2 protocol.
- Select subscription: Select the subscription list number of the Azure Spring Apps instance you created, which defaults to the first subscription in the list. If you use the default number, press Enter directly.
- Use existing Azure Spring Apps in Azure: Press y to use the existing Azure Spring Apps instance.
- Select Azure Spring Apps for deployment: Select the list number of the Azure Spring Apps instance you created. If you use the default number, press Enter directly.
- Use existing app in Azure Spring Apps <your-instance-name>: Press n to create a new app.
- Input the app name (demo): Provide an app name. If you use the default project artifact ID, press Enter directly.
- Expose public access for this app (boot-for-azure): Press y.
- Confirm to save all the above configurations: Press y. If you press n, the configuration isn't saved in the POM files.
Use the following command to deploy the app:
./mvnw azure-spring-apps:deploy
The following list describes the command interaction:
- OAuth2 login: You need to authorize the sign in to Azure based on the OAuth2 protocol.
After the command is executed, you can see from the following log messages that the deployment was successful:
[INFO] Deployment(default) is successfully created
[INFO] Starting Spring App after deploying artifacts...
[INFO] Deployment Status: Running
[INFO]   InstanceName:demo-default-x-xxxxxxxxxx-xxxxx  Status:Running Reason:null       DiscoverStatus:UNREGISTERED
[INFO]   InstanceName:demo-default-x-xxxxxxxxx-xxxxx  Status:Terminating Reason:null       DiscoverStatus:UNREGISTERED
[INFO] Getting public url of app(demo)...
[INFO] Application url: https://<your-Azure-Spring-Apps-instance-name>-demo.azuremicroservices.io
Use the following steps to package the app, provision the Azure resources required by the web application, and then deploy to Azure Spring Apps:
Use the following command to package a deployable copy of your application:
azd package
The console outputs messages similar to the following example:
SUCCESS: Your application was packaged for Azure in xx seconds.
Use the following command to deploy the application code to those newly provisioned resources:
azd deploy
The console outputs messages similar to the ones in the following example:
Deploying services (azd deploy)

(✓) Done: Deploying service demo
- Endpoint: https://<your-Azure-Spring-Apps-instance-name>-demo.azuremicroservices.io/


SUCCESS: Your application was deployed to Azure in xx minutes xx seconds.
You can view the resources created under the resource group rg-<your-environment-name> in Azure portal:
https://portal.azure.com/#@/resource/subscriptions/<your-subscription-id>/resourceGroups/rg-<your-environment-name>/overview
Note
You can also use azd up to combine the previous three commands: azd package (packages a deployable copy of your application), azd provision (provisions Azure resources), and azd deploy (deploys application code). For more information, see spring-guides/gs-spring-boot-for-azure.
2. Prepare the Spring project
The Deploy to Azure button in the next section launches an Azure portal experience that downloads a JAR package from the spring-cloud-azure-tools releases page on GitHub. No local preparation steps are needed.
Use the following steps to prepare the project:
Use the following command to clone the Spring Boot sample project for Azure from GitHub.
git clone https://github.com/spring-guides/gs-spring-boot-for-azure.git
Use the following command to move to the project folder:
cd gs-spring-boot-for-azure/complete
Use the following Maven command to build the project:
./mvnw clean package
Run the sample project locally by using the following command:
./mvnw spring-boot:run
Use the following steps to create the project:
Use the following command to generate a sample project from start.spring.io with the recommended dependencies for Azure Spring Apps:
curl https://start.spring.io/starter.tgz -d dependencies=web -d baseDir=demo -d bootVersion=3.0.0 -d javaVersion=17 -d type=maven-project -d groupId=com.example -d artifactId=demo -d name=demo -d packageName=com.example.demo -d packaging=jar | tar -xzvf -
Create a web controller for your web application by adding the file src/main/java/com/example/demo/HelloController.java with the following contents:
package com.example.demo;

import org.springframework.web.bind.annotation.RestController;
import org.springframework.web.bind.annotation.RequestMapping;

@RestController
public class HelloController {

    @RequestMapping("/")
    public String index() {
        return "Hello World";
     }
}
Use the following Maven command to build the project:
./mvnw clean package
Run the sample project locally by using the following command:
./mvnw spring-boot:run
3. Prepare the cloud environment
This section describes how to create an Azure Spring Apps service instance and prepare the Azure cloud environment.
This section uses a Deploy to Azure button to launch a deployment experience in the Azure portal. This experience uses an ARM template to create Azure resources.
3.1. Sign in to the Azure portal
Go to the Azure portal and enter your credentials to sign in to the portal. The default view is your service dashboard.
3.2. Create Azure resources
Use the following steps to create all the Azure resources that the app depends on:
Select the following Deploy to Azure button to launch the deployment experience in the Azure portal:
Fill out the form on the Basics tab. Use the following table as a guide for completing the form:
| Setting |
Suggested value |
Description |
| Subscription |
Your subscription name. |
The Azure subscription that you want to use for your server. If you have multiple subscriptions, choose the subscription in which you'd like to be billed for the resource. |
| Resource group |
myresourcegroup |
A new resource group name or an existing one from your subscription. |
| Region |
The region closest to your users. |
The region is used to create the resource group. |
Select Review and Create to review your selections. Then, select Create to deploy the app to Azure Spring Apps.
On the toolbar, select the Notifications icon (a bell) to monitor the deployment process. After the deployment finishes, you can select Pin to dashboard, which creates a tile for this service on your Azure portal dashboard as a shortcut to the service's Overview page. Select Go to resource to open the service's Overview page.
3.1. Sign in to the Azure portal
Go to the Azure portal and enter your credentials to sign in to the portal. The default view is your service dashboard.
3.2. Create an Azure Spring Apps instance
Use the following steps to create the service instance:
Select Create a resource in the corner of the Azure portal.
Select Compute > Azure Spring Apps.
Fill out the Basics form with the following information:
| Setting |
Suggested value |
Description |
| Subscription |
Your subscription name. |
The Azure subscription that you want to use for your server. If you have multiple subscriptions, choose the subscription in which you'd like to be billed for the resource. |
| Resource group |
myresourcegroup |
A new resource group name or an existing one from your subscription. |
| Name |
myasa |
A unique name that identifies your Azure Spring Apps service. The name must be between 4 and 32 characters long and can contain only lowercase letters, numbers, and hyphens. The first character of the service name must be a letter and the last character must be either a letter or a number. |
| Region |
The region closest to your users. |
The location that is closest to your users. |
| Hosting options and plans |
Enterprise |
The pricing plan that determines the resource and cost associated with your instance. |
| Zone Redundant |
Unselected |
The option to create your Azure Spring Apps service in an Azure availability zone. This feature isn't currently supported in all regions. |
| Software IP Plan |
Pay-as-You-Go |
The pricing plan that lets you pay as you go with Azure Spring Apps. |
| Deploy sample project |
Unselected |
The option to use the built-in sample application. |
Select Review and Create to review your selections. Then, select Create to provision the Azure Spring Apps instance.
On the toolbar, select the Notifications icon (a bell) to monitor the deployment process. After the deployment finishes, you can select Pin to dashboard, which creates a tile for this service on your Azure portal dashboard as a shortcut to the service's Overview page.
Select Go to resource to go to the Azure Spring Apps Overview page.
3.1. Provide names for each resource
Create variables to hold the resource names by using the following commands. Be sure to replace the placeholders with your own values.
export LOCATION="<region>"
export RESOURCE_GROUP="<resource-group-name>"
export SERVICE_NAME="<Azure-Spring-Apps-instance-name>"
export APP_NAME="demo"
3.2. Create a new resource group
Use the following steps to create a new resource group:
Use the following command to sign in to the Azure CLI:
az login
Use the following command to set the default location:
az configure --defaults location=${LOCATION}
Use the following command to list all available subscriptions to determine the subscription ID to use:
az account list --output table
Use the following command to set the default subscription:
az account set --subscription <subscription-ID>
Use the following command to create a resource group:
az group create --resource-group ${RESOURCE_GROUP}
Use the following command to set the newly created resource group as the default resource group:
az configure --defaults group=${RESOURCE_GROUP}
3.3. Install extension and register namespace
Use the following commands to install the Azure Spring Apps extension for the Azure CLI and register the namespace: Microsoft.SaaS:
az extension add --name spring --upgrade
az provider register --namespace Microsoft.SaaS
3.4. Create an Azure Spring Apps instance
Use the following steps to create the service instance:
Use the following command to accept the legal terms and privacy statements for the Enterprise plan:
Note
This step is necessary only if your subscription has never been used to create an Enterprise plan instance of Azure Spring Apps.
az term accept \
    --publisher vmware-inc \
    --product azure-spring-cloud-vmware-tanzu-2 \
    --plan asa-ent-hr-mtr
Use the following command to create an Azure Spring Apps service instance:
az spring create \
    --name ${SERVICE_NAME} \
    --sku Enterprise
3.5. Create an app in your Azure Spring Apps instance
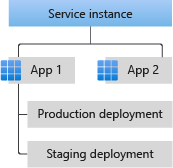
An App is an abstraction of one business app. For more information, see App and deployment in Azure Spring Apps. Apps run in an Azure Spring Apps service instance, as shown in the following diagram.
Use the following command to create the app on Azure Spring Apps:
az spring app create \
    --service ${SERVICE_NAME} \
    --name ${APP_NAME} \
    --assign-endpoint true
3.1. Sign in to the Azure portal
Open your web browser and go to the Azure portal, enter your credentials, and sign in to the portal. The default view is your service dashboard.
3.2. Create an Azure Spring Apps instance
Use the following steps to create the service instance:
Select Create a resource in the corner of the Azure portal.
Select Compute > Azure Spring Apps.
Fill out the Basics form with the following information:
| Setting |
Suggested value |
Description |
| Subscription |
Your subscription name. |
The Azure subscription that you want to use for your server. If you have multiple subscriptions, choose the subscription in which you'd like to be billed for the resource. |
| Resource group |
myresourcegroup |
A new resource group name or an existing one from your subscription. |
| Name |
myasa |
A unique name that identifies your Azure Spring Apps service. The name must be between 4 and 32 characters long and can contain only lowercase letters, numbers, and hyphens. The first character of the service name must be a letter and the last character must be either a letter or a number. |
| Region |
The region closest to your users. |
The location that is closest to your users. |
| Hosting options and plans |
Enterprise |
The pricing plan that determines the resource and cost associated with your instance. |
| Zone Redundant |
Unselected |
The option to create your Azure Spring Apps service in an Azure availability zone. This feature isn't currently supported in all regions. |
| Software IP Plan |
Pay-as-You-Go |
The pricing plan that lets you pay as you go with Azure Spring Apps. |
| Deploy sample project |
Unselected |
The option to use the built-in sample application. |
Select Review and Create to review your selections. Then, select Create to provision the Azure Spring Apps instance.
On the toolbar, select the Notifications icon (a bell) to monitor the deployment process. After the deployment finishes, you can select Pin to dashboard, which creates a tile for this service on your Azure portal dashboard as a shortcut to the service's Overview page.
Select Go to resource to go to the Azure Spring Apps Overview page.
4. Deploy the app to Azure Spring Apps
The Deploy to Azure button in the previous section launches an Azure portal experience that includes application deployment, so nothing else is needed.
Use the following steps to deploy using the Maven plugin for Azure Spring Apps:
Navigate to the complete directory, and then run the following command to configure the app in Azure Spring Apps:
./mvnw com.microsoft.azure:azure-spring-apps-maven-plugin:1.19.0:config
The following list describes the command interactions:
- OAuth2 login: You need to authorize the sign in to Azure based on the OAuth2 protocol.
- Select subscription: Select the subscription list number of the Azure Spring Apps instance you created, which defaults to the first subscription in the list. If you use the default number, press Enter directly.
- Use existing Azure Spring Apps in Azure: Press y to use the existing Azure Spring Apps instance.
- Select Azure Spring Apps for deployment: Select the list number of the Azure Spring Apps instance you created. If you use the default number, press Enter directly.
- Use existing app in Azure Spring Apps <your-instance-name>: Press n to create a new app.
- Input the app name (demo): Provide an app name. If you use the default project artifact ID, press Enter directly.
- Expose public access for this app (boot-for-azure): Press y.
- Confirm to save all the above configurations: Press y. If you press n, the configuration isn't saved in the POM files.
Use the following command to deploy the app:
./mvnw azure-spring-apps:deploy
The following list describes the command interaction:
- OAuth2 login: You need to authorize the sign in to Azure based on the OAuth2 protocol.
After the command is executed, you can see from the following log messages that the deployment was successful:
[INFO] Deployment(default) is successfully created
[INFO] Starting Spring App after deploying artifacts...
[INFO] Deployment Status: Running
[INFO]   InstanceName:demo-default-x-xxxxxxxxxx-xxxxx  Status:Running Reason:null       DiscoverStatus:N/A
[INFO] Getting public url of app(demo)...
[INFO] Application url: https://<your-Azure-Spring-Apps-instance-name>-demo.azuremicroservices.io
Use the following command to deploy the .jar file for the app:
az spring app deploy \
    --service ${SERVICE_NAME} \
    --name ${APP_NAME} \
    --artifact-path target/demo-0.0.1-SNAPSHOT.jar
Deploying the application can take a few minutes.
This section provides the steps to deploy your application to Azure Spring Apps.
4.1. Import the project
Use the following steps to import the project:
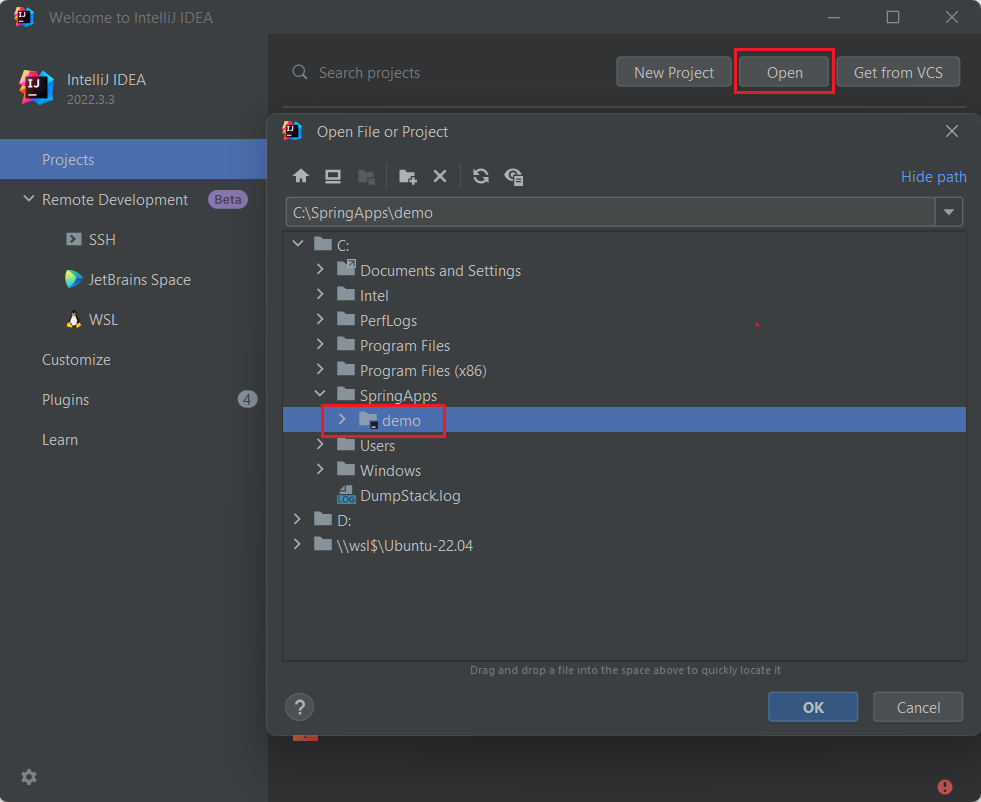
Open IntelliJ IDEA and select Open.
In the Open File or Project dialog box, select the demo folder.
4.2. Build and deploy your app
Use the following steps to build and deploy your app:
If you didn't already install the Azure Toolkit for IntelliJ, follow the steps in Install the Azure Toolkit for IntelliJ.
Note
Azure Toolkit for IntelliJ provides four ways to log in to Azure, and the deployment can only start after logging in.
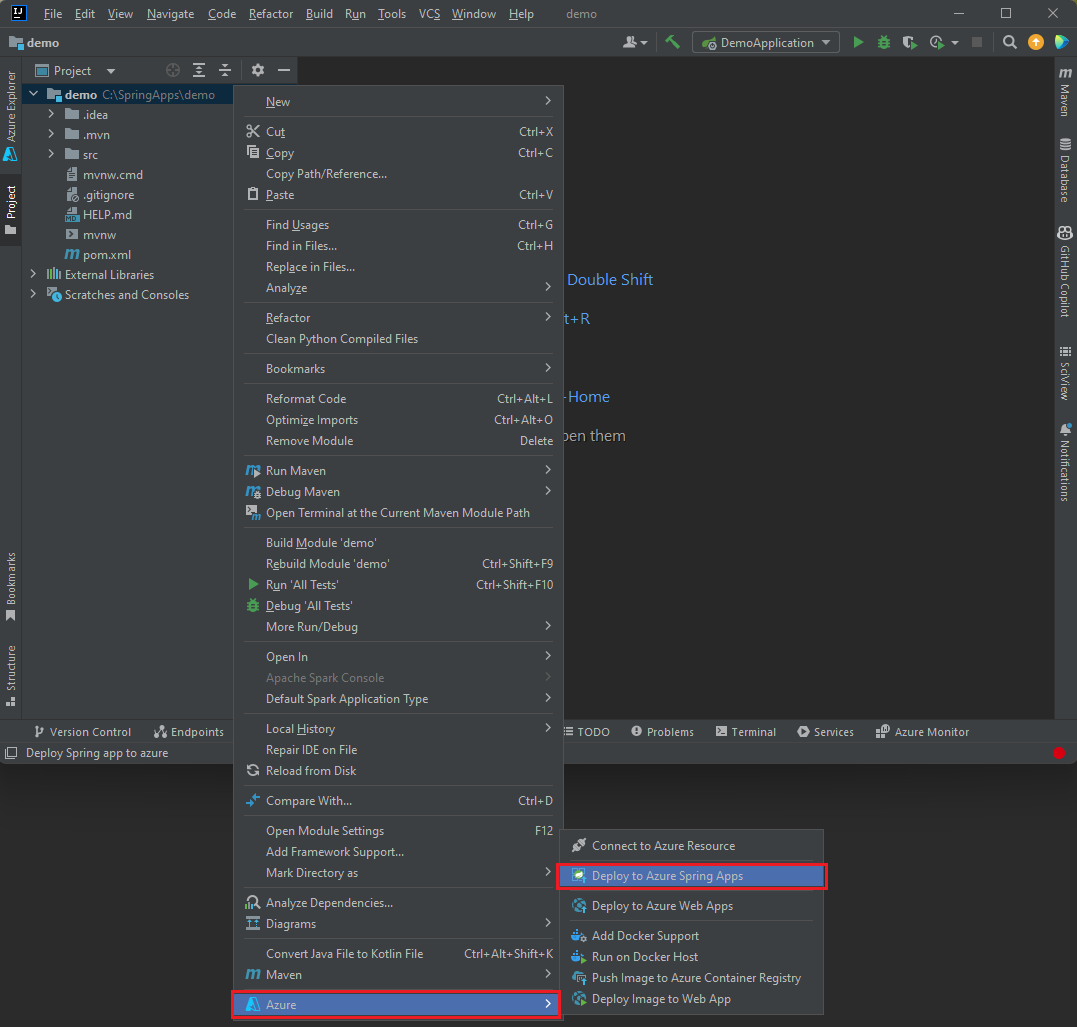
Right-click your project in the IntelliJ Project window and then select Azure -> Deploy to Azure Spring Apps.
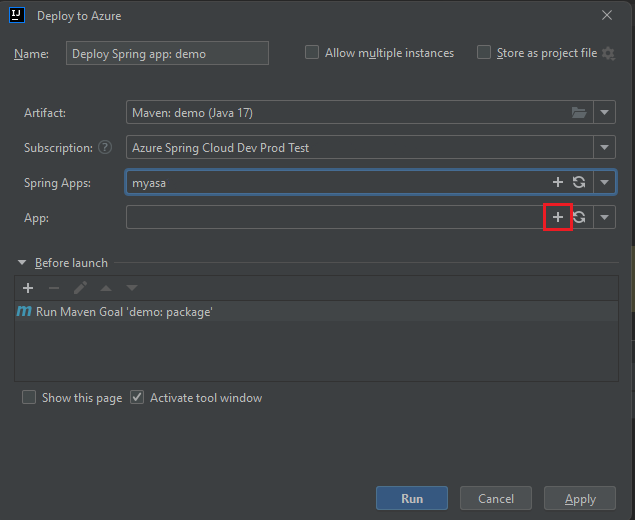
Accept the name for the app in the Name field. Name refers to the configuration, not the app name. You don't usually need to change it.
In the Artifact textbox, select Maven:demo(Java 17).
In the Subscription textbox, verify that your subscription is correct.
In the Spring Apps textbox, select the instance of Azure Spring Apps that you created.
In the App textbox, select the plus sign (+) to create a new app.
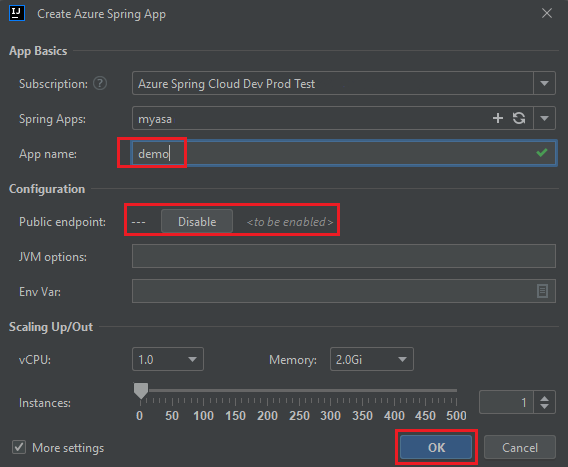
In the App name: textbox under App Basics, enter demo, and then select More settings.
Select the Enable button next to Public endpoint. The button changes to Disable <to be enabled>. Then, select OK.
Under Before launch, select Run Maven Goal 'demo:package', and then select the pencil icon to edit the command line.
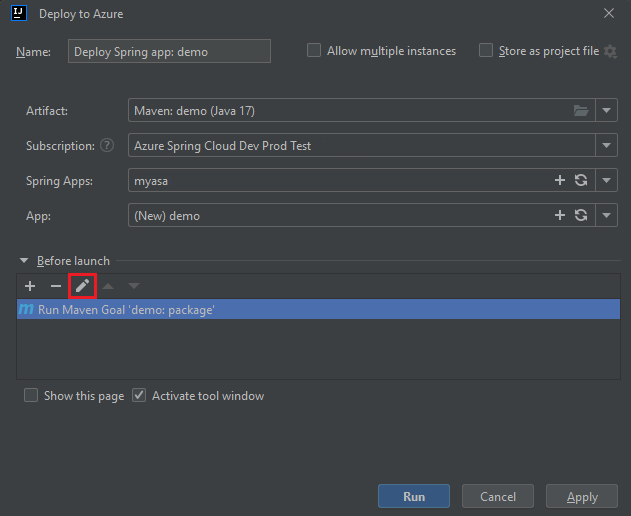
In the Command line textbox, enter -DskipTests after package, and then select OK.
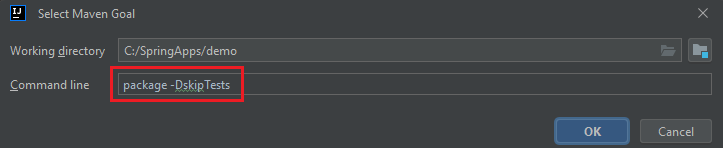
To start the deployment, select the Run button at the bottom of the Deploy to Azure dialog box. The plug-in runs the Maven command package -DskipTests on the demo app and deploys the .jar file generated by the package command.
Deploying the application can take a few minutes. You can see the public URL of the application in the output console log.
5. Validate the app
This section describes how to validate your application.
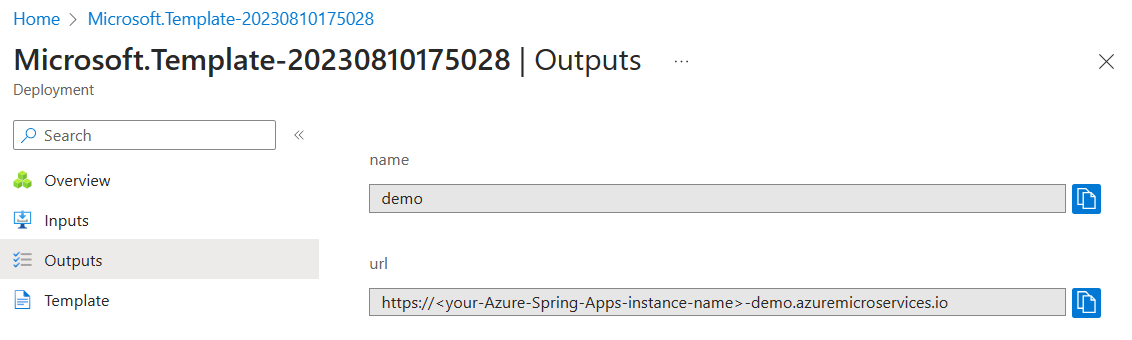
After the deployment finishes, use the following steps to find the application URL from the deployment outputs:
Access the application URL from the Outputs page of the Deployment. When you open the app, you get the response Hello World.
Check the details for each resource deployment, which are useful for investigating any deployment issues.
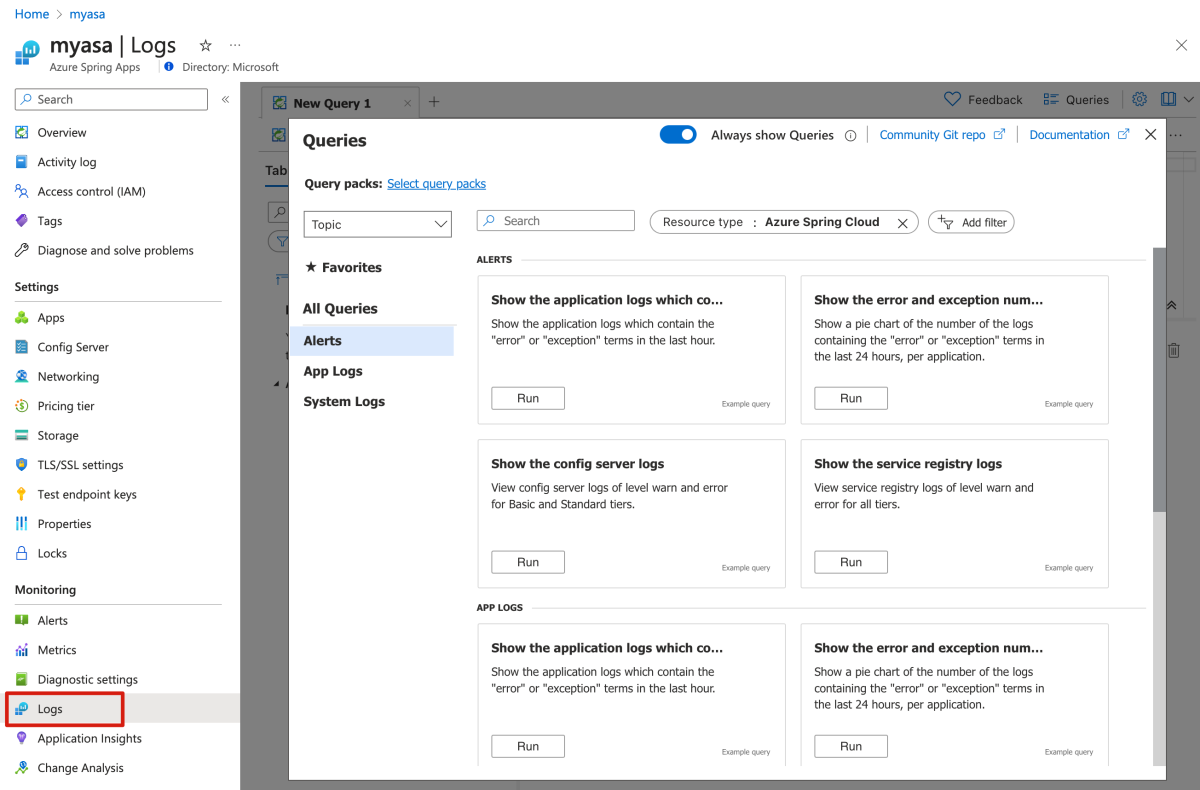
After the deployment finishes, use the following steps to check the app's logs to investigate any deployment issue:
Access the application URL from the Outputs page of the Deployment. When you open the app, you get the response Hello World.
From the navigation pane of the Azure Spring Apps instance overview page, select Logs to check the app's logs.
After the deployment finishes, access the application with the output endpoint. When you open the app, you get the response Hello World.
After the deployment finishes, use the following steps to find the application URL from the deployment outputs:
Access the application URL from the Outputs page of the Deployment. When you open the app, you get the response Hello World.
Check the details for each resource deployment, which are useful for investigating any deployment issues.
After the deployment finishes, use the following steps to validate the app:
Access the application URL. When you open the app, you get the response Hello World.
Check the console logs, which are useful for investigating any deployment issues.
After the deployment finishes, use the following steps to check the app's logs to investigate any deployment issue:
Access the application with the output application URL. When you open the app, you get the response Hello World.
Use the following command to check the app's log to investigate any deployment issue:
az spring app logs \
    --service ${SERVICE_NAME} \
    --name ${APP_NAME}
Use the following steps to stream your application logs:
Access the application with the output application URL. When you open the app, you get the response Hello World.
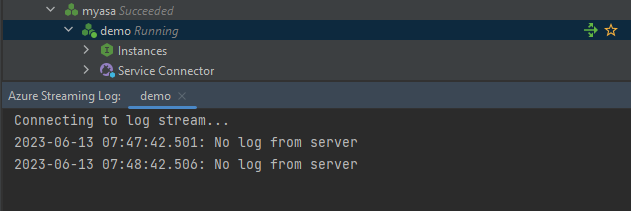
Open the Azure Explorer window, expand the node Azure, expand the service node Azure Spring Apps, expand the Azure Spring Apps instance you created, and then select the demo instance of the app you created.
Right-click and select Start Streaming Logs, then select OK to see real-time application logs.
6. Clean up resources
If you plan to continue working with subsequent quickstarts and tutorials, you might want to leave these resources in place. When you no longer need the resources, you can clean up unnecessary resources to avoid Azure charges.
Use the following steps to delete the entire resource group, including the newly created service instance:
- Locate your resource group in the Azure portal. On the navigation menu, select Resource groups, and then select the name of your resource group.
Use the following steps to delete the entire resource group, including the newly created service instance:
- Locate your resource group in the Azure portal. On the navigation menu, select Resource groups, and then select the name of your resource group.
Use the following command to delete the resource group by using the Azure CLI:
az group delete --name ${RESOURCE_GROUP}
Use the following steps to delete the resource group by using IntelliJ:
Go to your IntelliJ IDEA and find the name of your resource group.
Right-click the resource group and select Delete to delete all related Azure resources.
Use the following steps to delete the resource group by using Visual Studio Code:
Go to Visual Studio Code, select Group By to enable Group by Resource Group, and then find the name of your resource group.
Right-click the resource group and select Delete Resource Group... to delete all related Azure resources.
Use the following steps to delete the entire resource group, including the newly created service instance:
- Locate your resource group in the Azure portal. On the navigation menu, select Resource groups, and then select the name of your resource group.
Use the following steps to delete the entire resource group, including the newly created service instance:
- Locate your resource group in the Azure portal. On the navigation menu, select Resource groups, and then select the name of your resource group.
Use the following command to delete all the Azure resources used in this sample application:
azd down
The following list describes the command interaction:
- Total resources to delete: <your-resources-total>, are you sure you want to continue?: Press y.
The console outputs messages similar to the following example:
SUCCESS: Your application was removed from Azure in xx minutes xx seconds.
7. Next steps
For more information, see the following articles:


