Note
Access to this page requires authorization. You can try signing in or changing directories.
Access to this page requires authorization. You can try changing directories.
In this tutorial, you learn to deploy a Next.js website to Azure Static Web Apps, using the support for Next.js features such as React Server Components, Server-Side Rendering (SSR), and API routes.
Note
Next.js hybrid support is in preview.
Prerequisites
| Resource | Description |
|---|---|
| Azure account | If you don't have an Azure account with an active subscription, you can create one for free. |
| GitHub account | If you don't have a GitHub account, you can create an account for free. |
| Node.js | Install the latest version of Node.js. |
| Next.js CLI | Install the latest version of the Next.js CLI. See the Next.js Getting Started guide for details. |
Unsupported features in preview
The following features of Static Web Apps are unsupported for Next.js with hybrid rendering:
- Select Azure services: Linked APIs using Azure Functions, Azure App Service, Azure Container Apps, or Azure API Management.
- SWA CLI features: SWA CLI local emulation and deployment.
- Partial features support: The following properties in
staticwebapp.config.jsonfile aren't supported:- Navigation fallback is unsupported.
- Route rewrites to routes within the Next.js application must be configured within
next.config.js. - The configuration within the
staticwebapp.config.jsonfile takes precedence over the configuration withinnext.config.js. - Configuration for the Next.js site should be handled using
next.config.jsfor full feature compatibility.
- Build skipping: For Next.js applications if
skip_api_build=true, Static Web Apps does not remove dev dependencies or add the sharp package by default. If you want these optimizations, add them to your custom build steps before passingskip_app_build=true. - Incremental static regeneration (ISR): Image caching isn't supported.
Note
The maximum app size for the hybrid Next.js application is 250 MB. Use standalone feature by Next.js for optimized app sizes. If this is not sufficient, consider using Static HTML exported Next.js if your app size requirement is more than 250 MB.
Create a repository
This article uses a GitHub template repository to make it easy for you to get started. The template features a starter app to deploy to Azure Static Web Apps.
Navigate to the following location to create a new repository.
https://github.com/staticwebdev/nextjs-hybrid-starter/generate
Name your repository my-first-static-web-app
Select Create repository from template.
Create a static web app
Now that the repository is created, you can create a static web app from the Azure portal.
- Go to the Azure portal.
- Select Create a Resource.
- Search for Static Web Apps.
- Select Static Web Apps.
- Select Create.
In the Basics section, begin by configuring your new app and linking it to a GitHub repository.

| Setting | Value |
|---|---|
| Subscription | Select your Azure subscription. |
| Resource Group | Select the Create new link, and enter static-web-apps-test in the textbox. |
| Name | Enter my-first-static-web-app in the textbox. |
| Plan type | Select Free. |
| Source | Select GitHub and sign in to GitHub if necessary. |
Select Sign-in with GitHub and authenticate with GitHub.
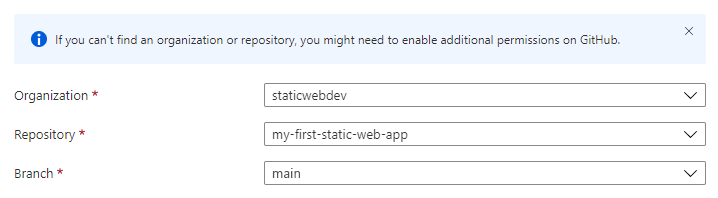
After you sign in with GitHub, enter the repository information.
| Setting | Value |
|---|---|
| Organization | Select your organization. |
| Repository | Select my-first-web-static-app. |
| Branch | Select main. |
Note
If you don't see any repositories:
- You may need to authorize Azure Static Web Apps in GitHub. Browse to your GitHub repository and go to Settings > Applications > Authorized OAuth Apps, select Azure Static Web Apps, and then select Grant.
- You may need to authorize Azure Static Web Apps in your Azure DevOps organization. You must be an owner of the organization to grant the permissions. Request third-party application access via OAuth. For more information, see Authorize access to REST APIs with OAuth 2.0.
In the Build Details section, add configuration details specific to your preferred front-end framework.
Select Next.js from the Build Presets dropdown.
Keep the default value in the App location box.
Leave the Api location box empty.
Leave the Output location box empty.
Select Review + create.

View the website
There are two aspects to deploying a static app. The first creates the underlying Azure resources that make up your app. The second is a workflow that builds and publishes your application.
Before you can go to your new static site, the deployment build must first finish running.
The Static Web Apps Overview window displays a series of links that help you interact with your web app.
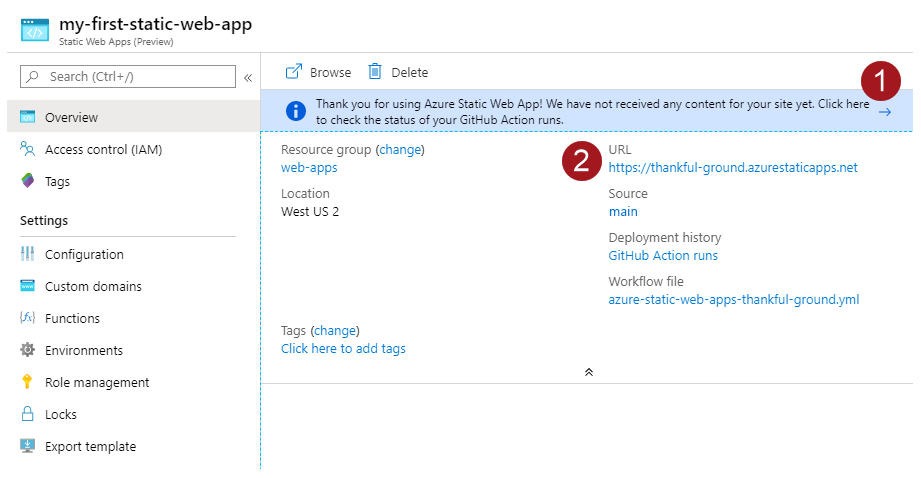
Selecting on the banner that says, Select here to check the status of your GitHub Actions runs takes you to the GitHub Actions running against your repository. Once you verify the deployment job is complete, then you can go to your website via the generated URL.
Once GitHub Actions workflow is complete, you can select the URL link to open the website in new tab.
Set up your Next.js project locally to make changes
Clone the new repo to your machine. Make sure to replace <GITHUB_ACCOUNT_NAME> with your account name.
git clone http://github.com/<GITHUB_ACCOUNT_NAME>/my-first-static-web-appOpen the project in Visual Studio Code or your preferred code editor.
Set up server side rendering
A managed backend is automatically available for every hybrid Next.js deployment in all plans. However, you can fine-tune performance and take more control of the backend by assigning a custom backend to your site. If you switch between a managed backend to a linked backend, your site experiences no downtime.
Bring your own backend
You can improve performance and gain more control over the Next.js server side rendering when you bring your backend. Use the following steps to set up a custom backend for your site.
The following steps show you how to associate a custom backend to your Standard plan and above static web apps.
Note
Linked backends are only available for sites using the Standard plan or above.
Go to your static web app in the Azure portal.
Select Settings and then APIs from the side menu.
Select Configure linked backend.
Either create a new App Service Plan or select an existing App Service Plan.
Your selected App Service Plan must use at least an S1 SKU.
Click Link.
Add Server-Rendered data with a Server Component
To add server-rendered data in your Next.js project using the App Router, edit a Next.js component to add a server-side operation to render data in the component. By default, Next.js components are Server Components that can be server-rendered.
Open the
app/page.tsxfile and add an operation that sets the value of a server-side computed variable. Examples include fetching data or other server operations.export default function Home() { const timeOnServer = new Date().toLocaleTimeString('en-US'); return( ... ); }Import
unstable_noStorefromnext/cacheand call it within theHomecomponent to ensure the route is dynamically rendered.import { unstable_noStore as noStore } from 'next/cache'; export default function Home() { noStore(); const timeOnServer = new Date().toLocaleTimeString('en-US'); return( ... ); }Note
This example forces dynamic rendering of this component to demonstrate server-rendering of the server's current time. The App Router model of Next.js recommends caching individual data requests to optimize the performance of your Next.js app. Read more on data fetching and caching in Next.js.
Update the
Homecomponent in app/pages.tsx to render the server-side data.import { unstable_noStore as noStore } from 'next/cache'; export default function Home() { noStore(); const timeOnServer = new Date().toLocaleTimeString('en-US'); return( <main className="flex min-h-screen flex-col items-center justify-between p-24"> <div> This is a Next.js application hosted on Azure Static Web Apps with hybrid rendering. The time on the server is <strong>{timeOnServer}</strong>. </div> </main> ); }
Adding an API route
In addition to Server Components, Next.js provides Route Handlers you can use to create API routes to your Next.js application. You can fetch these APIs in Client Components.
Begin by adding an API route.
Create a new file at
app/api/currentTime/route.tsx. This file holds the Route Handler for the new API endpoint.Add a handler function to return data from the API.
import { NextResponse } from 'next/server';

export const dynamic = 'force-dynamic';

export async function GET() {
    const currentTime = new Date().toLocaleTimeString('en-US');

    return NextResponse.json({
        message: `Hello from the API! The current time is ${currentTime}.`
    });
}
Create a new file at
app/components/CurrentTimeFromAPI.tsx. This component creates a container for the Client Component that fetches the API from the browser.Add a client component that fetches the API in this file.
'use client';

import { useEffect, useState } from 'react';

export function CurrentTimeFromAPI(){
    const [apiResponse, setApiResponse] = useState('');
    const [loading, setLoading] = useState(true);

    useEffect(() => {
        fetch('/api/currentTime')
            .then((res) => res.json())
            .then((data) => {
            setApiResponse(data.message);
            setLoading(false);
            });
        },
    []);

    return (
        <div className='pt-4'>
            The message from the API is: <strong>{apiResponse}</strong>
        </div>
    )
}
This Client Component fetches the API with a useEffect React hook to render the component after the load is complete. The 'use client' directive identifies this element as a Client Component. For more information, see Client Components.
Edit app/page.tsx to import and render the
CurrentTimeFromAPIClient Component.import { unstable_noStore as noStore } from 'next/cache'; import { CurrentTimeFromAPI } from './components/CurrentTimeFromAPI'; export default function Home() { noStore(); const timeOnServer = new Date().toLocaleTimeString('en-US'); return( <main className="flex min-h-screen flex-col items-center justify-between p-24"> <div> This is a Next.js application hosted on Azure Static Web Apps with hybrid rendering. The time on the server is <strong>{timeOnServer}</strong>. </div> <CurrentTimeFromAPI /> </main> ); }The result from the API route is displayed on the page.

Configure the runtime version for Next.js
Certain Next.js versions require specific Node.js versions. To configure a specific Node version, you can set the engines property of your package.json file to designate a version.
{
  ...
  "engines": {
    "node": "18.17.1"
  }
}
Set environment variables for Next.js
Next.js uses environment variables at build time and at request time, to support both static page generation and dynamic page generation with server-side rendering. Therefore, set environment variables both within the build and deploy task, and in the Environment variables of your Azure Static Web Apps resource.
...
      - name: Build And Deploy
        id: builddeploy
        uses: Azure/static-web-apps-deploy@v1
        with:
          azure_static_web_apps_api_token: ${{ secrets.AZURE_STATIC_WEB_APPS_API_TOKEN }}
          repo_token: ${{ secrets.GITHUB_TOKEN }} # Used for GitHub integrations (i.e. PR comments)
          action: "upload"
          app_location: "/"
          api_location: ""
          output_location: ""
        env:
          DB_HOST: ${{ secrets.DB_HOST }}
          DB_USER: ${{ secrets.DB_USER }}
          DB_DATABASE: ${{ secrets.DB_DATABASE }}
          DB_PASSWORD: ${{ secrets.DB_PASSWORD }}
          DB_PORT: ${{ secrets.DB_PORT }}
...
Enable standalone feature
When your application size exceeds 250 MB, the Next.js Output File Tracing feature helps optimize the app size and enhance performance.
Output File Tracing creates a compressed version of the whole application with necessary package dependencies. This package is built into a folder named .next/standalone. With this package, your app can deploy on its own without node_modules dependencies.
In order to enable the standalone feature, add the following property to your next.config.js:
module.exports ={
    output:"standalone",
}
Next, configure the build command in the package.json file in order to copy static files to your standalone output.
{
  ...
  "scripts": {
    ...
    "build": "next build && cp -r .next/static .next/standalone/.next/ && cp -r public .next/standalone/"
    ...
  }
  ...
}
Configure routing and middleware for deployment
You can configure your Next.js project handle of routes with custom redirects, rewrites, and middleware. These handlers are commonly used for authentication, personalization, routing, and internationalization. Custom handling affects the default routing of your Next.js site and the configuration must be compatible with hosting on Static Web Apps.
Static Web Apps validates that your Next.js site is successfully deployed by adding a page to your site at build time. The page is named public/.swa/health.html, and Static Web Apps verifies the successful startup and deployment of your site by navigating to /.swa/health.html and verifying a successful response. Middleware and custom routing, which includes redirects and rewrites, can affect the access of the /.swa/health.html path, which can prevent Static Web Apps' deployment validation. To configure middleware and routing for a successful deployment to Static Web Apps, follow these steps:
Exclude routes starting with
.swain yourmiddleware.ts(or.js) file in your middleware configuration.export const config = { matcher: [ /* * Match all request paths except for the ones starting with: * - .swa (Azure Static Web Apps) */ '/((?!.swa).*)', ], }Configure your redirects in
next.config.jsto exclude routes starting with.swa.module.exports = { async redirects() { return [ { source: '/((?!.swa).*)<YOUR MATCHING RULE>', destination: '<YOUR REDIRECT RULE>', permanent: false, }, ] }, };Configure your rewrite rules in
next.config.jsto exclude routes starting with.swa.module.exports = { async rewrites() { return { beforeFiles: [ { source: '/((?!.swa).*)<YOUR MATCHING RULE>', destination: '<YOUR REWRITE RULE>', } ] } }, };
These code snippets exclude paths that start with .swa to stop your custom routing or middleware from processing these requests. These rules ensure that the paths resolve as expected during deployment validation.
Enable logging for Next.js
Following best practices for Next.js server API troubleshooting, add logging to the API to catch these errors. Logging on Azure uses Application Insights. In order to preload this SDK, you need to create a custom startup script. To learn more:
Clean up resources
If you're not going to continue to use this application, you can delete the Azure Static Web Apps instance through the following steps:
- Open the Azure portal.
- Search for my-first-web-static-app from the top search bar.
- Select the app name.
- Select Delete.
- Select Yes to confirm the delete action (this action may take a few moments to complete).