Note
Access to this page requires authorization. You can try signing in or changing directories.
Access to this page requires authorization. You can try changing directories.
In this article, you learn how to create a security admin rule using network groups in Azure Virtual Network Manager. You use the Azure portal to create a security admin configuration, add a security admin rule, and deploy the security admin configuration.
In Azure Virtual Network Manager, you can deploy security admin rules using network groups. Security admin rules and network groups allow you to define the source and destination of the traffic for the security admin rule.
Important
The creation of security admin rules with network groups as source and destination in Azure Virtual Network Manager is in public preview. Public previews are made available to you on the condition that you agree to the Supplemental Terms of Use for Microsoft Azure Previews. Some features might not be supported or might have constrained capabilities. This preview version is provided without a service level agreement, and it's not recommended for production workloads.
Prerequisites
To complete this article, you need the following resources:
An Azure subscription. If you don't have an Azure subscription, create a free account before you begin.
An Azure Virtual Network Manager instance. If you don't have an instance, see Create an Azure Virtual Network Manager instance.
A network group. If you don't have a network group, see Create a network group.
Create a security admin configuration
To create a security admin configuration, follow these steps:
In the Azure portal, search for and select Virtual Network Manager.
Select Network Managers under Virtual network manager on the left side of the portal window.
In the Virtual Network Manager | Network managers window, select your network manager instance.
Select Configuration under Settings on the left side of the portal window.
In the Configurations window, select the Create security admin configuration button or + Create > Security admin configuration from the drop-down menu.
In the Basics tab of the Create security admin configuration windows, enter the following settings:
Setting Value Name Enter a name for the security admin rule. Description Enter a description for the security admin rule. Select the Deployment Options tab or Next: Deployment Options > and enter the following settings:
Setting Value Deployment option for NIP virtual networks Deployment option Select None. Option to use network group as source and destination Network group address space aggregation option Select Manual. 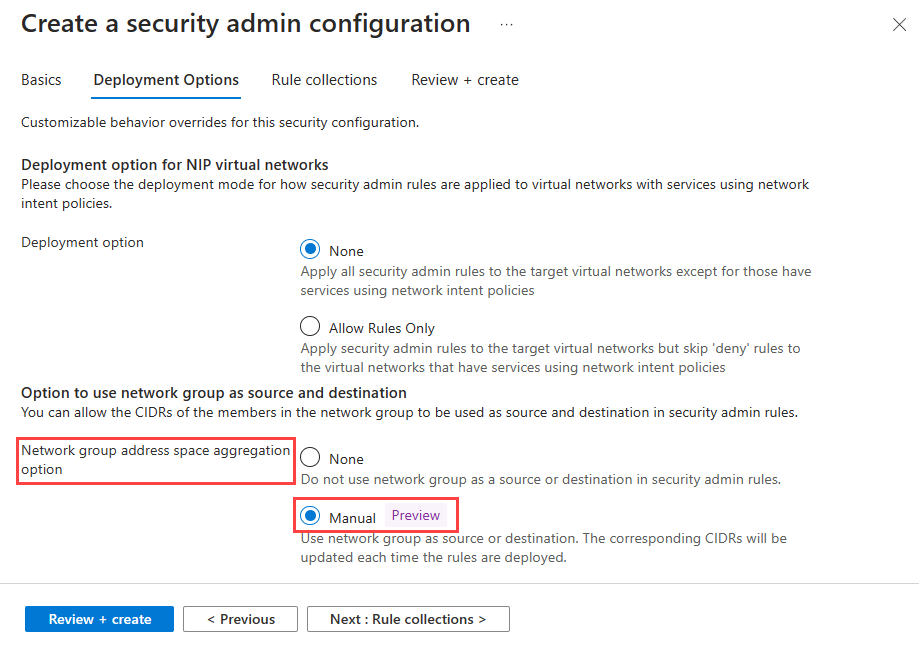
Note
The Network group address space aggregation option setting allows you to reference network groups in your security admin rules. Once elected, the virtual network manager instance will aggregate the CIDR ranges of the network groups referenced as the source and destination of the security admin rules in the configuration. With the manual aggregation option, the CIDR ranges in the network group are aggregated only when you deploy the security admin configuration. This allows you to commit the CIDR ranges on your schedule.
Select Rule collections or Next: Rule collections >.
In the Rule collections tab, select Add.
In the Add a rule collection window, enter the following settings:
Setting Value Name Enter a name for the rule collection. Target network groups Select the network group that contains the source and destination of the traffic for the security admin rule. Select Add and enter the following settings in the Add a rule window:
Setting Value Name Enter a name for the security admin rule. Description Enter a description for the security admin rule. Priority Enter a priority for the security admin rule. Action Select the action type for the security admin rule. Direction Select the direction for the security admin rule. Protocol Select the protocol for the security admin rule. Source Source type Select Network group. Source port Enter the source port for the security admin rule. Destination Destination type Select Network Group. Network Group Select the network group ID that you wish to use for dynamically establishing IP address ranges. Destination port Enter the destination port for the security admin rule. 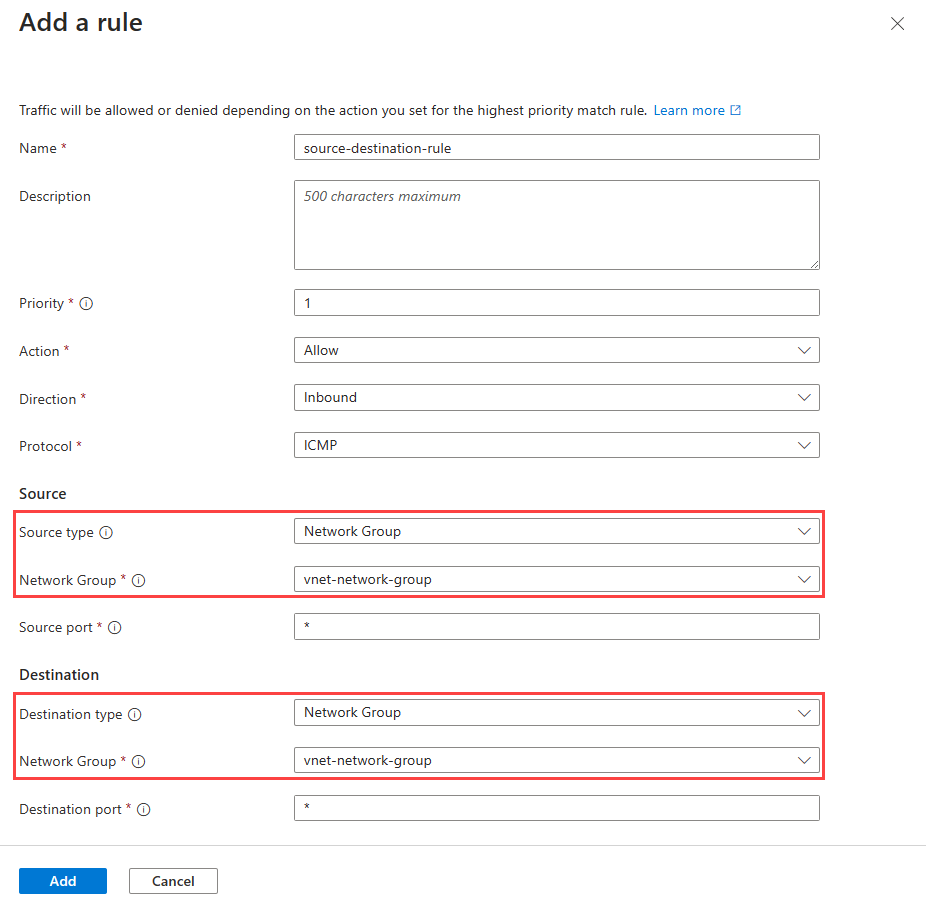
Select Add and Add again to add the security admin rule to the rule collection.
Select Review + create and then select Create.
Deploy the security admin configuration
Use the following steps to deploy the security admin configuration:
Return to the Configurations window and select the security admin configuration you created.
Select your security admin configuration and then select Deploy.
In Deploy security admin configuration, select the target Azure regions for security admin configuration and select Next > Deploy.