By default, when Azure Front Door Web Application Firewall (WAF) blocks a request because of a matched rule, it returns a 403 status code with the message "The request is blocked." The default message also includes the tracking reference string that's used to link to log entries for the request.
In this article, you learn how to configure a custom response status code and a custom message with a reference string for your use case using the Azure portal, PowerShell, or the Azure CLI.
Prerequisites
An Azure account with an active subscription. Create an account for free.
Azure Cloud Shell or Azure PowerShell.
The steps in this article run the Azure PowerShell cmdlets interactively in Azure Cloud Shell. To run the cmdlets in the Cloud Shell, select Open Cloud Shell at the upper-right corner of a code block. Select Copy to copy the code and then paste it into Cloud Shell to run it. You can also run the Cloud Shell from within the Azure portal.
You can also install Azure PowerShell locally to run the cmdlets. This article requires the Azure PowerShell module. If you run PowerShell locally, sign in to Azure using the Connect-AzAccount cmdlet.
An Azure account with an active subscription. Create an account for free.
Azure Cloud Shell or Azure CLI.
The steps in this article run the Azure CLI commands interactively in Azure Cloud Shell. To run the commands in the Cloud Shell, select Open Cloud Shell at the upper-right corner of a code block. Select Copy to copy the code, and paste it into Cloud Shell to run it. You can also run the Cloud Shell from within the Azure portal.
You can also install Azure CLI locally to run the commands. This article requires the Azure CLI version 2.67.0 or higher and front-door extension. Run az --version command to find the installed version. If you run Azure CLI locally, sign in to Azure using the az login command.
To customize the response status code and body, follow these steps:
Go to your Front Door WAF policy in the Azure portal.
Under Settings, select Policy settings.
Enter the custom response status code and response body in the Block response status code and Block response body boxes, respectively.
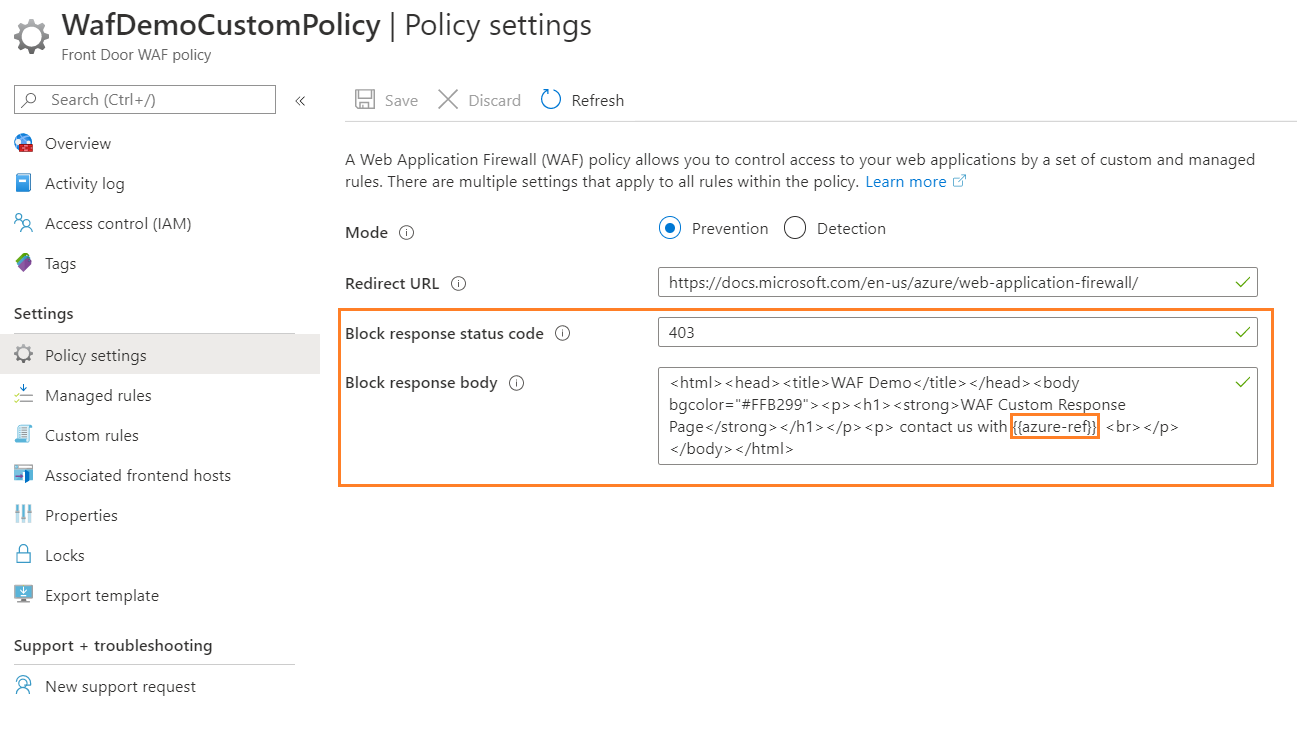
Select Save.
To customize the response status code and body, use Update-AzFrontDoorWafPolicy cmdlet.
# Update WAF policy settings to customize response body and status code
Update-AzFrontDoorWafPolicy `
-Name 'myWAFPolicy' `
-ResourceGroupName 'myResourceGroup' `
-RequestBodyCheck 'Enabled' `
-RedirectUrl 'https://learn.microsoft.com/en-us/azure/web-application-firewall/' `
-CustomBlockResponseStatusCode '403' `
-CustomBlockResponseBody '<html><head><title>WAF Demo</title></head><body><p><h1><strong>WAF Custom Response Page</strong></h1></p><p>Please contact us with this information:<br>{{azure-ref}}</p></body></html>'
To customize the response status code and body, use az network front-door waf-policy update command.
# Update WAF policy settings to customize response body and status code
az network front-door waf-policy update \
	--name 'myWAFPolicy' \
	--resource-group 'myResourceGroup' \
	--request-body-check 'Enabled' \
	--redirect-url 'https://learn.microsoft.com/en-us/azure/web-application-firewall/' \
	--custom-block-response-status-code '403' \
    --custom-block-response-body 'PGh0bWw+PGhlYWQ+PHRpdGxlPldBRiBEZW1vPC90aXRsZT48L2hlYWQ+PGJvZHk+PHA+PGgxPjxzdHJvbmc+V0FGIEN1c3RvbSBSZXNwb25zZSBQYWdlPC9zdHJvbmc+PC9oMT48L3A+PHA+UGxlYXNlIGNvbnRhY3QgdXMgd2l0aCB0aGlzIGluZm9ybWF0aW9uOjxicj57e2F6dXJlLXJlZn19PC9wPjwvYm9keT48L2h0bWw+'
Note
The value of the --custom-block-response-body parameter must be a base64 encoded string.
In the previous example, the response code was kept as 403 with a custom message: "Please contact us with this information:".

Note
{{azure-ref}} inserts the unique reference string in the response body. The value matches the TrackingReference field in the FrontDoorAccessLog and FrontDoorWebApplicationFirewallLog logs.
Important
If you leave the block response body blank, the WAF returns a 403 Forbidden response for normal WAF blocks and a 429 Too many requests for rate limit blocks.
Next step
