Getting Started with iOS
Note
Bing Maps SDK for Android and iOS retirement
Bing Maps SDK for Android and iOS is deprecated and will be retired. Free (Basic) account customers can continue to use Bing Maps SDK for Android and iOS until June 30th, 2025. Enterprise account customers can continue to use Bing Maps SDK for Android and iOS until June 30th, 2028. To avoid service disruptions, all implementations using Bing Maps SDK for Android and iOS will need to be updated to use Azure Maps Web SDK by the retirement date that applies to your Bing Maps for Enterprise account type.
Azure Maps is Microsoft's next-generation maps and geospatial services for developers. Azure Maps has many of the same features as Bing Maps for Enterprise, and more. To get started with Azure Maps, create a free Azure subscription and an Azure Maps account. For more information about azure Maps, see Azure Maps Documentation. For migration guidance, see Bing Maps Migration Overview.
This tutorial goes through creating an iOS app with a Bing Maps Native Control step-by-step.
Prerequisites
- Bing Maps Key. Must be obtained to use the Bing Maps SDK. The Bing Maps Key will need to be set through the API to use the Bing Maps native control and to make API requests to Bing Maps services. Visit the Bing Maps Dev Center Help page for detailed steps on obtaining one.
- CocoaPods. Dependency manager for Swift and Objective-C Cocoa projects, which is required to add the Bing Maps SDK to the app. Here's a page for instruction to install the manager.
- XCode. This example is built using XCode. You can download it here.
Creating a project
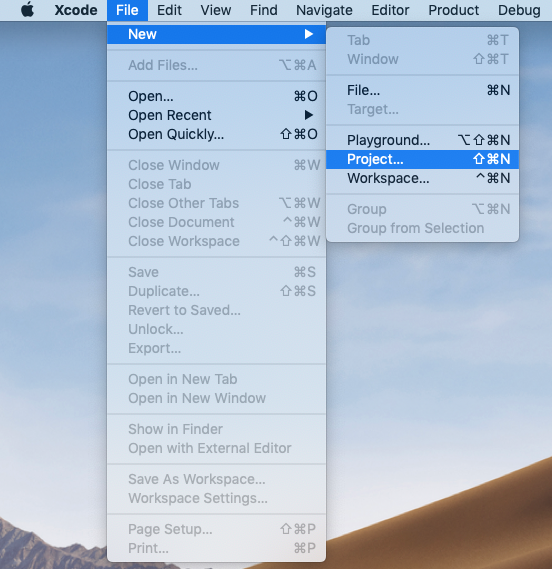
Launch Xcode and choose File > New > Project
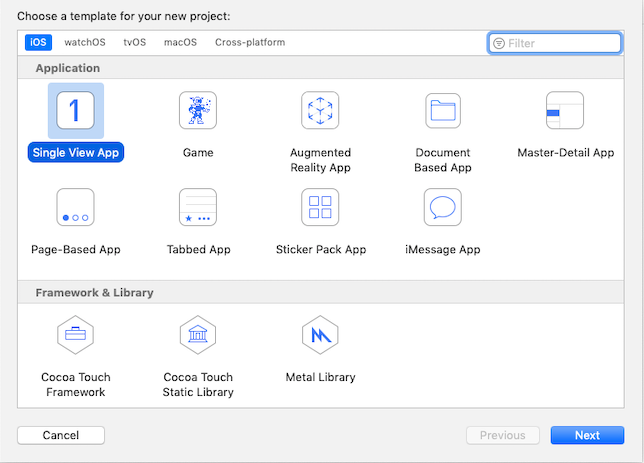
Select iOS > Single View Application from Project selection view and click Next
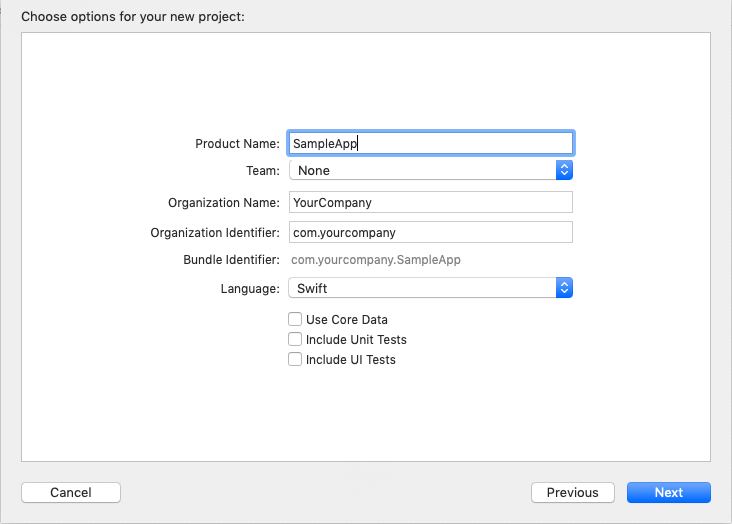
Fill options for your project and press Next. (Choose Objective-C to write the project in Objective-C.)
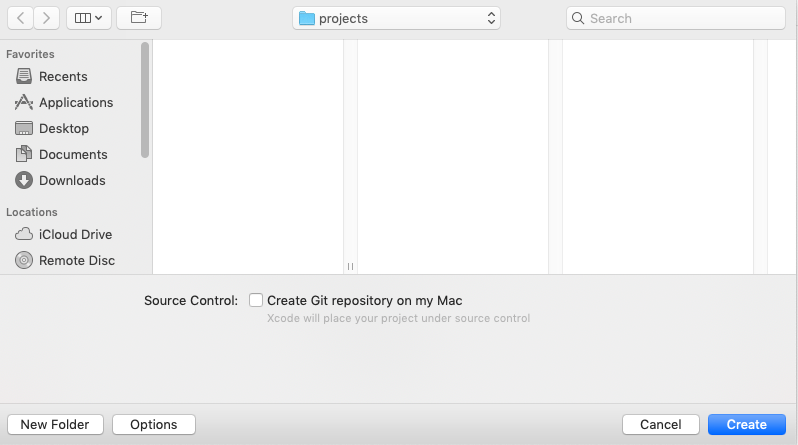
Select any folder to save your project and press Create
Adding CocoaPods to your project
- In the terminal, change the working directory to your app folder which contains the xcodeproj file.
- Run the command
pod initin the terminal to createPodfilewhich is used to store your project's CocoaPods configuration.
Including Bing Maps Native Control in your project
- Open the newly created
Podfileand specify the following:
# Uncomment the next line to define a global platform for your project
source 'https://github.com/CocoaPods/Specs.git'

platform :ios, '9.2'

target 'YOUR_APPLICATION_TARGET_NAME' do

  # Comment the next line if you're not using Swift and don't want to use dynamic frameworks
  use_frameworks!

  # Pods for SampleApp
  pod 'MicrosoftMapsSDK', '~> 1.2.0'
end
Save the
Podfileand run the commandpod installin the terminal.Open the workspace file in XCode and you are ready to use the API.
Adding a map view to UIViewControl
Add UIView to the scene and set its class to MSMapView
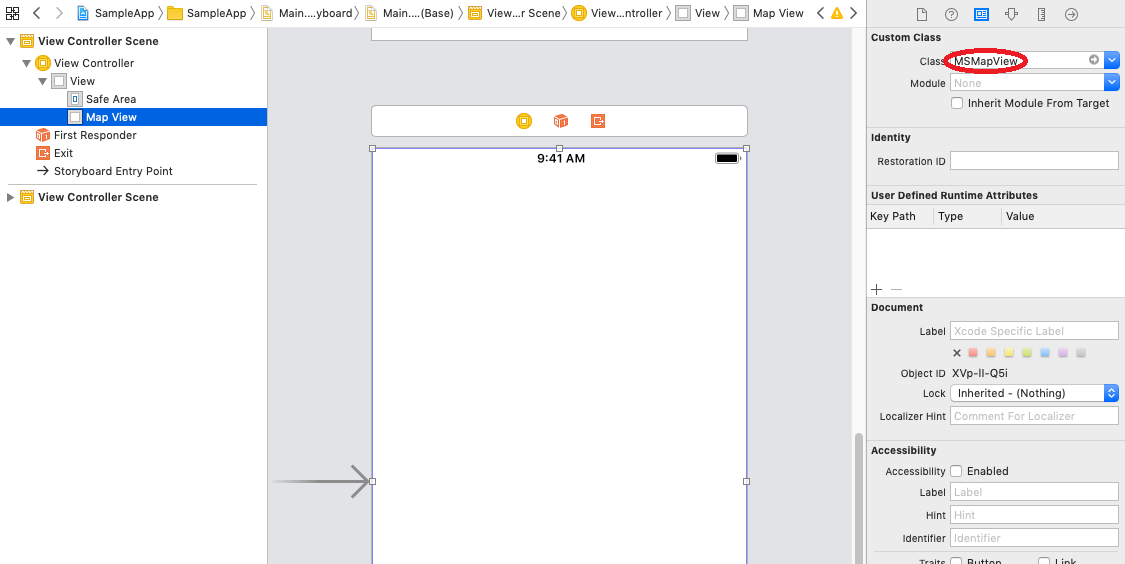
Add the following import to ViewController
import MicrosoftMaps
#import <MicrosoftMaps/MicrosoftMaps.h>
Create IBOutlet for the map

Set the map key in viewDidLoad
override func viewDidLoad() {
    super.viewDidLoad()
    // Do any additional setup after loading the view.

    mapview.credentialsKey = "Your credentials here"
}
- (void)viewDidLoad {
    [super viewDidLoad];

    self.mapView.credentialsKey = @"Your credentials here";
}
Further customization
Scenes
Let's go through a common scenario to set map scene to a specific location on startup.
First, declare the location. Say, we want to show Seattle and Bellevue and choose Lake Washington in between:
let LOCATION_LAKE_WASHINGTON = MSGeopoint(latitude: 47.609466, longitude: -122.265185)
MSGeopoint *LOCATION_LAKE_WASHINGTON = nil;

+ (void)initialize {
    if(!LOCATION_LAKE_WASHINGTON)
    LOCATION_LAKE_WASHINGTON = [MSGeopoint geopointWithLatitude:47.609466
                                           longitude:-122.265185];
}
Then override your ViewController's viewDidLoad method with a setScene call:
override func viewDidLoad() {
    super.viewDidLoad()
    mapView.credentialsKey = "Your credentials here"
    let scene = MSMapScene(location: LOCATION_LAKE_WASHINGTON, zoomLevel: 10 )
    self.mapView.setScene(scene, with: .none)
}
- (void)viewDidLoad {
    [super viewDidLoad];
    self.mapView.credentialsKey = @"Your credentials here";
    MSMapScene *scene = [MSMapScene sceneWithLocation:LOCATION_LAKE_WASHINGTON
                                                      zoomLevel:10];
    [self.mapView setScene:scene withAnimationKind:MSMapAnimationKindNone];
}
Pins
You can attach pins to locations on the map using custom element layer populated with MapImage elements. Here's an example:
First, declare the element layer as class member:
private var pinLayer: MSMapElementLayer!
MSMapElementLayer *pinLayer;
Next step, initialize and add it to map view's layers in your viewDidLoad method:
pinLayer = MSMapElementLayer()
mapView.layers.add(pinLayer)
pinLayer = [[MSMapElementLayer alloc] init];
[self.mapView.layers addMapLayer:pinLayer];
Use the following snippet to add pins:
let location = MSGeopoint(...) // your pin lat-long coordinates
let pinBitmap = MSMapImage(...)  // your pin graphic (optional)

let pushpin = MSMapIcon()
pushpin.location = location
pushpin.image = pinBitmap

pinLayer.elements.add(pushpin)
MSGeopoint *location = [MSGeopoint geopointWithLatitude: ...]; // your pin lat-long coordinates
MSMapImage *pinBitmap = [[MSMapImage alloc] ...] // your pin graphic (optional)

MSMapIcon *pushpin = [[MSMapIcon alloc] init];
pushpin.location = location;
pushpin.image = pinBitmap;

[pinLayer.elements addMapElement:pushpin];
Note: if pins in your scenario use the same graphic, it is recommended to reuse the associated MSMapImage object. Rather than creating a new one for each pin, consider declaring and initializing it similarly to your MapElementLayer instance.
To clear existing pins, just call clear() on Elements member of the associated layer:
pinLayer.elements.clear();
[pinLayer.elements clear];
Styling
There's a set of predefined styles exposed by MapStyleSheets class:
empty: renders nothing. Useful if you want to display a custom set of tiles with no underlying map data.roadLight: symbolic map, light color scheme. Default look.roadDark: symbolic map, dark color scheme.roadCanvasLight: symbolic map, light low-contrast color scheme.roadHighContrastLight: symbolic map, light high-contrast color scheme.roadHighContrastDark: symbolic map, dark high-contrast color scheme.aerial: photorealistic map.aerialWithOverlay: hybrid map, photorealistic tiles with symbolic entities rendered on top.
Example setting aerialWithOverlay map style:
mapView.setStyleSheet(MSMapStyleSheets.aerialWithOverlay())
[self.mapView setStyleSheet:[MSMapStyleSheets aerialWithOverlay]];
Bing Maps Native Control also supports custom styling via JSON, using the same format as desktop and iOS controls. Here's an example applying your own style:
var styleSheetFromJson:MSMapStyleSheet!
let result = MSMapStyleSheets.try(toParseJson: yourCustomStyleJsonString, into:&styleSheetFromJson)
if (result)
{
    mapView.setStyleSheet(styleSheetFromJson)
} else {
    // Custom style JSON is invalid
}
MSMapStyleSheet *styleSheetFromJson;
BOOL result = [MSMapStyleSheet tryToParseJson:yourCustomStyleJsonString
                               intoStyleSheet:&styleSheetFromJson];
if (result)
{
    [self.mapView setStyleSheet:styleSheetFromJson];
} else {
    // Custom style JSON is invalid
}
Map projection
Bing Maps Native Control runs on a 3D engine and it supports switching map projection between Web Mercator and Globe on demand and in real time. Here's an example:
mapView.projection = MSMapProjection.globe
mapView.projection = MSMapProjection.mercator
self.mapView.projection = MSMapProjectionGlobe;
self.mapView.projection = MSMapProjectionMercator;