Note
Access to this page requires authorization. You can try signing in or changing directories.
Access to this page requires authorization. You can try changing directories.
Device control in Microsoft Defender for Endpoint helps security teams manage access to removable storage, printers, and other peripheral devices on Windows devices. This article describes how to enable and configure device control.
Configure device control in Microsoft Intune
Microsoft Intune is the recommended tool for configuring and distributing Defender for Endpoint features to devices. However, Intune is a separate product that isn't part of Defender for Endpoint, and it isn't included in all subscriptions. To use Intune, you need a subscription that includes it, or you can buy it separately as a standalone subscription or add-on. If you don't have Intune, you can use any of the other methods in this article. For more information, see Microsoft Intune licensing.
View device control groups in Intune
In Intune, device control groups appear as reusable settings.
- On the Endpoint security | Overview page in the Microsoft Intune admin center at https://intune.microsoft.com/#view/Microsoft_Intune_Workflows/SecurityManagementMenu/~/overview, go to Manage > Attack surface reduction.
- On the Endpoint security | Attack surface reduction page, select the Reusable settings tab.
Configure device control in Intune using endpoint security policies
To configure device control in Microsoft Intune, use an endpoint security Attack surface reduction policy. For detailed instructions, see Create endpoint security policies or Modify existing policies (links open new tabs in the Intune documentation).
When you create the policy, use these specific settings:
- Policy type: Go to Manage > Attack surface reduction on the Endpoint security | Overview page at https://intune.microsoft.com/#view/Microsoft_Intune_Workflows/SecurityManagementMenu/~/overview, and then select
 Create policy.
 - Platform: Select Windows. Currently, the Device Control profile isn't supported for Windows Server devices managed through Defender for Endpoint security settings management, even though This policy applies to shows Windows Server.
- Profile: Select Device Control.
When you create or modify the policy, use these specific settings on the Configuration settings tab:
Defender section: See Allow Full Scan Removable Drive Scanning settings.
Device Control section: Configure custom policies with reusable settings. Each row in this section represents a device control policy. The policy name appears in user notifications, advanced hunting, and reports.
Select
Add to add a policy. Configure the following settings:- Name: Enter a unique name.
- Included ID: Select the reusable settings that the policy applies to.
- Excluded ID: Select the reusable settings that the policy excludes.
- Type, Options, and Access mask: Configure the action, user notification and event behavior, and allowed permissions.
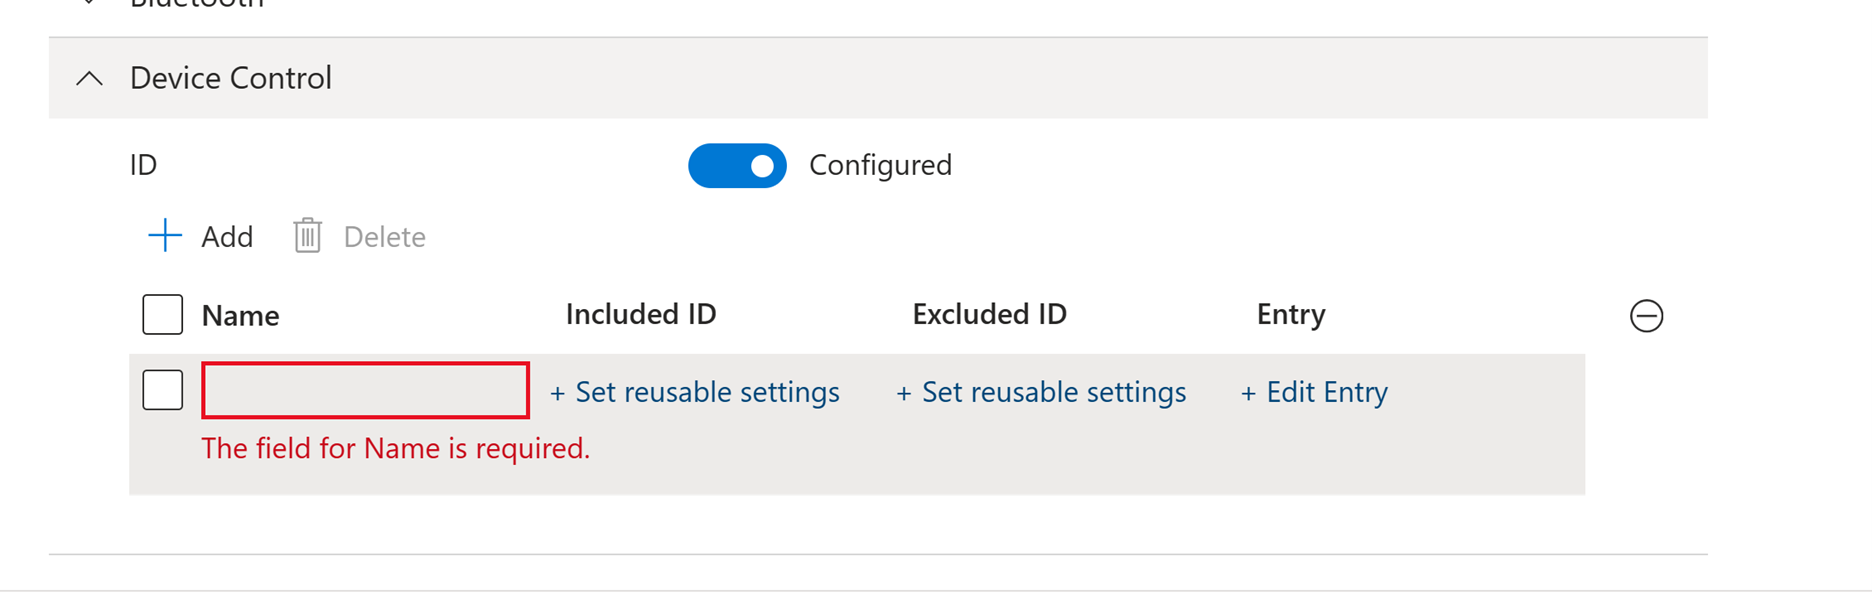
For information about adding reusable groups of settings to a policy, see Add reusable groups to a Device Control profile. For information about device control rules, see Device control overview: Rules.
Add an Allow or Deny policy when you add an audit policy to avoid unexpected results.
Important
If you configure only audit policies, permissions are inherited from the default enforcement setting.
Intune doesn't preserve the order of policies shown in the user interface for policy enforcement. Use non-intersecting Allow and Deny policies by explicitly adding devices to be excluded. You can't change the default enforcement setting in the Intune graphical interface. If you change the default enforcement to
Denyby using another method and create anAllowpolicy for specific devices, all other devices are blocked.Device Installation Restrictions: See Device Installation settings.
Removable Storage Access: See Removable Storage Access settings.
Data Protection: See Allow Direct Memory Access settings.
Dma Guard: See Device Enumeration Policy settings.
Storage: See Removable Disk Deny Write Access settings.
Connectivity: See Allow USB Connection and Allow Bluetooth settings.
Bluetooth: Configure settings related to Bluetooth connections and services. See Policy CSP - Bluetooth.
System: See Allow Storage Card settings.
Tip
You don't need to configure all available settings at once. Consider starting with the Device Control settings.
Configure device control in Intune using custom profiles with OMA-URIs and CSPs
Although endpoint security policies are recommended, you can also configure device control in Intune by using custom profiles that contain Open Mobile Alliance Uniform Resource Identifier (OMA-URI) settings from the Defender configuration service provider (CSP).
For instructions to create and assign a custom profile, see Use custom device settings in Microsoft Intune. For information about the OMA-URI fields in Windows custom profiles, see Add custom settings for Windows devices in Microsoft Intune.
Important
Using Intune OMA-URI settings to configure device control requires Intune to manage the Device Configuration workload if the device is co-managed with Configuration Manager. For more information, see How to switch Configuration Manager workloads to Intune.
When you create the policy, use these specific settings:
- Platform: Select Windows 10 and later.
- Profile type: Select Templates, and then select Custom.
When you create or modify the policy, add a row for each setting on the Configuration settings tab. Use the following OMA-URI values for device control settings:
- Device control default enforcement: Establishes what decisions are made during device control access checks when none of the policy rules match.
- OMA-URI:
./Vendor/MSFT/Defender/Configuration/DefaultEnforcement - Data type: Integer
- Values:
DefaultEnforcementAllow=1DefaultEnforcementDeny=2
- OMA-URI:
- Device types: Specifies the device types, identified by their primary IDs, that have device control protection turned on. Separate multiple product family IDs with a pipe, without spaces.
- OMA-URI:
./Vendor/MSFT/Defender/Configuration/SecuredDevicesConfiguration - Data type: String
- Values:
RemovableMediaDevicesCdRomDevicesWpdDevicesPrinterDevices
- OMA-URI:
- Enable device control: Enables or disables device control on the device.
- OMA-URI:
./Vendor/MSFT/Defender/Configuration/DeviceControlEnabled - Data type: Integer
- Values:
- Disable =
0 - Enable =
1
- Disable =
- OMA-URI:
Create policies with OMA-URI
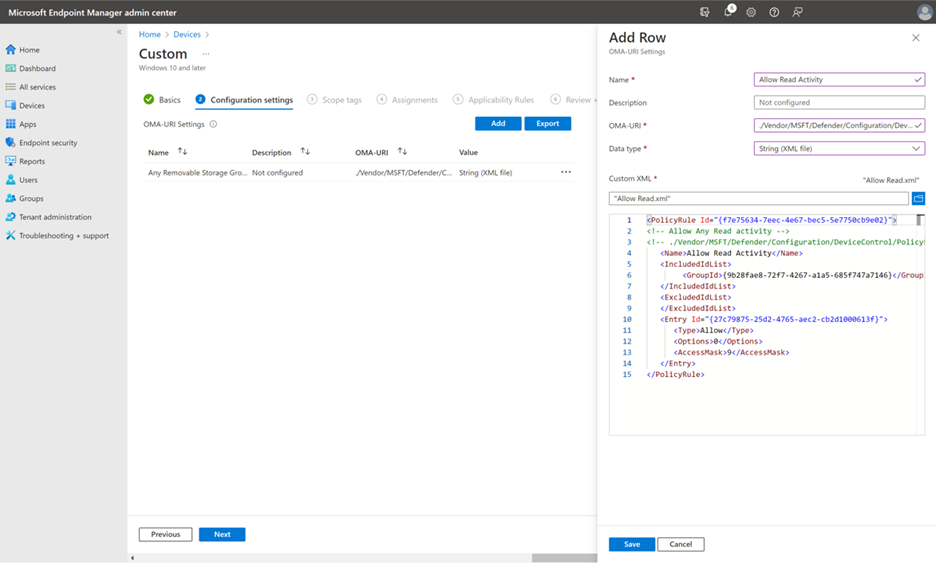
When you create policies with OMA-URI in Intune, create one XML file for each policy. As a best practice, use the Device Control profile to author custom policies.
In the Add Row pane, specify the following settings:
- In the Name field, type
Allow Read Activity. - In the OMA-URI field, type
./Vendor/MSFT/Defender/Configuration/DeviceControl/PolicyRules/%7b[PolicyRule Id]%7d/RuleData. Use the PowerShell commandNew-Guidto generate the GUID that replaces[PolicyRule Id]. Use the same GUID for thePolicyRule Idvalue in the policy XML file. - In the Data Type field, select String (XML file), and use Custom XML.
You can use parameters to set conditions for specific entries. For an example, see the Allow Read policy XML file for removable storage.
Note
Comments using XML comment notation <!-- COMMENT --> can be used in the Rule and Group XML files, but they must be inside the first XML tag, not the first line of the XML file.
Create groups with OMA-URI
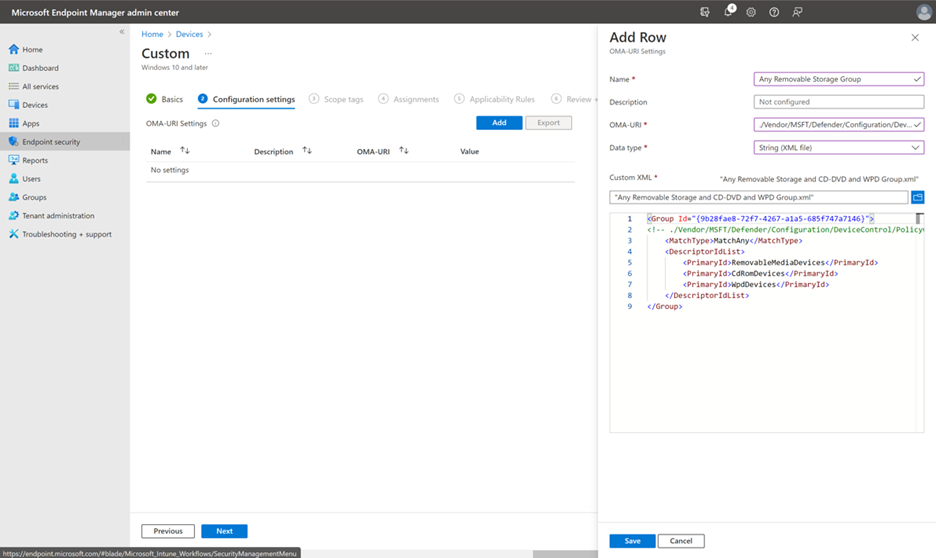
When you create groups with OMA-URI in Intune, create one XML file for each group. As a best practice, use reusable settings to define groups.
In the Add Row pane, specify the following settings:
- In the Name field, type
Any Removable Storage Group. - In the OMA-URI field, type
./Vendor/MSFT/Defender/Configuration/DeviceControl/PolicyGroups/%7b[GroupId]%7d/GroupData. Use the PowerShell commandNew-Guidto generate the GUID that replaces[GroupId]. Use the same GUID for the groupIdvalue in the group XML file. - In the Data Type field, select String (XML file), and use Custom XML.
Note
Comments using XML comment notation <!-- COMMENT --> can be used in the Rule and Group XML files, but they must be inside the first XML tag, not the first line of the XML file.
Configure device control in the Microsoft Defender portal
If your organization manages endpoint security policies in the Microsoft Defender portal, you can configure device control with the same endpoint security policies that Intune uses.
Important
Device control policies created in the Defender portal apply only to devices enrolled in Intune. They don't apply to devices managed through Defender for Endpoint security settings management that aren't enrolled in Intune.
For detailed instructions, see Create an endpoint security policy or Edit an endpoint security policy (links open new tabs).
When you create the policy on the Windows policies tab of the Endpoint security policies page in the Defender portal at https://security.microsoft.com/policy-inventory?osPlatform=Windows, use these specific settings:
- Select platform: Select Windows.
- Select template: Select Device control.
When you create or modify the policy, use the same settings described in Configure device control in Intune using endpoint security policies on the Configuration settings tab.
Configure device control in Group Policy
Warning
If you manage device control with Intune or another mobile device management service, remove conflicting Group Policy settings. The ControlPolicyConflict setting isn't applicable to the Defender CSP.
To configure device control settings in Group Policy, follow these steps:
In Centralized Group Policy, open the Group Policy Management Console (GPMC) on your Group Policy management computer.
In the GPMC console tree, expand Group Policy Objects in the forest and domain that contain the Group Policy Object (GPO) you want to edit.
Right-click the GPO, and then select Edit.
In the Group Policy Management Editor, go to Computer configuration > Administrative templates > Windows components > Microsoft Defender Antivirus.
The device control settings are available in the following locations:
- Features:
- Device Control:
To open and configure a setting, use any of the following methods:
- Double-click the setting.
- Right-click the setting, and then select Edit.
- Select the setting, and then select Action > Edit.
Tip
You can also configure Group Policy locally on individual devices by using the Local Group Policy Editor (gpedit.msc). Go to the same base path: Computer configuration > Administrative templates > Windows components > Microsoft Defender Antivirus, and then select Features or Device Control, depending on the setting.
Note
If you don't see the device control Group Policy settings, add the Group Policy Administrative Templates (ADMX). You can download WindowsDefender.adml and WindowsDefender.admx from the Microsoft Defender for Endpoint device control samples on GitHub.
Enable device control in Group Policy
To enable removable storage access control, follow these steps:
In the Microsoft Defender Antivirus policy tree, select Features.
In the details pane of Features, open the Device Control setting.
In the Device Control window, select Enabled.

Configure default enforcement in Group Policy
You can set the default access to Deny or Allow for all device control features, including RemovableMediaDevices, CdRomDevices, WpdDevices, and PrinterDevices.
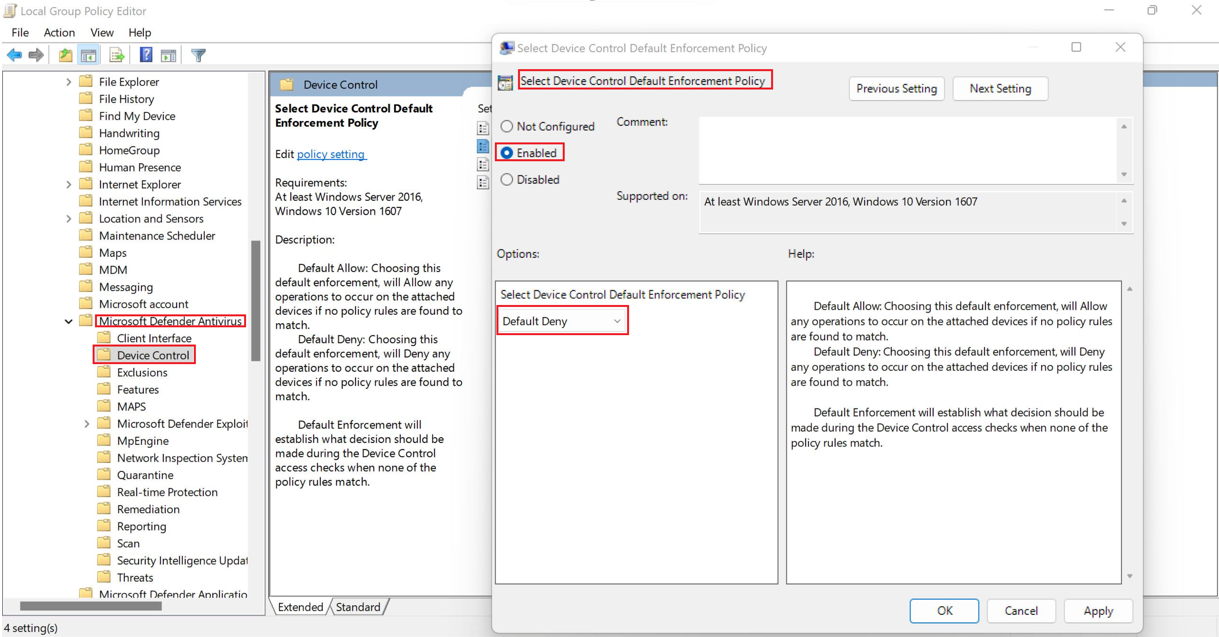
For example, you can have a Deny or Allow policy for RemovableMediaDevices, but not for CdRomDevices or WpdDevices. If you set the default enforcement to Deny, read, write, and execute access to CdRomDevices and WpdDevices is blocked. If you want to manage only storage, create an Allow policy for printers. Otherwise, default enforcement also denies access to printers.
To set the default enforcement to deny, follow these steps:
In the Microsoft Defender Antivirus policy tree, select Device Control.
In the details pane of Device Control, open the Select Device Control Default Enforcement Policy setting.
In the Select Device Control Default Enforcement Policy window, configure the following options:
- Select Enabled.
- Under Options, select Default Deny.
Configure device types in Group Policy
To configure the device types that a device control policy applies to, follow these steps:
In the Microsoft Defender Antivirus policy tree, select Device Control.
In the details pane of Device Control, open the Turn on device control for specific device types setting.
In the Turn on device control for specific device types window, configure the following options:
- Select Enabled.
- Under Options, in the Turn on device control for specific device types box, specify the product family IDs, separated by a pipe (
|). Enter the value as a single string without spaces. Otherwise, the device control engine might parse the value incorrectly. Product family IDs includeRemovableMediaDevices,CdRomDevices,WpdDevices, andPrinterDevices.

Define device control groups in Group Policy
Create and deploy one XML file for each removable storage group:
Use the properties in your removable storage group to create an XML file. Make sure the root node is
PolicyGroups. For example:<PolicyGroups> <Group Id="{d8819053-24f4-444a-a0fb-9ce5a9e97862}" Type="Device"> </Group> </PolicyGroups>Save the XML file to your network share.
In the Microsoft Defender Antivirus policy tree, select Device Control.
In the details pane of Device Control, open the Define device control policy groups setting.
In the Define device control policy groups window, configure the following options:
- Select Enabled.
- Under Options, in the Define the policy groups here box, specify the network share file path that contains the XML groups data.
For an example that defines any removable storage, CD-ROM, Windows portable devices, and approved USBs groups, see the removable storage group XML file.
Note
You can use XML comments in the format <!--COMMENT--> in rule and group XML files. Place comments inside the first XML tag, not on the first line of the XML file.
Define device control policies in Group Policy
Create and deploy one XML file for each removable storage access policy rule:
Use the properties in the removable storage access policy rule to create an XML file. Make sure the root node is
PolicyRules. For example:<PolicyRules> <PolicyRule Id="{d8819053-24f4-444a-a0fb-9ce5a9e97862}"> ... </PolicyRule> </PolicyRules>Save the XML file to a network share.
In the Microsoft Defender Antivirus policy tree, select Device Control.
In the details pane of Device Control, open the Define device control policy rules setting.
In the Define device control policy rules window, configure the following options:
- Select Enabled.
- Under Options, in the Define the policy rules here box, specify the network share file path that contains the XML rules data.
Validate device control XML files with MpCmdRun
The MpCmdRun command-line utility can validate XML files used for Group Policy deployments. Validation detects syntax errors that the device control engine might encounter when it parses the settings.
To validate the XML files, follow these steps:
In an elevated Command Prompt (a Command Prompt window you opened by selecting Run as administrator), run the following commands. Replace the example XML file paths with the paths to your rules and groups XML files.
Tip
The first command changes the directory to the latest version of <antimalware platform version> in
%ProgramData%\Microsoft\Windows Defender\Platform\<antimalware platform version>. If that path doesn't exist, it goes to%ProgramFiles%\Windows Defender.(set "_done=" & if exist "%ProgramData%\Microsoft\Windows Defender\Platform\" (for /f "delims=" %d in ('dir "%ProgramData%\Microsoft\Windows Defender\Platform" /ad /b /o:-n 2^>nul') do if not defined _done (cd /d "%ProgramData%\Microsoft\Windows Defender\Platform\%d" & set _done=1)) else (cd /d "%ProgramFiles%\Windows Defender")) >nul 2>&1 MpCmdRun.exe -DeviceControl -TestPolicyXml "C:\Policies\PolicyRules.xml" -Rules MpCmdRun.exe -DeviceControl -TestPolicyXml "C:\Policies\Groups.xml" -Groups
If there are no errors, the following output is shown:
DC policy rules parsing succeeded
Verifying absolute rules data against the original data
Rules verified with success
DC policy groups parsing succeeded
Verifying absolute groups data against the original data
Groups verified with success
Has Group Dependency Loop: no
Note
To capture evidence of files that are copied or printed, use Endpoint DLP.
You can use XML comments in the format <!-- COMMENT --> in rule and group XML files. Place comments inside the first XML tag, not on the first line of the XML file.