Note
Access to this page requires authorization. You can try signing in or changing directories.
Access to this page requires authorization. You can try changing directories.
Create Windows Service using
.NET Framework developers are probably familiar with Windows Service apps. Before .NET Core and .NET 5+, developers who relied on .NET Framework could create Windows Services to perform background tasks or execute long-running processes. This functionality is still available and you can create Worker Services that run as a Windows Service.
In this tutorial, you'll learn how to:
- Publish a .NET worker app as a single file executable.
- Create a Windows Service.
- Create the
BackgroundServiceapp as a Windows Service. - Start and stop the Windows Service.
- View event logs.
- Delete the Windows Service.
Tip
All of the "Workers in .NET" example source code is available in the Samples Browser for download. For more information, see Browse code samples: Workers in .NET.
Important
Installing the .NET SDK also installs the Microsoft.NET.Sdk.Worker and the worker template. In other words, after installing the .NET SDK, you could create a new worker by using the dotnet new worker command. If you're using Visual Studio, the template is hidden until the optional ASP.NET and web development workload is installed.
Prerequisites
- The .NET 8.0 SDK or later
- A Windows OS
- A .NET integrated development environment (IDE)
- Feel free to use Visual Studio
Create a new project
To create a new Worker Service project with Visual Studio, you'd select File > New > Project.... From the Create a new project dialog search for "Worker Service", and select Worker Service template. If you'd rather use the .NET CLI, open your favorite terminal in a working directory. Run the dotnet new command, and replace the <Project.Name> with your desired project name.
dotnet new worker --name <Project.Name>
For more information on the .NET CLI new worker service project command, see dotnet new worker.
Tip
If you're using Visual Studio Code, you can run .NET CLI commands from the integrated terminal. For more information, see Visual Studio Code: Integrated Terminal.
Install NuGet package
To interop with native Windows Services from .NET IHostedService implementations, you'll need to install the Microsoft.Extensions.Hosting.WindowsServices NuGet package.
To install this from Visual Studio, use the Manage NuGet Packages dialog. Search for "Microsoft.Extensions.Hosting.WindowsServices", and install it. If you'd rather use the .NET CLI, run the following command. (If you're using an SDK version of .NET 9 or earlier, use the dotnet add package form instead.)
dotnet package add Microsoft.Extensions.Hosting.WindowsServices
For more information, see dotnet package add.
After successfully adding the packages, your project file should now contain the following package references:
<ItemGroup>
  <PackageReference Include="Microsoft.Extensions.Hosting" Version="9.0.6" />
  <PackageReference Include="Microsoft.Extensions.Hosting.WindowsServices" Version="9.0.6" />
</ItemGroup>
Update project file
This worker project makes use of C#'s nullable reference types. To enable them for the entire project, update the project file accordingly:
<Project Sdk="Microsoft.NET.Sdk.Worker">

  <PropertyGroup>
    <TargetFramework>net8.0-windows</TargetFramework>
    <Nullable>enable</Nullable>
    <ImplicitUsings>true</ImplicitUsings>
    <RootNamespace>App.WindowsService</RootNamespace>
  </PropertyGroup>

  <ItemGroup>
    <PackageReference Include="Microsoft.Extensions.Hosting" Version="9.0.6" />
    <PackageReference Include="Microsoft.Extensions.Hosting.WindowsServices" Version="9.0.6" />
  </ItemGroup>
</Project>
The preceding project file changes add the <Nullable>enable<Nullable> node. For more information, see Setting the nullable context.
Create the service
Add a new class to the project named JokeService.cs, and replace its contents with the following C# code:
namespace App.WindowsService;

public sealed class JokeService
{
    public string GetJoke()
    {
        Joke joke = _jokes.ElementAt(
            Random.Shared.Next(_jokes.Count));

        return $"{joke.Setup}{Environment.NewLine}{joke.Punchline}";
    }

    // Programming jokes borrowed from:
    // https://github.com/eklavyadev/karljoke/blob/main/source/jokes.json
    private readonly HashSet<Joke> _jokes = new()
    {
        new Joke("What's the best thing about a Boolean?", "Even if you're wrong, you're only off by a bit."),
        new Joke("What's the object-oriented way to become wealthy?", "Inheritance"),
        new Joke("Why did the programmer quit their job?", "Because they didn't get arrays."),
        new Joke("Why do programmers always mix up Halloween and Christmas?", "Because Oct 31 == Dec 25"),
        new Joke("How many programmers does it take to change a lightbulb?", "None that's a hardware problem"),
        new Joke("If you put a million monkeys at a million keyboards, one of them will eventually write a Java program", "the rest of them will write Perl"),
        new Joke("['hip', 'hip']", "(hip hip array)"),
        new Joke("To understand what recursion is...", "You must first understand what recursion is"),
        new Joke("There are 10 types of people in this world...", "Those who understand binary and those who don't"),
        new Joke("Which song would an exception sing?", "Can't catch me - Avicii"),
        new Joke("Why do Java programmers wear glasses?", "Because they don't C#"),
        new Joke("How do you check if a webpage is HTML5?", "Try it out on Internet Explorer"),
        new Joke("A user interface is like a joke.", "If you have to explain it then it is not that good."),
        new Joke("I was gonna tell you a joke about UDP...", "...but you might not get it."),
        new Joke("The punchline often arrives before the set-up.", "Do you know the problem with UDP jokes?"),
        new Joke("Why do C# and Java developers keep breaking their keyboards?", "Because they use a strongly typed language."),
        new Joke("Knock-knock.", "A race condition. Who is there?"),
        new Joke("What's the best part about TCP jokes?", "I get to keep telling them until you get them."),
        new Joke("A programmer puts two glasses on their bedside table before going to sleep.", "A full one, in case they gets thirsty, and an empty one, in case they don’t."),
        new Joke("There are 10 kinds of people in this world.", "Those who understand binary, those who don't, and those who weren't expecting a base 3 joke."),
        new Joke("What did the router say to the doctor?", "It hurts when IP."),
        new Joke("An IPv6 packet is walking out of the house.", "He goes nowhere."),
        new Joke("3 SQL statements walk into a NoSQL bar. Soon, they walk out", "They couldn't find a table.")
    };
}

readonly record struct Joke(string Setup, string Punchline);
The preceding joke service source code exposes a single piece of functionality, the GetJoke method. This is a string returning method that represents a random programming joke. The class-scoped _jokes field is used to store the list of jokes. A random joke is selected from the list and returned.
Rewrite the Worker class
Replace the existing Worker from the template with the following C# code, and rename the file to WindowsBackgroundService.cs:
namespace App.WindowsService;

public sealed class WindowsBackgroundService(
    JokeService jokeService,
    ILogger<WindowsBackgroundService> logger) : BackgroundService
{
    protected override async Task ExecuteAsync(CancellationToken stoppingToken)
    {
        try
        {
            while (!stoppingToken.IsCancellationRequested)
            {
                string joke = jokeService.GetJoke();
                logger.LogWarning("{Joke}", joke);

                await Task.Delay(TimeSpan.FromMinutes(1), stoppingToken);
            }
        }
        catch (OperationCanceledException)
        {
            // When the stopping token is canceled, for example, a call made from services.msc,
            // we shouldn't exit with a non-zero exit code. In other words, this is expected...
        }
        catch (Exception ex)
        {
            logger.LogError(ex, "{Message}", ex.Message);

            // Terminates this process and returns an exit code to the operating system.
            // This is required to avoid the 'BackgroundServiceExceptionBehavior', which
            // performs one of two scenarios:
            // 1. When set to "Ignore": will do nothing at all, errors cause zombie services.
            // 2. When set to "StopHost": will cleanly stop the host, and log errors.
            //
            // In order for the Windows Service Management system to leverage configured
            // recovery options, we need to terminate the process with a non-zero exit code.
            Environment.Exit(1);
        }
    }
}
In the preceding code, the JokeService is injected along with an ILogger. Both are made available to the class as fields. In the ExecuteAsync method, the joke service requests a joke and writes it to the logger. In this case, the logger is implemented by the Windows Event Log - Microsoft.Extensions.Logging.EventLog.EventLogLoggerProvider. Logs are written to, and available for viewing in the Event Viewer.
Note
By default, the Event Log severity is Warning. This can be configured, but for demonstration purposes the WindowsBackgroundService logs with the LogWarning extension method. To specifically target the EventLog level, add an entry in the appsettings.{Environment}.json, or provide an EventLogSettings.Filter value.
{
  "Logging": {
    "LogLevel": {
      "Default": "Warning"
    },
    "EventLog": {
      "SourceName": "The Joke Service",
      "LogName": "Application",
      "LogLevel": {
        "Microsoft": "Information",
        "Microsoft.Hosting.Lifetime": "Information"
      }
    }
  }
}
For more information on configuring log levels, see Logging providers in .NET: Configure Windows EventLog.
Rewrite the Program class
Replace the template Program.cs file contents with the following C# code:
using App.WindowsService;
using Microsoft.Extensions.Logging.Configuration;
using Microsoft.Extensions.Logging.EventLog;

HostApplicationBuilder builder = Host.CreateApplicationBuilder(args);
builder.Services.AddWindowsService(options =>
{
    options.ServiceName = ".NET Joke Service";
});

LoggerProviderOptions.RegisterProviderOptions<
    EventLogSettings, EventLogLoggerProvider>(builder.Services);

builder.Services.AddSingleton<JokeService>();
builder.Services.AddHostedService<WindowsBackgroundService>();

IHost host = builder.Build();
host.Run();
The AddWindowsService extension method configures the app to work as a Windows Service. The service name is set to ".NET Joke Service". The hosted service is registered for dependency injection.
For more information on registering services, see Dependency injection in .NET.
Publish the app
To create the .NET Worker Service app as a Windows Service, it's recommended that you publish the app as a single file executable. It's less error-prone to have a self-contained executable, as there aren't any dependent files lying around the file system. But you may choose a different publishing modality, which is perfectly acceptable, so long as you create an *.exe file that can be targeted by the Windows Service Control Manager.
Important
An alternative publishing approach is to build the *.dll (instead of an *.exe), and when you install the published app using the Windows Service Control Manager you delegate to the .NET CLI and pass the DLL. For more information, see .NET CLI: dotnet command.
sc.exe create ".NET Joke Service" binpath= "C:\Path\To\dotnet.exe C:\Path\To\App.WindowsService.dll"
<Project Sdk="Microsoft.NET.Sdk.Worker">

  <PropertyGroup>
    <TargetFramework>net8.0-windows</TargetFramework>
    <Nullable>enable</Nullable>
    <ImplicitUsings>true</ImplicitUsings>
    <RootNamespace>App.WindowsService</RootNamespace>
    <OutputType>exe</OutputType>
    <PublishSingleFile Condition="'$(Configuration)' == 'Release'">true</PublishSingleFile>
    <RuntimeIdentifier>win-x64</RuntimeIdentifier>
    <PlatformTarget>x64</PlatformTarget>
  </PropertyGroup>

  <ItemGroup>
    <PackageReference Include="Microsoft.Extensions.Hosting" Version="9.0.6" />
    <PackageReference Include="Microsoft.Extensions.Hosting.WindowsServices" Version="9.0.6" />
  </ItemGroup>
</Project>
The preceding highlighted lines of the project file define the following behaviors:
<OutputType>exe</OutputType>: Creates a console application.<PublishSingleFile Condition="'$(Configuration)' == 'Release'">true</PublishSingleFile>: Enables single-file publishing.<RuntimeIdentifier>win-x64</RuntimeIdentifier>: Specifies the RID ofwin-x64.<PlatformTarget>x64</PlatformTarget>: Specify the target platform CPU of 64-bit.
To publish the app from Visual Studio, you can create a publish profile that is persisted. The publish profile is XML-based and has the .pubxml file extension. Visual Studio uses this profile to publish the app implicitly, whereas if you're using the .NET CLI, you must explicitly specify the publish profile for it to be used.
Right-click on the project in the Solution Explorer, and select Publish. Then, select Add a publish profile to create a profile. From the Publish dialog, select Folder as your Target.

Leave the default Location, and then select Finish. Once the profile is created, select Show all settings, and verify your Profile settings.

Ensure that the following settings are specified:
- Deployment mode: Self-contained
- Produce single file: checked
- Enable ReadyToRun compilation: checked
- Trim unused assemblies (in preview): unchecked
Finally, select Publish. The app is compiled, and the resulting .exe file is published to the /publish output directory.
Alternatively, you could use the .NET CLI to publish the app:
dotnet publish --output "C:\custom\publish\directory"
For more information, see dotnet publish.
Important
With .NET 6, if you attempt to debug the app with the <PublishSingleFile>true</PublishSingleFile> setting, you will not be able to debug the app. For more information, see Unable to attach to CoreCLR when debugging a 'PublishSingleFile' .NET 6 app.
Create the Windows Service
If you're unfamiliar with using PowerShell and you'd rather create an installer for your service, see Create a Windows Service installer. Otherwise, to create the Windows Service, use the native Windows Service Control Manager's (sc.exe) create command. Run PowerShell as an Administrator.
sc.exe create ".NET Joke Service" binpath= "C:\Path\To\App.WindowsService.exe"
Tip
If you need to change the content root of the host configuration, you can pass it as a command-line argument when specifying the binpath:
sc.exe create "Svc Name" binpath= "C:\Path\To\App.exe --contentRoot C:\Other\Path"
You'll see an output message:
[SC] CreateService SUCCESS
For more information, see sc.exe create.
Configure the Windows Service
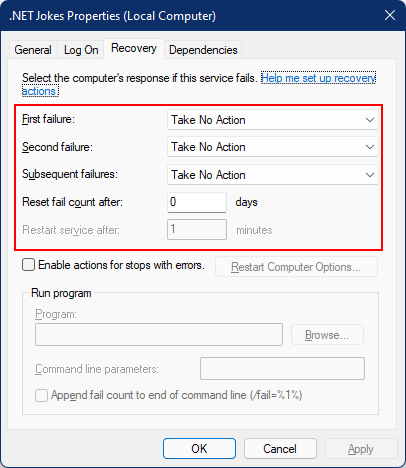
After the service is created, you can optionally configure it. If you're fine with the service defaults, skip to the Verify service functionality section.
Windows Services provide recovery configuration options. You can query the current configuration using the sc.exe qfailure "<Service Name>" (where <Service Name> is your services' name) command to read the current recovery configuration values:
sc qfailure ".NET Joke Service"
[SC] QueryServiceConfig2 SUCCESS

SERVICE_NAME: .NET Joke Service
        RESET_PERIOD (in seconds)    : 0
        REBOOT_MESSAGE               :
        COMMAND_LINE                 :
The command will output the recovery configuration, which is the default values—since they've not yet been configured.
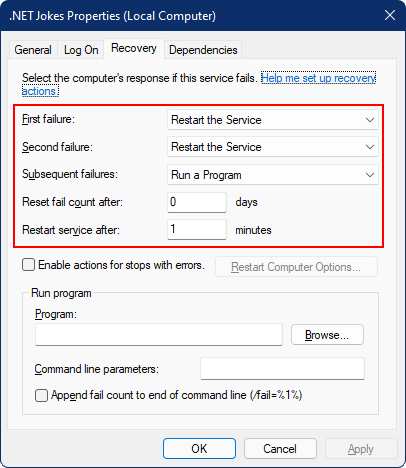
To configure recovery, use the sc.exe failure "<Service Name>" where <Service Name> is the name of your service:
sc.exe failure ".NET Joke Service" reset= 0 actions= restart/60000/restart/60000/run/1000
[SC] ChangeServiceConfig2 SUCCESS
Tip
To configure the recovery options, your terminal session needs to run as an Administrator.
After it's been successfully configured, you can query the values once again using the sc.exe qfailure "<Service Name>" command:
sc qfailure ".NET Joke Service"
[SC] QueryServiceConfig2 SUCCESS

SERVICE_NAME: .NET Joke Service
        RESET_PERIOD (in seconds)    : 0
        REBOOT_MESSAGE               :
        COMMAND_LINE                 :
        FAILURE_ACTIONS              : RESTART -- Delay = 60000 milliseconds.
                                       RESTART -- Delay = 60000 milliseconds.
                                       RUN PROCESS -- Delay = 1000 milliseconds.
You will see the configured restart values.
Service recovery options and .NET BackgroundService instances
With .NET 6, new hosting exception-handling behaviors have been added to .NET. The BackgroundServiceExceptionBehavior enum was added to the Microsoft.Extensions.Hosting namespace, and is used to specify the behavior of the service when an exception is thrown. The following table lists the available options:
| Option | Description |
|---|---|
| Ignore | Ignore exceptions thrown in BackgroundService. |
| StopHost | The IHost will be stopped when an unhandled exception is thrown. |
The default behavior before .NET 6 is Ignore, which resulted in zombie processes (a running process that didn't do anything). With .NET 6, the default behavior is StopHost, which results in the host being stopped when an exception is thrown. But it stops cleanly, meaning that the Windows Service management system will not restart the service. To correctly allow the service to be restarted, you can call Environment.Exit with a non-zero exit code. Consider the following highlighted catch block:
namespace App.WindowsService;

public sealed class WindowsBackgroundService(
    JokeService jokeService,
    ILogger<WindowsBackgroundService> logger) : BackgroundService
{
    protected override async Task ExecuteAsync(CancellationToken stoppingToken)
    {
        try
        {
            while (!stoppingToken.IsCancellationRequested)
            {
                string joke = jokeService.GetJoke();
                logger.LogWarning("{Joke}", joke);

                await Task.Delay(TimeSpan.FromMinutes(1), stoppingToken);
            }
        }
        catch (OperationCanceledException)
        {
            // When the stopping token is canceled, for example, a call made from services.msc,
            // we shouldn't exit with a non-zero exit code. In other words, this is expected...
        }
        catch (Exception ex)
        {
            logger.LogError(ex, "{Message}", ex.Message);

            // Terminates this process and returns an exit code to the operating system.
            // This is required to avoid the 'BackgroundServiceExceptionBehavior', which
            // performs one of two scenarios:
            // 1. When set to "Ignore": will do nothing at all, errors cause zombie services.
            // 2. When set to "StopHost": will cleanly stop the host, and log errors.
            //
            // In order for the Windows Service Management system to leverage configured
            // recovery options, we need to terminate the process with a non-zero exit code.
            Environment.Exit(1);
        }
    }
}
Verify service functionality
To see the app created as a Windows Service, open Services. Select the Windows key (or Ctrl + Esc), and search from "Services". From the Services app, you should be able to find your service by its name.
Important
By default, regular (non-admin) users cannot manage Windows services. To verify that this app functions as expected, you'll need to use an Admin account.

To verify that the service is functioning as expected, you need to:
- Start the service
- View the logs
- Stop the service
Important
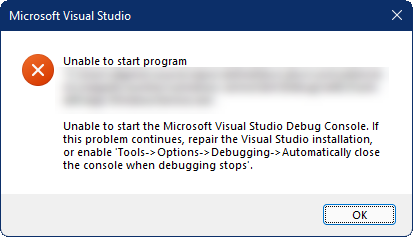
To debug the application, ensure that you're not attempting to debug the executable that is actively running within the Windows Services process.
Start the Windows Service
To start the Windows Service, use the sc.exe start command:
sc.exe start ".NET Joke Service"
You'll see output similar to the following:
SERVICE_NAME: .NET Joke Service
    TYPE               : 10  WIN32_OWN_PROCESS
    STATE              : 2  START_PENDING
                            (NOT_STOPPABLE, NOT_PAUSABLE, IGNORES_SHUTDOWN)
    WIN32_EXIT_CODE    : 0  (0x0)
    SERVICE_EXIT_CODE  : 0  (0x0)
    CHECKPOINT         : 0x0
    WAIT_HINT          : 0x7d0
    PID                : 37636
    FLAGS
The service Status will transition out of START_PENDING to Running.
View logs
To view logs, open the Event Viewer. Select the Windows key (or Ctrl + Esc), and search for "Event Viewer". Select the Event Viewer (Local) > Windows Logs > Application node. You should see a Warning level entry with a Source matching the apps namespace. Double-click the entry, or right-click and select Event Properties to view the details.

After seeing logs in the Event Log, you should stop the service. It's designed to log a random joke once per minute. This is intentional behavior but is not practical for production services.
Stop the Windows Service
To stop the Windows Service, use the sc.exe stop command:
sc.exe stop ".NET Joke Service"
You'll see output similar to the following:
SERVICE_NAME: .NET Joke Service
    TYPE               : 10  WIN32_OWN_PROCESS
    STATE              : 3  STOP_PENDING
                            (STOPPABLE, NOT_PAUSABLE, ACCEPTS_SHUTDOWN)
    WIN32_EXIT_CODE    : 0  (0x0)
    SERVICE_EXIT_CODE  : 0  (0x0)
    CHECKPOINT         : 0x0
    WAIT_HINT          : 0x0
The service Status will transition from STOP_PENDING to Stopped.
Delete the Windows Service
To delete the Windows Service, use the native Windows Service Control Manager's (sc.exe) delete command. Run PowerShell as an Administrator.
Important
If the service is not in the Stopped state, it will not be immediately deleted. Ensure that the service is stopped before issuing the delete command.
sc.exe delete ".NET Joke Service"
You'll see an output message:
[SC] DeleteService SUCCESS
For more information, see sc.exe delete.
See also
- Create a Windows Service installer
- Worker Services in .NET
- Create a Queue Service
- Use scoped services within a
BackgroundService - Implement the
IHostedServiceinterface
Next
Collaborate with us on GitHub
The source for this content can be found on GitHub, where you can also create and review issues and pull requests. For more information, see our contributor guide.