Note
Access to this page requires authorization. You can try signing in or changing directories.
Access to this page requires authorization. You can try changing directories.
This tutorial shows how to publish a console app so that other users can run it. Publishing creates the set of files that are needed to run an application. To deploy the files, copy them to the target machine.
Prerequisites
- This tutorial works with the console app that you create in Create a .NET console application.
Publish the app
Start Visual Studio.
Open the HelloWorld project that you created in Create a .NET console application.
Make sure that Visual Studio is using the Release build configuration. If necessary, change the build configuration setting on the toolbar from Debug to Release.

Right-click on the HelloWorld project (not the HelloWorld solution) and select Publish from the menu.

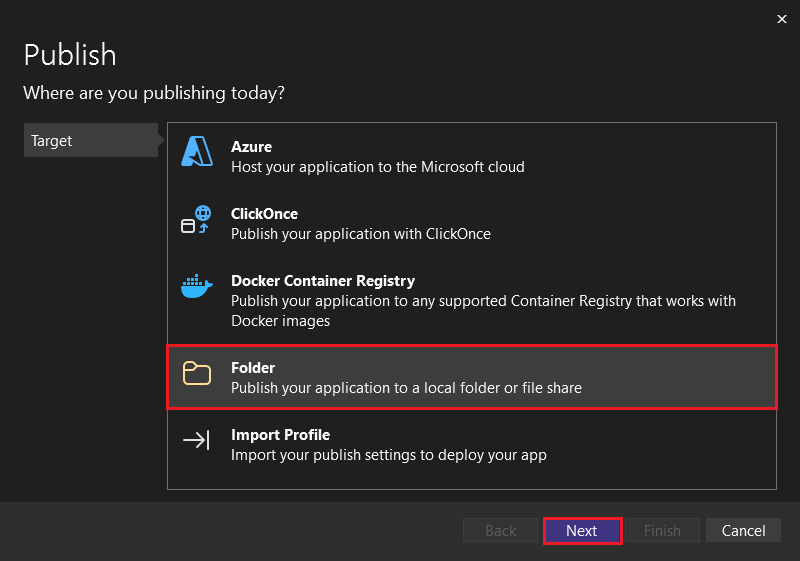
On the Target tab of the Publish page, select Folder, and then select Next.
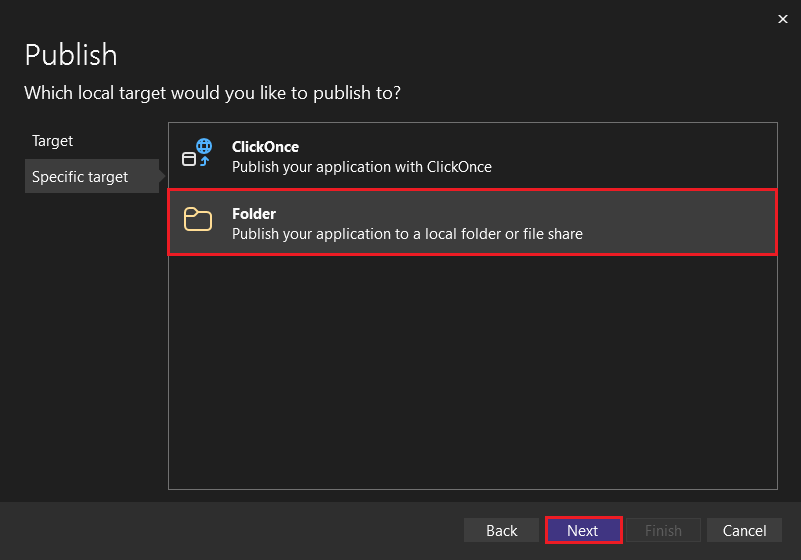
On the Specific Target tab of the Publish page, select Folder, and then select Next.
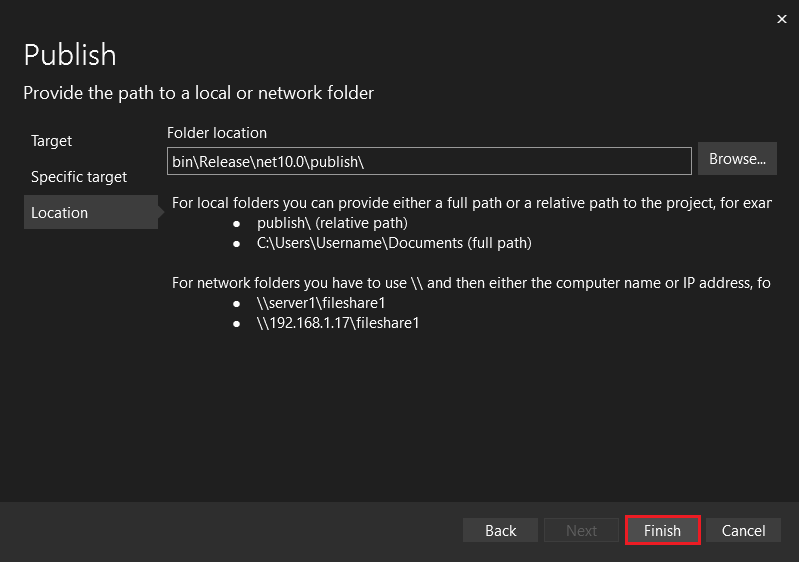
On the Location tab of the Publish page, select Finish.
On the Publish profile creation progress page, select Close.
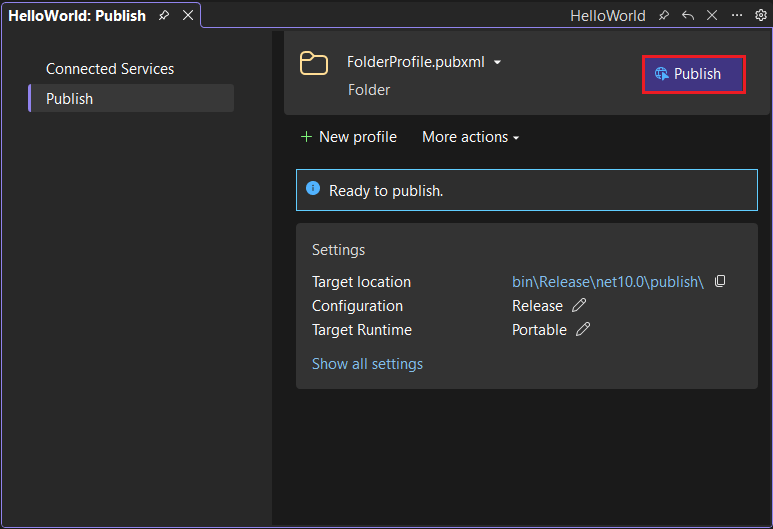
On the Publish tab of the Publish window, select Publish.
Start Visual Studio Code.
Open the HelloWorld project folder that you created in Create a .NET console application.
Choose View > Terminal from the main menu.
The terminal opens in the HelloWorld folder.
Run the following command:
dotnet publishThe default build configuration is Release, which is appropriate for a deployed site running in production. The output from the Release build configuration has minimal symbolic debug information and is fully optimized.
The command output is similar to the following example:
Restore complete (1.1s)
  HelloWorld net10.0 succeeded (7.8s) → bin\Release\net10.0\publish\

Build succeeded in 10.3s
Open your GitHub Codespace that you created in Create a .NET console application.
Add the following line of code to the top of HelloWorld.cs:
#:property PublishAot=falseThis property directive, disables native ahead-of-time (AOT) compilation and the app will use the standard just-in-time (JIT) compiler at runtime. The published output will be framework-dependent.
In the terminal, make sure you're in the tutorials folder.
Run the following command:
dotnet publish HelloWorld.csThe command creates an independent executable.
The command output is similar to the following example:
Restore complete (0.5s)
  HelloWorld net10.0 succeeded (4.0s) → artifacts\HelloWorld\

Build succeeded in 5.1s
Inspect the files
By default, the publishing process creates a framework-dependent deployment, which is a type of deployment where the published application runs on a machine that has the .NET runtime installed. Users can run the published app by double-clicking the executable or issuing the dotnet HelloWorld.dll command from a command prompt.
In the following steps, you'll look at the files created by the publish process.
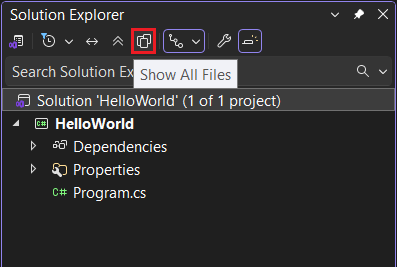
In Solution Explorer, select Show All Files.
In the project folder, expand bin/Release/{net}/publish. (Where {net} is the target framework folder, such as net10.0.)
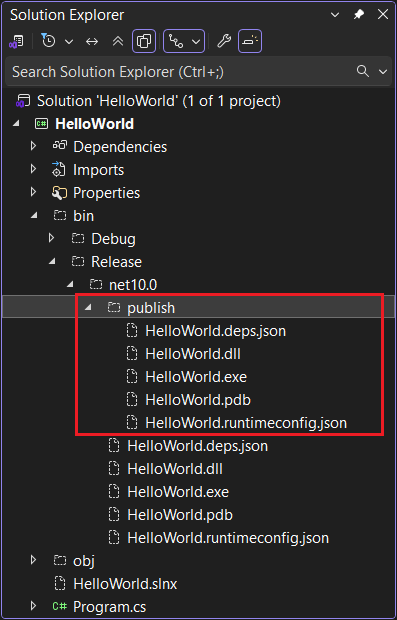
As the image shows, the published output includes the following files:
HelloWorld.deps.json
This is the application's runtime dependencies file. It defines the .NET components and the libraries (including the dynamic link library that contains your application) needed to run the app. For more information, see Runtime configuration files.
HelloWorld.dll
This is the framework-dependent deployment version of the application. To execute this dynamic link library, enter
dotnet HelloWorld.dllat a command prompt. This method of running the app works on any platform that has the .NET runtime installed.HelloWorld.exe
This is the framework-dependent executable version of the application. To run it, enter
HelloWorld.exeat a command prompt. The file is operating-system-specific.HelloWorld.pdb (optional for deployment)
This is the debug symbols file. You aren't required to deploy this file along with your application, although you should save it in the event that you need to debug the published version of your application.
HelloWorld.runtimeconfig.json
This is the application's runtime configuration file. It identifies the version of .NET that your application was built to run on. You can also add configuration options to it. For more information, see .NET runtime configuration settings.
By default, the publishing process creates a framework-dependent deployment, which is a type of deployment where the published application runs on a machine that has the .NET runtime installed. To run the published app you can use the executable file or run the dotnet HelloWorld.dll command from a command prompt.
In the following steps, you'll look at the files created by the publish process.
Select the Explorer in the left navigation bar.
Expand bin/Release/net10.0/publish.
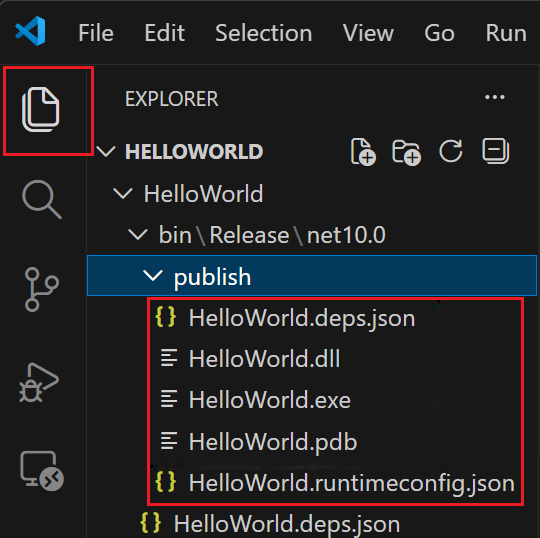
As the image shows, the published output includes the following files:
HelloWorld.deps.json
This is the application's runtime dependencies file. It defines the .NET components and the libraries (including the dynamic link library that contains your application) needed to run the app. For more information, see Runtime configuration files.
HelloWorld.dll
This is the framework-dependent deployment version of the application. To run this dynamic link library, enter
dotnet HelloWorld.dllat a command prompt. This method of running the app works on any platform that has the .NET runtime installed.HelloWorld.exe (HelloWorld on Linux or macOS.)
This is the framework-dependent executable version of the application. The file is operating-system-specific.
HelloWorld.pdb (optional for deployment)
This is the debug symbols file. You aren't required to deploy this file along with your application, although you should save it in the event that you need to debug the published version of your application.
HelloWorld.runtimeconfig.json
This is the application's runtime configuration file. It identifies the version of .NET that your application was built to run on. You can also add configuration options to it. For more information, see .NET runtime configuration settings.
For a single-file application, the publishing process creates an artifacts directory with a compiled assembly file. The published application can be run using the dotnet command.
In the following steps, you'll look at the files created by the publish process.
Select the Explorer in the left navigation bar.
Expand artifacts/HelloWorld.

As the image shows, the published output includes the following files:
HelloWorld
This is the framework-dependent executable version of the application. The file is operating-system-specific. Codespaces runs on Linux, so this a Linux executable.
HelloWorld.deps.json
This is the application's runtime dependencies file. It defines the .NET components and the libraries (including the dynamic link library that contains your application) needed to run the app. For more information, see Runtime configuration files.
HelloWorld.dll
This is the framework-dependent deployment version of the application. To run this dynamic link library, enter
dotnet HelloWorld.dllat a command prompt. This method of running the app works on any platform that has the .NET runtime installed.HelloWorld.pdb (optional for deployment)
This is the debug symbols file. You aren't required to deploy this file along with your application, although you should save it in the event that you need to debug the published version of your application.
HelloWorld.runtimeconfig.json
This is the application's runtime configuration file. It identifies the version of .NET that your application was built to run on. You can also add configuration options to it. For more information, see .NET runtime configuration settings.
Right-click and select Download... to download files from Codespaces to your local computer.
Run the published app
In Solution Explorer, right-click the publish folder, and select Copy Full Path.
Open a command prompt and navigate to the publish folder. To do that, enter
cdand then paste the full path. For example:cd C:\Projects\HelloWorld\bin\Release\net10.0\publish\Run the app by using the executable:
Enter
HelloWorld.exeand press Enter.Enter a name in response to the prompt, and press any key to exit.
Run the app by using the
dotnetcommand:Enter
dotnet HelloWorld.dlland press Enter.Enter a name in response to the prompt, and press any key to exit.
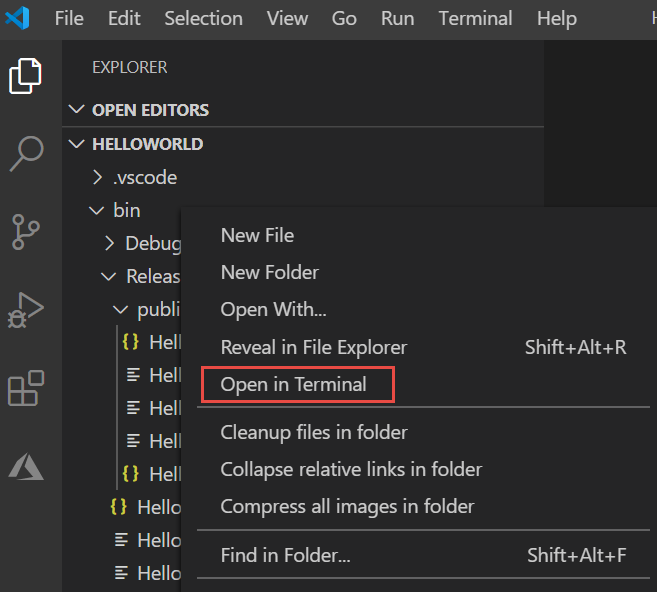
In Explorer, right-click the publish folder (Ctrl-click on macOS), and select Open in Integrated Terminal.
On Windows or Linux, run the app by using the executable.
On Windows, enter
.\HelloWorld.exeand press Enter.On Linux, enter
./HelloWorldand press Enter.Enter a name in response to the prompt, and press Enter to exit.
On any platform, run the app by using the
dotnetcommand:Enter
dotnet HelloWorld.dlland press Enter.Enter a name in response to the prompt, and press Enter to exit.
In Explorer, right-click the artifacts/HelloWorld folder and select Open in Integrated Terminal.
Run the app by using the executable. Enter
./HelloWorldand then press Enter.Enter a name in response to the prompt, and press Enter to exit.
Additional resources
- .NET application publishing overview
dotnet publish- Use the .NET SDK in continuous integration (CI) environments
Cleanup resources
GitHub automatically deletes your Codespace after 30 days of inactivity. If you plan to explore more tutorials in this series, you can leave your Codespace provisioned. If you're ready to visit the .NET site to download the .NET SDK, you can delete your Codespace. To delete your Codespace, open a browser window and navigate to your Codespaces. You see a list of your codespaces in the window. Select the three dots (...) in the entry for the learn tutorial codespace. Then select "Delete".
Next steps
In this tutorial, you published a console app. In the next tutorial, you create a class library.
Collaborate with us on GitHub
The source for this content can be found on GitHub, where you can also create and review issues and pull requests. For more information, see our contributor guide.