Note
Access to this page requires authorization. You can try signing in or changing directories.
Access to this page requires authorization. You can try changing directories.
This tutorial shows how to create and run a .NET console application in Visual Studio.
In this tutorial, you:
- Create a Visual Studio solution and console app project.
- Create a "HelloWorld" .NET console application.
- Enhance the app to prompt the user for their name and display it in the console window.
This tutorial shows how to create and run a .NET console application by using Visual Studio Code.
In this tutorial, you:
- Launch Visual Studio Code with a C# development environment.
- Create a "HelloWorld" .NET console application.
- Enhance the app to prompt the user for their name and display it in the console window.
This tutorial shows how to create and run a .NET console application by using GitHub Codespaces.
In this tutorial, you:
- Launch a GitHub Codespace with a C# development environment.
- Create a "HelloWorld" .NET file-based app.
- Enhance the app to prompt the user for their name and display it in the console window.
Prerequisites
Visual Studio with the .NET desktop development workload installed. The .NET SDK is automatically installed when you select this workload.
For more information, see Install the .NET SDK with Visual Studio.
- The latest .NET SDK
- Visual Studio Code editor
- The C# DevKit
Installation instructions
On Windows, this WinGet configuration file to install all prerequisites. If you already have something installed, WinGet will skip that step.
- Download the file and double-click to run it.
- Read the license agreement, type y, and select Enter when prompted to accept.
- If you get a flashing User Account Control (UAC) prompt in your Taskbar, allow the installation to continue.
On other platforms, you need to install each of these components separately.
- Download the recommended installer from the .NET SDK download page and double-click to run it. The download page detects your platform and recommends the latest installer for your platform.
- Download the latest installer from the Visual Studio Code home page and double click to run it. That page also detects your platform and the link should be correct for your system.
- Click the "Install" button on the C# DevKit extension page. That opens Visual Studio code, and asks if you want to install or enable the extension. Select "install".
- A GitHub account to use GitHub Codespaces. If you don't already have one, you can create a free account at GitHub.com.
Create the app
Create a .NET console app project named "HelloWorld".
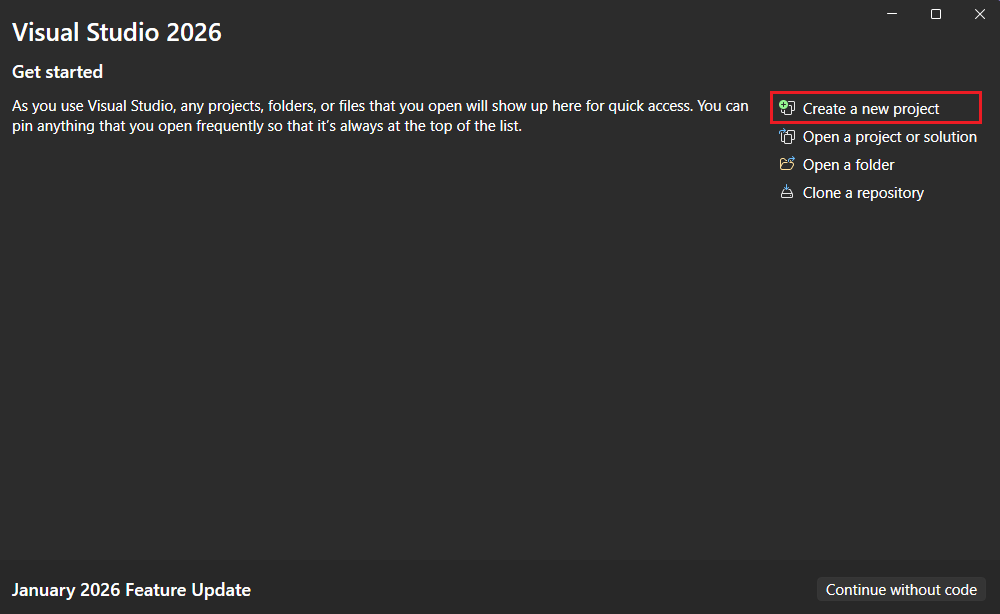
Start Visual Studio.
On the start page, choose Create a new project.
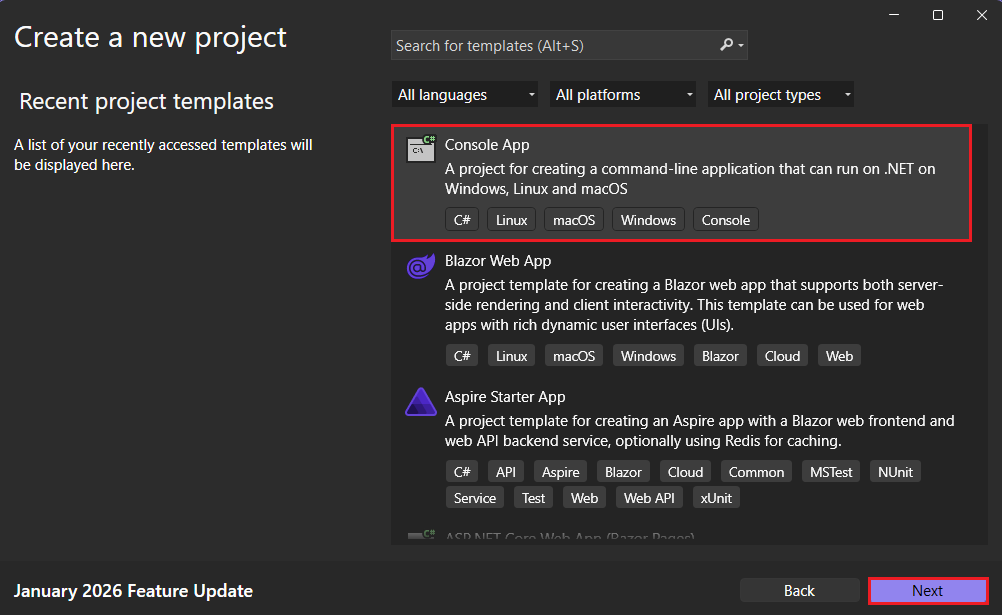
On the Create a new project page, enter console in the search box. Next, choose C# or Visual Basic from the language list, and then choose All platforms from the platform list. Choose the Console App template, and then choose Next.
Tip
If you don't see the .NET templates, you're probably missing the required workload. Under the Not finding what you're looking for? message, choose the Install more tools and features link. The Visual Studio Installer opens. Make sure you have the .NET desktop development workload installed.
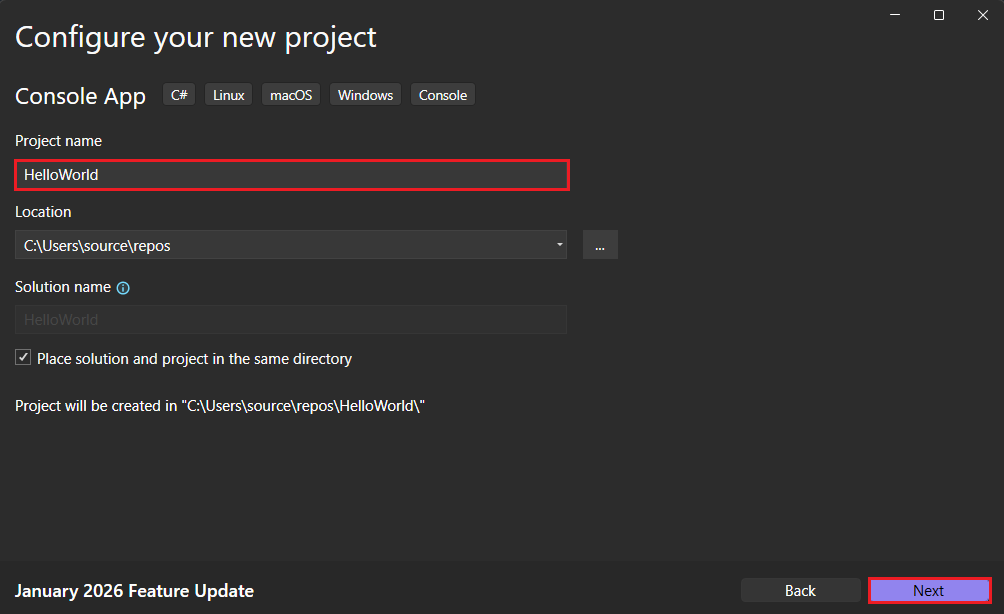
In the Configure your new project dialog, enter HelloWorld in the Project name box. Then choose Next.
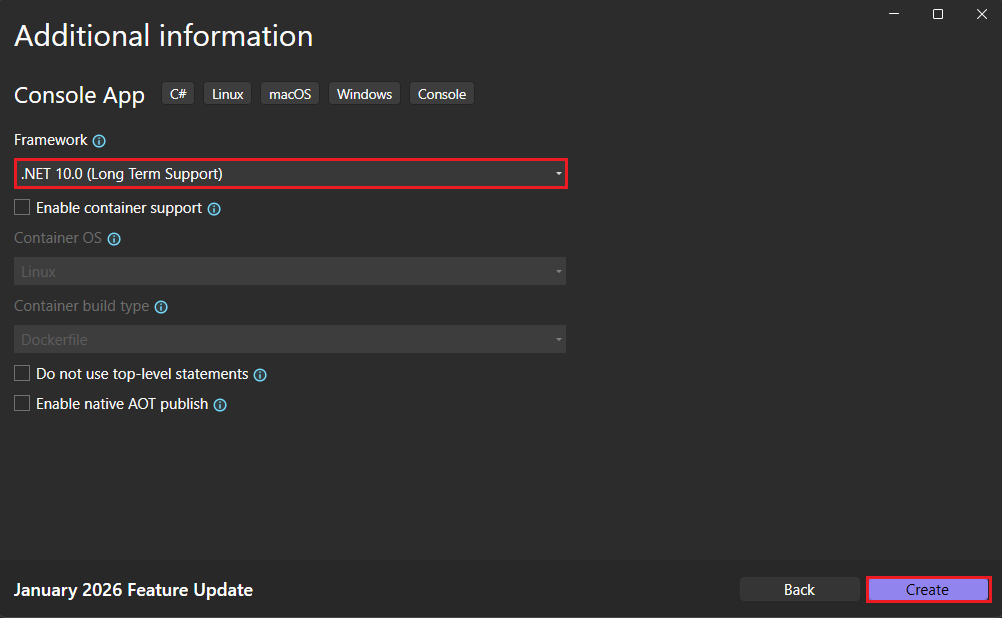
In the Additional information dialog:
- Select .NET 10.0 (Long Term Support).
- Select Create.
The template creates a simple application that displays "Hello, World!" in the console window. The code is in the Program.cs or Program.vb file:
// See https://aka.ms/new-console-template for more information
Console.WriteLine("Hello, World!");
Imports System Module Program Sub Main(args As String()) Console.WriteLine("Hello World!") End Sub End ModuleIf the language you want to use is not shown, change the language selector at the top of the page.
The C# template uses top-level statements to call the Console.WriteLine(String) method to display a message in the console window. The Visual Basic template defines a
Module Programwith aSub Mainmethod that calls the same method.
Create a .NET console app project named "HelloWorld".
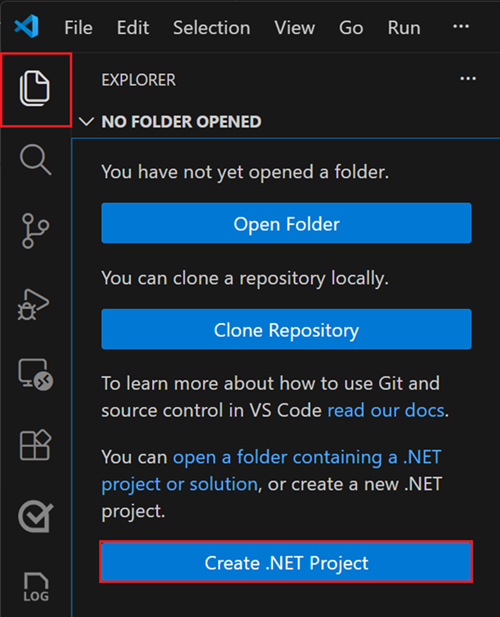
Start Visual Studio Code.
Go to the Explorer view and select Create .NET Project. Alternatively, you can bring up the Command Palette using Ctrl+Shift+P (Command+Shift+P on MacOS) and then type ".NET" and find and select the .NET: New Project command.
After selecting the command, you need to choose the project template. Choose Console App.
Select the location where you would like the new project to be created.
Give your new project a name, "HelloWorld".
Select .sln for the solution file format.
Select Create Project.
The project is created and the Program.cs file opens. You see the simple application created by the template:
// See https://aka.ms/new-console-template for more information
Console.WriteLine("Hello, World!");
The code defines a class,
Program, that calls the Console.WriteLine(String) method to display a message in the console window.
Open Codespaces
Start a GitHub Codespace with the tutorial environment.
Open a browser window and navigate to the tutorial codespace repository.
Select the green Code button, and then the Codespaces tab.
Select the
+sign or the green Create codespace on main button to create a new Codespace using this environment.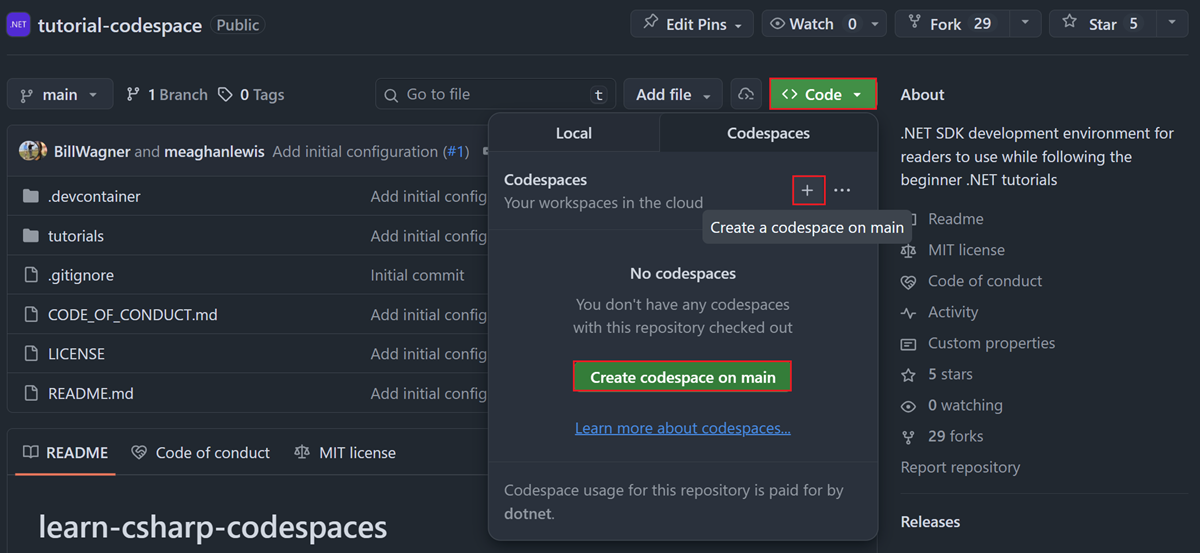
Create a .NET file-based app
In Codespaces, you'll create a file-based app. File-based apps let you build .NET applications from a single C# file without creating a traditional project file.
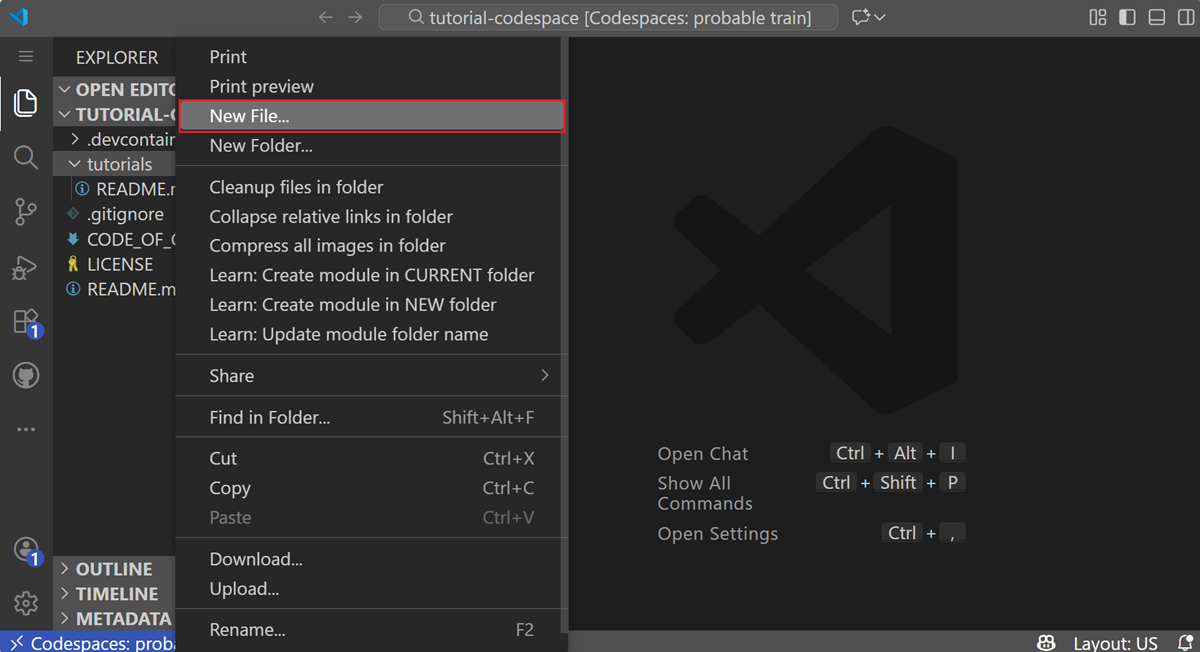
When your codespace loads, right-click on the tutorials folder and select New File.... Enter the name HelloWorld.cs and then press Enter.
HelloWorld.cs opens in the editor. Type or copy the following code into the file:
Console.WriteLine("Hello, World!");
Run the app
Press Ctrl+F5 to run the program without debugging.
A console window opens with the text "Hello, World!" printed on the screen. (Or "Hello World!" without a comma in the Visual Basic project template.)
Press any key to close the console window.
To run your app, select Run > Run without Debugging in the upper menu, or use the keyboard shortcut (Ctrl+F5).
If asked to select a debugger, select C# as the debugger, then select C#: Debug Active File as the Launch configuration.
The program displays "Hello, World!" and ends.
In the terminal window, make sure the tutorials folder is the current folder, and run your program:
cd tutorials
dotnet HelloWorld.cs
The program displays "Hello, World!" and ends.
Enhance the app
Enhance the application to prompt the user for their name and display it along with the date and time.
In Program.cs or Program.vb, replace the contents with the following code:
Console.WriteLine("What is your name?");
var name = Console.ReadLine();
var currentDate = DateTime.Now;
Console.WriteLine($"{Environment.NewLine}Hello, {name}, on {currentDate:d} at {currentDate:t}!");
Console.Write($"{Environment.NewLine}Press Enter to exit...");
Console.Read();
Console.WriteLine("What is your name?") Dim name = Console.ReadLine() Dim currentDate = DateTime.Now Console.WriteLine($"{Environment.NewLine}Hello, {name}, on {currentDate:d} at {currentDate:t}") Console.Write($"{Environment.NewLine}Press any key to exit...") Console.ReadKey(True)This code displays a prompt in the console window and waits until the user enters a string followed by the Enter key. It stores this string in a variable named
name. It also retrieves the value of the DateTime.Now property, which contains the current local time, and assigns it to a variable namedcurrentDate. And it displays these values in the console window. Finally, it displays a prompt in the console window and calls the Read() method to wait for user input.Environment.NewLine is a platform-independent and language-independent way to represent a line break. Alternatives are
\nin C# andvbCrLfin Visual Basic.The dollar sign (
$) in front of a string lets you put expressions such as variable names in curly braces in the string. The expression value is inserted into the string in place of the expression. This syntax is referred to as interpolated strings.Press Ctrl+F5 to run the program without debugging.
Respond to the prompt by entering a name and pressing the Enter key.
Press any key to close the console window.
Open Program.cs.
Replace the contents of the class with the following code:
Console.WriteLine("What is your name?");
var name = Console.ReadLine();
var currentDate = DateTime.Now;
Console.WriteLine($"{Environment.NewLine}Hello, {name}, on {currentDate:d} at {currentDate:t}!");
Console.Write($"{Environment.NewLine}Press Enter to exit...");
Console.Read();
This code displays a prompt in the console window and waits until the user enters a string followed by the Enter key. It stores this string in a variable named
name. It also retrieves the value of the DateTime.Now property, which contains the current local time, and assigns it to a variable namedcurrentDate. And it displays these values in the console window. Finally, it displays a prompt in the console window and calls the Read() method to wait for user input.NewLine is a platform-independent and language-independent way to represent a line break.
The dollar sign (
$) in front of a string lets you put expressions such as variable names in curly braces in the string. The expression value is inserted into the string in place of the expression. This syntax is referred to as interpolated strings.Save your changes.
Important
In Visual Studio Code, you have to explicitly save changes. Unlike Visual Studio, file changes are not automatically saved when you build and run an app.
Select Run>Run without debugging.
Respond to the prompt by entering a name and pressing the Enter key.
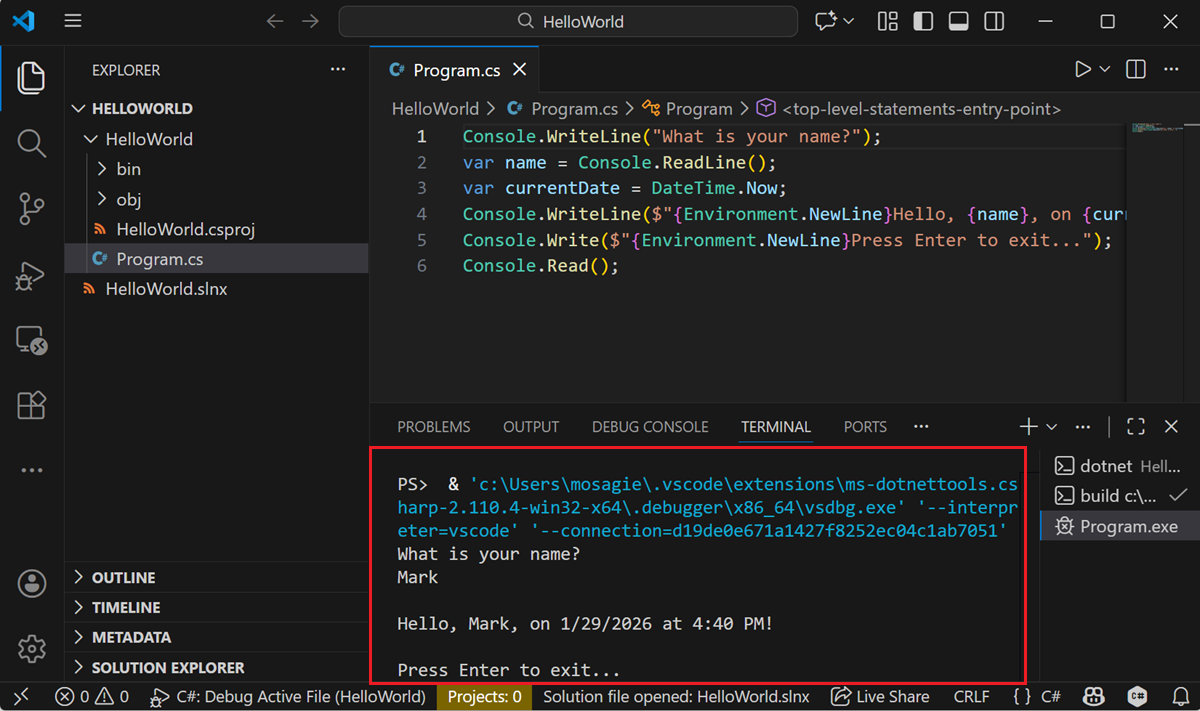
Press Enter to exit the program.
Update HelloWorld.cs with the following code:
Console.WriteLine("What is your name?");
var name = Console.ReadLine();
var currentDate = DateTime.Now;
Console.WriteLine($"{Environment.NewLine}Hello, {name}, on {currentDate:d} at {currentDate:t}!");
Console.Write($"{Environment.NewLine}Press Enter to exit...");
Console.Read();
This code displays a prompt in the console window and waits until the user enters a string followed by the Enter key. It stores this string in a variable named
name. It also retrieves the value of the DateTime.Now property, which contains the current local time, and assigns it to a variable namedcurrentDate. And it displays these values in the console window. Finally, it displays a prompt in the console window and calls the Read() method to wait for user input.NewLine is a platform-independent and language-independent way to represent a line break.
The dollar sign (
$) in front of a string lets you put expressions such as variable names in curly braces in the string. The expression value is inserted into the string in place of the expression. This syntax is referred to as interpolated strings.Run the updated app using the following command:
dotnet HelloWorld.csRespond to the prompt by entering a name and pressing the Enter key.
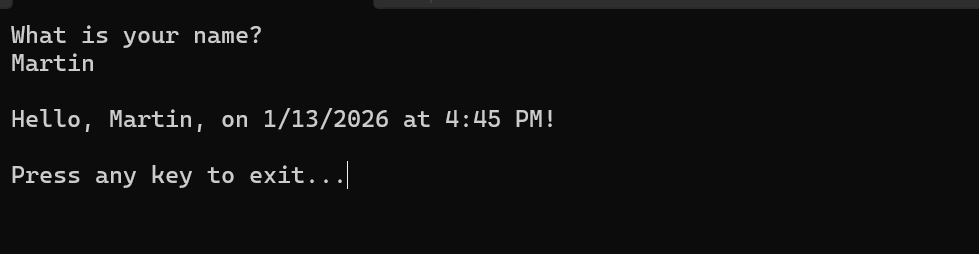
You'll see output similar to the following:
What is your name? Mark
Hello, Mark, on 1/29/2026 at 4:40 PM!
Press Enter to exit...
Press Enter to exit the program.
Additional resources
Cleanup resources
GitHub automatically deletes your Codespace after 30 days of inactivity. If you plan to explore more tutorials in this series, you can leave your Codespace provisioned. If you're ready to visit the .NET site to download the .NET SDK, you can delete your Codespace. To delete your Codespace, open a browser window and navigate to your Codespaces. You see a list of your codespaces in the window. Select the three dots (...) in the entry for the learn tutorial codespace. Then select "Delete".
Next steps
In this tutorial, you created a .NET console application. In the next tutorial, you debug the app.
Collaborate with us on GitHub
The source for this content can be found on GitHub, where you can also create and review issues and pull requests. For more information, see our contributor guide.