Note
Access to this page requires authorization. You can try signing in or changing directories.
Access to this page requires authorization. You can try changing directories.
Use the canvases list in Canvas studio to choose where published canvases appear and who sees them. You can roll out a canvas to a pilot group, switch the canvas used for a table, or delete a custom canvas. Use the canvas designer to review published versions and roll back changes.
To create a canvas, customize its sections and components, or publish design changes, see Configure a canvas in CRM Canvas Designer.
Important
- This is a preview feature.
- Preview features aren’t meant for production use and might have restricted functionality. These features are subject to supplemental terms of use, and are available before an official release so that customers can get early access and provide feedback.
Prerequisites
- You have the App Profile Manager Administrator security role. Learn more in Security roles.
- For access configuration and rollout, the canvas is published. For publishing instructions, see Publish the canvas and choose who sees it.
Roll out a canvas to a pilot group
Start with a small group, such as a few sellers or one team, before you make a canvas available to everyone.
If the canvas isn't published, publish it.
In the canvases list, select the checkbox next to only that canvas, and then select Configure. Configure is available only when one canvas is selected.
On Choose apps, select the apps where the canvas appears, such as Sales Hub or Copilot Service workspace. This step and the next one look the same as in the guided setup.
On Users, select the People tab or the Roles tab, and then select the people or security roles in your pilot group.
On Review configuration, check the apps and people, and then save.
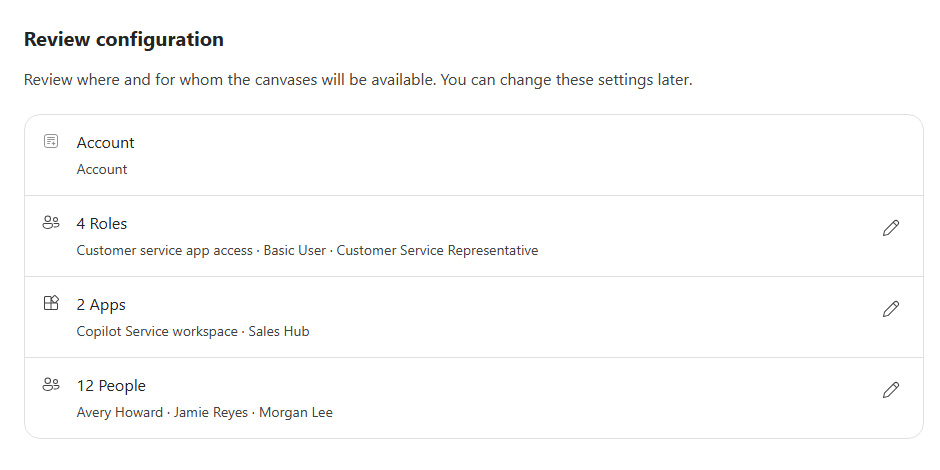
People in your pilot group see the canvas the next time they open a record. Everyone else keeps the classic form.
Note
The people and roles you select get all the canvases that are enabled, not just the one you're configuring.
To add more people later, select the canvas, select Configure again, and add people or roles.
Switch a table to a different canvas
Each table uses one canvas at a time. For example, after you build your own account canvas, you can switch from the default account canvas to your canvas.
- Publish the new canvas.
- In the canvases list, select the checkbox next to the custom canvas, and then select Configure.
- In Replace the canvas name canvas?, select Continue. Nothing changes until you save on the last step.
- Choose the apps and people, and then review your changes. The review shows which canvas the new one replaces.
- Save your changes.
The previous canvas is disabled but isn't deleted. To switch back, configure the previous canvas again.
Roll back to an earlier version
Each publish creates a new numbered version. Only published versions are listed in Revision history. If you never published the canvas, there's nothing to roll back to.
- In the canvases list, select the canvas, and then select Edit to open the canvas designer.
- Select History. Revision history lists each published version, with its number, who published it, and when.
- Select Roll back on the version you want.
Rolling back publishes the earlier version again as a new version. People see it the next time they open a record. No version is deleted.
Delete a canvas
Follow these steps to delete a canvas that's in use. You can't delete default canvases, such as Account, Contact, Opportunity, and Case.
- Select the canvas you want to delete.
- Select Configure and remove the associated apps and users.
- Select Save.
- In the canvases list, select the canvas you want to delete, and then select Delete.
- Confirm the deletion.
Deleting a canvas also deletes all its published versions. You can't undo this action.