Note
Access to this page requires authorization. You can try signing in or changing directories.
Access to this page requires authorization. You can try changing directories.
Note
The Retail Interest Group by Dynamics 365 Commerce has moved from Yammer to Viva Engage. If you don't have access to the new Viva Engage community, fill out this form (https://aka.ms/JoinD365commerceVivaEngageCommunity) to be added and stay engaged in the latest discussions.
This article describes how to build custom pages in Microsoft Dynamics 365 Commerce that handle customized sign-ins for users of Microsoft Entra business-to-consumer (B2C) tenants.
To use custom pages that you author in Dynamics 365 Commerce to handle user sign-in flows, set up the Microsoft Entra policies that the Commerce environment references. You can configure the "Sign up and sign in," "Profile editing," and "Password reset" Microsoft Entra B2C policies by using the Microsoft Entra B2C application. You can then reference the Microsoft Entra B2C tenant and policy names during the provisioning process for the Commerce environment by using Microsoft Dynamics Lifecycle Services (LCS).
Build the custom Commerce pages by using the sign in, sign up, account profile edit, password reset, or generic Microsoft Entra modules. Reference the page URLs that you publish for these custom pages in Microsoft Entra B2C policy configurations in the Azure portal.
Use the module library for Commerce version 10.0.15 or higher with the recommended B2C user flows. You can also use the default user policy pages that Microsoft Entra ID B2C offers. These pages allow for added background image, logo, and background color changes related to company branding. Though more limited in design capabilities, the default user policy pages provide Microsoft Entra B2C policy functionality without creating and configuring dedicated custom pages.
Set up B2C policies
After you set up your Microsoft Entra B2C tenant and associate it with your Commerce environment, go to the Microsoft Entra B2C page in the Azure portal. On the menu, under Policies, select User flows (policies).
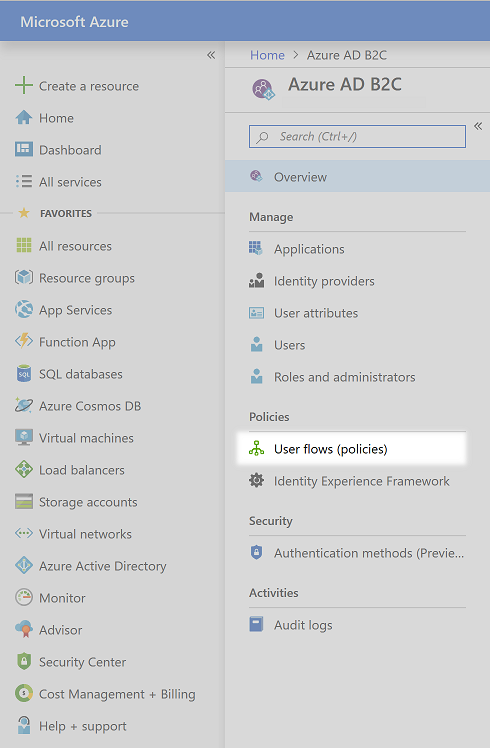
You can now configure the "Sign up and sign in," "Profile editing," and "Password reset" user authentication flows.
Configure the "Sign up and sign in" policy
To configure the "Sign up and sign in" policy, follow these steps:
Select New user flow, select Sign up and sign in, select the Recommended tab, and then select Create.
Enter a name for the policy (for example, B2C_1_SignInSignUp).
In the Identity Providers section, select the identity providers to use for the policy. At a minimum, select Email signup.
In the Collect attribute column, select the check boxes for Email Address, Given Name, and Surname.
In the Return claim column, select the check boxes for Email Addresses, Given Name, Identity Provider, Surname, and User's Object ID.
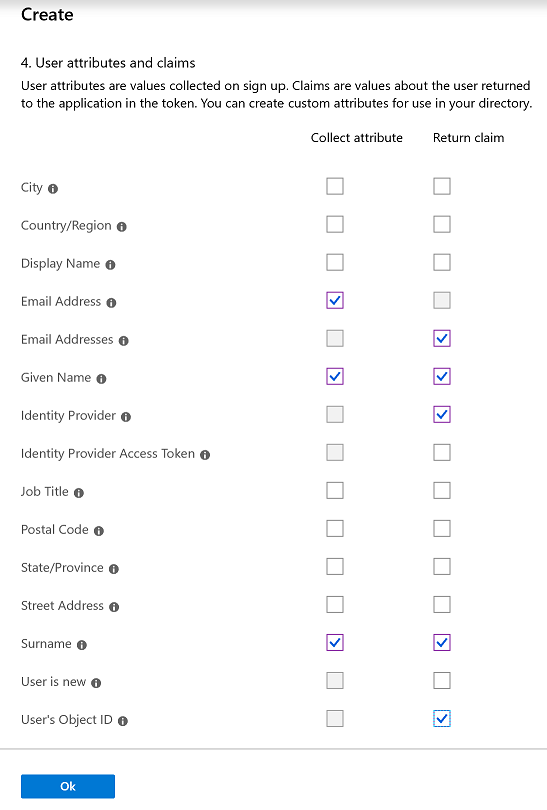
Select OK to create the policy.
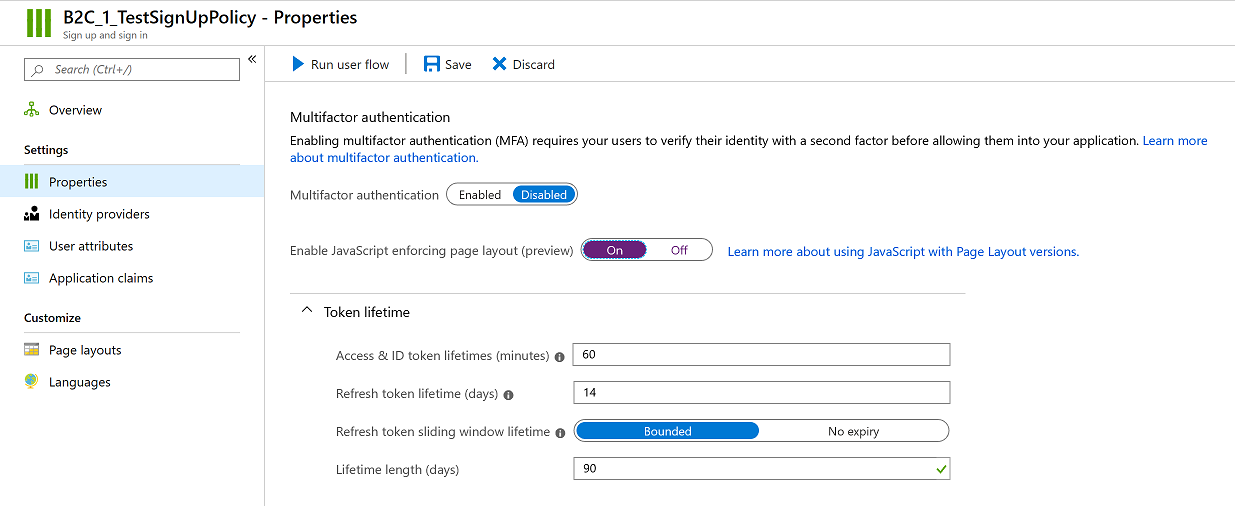
Double-click the new policy name, and then, in the navigation pane, select Properties.
Set the Enable JavaScript enforcing page layout (preview) option to On.
Note
The Commerce environment fully references the policy name and includes the B2C_1_ prefix in the reference. You can't rename policies after you create them. If you're replacing an existing policy for your Commerce environment, you can delete the original policy and build a new policy that has the same name. Alternatively, if the environment is already provisioned, you can submit the new policy name through a service request.
You return to this policy to finish the setup after you build the custom pages. For now, close the policy to return to the User flows (policies) page in the Azure portal.
Configure the "Profile editing" policy
To configure the "Profile editing" policy, follow these steps:
- Select New user flow, select Profile editing, select the Recommended tab, and then select Create.
- Enter a name for the policy (for example, B2C_1_EditProfile).
- In the Identity Providers section, select the identity providers to use for the policy. At a minimum, select Local Account SignIn.
- In the Collect attribute column, select the check boxes for Given Name and Surname.
- In the Return claim column, select the check boxes for Email Addresses, Given Name, Identity Provider, Surname, and User's Object ID.
- Select OK to create the policy.
- Double-click the new policy name, and then, in the navigation pane, select Properties.
- Set the Enable JavaScript enforcing page layout (preview) option to On.
You return to this policy to finish the setup after you build the custom pages. For now, close the policy to return to the User flows (policies) page in the Azure portal.
Configure the "Password reset" policy
To configure the "Password reset" policy, follow these steps:
- Select New user flow, select the Password reset option, choose the Recommended tab, and select Create.
- Enter a name for the policy (for example, B2C_1_ForgetPassword).
- In the Identity Providers section, select Reset password using email address.
- In the Return claim column, select the check boxes for Email Addresses, Given Name, Surname, and User's Object ID.
- Select OK to create the policy.
- Double-click the new policy name, and then, in the navigation pane, select Properties.
- Set the Enable JavaScript enforcing page layout (preview) option to On.
You return to this policy to finish the setup after you build the custom pages. For now, close the policy to return to the User flows (policies) page in the Azure portal.
Build the custom pages
Commerce includes dedicated Microsoft Entra modules to build custom pages for Microsoft Entra B2C user policies. You can build pages specifically for each user policy page's layout by using the main Microsoft Entra B2C modules detailed in the following section. Alternatively, you can use the Microsoft Entra Generic module for all page layouts and policies in Microsoft Entra ID B2C (even for page layout options within policies not listed in the following section).
- Page-specific Microsoft Entra modules bind to data input items that Microsoft Entra ID B2C renders. These modules give you more control over the positioning of the elements in your pages. However, you might need to build more pages and module extensions to account for variances beyond the default settings described in the following section.
- The Microsoft Entra Generic module creates the "div" element for Microsoft Entra B2C to render all elements in the user policy page layout. This approach gives more flexibility to the B2C functions of the page, but you have less control of the positioning and styling (though CSS can be used to match the look and feel of your site).
You can create a single page by using the Microsoft Entra Generic module and use it for all of your user policy pages. Or, you can build out specific pages by using the individual Microsoft Entra modules for sign-in, sign-up, profile edit, password reset, and password reset verification. You can also use a mix of both approaches, using the specific Microsoft Entra pages for the page layouts noted in the following section and the generic Microsoft Entra module page for remaining page layouts within these or other user policies pages.
For more information about the Microsoft Entra Modules that ship with the module library, see Identity management pages and modules.
To build the custom pages with specific identity modules to handle user sign-ins, follow these steps:
- In Commerce site builder, go to your site.
- Build the following five templates and pages (if not already present in your site):
- A Sign In template and page that use the sign-in module.
- A Sign Up template and page that use the sign-up module.
- A Password Reset template and page that use the password reset module.
- A Password Reset verification template and page that use the password reset verification module.
- A Profile Edit template and page that use the account profile edit module.
When you build the pages, follow these guidelines:
- For each page or module, use the layout and style that best suit your business requirements.
- Publish all pages and URLs that must be used in the Microsoft Entra B2C setup.
- After you publish the pages and URLs, collect the URLs that must be used for the Microsoft Entra B2C policy configurations. A ?preloadscripts=true suffix is added to every URL when used.
Important
Microsoft Entra B2C serves pages directly from the Microsoft Entra B2C tenant's domain. Don't reuse universal headers and footers that have relative links. Because these pages are hosted in the Microsoft Entra B2C domain, use only absolute URLs for all links. Create a specific header and footer with absolute URLs for your Microsoft Entra-related custom pages. Remove any Commerce-specific modules that require connection to Retail Server. For example, the favorites, search bar, sign-in link, and cart modules shouldn't be included in any pages that are used in Microsoft Entra B2C user flows.
Configure Microsoft Entra B2C policies with custom page information
In the Azure portal, return to the Microsoft Entra B2C page. On the menu, under Policies, select User flows (policies).
Update the "Sign up and sign in" policy with custom page information
To update the "Sign up and sign in" policy with custom page information, follow these steps:
- In the Sign in and sign up policy that you configured earlier, in the navigation pane, select Page layouts.
- Select the Unified sign up or sign in page layout.
- Set the Use custom page content option to Yes.
- In the Custom page URI field, enter the full sign-in URL. Include the ?preloadscripts=true suffix. For example, enter
www.<my domain>.com/sign-in?preloadscripts=true. - In the Page Layout Version field, select version 2.1.0 or later (requires module library for Commerce version 10.0.15 or higher).
- Select Save.
- Select the Local account sign up page layout.
- Set the Use custom page content option to Yes.
- In the Custom page URI field, enter the full sign-up URL. Include the ?preloadscripts=true suffix. For example, enter
www.<my domain>.com/sign-up?preloadscripts=true. - In the Page Layout Version field, select version 2.1.0 or later (requires module library for Commerce version 10.0.15 or higher).
- In the User attributes section, follow these steps:
- For the Given Name and Surname attributes, select No in the Requires Verification column.
- For Email Address attribute, leave the default value Yes selected in the Requires Verification column. This option ensures that users signing up with a given email address verify that they own the email address.
- For the Email Address, Given Name, and Surname attributes, select No in the Optional column.
- Select Save.
Update the "Profile editing" policy with custom page information
To update the "Profile editing" policy with custom page information, follow these steps:
- In the Profile Editing policy that you configured earlier, in the navigation pane, select Page layouts.
- Select the Profile edit page layout. You might need to scroll down past other layout options, depending on your screen.
- Set the Use custom page content option to Yes.
- In the Custom page URI field, enter the full profile edit URL. Include the ?preloadscripts=true suffix. For example, enter
www.<my domain>.com/profile-edit?preloadscripts=true. - For Page Layout Version, select version 2.1.0 or higher. This version requires the module library for Commerce version 10.0.15 or higher.
- In the User attributes section, follow these steps:
- For the Given Name and Surname attributes, select No in the Optional column.
- For the Given Name and Surname attributes, select No in the Requires verification column.
- Select Save.
Update the "Password reset" policy with custom page information
To update the "Password reset" policy with custom page information, follow these steps:
- In the Password Reset policy that you configured earlier, in the navigation pane, select Page layouts.
- Select the Forgot password page layout.
- Set the Use custom page content option to Yes.
- In the Custom page URI field, enter the full password reset verification URL. Include the ?preloadscripts=true suffix. For example, enter
www.<my domain>.com/password-reset-verification?preloadscripts=true. - In the Page Layout Version field, select version 2.1.0 or higher. This version requires the module library for Commerce version 10.0.15 or higher.
- Select Save.
- Select the Change password page layout.
- Set the Use custom page content option to Yes.
- In the Custom page URI field, enter the full password reset URL. Include the ?preloadscripts=true suffix. For example, enter
www.<my domain>.com/password-reset?preloadscripts=true. - In the Page Layout Version field, select version 2.1.0 or higher. This version requires the module library for Commerce version 10.0.15 or higher.
- Select Save.
Customize default text strings for labels and descriptions
In the module library, the sign-in modules include default text strings for the labels and descriptions. You can customize these strings in the properties pane of the module you're working on. To change other strings on the page, such as the Forgotten password? link text or the Create an account call to action text, you need to use the Commerce software development kit (SDK) and update the values in the global.json file for the sign-in module.
For example, the default text for the forgotten password link is Forgotten password?. The following screenshot shows this default text on the sign-in page.
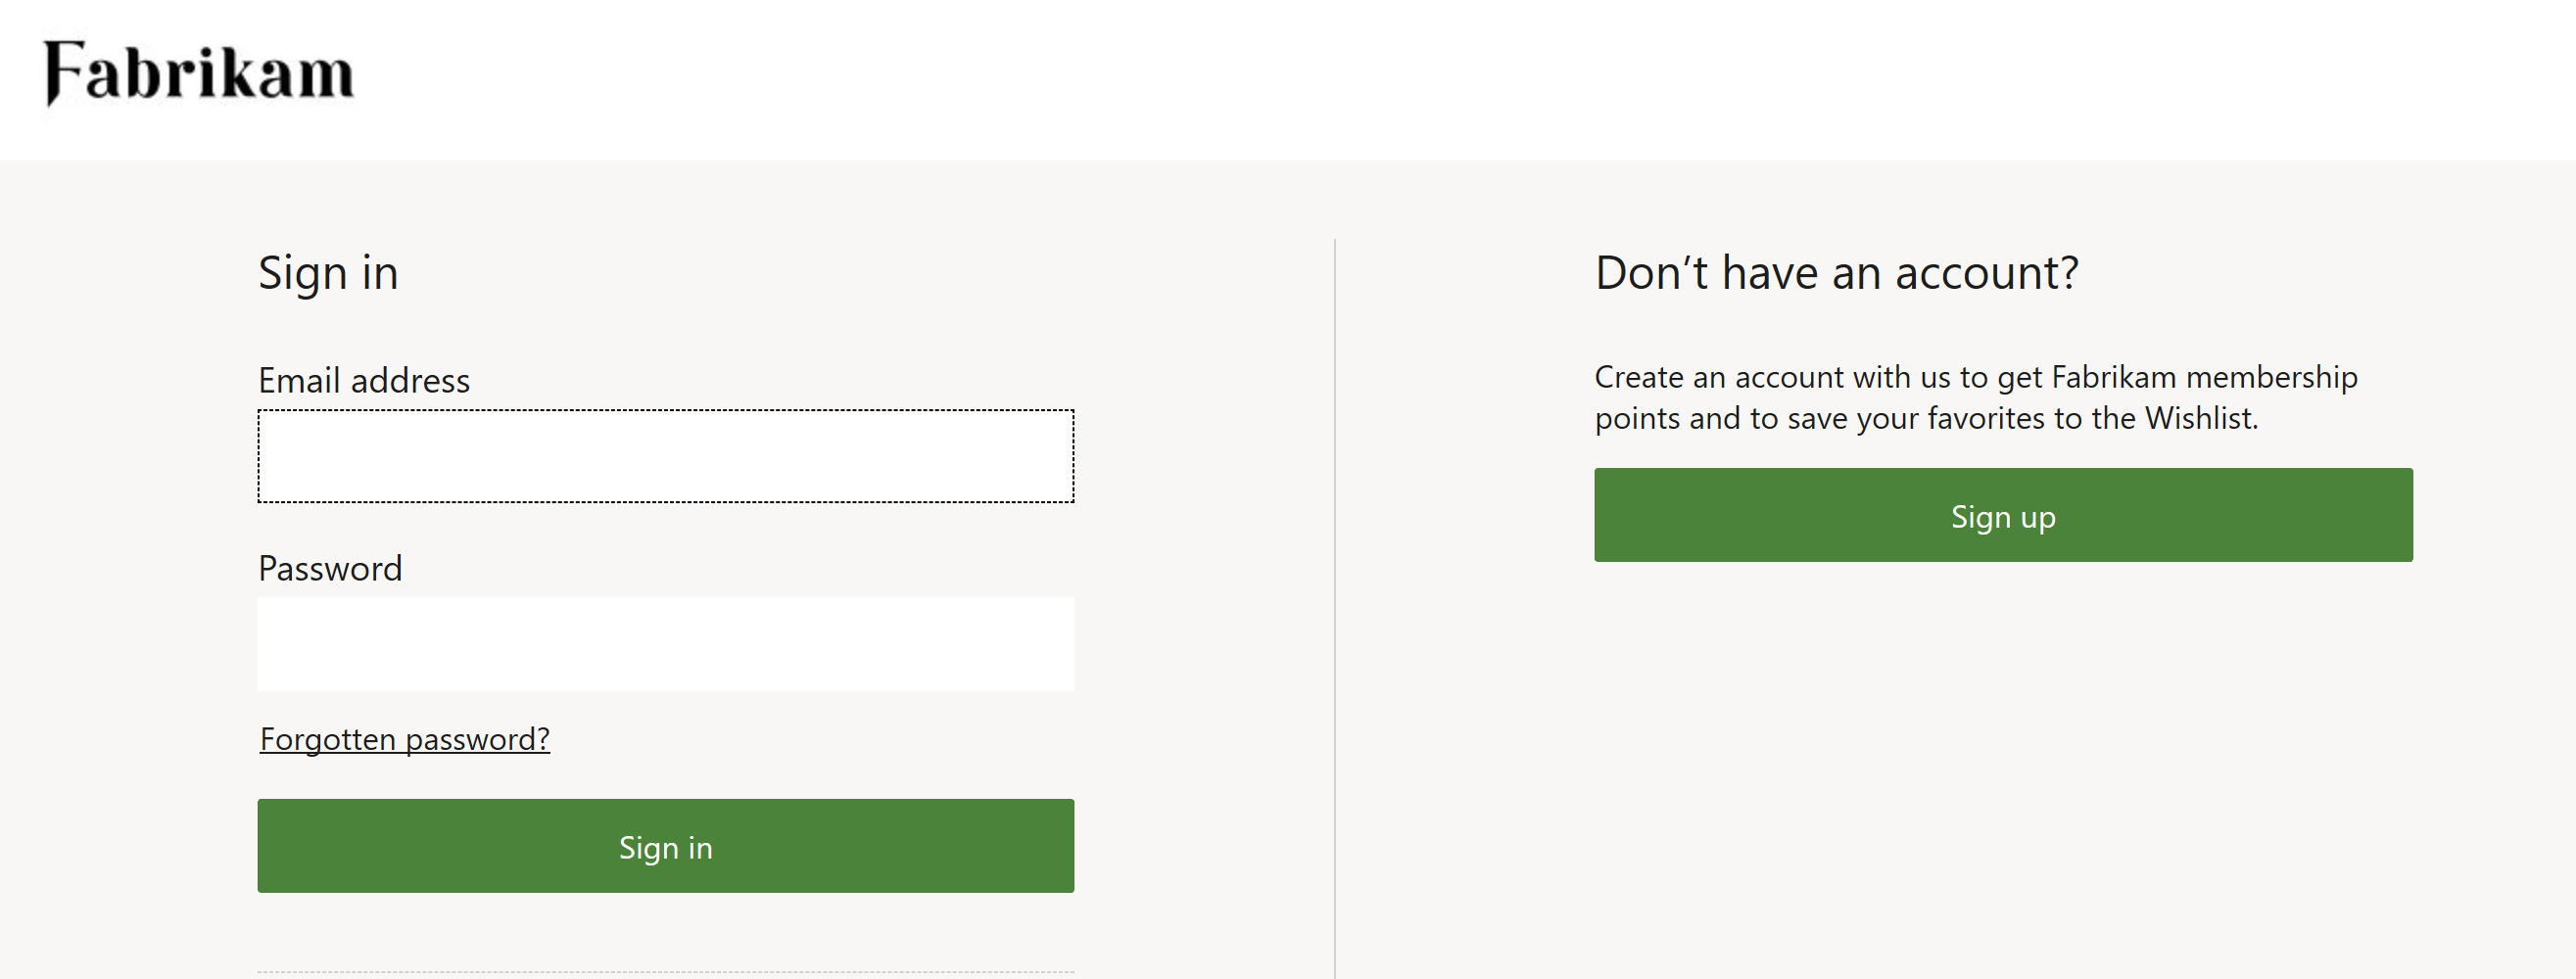
However, in the global.json file for the module library sign-in module, you can edit the text to Forgot Password?, as shown in the following illustration.
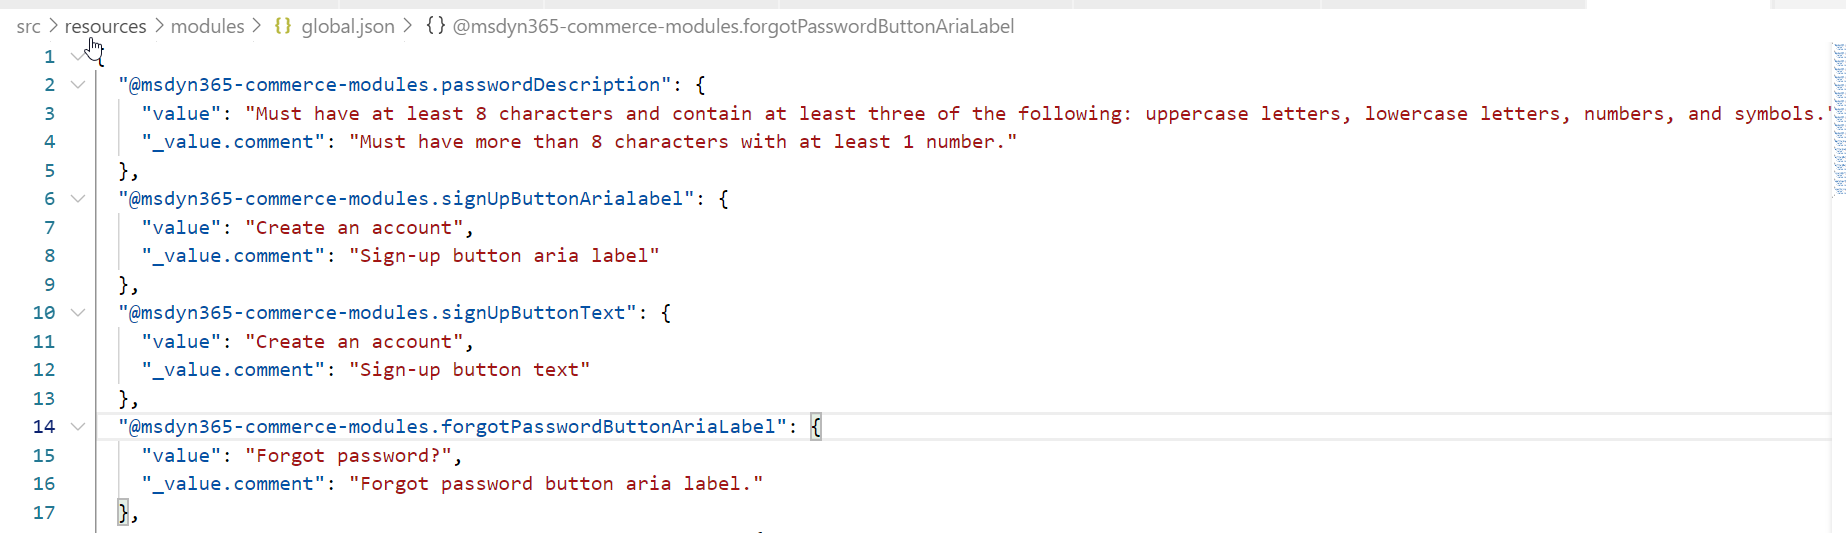
After you update the global.json file and publish your changes, the new link text appears in the sign-in module in both Commerce and on the live sign-in page.
Additional resources
Deploy a new e-commerce tenant
Associate a Dynamics 365 Commerce site with an online channel
Set up a B2C tenant in Commerce
Configure multiple B2C tenants in a Commerce environment