Note
Access to this page requires authorization. You can try signing in or changing directories.
Access to this page requires authorization. You can try changing directories.
Note
The Retail Interest Group by Dynamics 365 Commerce has moved from Yammer to Viva Engage. If you don't have access to the new Viva Engage community, fill out this form (https://aka.ms/JoinD365commerceVivaEngageCommunity) to be added and stay engaged in the latest discussions.
This article covers the store selector module and describes how to add it to site pages in Microsoft Dynamics 365 Commerce.
Customers can use the store selector module to pick up a product in a selected store after an online purchase. In Commerce version 10.0.13, the store selector module also includes additional capabilities that can showcase a Find a Store page that shows nearby stores.
The store selector module lets users enter a location (city, state, address, and so on) to search for stores within a search radius. When the module is first opened, it uses the customer's browser location to find stores (if consent is provided).
Store selector module usage
- A store selector module can be used on a product details page (PDP) to select a store for pickup.
- A store selector module can be used on a cart page to select a store for pickup.
- A store selector module can be used on a standalone page that shows all available stores.
Fulfillment group setup in Commerce headquarters
For the store selector to display available stores, the fulfillment group must be set up in Commerce headquarters. For more information, see Set up fulfillment groups.
In addition, for each store in the fulfillment group, the latitude and longitude of the retail store must be defined in headquarters.
To enter the latitude and longitude values for a retail store in Commerce headquarters, follow these steps:
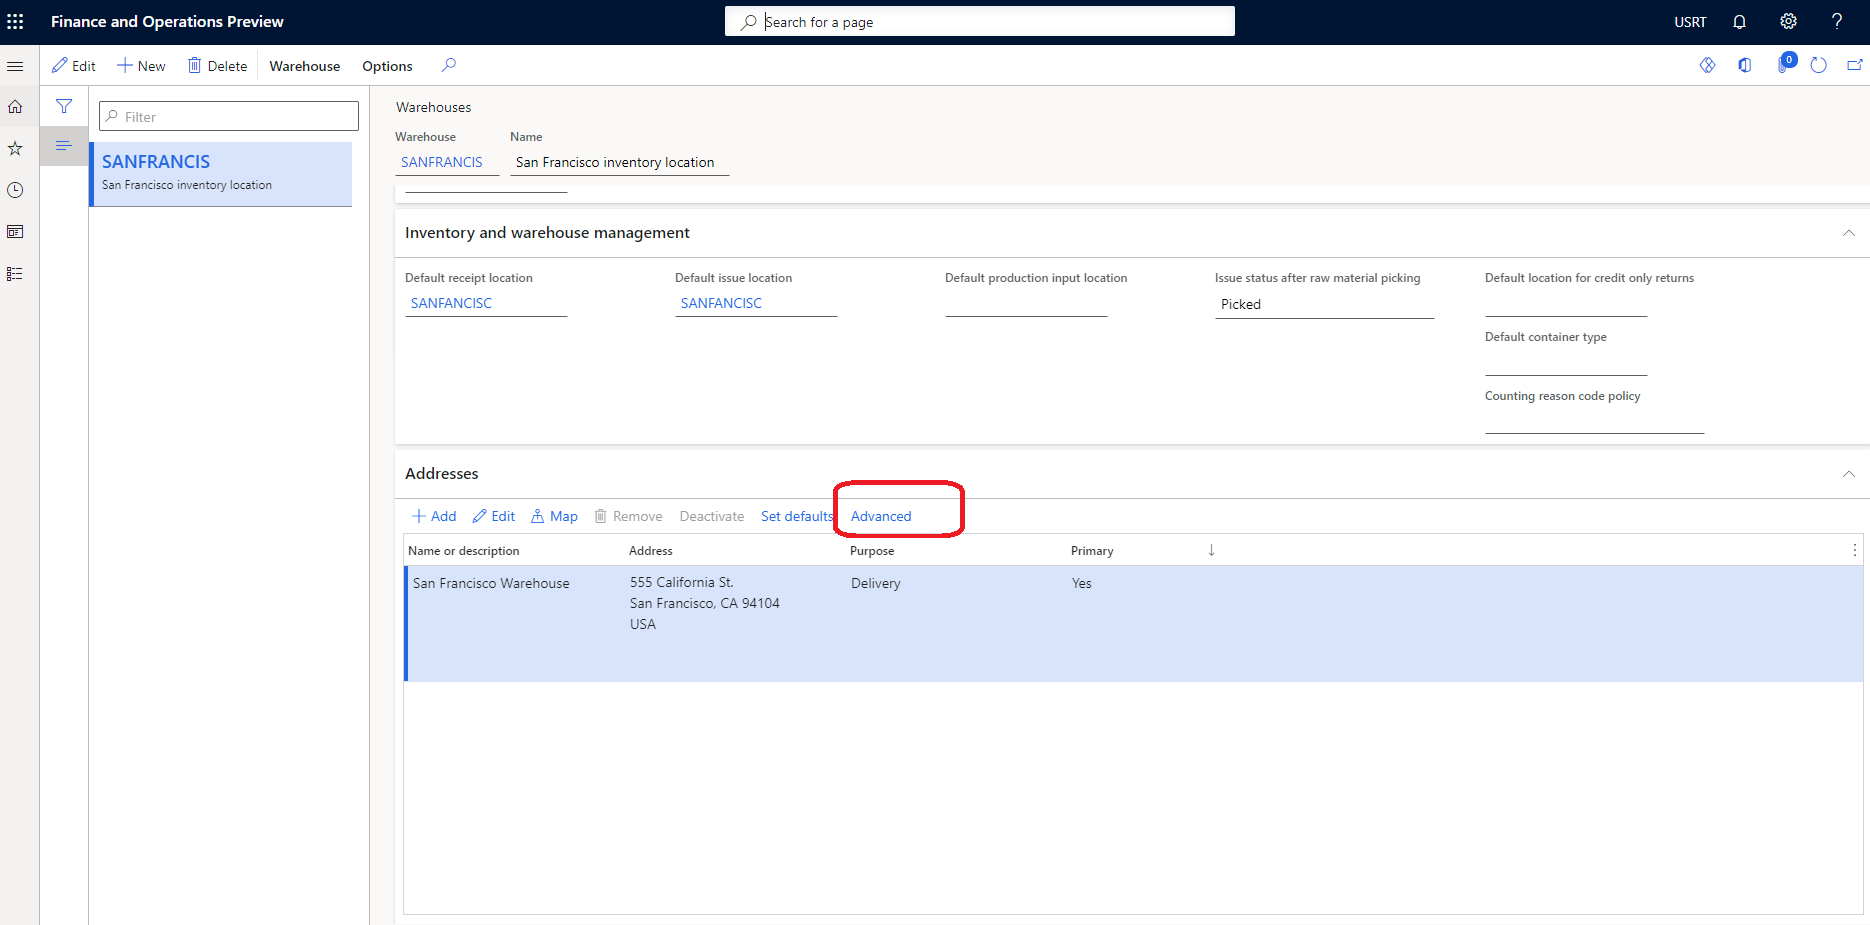
In Commerce headquarters, go to Organization administration > Organizations > Operating unit.
Search by the operating unit number in the left pane.
On the Addresses FastTab, select More options -> Advanced.
On the Action Pane, select Edit.
On the General FastTab, enter values for Latitude and Longitude.
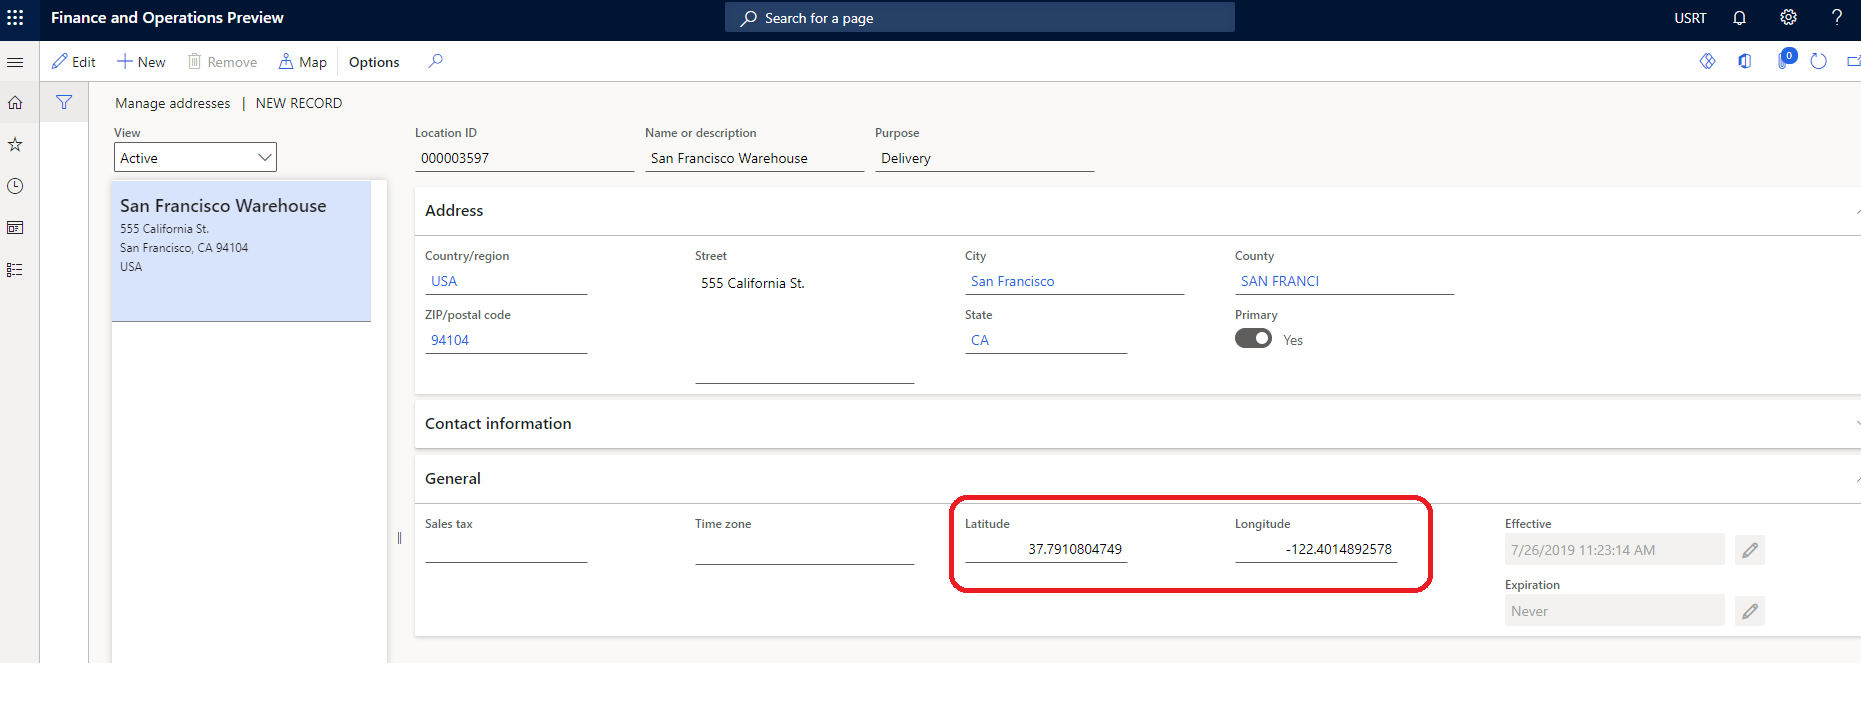
On the Action Pane, select Save.
Run the 1070 Channel configuration distribution schedule job.
Hide a store from the store selector module
Some stores in a fulfillment group might not be valid pickup locations. To ensure that only valid pickup locations appear as options in the store selector module, follow these steps in Commerce headquarters.
- In Commerce headquarters, go to Retail and Commerce > Commerce setup > Fulfillment groups > All stores.
- On the Action Pane, select Edit.
- Under Setup, for every store that isn't a valid pickup location, clear the Is Pickup Location checkbox.
- On the Action Pane, select Save.
- Run the 1070 Channel configuration distribution schedule job.
Important
- Bing Maps for Enterprise is deprecated and is scheduled to be retired. If you have an enterprise license for Bing Maps for Enterprise, you can continue to use it until June 30, 2028. If you have a free or basic license for Bing Maps for Enterprise, you can continue to use it until June 30, 2025.
- Until the Azure Maps modules becomes available in Commerce version 10.0.45, you can manually enable Azure Maps by following the steps provided in the Dynamics365Commerce.Solutions GitHub repository.
Azure Maps integration
The store selector module is integrated with the Azure Maps REST application programming interfaces (APIs) to use Azure Maps's Fuzzy Search features. An Azure Maps API key is required and must be added to the shared parameters page in Commerce headquarters. The integration with the Autosuggest API is used to show search suggestions when users enter locations in the search field.
For the Azure Maps REST SDK, you must ensure that the following URLs are allowed per your site's content security policy (CSP). This setup is done in Commerce site builder, by adding allowed URLs to various CSP directives for the site (for example, img-src). For more information, see Content security policy.
- To the child-src directive, add "blob:".
- To the connect-src directive, add
https://atlas.microsoft.com/andhttps://js.monitor.azure.com/. - To the font-src directive, add
https://atlas.microsoft.com/. - To the script-src directive, add
https://atlas.microsoft.com/. - To the style-src directive, add
https://atlas.microsoft.com/.
Pickup in store mode
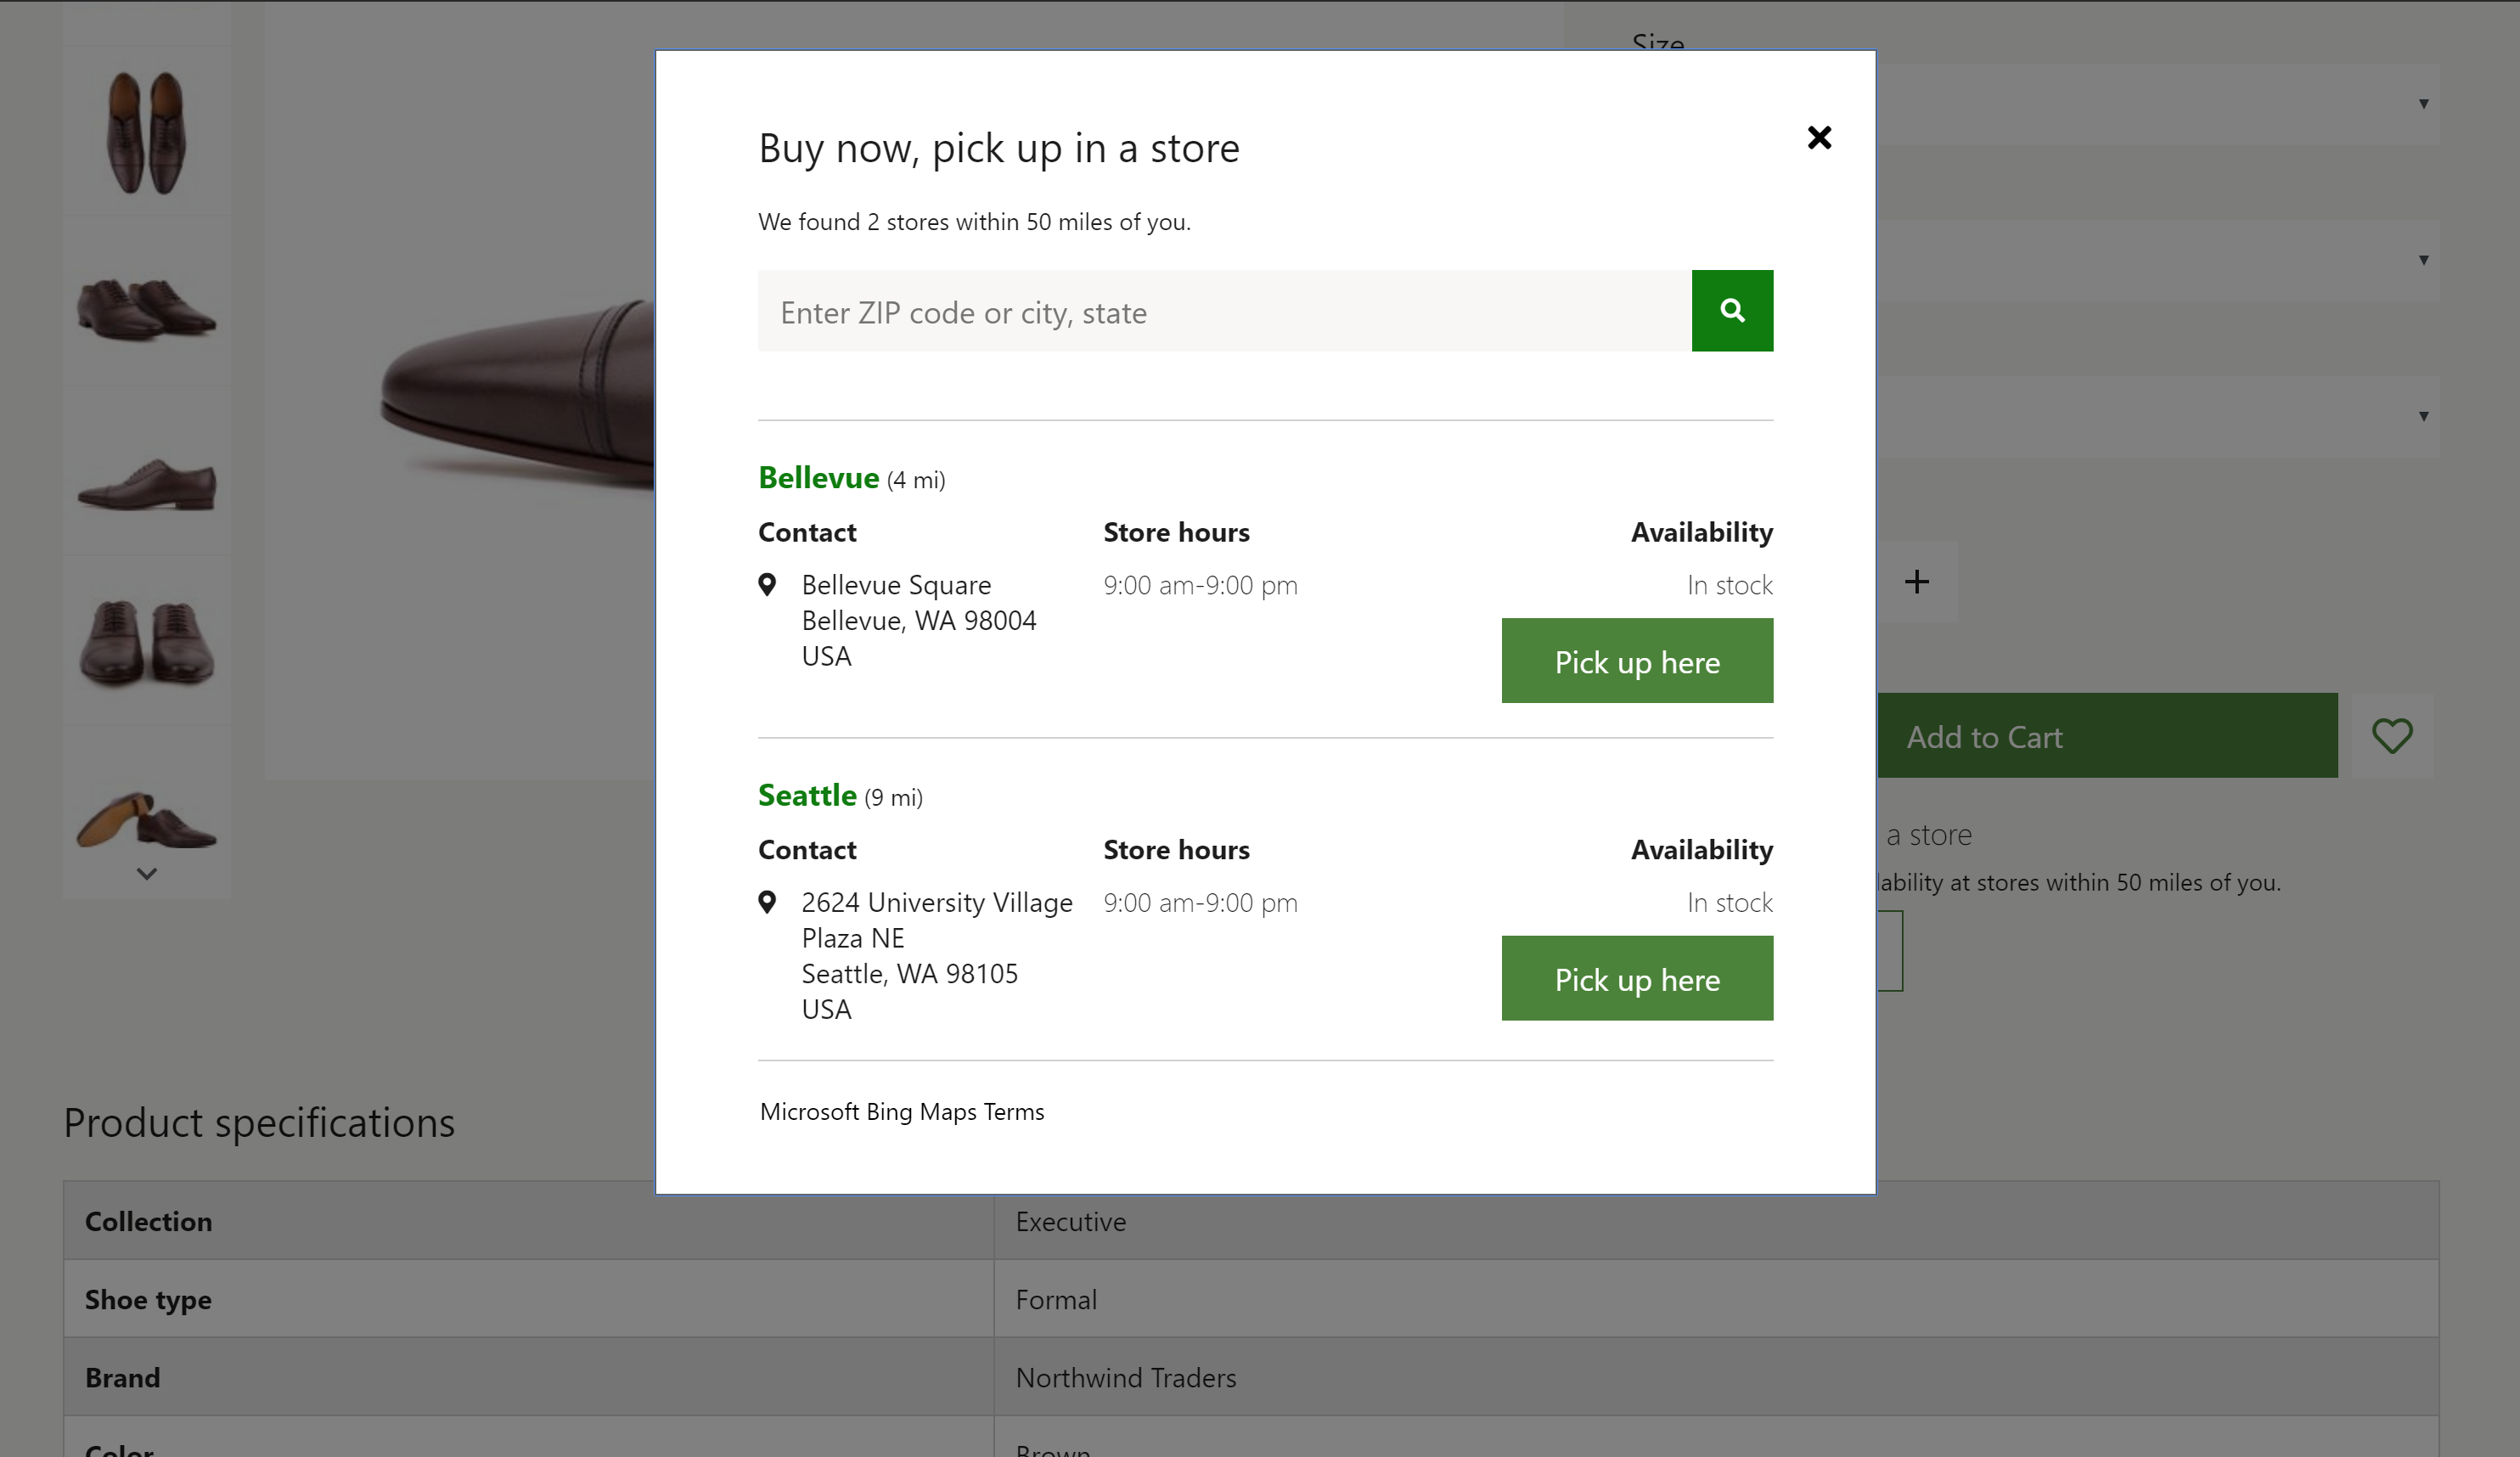
The store selector module supports a Pick up in store mode that shows a list of stores where a product is available for pickup. It also shows store hours and product inventory for each store in the list. The store selector module requires the context of a product to render product availability and to let the user add the product to the cart, if the product's delivery mode is set to pickup at the selected store. For more information, see Inventory settings.
The store selector module can be added to a buy box module on a PDP to show stores where a product is available for pickup. It can also be added to a cart module. In this case, the store selector module shows pickup options for each line item in the cart. The store selector module can also be added to other pages or modules via extensions and customizations.
For this scenario to work, products should be configured so that the pickup delivery mode is used. Otherwise, the module isn't shown on the product pages. For more information about how to configure the delivery mode, see Set up modes of delivery.
The following image shows an example of a store selector module used on a PDP.
Note
In Commerce version 10.0.16 and later, a feature can be enabled that allows an organization to define multiple pickup modes of delivery options for customers. If this feature is enabled, the store selector module and other Commerce modules are enhanced to allow the shopper to choose from potentially multiple pickup delivery options if configured. To learn more about this feature, refer to this documentation.
Find stores mode
The store selector module also supports a Find stores mode. This mode can be used to create a store locations page that shows available stores and their information. In this mode, the store selector module works without product context and can be used as a standalone module on any site page. In addition, if the relevant settings are turned on for the module, users can select a store as their preferred store. When a store is selected as a user's preferred store, the store ID is maintained in the browser cookie. Therefore, the user must accept a cookie consent message.
The following illustration shows an example of a store selector module that is used together with an Azure Maps module on a store locations page.

Render a map
The store selector module can be used together with the Azure Maps module to show the store locations on a map. Learn more in Azure Maps module
Store selector module properties
| Property name | Value | Description |
|---|---|---|
| Heading | Text | The heading for the module. |
| Mode | Find stores or Pick up in store | Find stores mode shows available stores. Pick up in store mode lets users select a store for pickup. |
| Style | Dialog or Inline | The module can be rendered either inline or in a dialog box. |
| Set as preferred store | True or False | When this property is set to True, users can set a preferred store. This feature requires that users accept a cookie consent message. |
| Show all stores | True or False | When this property is set to True, users can bypass the Search radius property and view all stores. |
| Autosuggest options: Max results | Number | This property defines the maximum number of autosuggest results that can be shown via the Azure Maps Fuzzy Search API. |
| Search radius | Number | This property defines the search radius for stores, in miles. If no value is specified, the default search radius of 50 miles is used. |
| Terms of service | URL | This property specifies the terms of service URL that is required to use the Azure Maps service. |
Site settings
The store selector module respects the Add product to cart settings. After an item is added to the cart from the store selector module, site users will see the appropriate configured workflows.
Add a store selector module to a page
For Pickup in store mode, the module can be used only on PDPs and cart pages. You must set the mode to Pickup in store in the module's property pane.
- For information on how to add a store selector module to a buy box module, see Buy box module.
- For information on how to add a store selector module to a cart module, see Cart module
To configure the store selector module to show available stores for a store locations page, follow these steps:
- In Commerce headquarters, go to Templates, and select New to create a new template.
- In the New template dialog box, under Template name, enter Marketing template, and then select OK.
- Select Save, select Finish editing to check in the template, and then select Publish to publish it.
- Go to Pages, and select New to create a new page.
- In the Create a new page dialog box, under Page name, enter Store locations, and then select Next.
- Under Choose a template, select the Marketing template that you created, and then select Next.
- Under Choose a layout, select a page layout (for example, Flexible layout), and then select Next.
- Under Review and finish, review the page configuration. If you need to edit the page information, select Back. If the page information is correct, select Create page.
- In the Main slot of the new page, select the ellipsis (...), and then select Add module.
- In the Select modules dialog box, select the Container module, and then select OK.
- In the Container slot, select the ellipsis (...), and then select Add module.
- In the Select modules dialog box, select the Container with 2 columns module, and then select OK.
- In the module's properties pane, set the Width value to Fill Container.
- Set the X-Small view port column configuration value to 100%.
- Set the Small view port column configuration value to 100%.
- Set the Medium view port column configuration value to 33% 67%.
- Set the Large view port column configuration value to 33% 67%.
- In the Container with 2 columns slot, select the ellipsis (...), and then select Add module.
- In the Select modules dialog box, select the Store selector module, and then select OK.
- In the module's properties pane, set the Mode value to Find stores.
- Set the Search radius value in miles.
- Set other properties, such as Set as preferred store, Show all stores, and Enable auto suggestion, as you require.
- In the Container with 2 columns slot, select the ellipsis (...), and then select Add module.
- In the Select modules dialog box, select the Azure Maps module, and then select OK.
- In the module's properties pane, set any additional properties as you require.
- Select Save, select Finish editing to check in the page, and then select Publish to publish it.
Additional resources
Quick tour of cart and checkout