Note
Access to this page requires authorization. You can try signing in or changing directories.
Access to this page requires authorization. You can try changing directories.
Convert an existing Azure Data Lake Delta tables data source to a Microsoft Fabric OneLake data source without removing and recreating the connection. This conversion keeps the existing tables, mappings, and downstream dependencies in place, and repoints the data source to read the same Delta tables from your Fabric OneLake lakehouse.
Key reasons to convert an existing data source to Fabric OneLake:
- Move to Fabric OneLake without recreating the data source or reconfiguring downstream mappings, relationships, and enrichments.
- Read Delta tables directly from your Fabric lakehouse and remove the intermediate Azure Data Lake Storage staging layer.
- Reduce data movement, storage costs, and pipeline maintenance.
- Easily and safely revert converted connections back to the previous configuration if there are any issues.
When to use the conversion method
Use the conversion method when you already have an Azure Data Lake Delta tables data source in Customer Insights - Data and you want it to read the same tables from a Microsoft Fabric OneLake lakehouse instead. The same tables and columns that the data source uses today must exist in the target lakehouse, inside one schema if the lakehouse supports them.
Prerequisites
Verify that the following requirements are met.
Workspace and permissions
- Prerequisites for connecting to Microsoft Fabric OneLake are met.
- If Inbound Access Protection is enabled for the workspace, a workspace-level Private Link is created and validated. To learn more, see Connect to a Microsoft Fabric workspace with inbound access protection enabled.
Data requirements
- The target lakehouse contains managed Delta tables. The process doesn't support files such as CSV or non-Delta Parquet, or Fabric Data Warehouse tables.
- The tables and columns the system reads from Azure storage must exist in the target lakehouse, be within a single schema (folder), and the table schemas (names, columns, data types) must match. Use the Verify step (described later in this article) to confirm this requirement before you convert.
- The process supports Delta tables exposed through Fabric shortcuts.
Note
To support reverting the connection back to Azure, continue updating data in both Azure and Fabric for several full refresh cycles in Customer Insights – Data. Don't edit the data source connection (add, remove, or configure tables) until verified as edits eliminate the ability to revert the connection back to Azure.
Convert a data source to Fabric OneLake
Go to Data > Data sources.
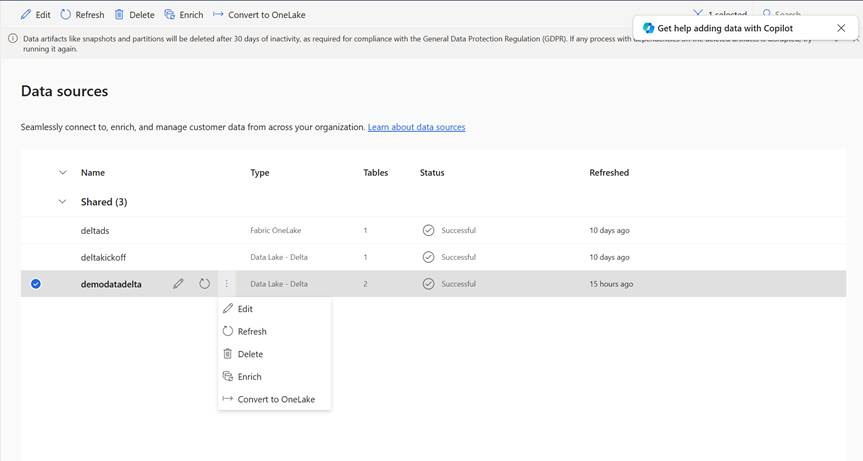
Select the existing Azure Data Lake Delta tables data source that you want to convert and select Convert to OneLake.
Enter the target OneLake location:
- Workspace: Enter or select the Fabric workspace that contains your lakehouse.
- Lakehouse: Enter or select the lakehouse that contains the Delta tables.
- Schema: If the data uses a specific named schema, enter the schema that contains the tables. Otherwise, leave this field empty.
If the target workspace has Inbound Access Protection enabled, select Enable Azure Private Link and choose the workspace Private Link. Validate it before you continue. For instructions, see Connect to a Microsoft Fabric workspace with inbound access protection enabled.
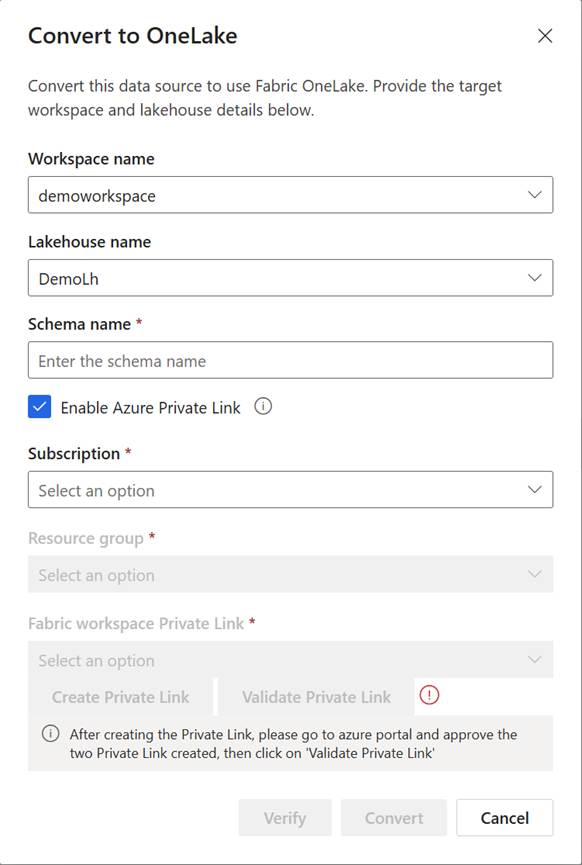
Select Verify to check that the target OneLake location contains the same tables and columns that the data source currently uses. Verification generates the target schema and compares it against the data source's configured tables and columns.
The inputs are locked and a progress indicator appears while verification runs. This process can take a few minutes.
Review the result:
- Verified - the target matches the data source. You can convert.
- Issues found - the target is missing tables or columns, or column types don't match. See Understand verification results.
Tip
If you change the Workspace, Lakehouse, or Schema after verifying, the previous result is cleared, and you need to verify again.
After verification succeeds (or when you choose to proceed in advisory mode), select Convert.
The Data sources page opens and shows the data source in Refreshing status.
Important
Don't stop the refreshing process. Stopping it can negatively affect the conversion of the data source.
Understand verification results
When the tables in Azure Data Lake don't match the tables in the lakehouse, verification lists the differences so you can fix the workspace before converting. Verification groups differences into up to three categories:
- Missing tables - tables the data source uses that aren't present in the target lakehouse.
- Missing columns (type) - columns that are missing from a target table, shown as
table.column(expected type). - Type mismatched columns (expected type : actual type) - columns whose data type in the target doesn't match what the data source expects.
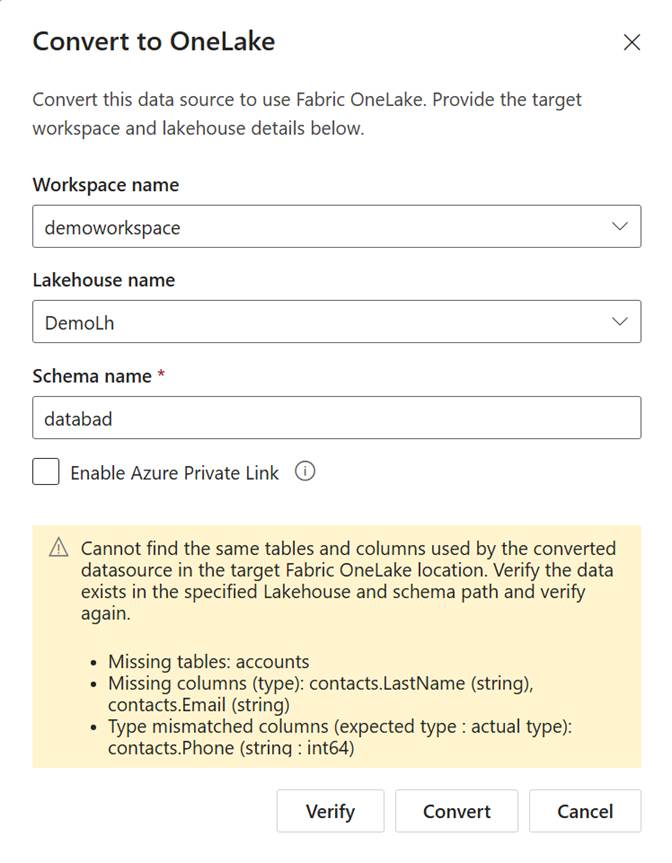
Depending on how your environment is configured, verification runs in one of two modes:
- Strict mode - if verification finds problems, Convert stays disabled until you fix the workspace and verify again.
- Advisory mode - if verification finds problems, a warning is shown. You can try to convert the connection at your own risk. Errors might be shown during the conversion process, or might not be shown until the next data refresh and unification run, causing the data refresh to fail. In either case, you can revert the update and the data connection is restored to its previous state.
Monitor the conversion
Select the status on the Data sources page to open the Progress details pane and view the progress of the tasks. Ensure that all the tasks dependent on the converted data source (for example, unification, segments) succeed. Check if the resulting data (profiles, segments) is as expected.
Important
Don't edit the converted data source before confirming the full refresh ran successfully, as it prevents the rollback execution. Editing the converted data source removes the saved rollback information and prevents reverting.
Revert the conversion
If the first refresh after conversion fails or produces incorrect results, you can revert the data source back to its original Azure Data Lake Delta tables configuration. Reverting repoints the data source to the Azure Data Lake location it used before the conversion and removes the Fabric OneLake connection details.
Before you revert
- Confirm your organization continued to stream data to the original Azure Data Lake location and maintained its manifests and schemas.
- Ensure you didn't edit the converted data source. Editing the converted data source removes the saved rollback information and prevents reverting.
Revert to Azure Data Lake Delta tables
Go to Data > Data sources.
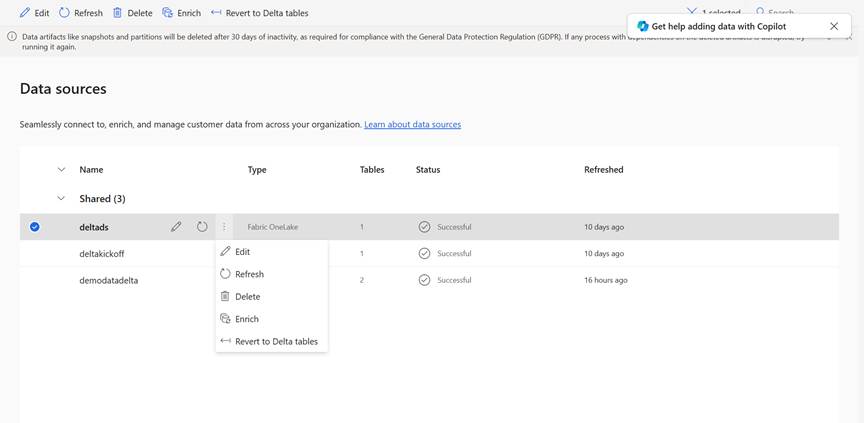
Select the converted data source, and then select Revert data source.
In Revert data source to Delta tables, confirm that you want to revert.
The Data sources page opens and shows the data source in Refreshing status while it reverts to the original Azure Data Lake Delta tables location.
Important
Don't stop the refresh process. Stopping it can negatively affect reverting the data source. After the refresh finishes, confirm that the data source and its dependent processes (such as unification and segments) succeed.
Troubleshooting
Verification reports missing tables or columns
Confirm that the specified lakehouse and schema path contain the same tables and columns the data source uses, that the table (folder) names match exactly, and that the column names and data types match. Fix the workspace and select Verify again.
Verification can't be completed
If verification can't compare the schemas (for example, the target manifest or the baseline model isn't available), you can still convert, but the schema isn't confirmed. Verify that the access to the workspace and that the lakehouse and schema path are correct.
The workspace or lakehouse list is empty
An empty or continually refreshing empty table list indicates that Customer Insights - Data doesn't have permission to access the workspace. Verify workspace permissions and external access settings. If the workspace uses Inbound Access Protection, verify that the Private Link is configured correctly.