Note
Access to this page requires authorization. You can try signing in or changing directories.
Access to this page requires authorization. You can try changing directories.
Customize the case resolution experience in Power apps as follows:
- When customer service representatives (service representatives or representatives) try to close a case with open activities, the application displays a warning message with a redirect link. You can configure the tab representatives view when they select this link.
- Choose to display the legacy Resolve case dialog instead of the default minimal Resolve case dialog when a representative closes a case with open activities.
Redirect users to a specific tab to close the open activities for a case
You can configure the tab users must be redirected to when they select the open activities link on the Resolve Case dialog. You'll need to add and configure the Redirect user to the specified tab to close open activities setting definition in Power Apps to set the tab at an environment level or for a specific app.
In Power Apps, add the Redirect user to the specified tab to close open activities setting definition. More information: Add an existing setting definition.
You'll need to update the setting definition with the tab name. To find the tab's name, perform the following steps:
- Navigate to a form which has the required tab.
- Select the tab, and then copy the value in Name in Display options.
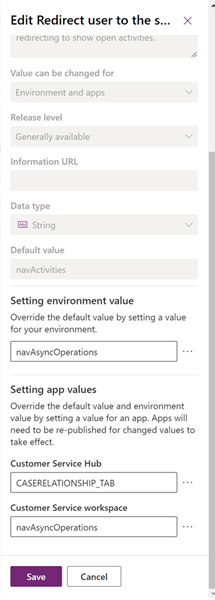
In the Edit Redirect user to the specified tab to close open activities pane, paste the name in the Setting environment value option. More information: Update a setting definition.
Optionally, in the Setting app values section, or a required app, you can set the tab in New app value. The tab set at the application level overrides the environment level setting.
Select Publish All Customizations.

Disable the minimal case resolution dialog
You can choose to display the legacy case resolution dialog box that appears when a representative selects Resolve case. You'll need to add and configure the Enable minimal case resolution dialog setting definition in Power Apps to revert to the legacy case resolution dialog.
Note
- You can revert to the legacy case resolution dialog only if the Case settings > Other settings > Resolve case dialog is set to Standard dialog in Copilot Service admin center.
- If Resolve case dialog is set to Customizable dialog or Quick create dialog, to add Duration, Billable TIme, Total Time and other customizations, perform the steps in Modify the case resolution dialog.
Perform the following steps:
In Power Apps, add the Enable minimal case resolution dialog setting definition. More information: Add an existing setting definition.
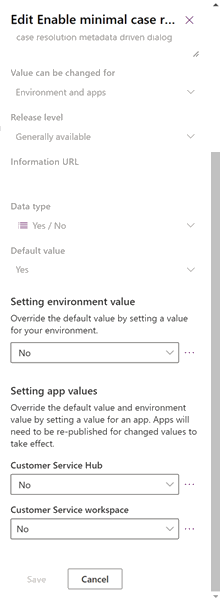
In the Edit Enable minimal case resolution dialog pane, set the Setting environment value option to No. More information: Update a setting definition.
Optionally, in the Setting app values section, for a required app, you can set the value to No in New app value. The tab set at the application level overrides the environment level setting.
Select Publish All Customizations.