Note
Access to this page requires authorization. You can try signing in or changing directories.
Access to this page requires authorization. You can try changing directories.
This section describes several of the tasks that the Dynamics 365 Customer Engagement (on-premises) administrator should consider after the Dynamics 365 Server application is installed. This section isn’t meant to be an exhaustive resource used to configure deployments. Instead, use this section as a guideline to determine what best practices to implement and features to configure, based on your organization's needs.
Copy your organization encryption key
All new and upgraded organizations use data encryption that uses an encryption key to secure data such as user passwords for email mailboxes and Yammer accounts. This encryption key may be required to use Dynamics 365 Customer Engagement (on-premises) after a redeployment or failure recovery. We strongly recommend that you make a copy of the encryption key and save it to a secure location. More information:Copy your organization data encryption key
Make Dynamics 365 client-to-server network communications more secure
With any network design, it is important to consider the security of your organization's client-to-server communications. When making necessary decisions that can help protect data, we recommend that you understand the following information about Dynamics 365 Customer Engagement (on-premises) network communication and about the technology options that are available that provide more secure data transmissions.
If you installed Dynamics 365 Customer Engagement (on-premises) or upgraded a Dynamics 365 Server that isn’t already configured for HTTPS, Dynamics 365 Customer Engagement (on-premises) client-to-server communications are not encrypted. When using a website that supports only HTTP, information from Customer Engagement clients is transmitted in clear text and, therefore, possibly vulnerable to malicious intent, such as "man-in-the-middle" type attacks that could compromise content by adding scripts to perform harmful actions.
Configuring Dynamics 365 for HTTPS
Configuring a site for HTTPS will cause a disruption in the Dynamics 365 Customer Engagement (on-premises) application so plan the configuration when there will be minimal disruption to users. The high-level steps for configuring Dynamics 365 Customer Engagement (on-premises) for HTTPS are as follows:
In Dynamics 365 Deployment Manager, disable the server where the Web Application Server, Organization Web Service, Discovery Web Service, and Deployment Web Service roles are running. If this is a Full Server deployment, all server roles are running on the same computer. For information about how to disable a server, see Dynamics 365 Customer Engagement (on-premises)Deployment Manager Help.
Configure the website where the Web Application Server role is installed to use HTTPS. For more information about how to do this, see Internet Information Services (IIS) Help.
Set the binding in Deployment Manager. This is done on the Web Address tab of the Properties page for the deployment. For more information about how change the bindings see Microsoft Dynamics 365 deployment properties.
If you want to make other Customer Engagement services more secure and Dynamics 365 Customer Engagement (on-premises) is installed by using separate server roles, repeat the previous steps for the additional server roles.
Configure a Dynamics 365 Internet-facing deployment
After all Dynamics 365 Server roles are installed, you can configure the deployment so that remote users can connect to the application through the Internet. To do this, start Rule Deployment Manager and complete the Configure Claims-Based Authentication Wizard followed by the Internet-Facing Deployment Configuration Wizard. Alternatively, you can complete these tasks using Windows PowerShell. More information: Overview of Dynamics 365 Customer Engagement (on-premises) PowerShell
Important
For Dynamics 365 for tablets to successfully connect to a new deployment of Dynamics 365 Server, you must run a Repair of the Dynamics 365 Server application on the server running IIS where the Web Application Server role is installed after the Internet-Facing Deployment Configuration Wizard is successfully completed.
Add or remove sample data
Sample data is available to help you become familiar with how Dynamics 365 Customer Engagement (on-premises) works. By using sample data, work with records and see how they relate to each other, how data displays in charts, and see what information is in reports.
Sample data can be added or removed from within the Customer Engagement application. More information:Add or remove sample data
Complete the configuration tasks for new organizations
After you've completed installing Dynamics 365 Customer Engagement (on-premises), but before the business users in your organization start using it, there are some basic tasks that you, as the Customer Engagement administrator, should complete. These tasks include defining business units and security roles, adding users, and importing data.
More information: Set up a Dynamics 365 organization
Import apps and solutions
Sales and Field Service apps are available to you. More information: Available apps for Dynamics 365 Customer Engagement (on-premises)
Use solutions to extend functionality and the user interface. Customizers and developers distribute their work as solutions. Organizations use Dynamics 365 Customer Engagement (on-premises) to import the solution. Find a solution in the Microsoft AppSource.
Important
Importing a solution or publishing customizations can interfere with normal system operation. We recommend that you schedule solution imports when it’s least disruptive to users.
For more information about how to import a solution, see Import, update, and export a solution.
Configure Windows Server for Dynamics 365 Customer Engagement (on-premises) applications that use OAuth
The following information describes how to configure Windows Server with AD FS to support Customer Engagement applications such as Dynamics 365 for phones, Dynamics 365 for tablets, Dynamics 365 for Outlook, Microsoft Social Engagement, or other Dynamics 365 for Customer Engagement applications that need OAuth support.
Enable forms authentication
By default, forms authentication is disabled in the intranet zone. You must enable forms authentication by following these steps:
Log on to the AD FS server as an administrator.
Open the ADFS management wizard.
Select Authentication Policies > Primary Authentication > Global Settings > Authentication Methods > Edit.
Select (check) Form Based Authentication on the Intranet tab.
Configure the OAuth provider
Follow these steps to configure the OAuth provider in Dynamics 365 Customer Engagement (on-premises):
Log on to the Dynamics 365 Customer Engagement (on-premises) server as an administrator.
Add the Customer EngagementWindows PowerShell snap-in (Microsoft.Crm.PowerShell.dll). More information: Administer the deployment using Windows PowerShell
Add-PSSnapin Microsoft.Crm.PowerShellEnter the following Windows PowerShell commands.
$ClaimsSettings = Get-CrmSetting -SettingType OAuthClaimsSettings
$ClaimsSettings.Enabled = $true
Set-CrmSetting -Setting $ClaimsSettings
Register the client apps
The client apps must be registered with AD FS.
Log on to the AD FS server as administrator.
In a PowerShell window, execute the following commands to register each application that is applicable to your deployment.
Dynamics 365 (online), version 8.2 mobile apps for Apple iPhone, Android, and Windows.
Add-AdfsClient -ClientId 00001111-aaaa-2222-bbbb-3333cccc4444 -Name "Microsoft Dynamics CRM for tablets and phones" -RedirectUri ms-app://s-1-15-2-2572088110-3042588940-2540752943-3284303419-1153817965-2476348055-1136196650/, ms-app://s-1-15-2-1485522525-4007745683-1678507804-3543888355-3439506781-4236676907-2823480090/, ms-app://s-1-15-2-3781685839-595683736-4186486933-3776895550-3781372410-1732083807-672102751/, ms-app://s-1-15-2-3389625500-1882683294-3356428533-41441597-3367762655-213450099-2845559172/, ms-auth-dynamicsxrm://com.microsoft.dynamics,ms-auth-dynamicsxrm://com.microsoft.dynamics.iphone.moca,ms-auth-dynamicsxrm://com.microsoft.dynamics.ipad.good,msauth://code/ms-auth-dynamicsxrm%3A%2F%2Fcom.microsoft.dynamics,msauth://code/ms-auth-dynamicsxrm%3A%2F%2Fcom.microsoft.dynamics.iphone.moca,msauth://code/ms-auth-dynamicsxrm%3A%2F%2Fcom.microsoft.dynamics.ipad.good,msauth://com.microsoft.crm.crmtablet/v%2BXU%2FN%2FCMC1uRVXXA5ol43%2BT75s%3D,msauth://com.microsoft.crm.crmphone/v%2BXU%2FN%2FCMC1uRVXXA5ol43%2BT75s%3D, urn:ietf:wg:oauth:2.0:oobDynamics 365 for Outlook.
Add-AdfsClient -ClientId 11112222-bbbb-3333-cccc-4444dddd5555 -Name "Dynamics CRM Outlook Client" -RedirectUri app://22223333-cccc-4444-dddd-5555eeee6666/Unified Service Desk client.
Add-AdfsClient -ClientId 33334444-dddd-5555-eeee-6666ffff7777 -Name "Dynamics 365 Unified Service Desk" -RedirectUri app://44445555-eeee-6666-ffff-7777aaaa8888/Dynamics 365 Customer Engagement (on-premises) developer tools.
Add-AdfsClient -ClientId 55556666-ffff-7777-aaaa-8888bbbb9999 -Name "Dynamics 365 Development Tools" -RedirectUri app://66667777-aaaa-8888-bbbb-9999cccc0000/To register the Dynamics 365 App for Outlook, in Customer Engagement (on-premises), go to Settings > Dynamics 365 App for Outlook and register the app there.
Required steps after enabling OAuth for Dynamics 365 Server
When OAuth is enabled, and you have registered your applications, it's required to complete the following steps:
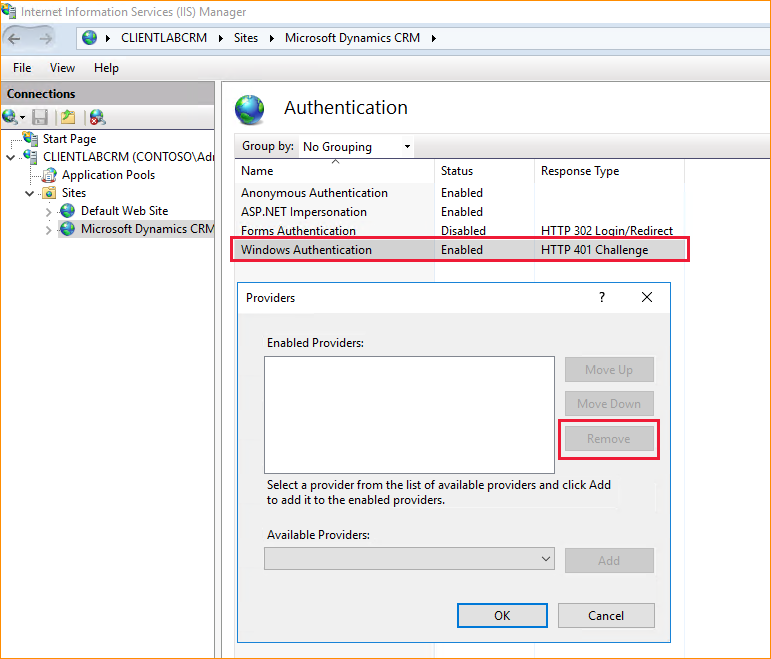
Remove site authentication providers
On the Dynamics 365 Server where the web application server role is running, open Internet Information Services (IIS) Manager.
In the left pane, under the organization name, expand Sites, and then select Microsoft Dynamics CRM.
Double-click Authentication in the middle pane.
Right-click Windows Authentication, and select Providers. For each provider in the list, select the provider, select Remove, and then select OK.
After all providers are removed, right-click Windows Authentication, and then select Disable.
Repeat the previous steps to remove all Windows Authentication providers from the nga and AppWebServices site folders.
Add the AD FS address to the client local intranet zone to avoid client authentication prompts
- On the client computer, select Start, enter inetcpl.cpl, and select Enter to open Internet Properties.
- Select the Security tab, select the Local intranet zone, select Sites, and then select Advanced.
- Enter in the AD FS address, select Add, select Close, select OK, and then select OK again.
Grant application permission
On the AD FS server, run the following command in a Windows PowerShell console. This is required if you use Windows Server 2016 AD FS or later versions.
Grant-AdfsApplicationPermission -ClientRoleIdentifier "<client_id/org_id>" -ServerRoleIdentifier "<org_auth_url>"
Important
Make sure org_auth_url is complete and accurate URL. Also, you must include the trailing forward slash /.
For example:
Grant-AdfsApplicationPermission -ClientRoleIdentifier "806e5da7-0600-e611-80bf-6c3be5b27d7a" -ServerRoleIdentifier https://auth.contoso.com:444/
To display the authentication URL, run this PowerShell command:
Get-ADFSRelyingPartyTrust
Restart AD FS
On the AD FS server, run the following PowerShell commands to force AD FS to restart.
net stop adfssrv
net start adfssrv
Enable Device Registration Service (DRS) on the federation server
To make sure that devices can connect to your deployment, follow the instructions in this topic: Configure a federation server with Device Registration Service.
Request custom certificates using the Certificates MMC snap-in
This section explains how to generate a custom certificate request (CSR) that can be used to obtain an SSL certificate for Microsoft Dynamics 365 Customer Engagement on-premises.
Important
For claim-based authentication and the internet-facing deployment to work, it's mandatory that the steps below are completed.
- Sign in to any Windows computer with an account that is a member of the local Administrators group.
- Select Start, type mmc.exe, and then press ENTER.
- Select File on the command bar, and then select Add/Remove Snap-in.
- In the list of available snap-ins, select Certificates, and then select Add.
- Select Computer account, and then select Next.
- Select Local computer, select Finish, and then select OK.
After you have added the Certificates snap-in for your local computer store open, create a custom certificate request.
In the MMC console tree, expand Certificates (Local Computer).
Right-click Personal, point to All Tasks, point to Advanced Operations, and then select Create Custom Request.
The Certificate Enrollment wizard opens. Select Next.
On the Select Certificate Enrollment Policy page select Proceed without enrollment policy under Custom Request, and then select Next.
On the Custom Request page next to the Template options select (No template) Legacy key and select the PKCS #10 request format option, and then select Next.
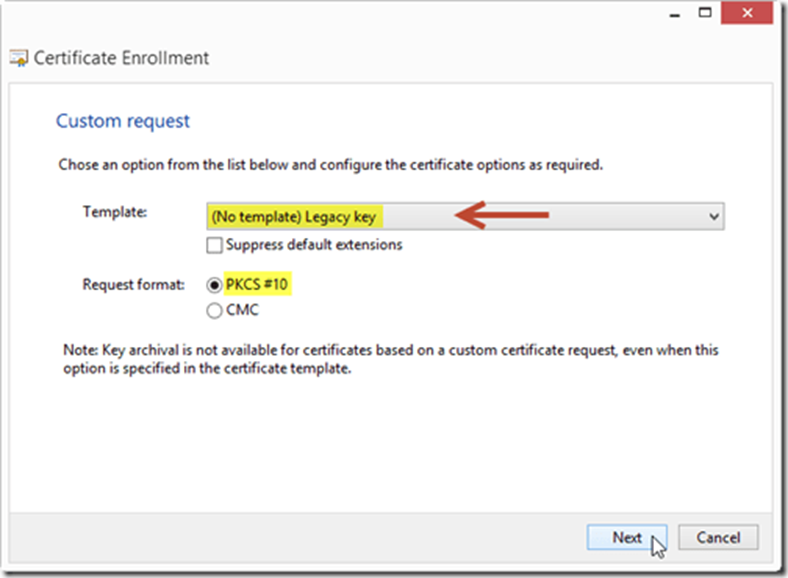
Important
CNG certificates aren't supported.
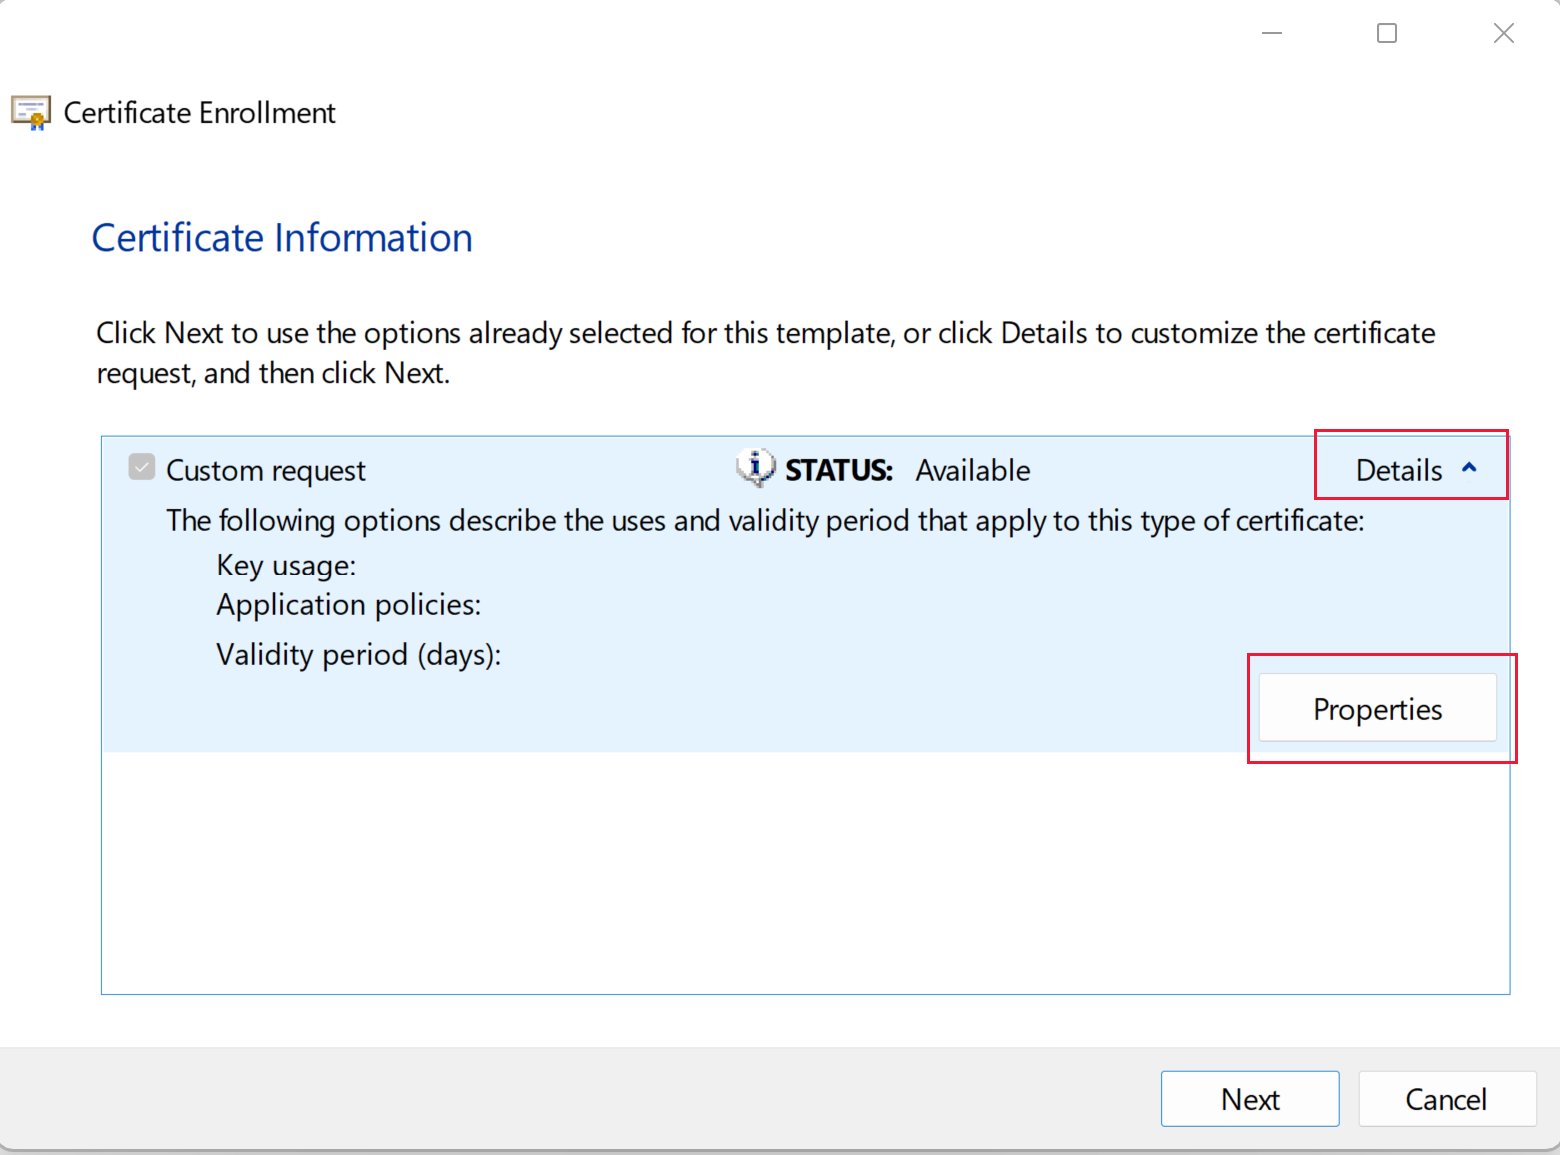
On the Certificate Information page expand Details, and then select Properties.
On the General tab, enter the Friendly name (display name), and then select Apply.
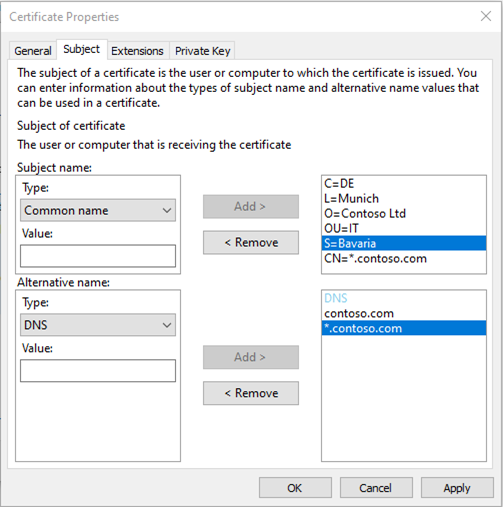
Select the Subject tab, and add the relevant subject names and alternative names for the certificate. Some public certificate authorities require various subject values. More information: Certificate subject and alternative names examples
After you've added all relevant values select Apply.
Select the Extensions tab.
- Expand Key Usage and then Add Data encipherment, Digital signature, and Key encipherment as the Selected options.
- Expand Extended Key Usage (application policies) and then Add Server Authentication and Client Authentication as the Selected options.
- Select Apply.
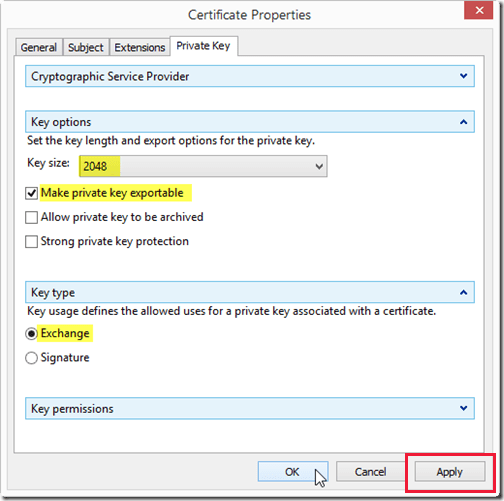
Select the Private Key tab.
- Expand Cryptographic Servicer Provider and then select Microsoft RSA Schannel Cryptographic Provider (Encryption)
- Expand Key options then set Key size to 2048 (or higher) and select the Make private key exportable option.
- Expand Key type and then select Exchange.
- Select Apply.
Review all tabs to make sure all required options are selected or entered. After verification select OK.
The Certificate Enrollment page is displayed. Select Next.
On the Where do you want to save the offline request page, enter the full path to save the request file and ensure that File format is set to Base 64. Select Finish.
Now you will have a CSR in BASE 64 format, which you can forward to an external or internal certificate authority for signing.
Important
There's no private key included. This avoids any compromise of the private key when transferring to a Certificate Authority.
Your provider will provide a signed version of the certificate including the private key and the payload. That certificate you receive must be imported back on the same machine where you created the certificate request.
Import and then export the received certificate
Import the certificate into the local certificate store (Personal) and the request will automatically be completed. Doing so merges the private and public key. From the Certificates MMC snap-in right-click the Certificates folder in the Personal folder, point to All Tasks, and then select Import. Browse to and select the certificate and follow the steps in the Certificate Import Wizard to import it.
Finally, you export the certificate.
- In the Certificates MMC snap-in, right-click the certificate, point to All Tasks, and then select Export.
- On the Certificate Export Wizard select Next, and then select Yes, export the private key. Select Next.
- On the Export File Format page, leave all the default settings, and then select Next.
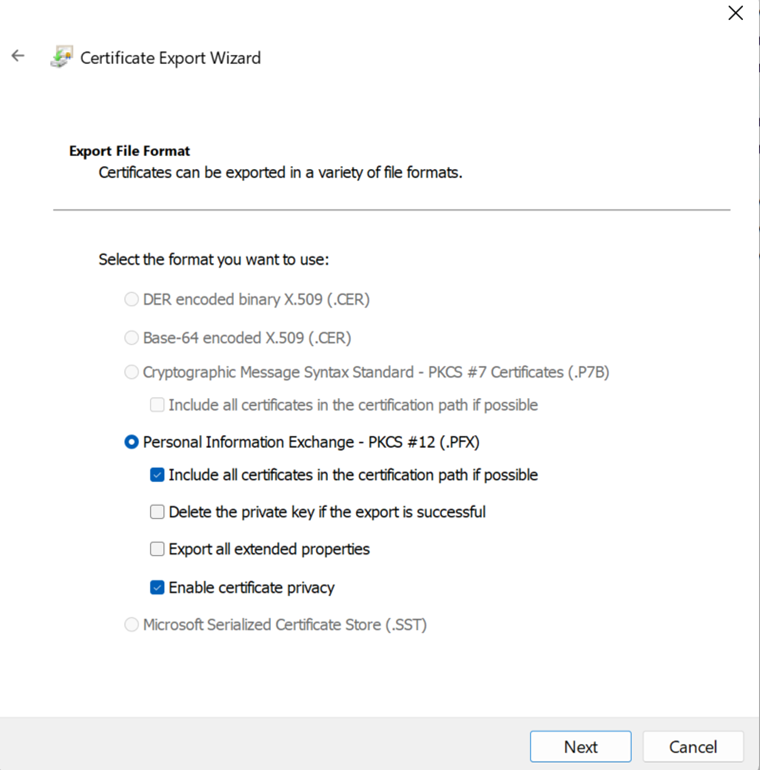
- On the Security page select Password.
- Enter a password that will be your private key. Ensure to save that information in a secure place.
- Select Encryption as AES256-SHA256.
- Select Next.
- Enter the folder path where you want to save the certificate, that will be saved in PFX format.
- Select Next and then select Finish.
Now you can use the PFX certificate for Dynamics 365 Customer Engagement (on-premises) and other applications such as AD FS as well.
Important
If your certificate authority doesn't accept legacy type certificate requests, ensure to match all requirements except the Cryptographic Service Provider (CSP). You can run the below Certutil.exe in an elevated command shell to reimport the PFX with the required provider.
certutil -csp "Microsoft RSA SChannel Cryptographic Provider" -importpfx <drive><name of cert>.pfx AT_KEYEXCHANGE
Certificate subject and alternative names examples
Subject name examples.
| Type | Value entered | Subject name |
|---|---|---|
| Country | DE | C=DE |
| Locality | Munich | L=Munich |
| Organization | Contoso Ltd | O=Contoso Ltd |
| Organizational unit | IT | OU=IT |
| State | Bavaria | S=Bavaria |
| Common name | *.contoso.com1 | CN=*.contoso.com1 |
1Uses wildcard. A wildcard certificate is recommended as it covers all DNS values created for the domain.
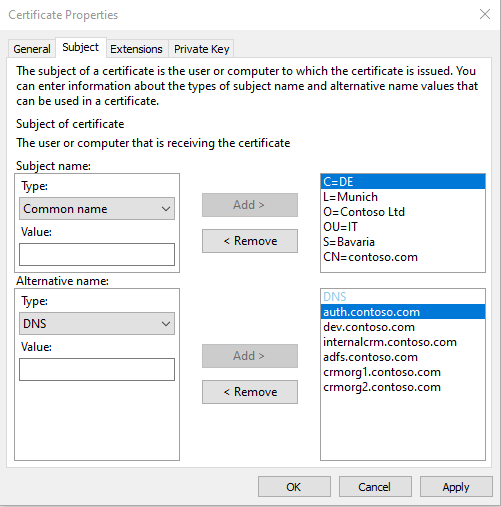
For the subject alternative names (SAN) ensure to cover all DNS values you require. For example, alternative name DNS type values for the fictional company named Contoso might be: auth.contoso.com, dev.contoso.com, internalcrm.contoso.com, adfs.contoso.com, crmorg1.contoso.com, crmorg2.contoso.com, and so on.
Configure databases for SQL Server AlwaysOn
Although the article referenced below applies to an earlier version of Dynamics 365 Customer Engagement (on-premises), you can use similar steps to configure the Dynamics 365 Customer Engagement (on-premises), version 9 organization and configuration databases for SQL Server AlwaysOn.
Important
The final tasks under step 4 in the below article link that describe how to Create the MSCRMSqlClrLogin SQL Login under Create the SQL logins for the Microsoft Dynamics 365 security groups on all secondary replicas are not applicable to this version and should be ignored when configuring Dynamics 365 Customer Engagement (on-premises), version 9 databases to use SQL Server AlwaysOn.
MSCRMSqlClrLogin SQL login, the asymmetric key for it, and Microsoft.Crm.SqlClr.Helper.dll aren’t required with Dynamics 365 Customer Engagement (on-premises), version 9.
More information: Set configuration and organization databases for SQL Server AlwaysOn failover
User training and adoption
More information: Training and Adoption Kit for Microsoft Dynamics 365
See also
Installing on-premises Dynamics 365
Operating Microsoft Dynamics 365