Note
Access to this page requires authorization. You can try signing in or changing directories.
Access to this page requires authorization. You can try changing directories.
Note
Community interest groups have now moved from Yammer to Microsoft Viva Engage. To join a Viva Engage community and take part in the latest discussions, fill out the Request access to Finance and Operations Viva Engage Community form and choose the community you want to join.
Prerequisites
To complete these steps, you must first complete the steps in Configure ER formats to use parameters that are specified per legal entity.
To complete the examples in this article, you must have access to Microsoft Dynamics 365 Finance for one of the following roles:
- Electronic reporting developer
- Electronic reporting functional consultant
- System administrator
Import ER configurations
To import ER configurations, follow these steps:
Sign in to your environment.
On the default dashboard, select Electronic reporting.
Select Reporting configurations.
In the current instance of Finance, import the configurations that you exported from Regulatory Configuration Services (RCS) while you were completing the steps in Configure ER formats to use parameters that are specified per legal entity. Follow these steps for each Electronic reporting (ER) configuration in the following order: data model, model mapping, and formats.
- Select Exchange > Load from XML file.
- Select Browse to select the file for the required ER configuration in XML format.
- Select OK.
The following illustration shows the configurations that you must have when you've finished.
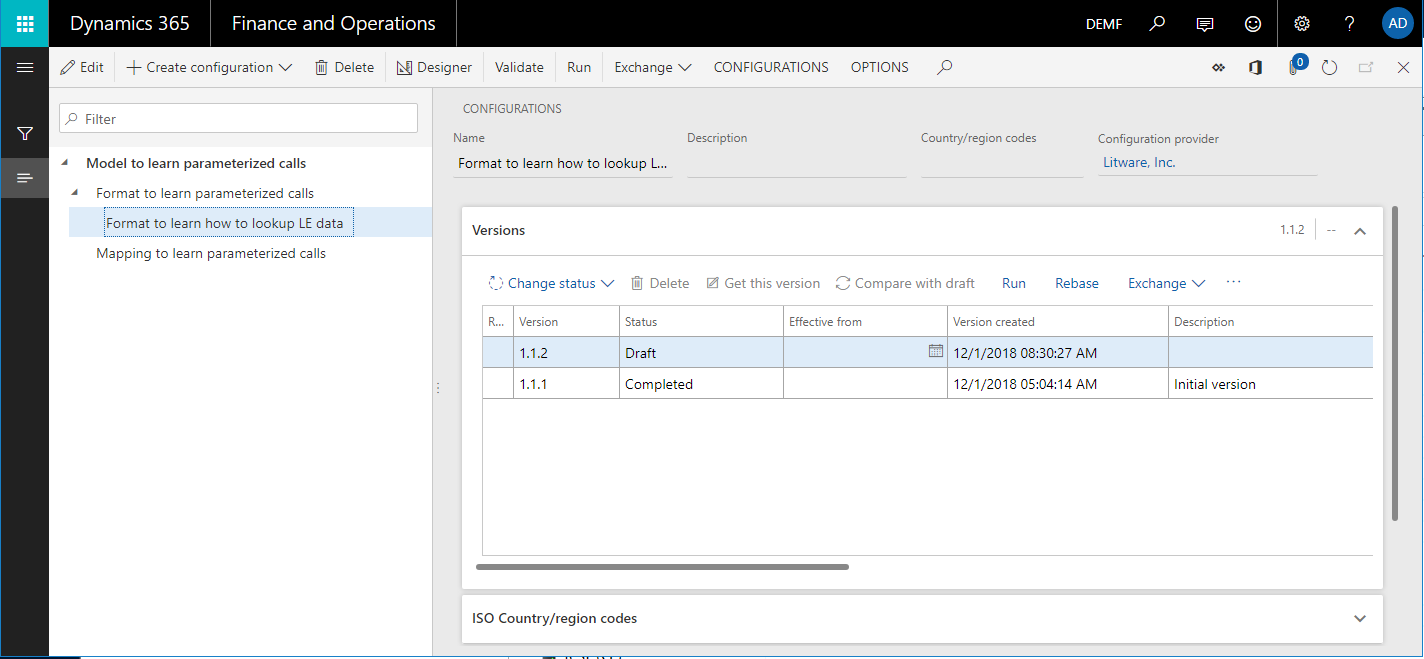
Set up parameters for the DEMF company
You can use the ER framework to set up application-specific parameters for an ER format.
Select the DEMF legal entity.
In the configurations tree, select the Format to learn how to lookup LE data format.
On the Action Pane, on the Configurations tab, in the Application specific parameters group, select Setup.
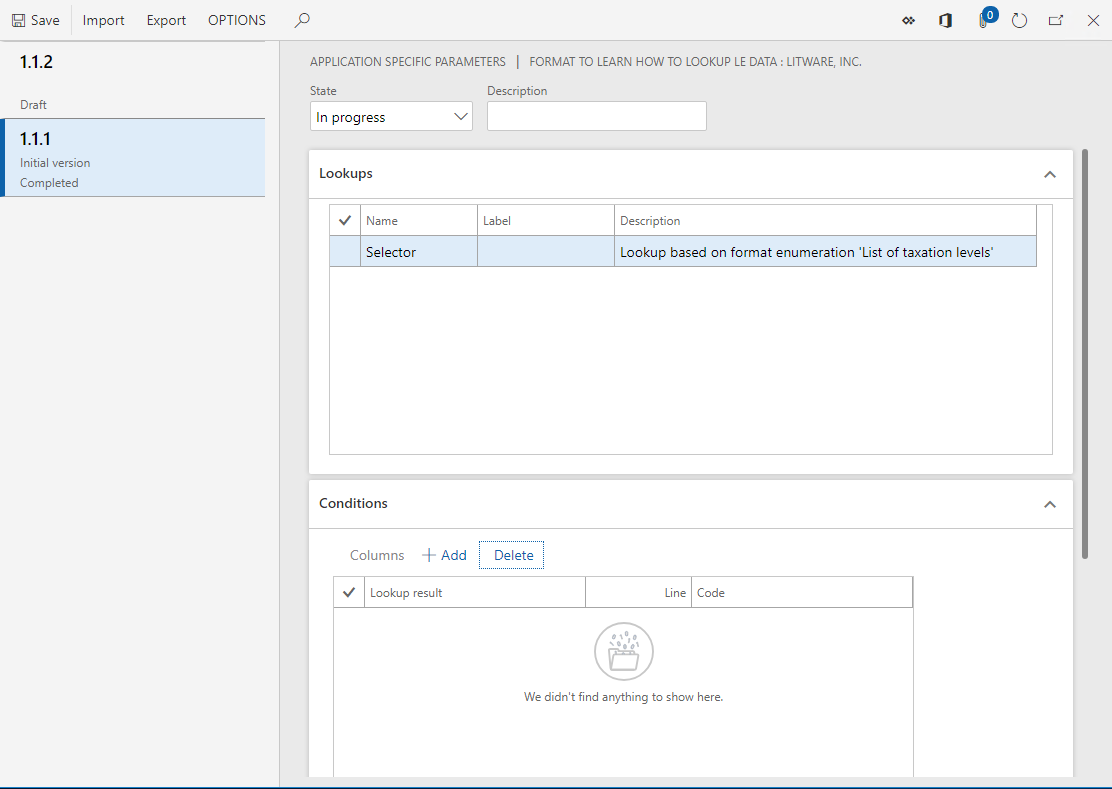
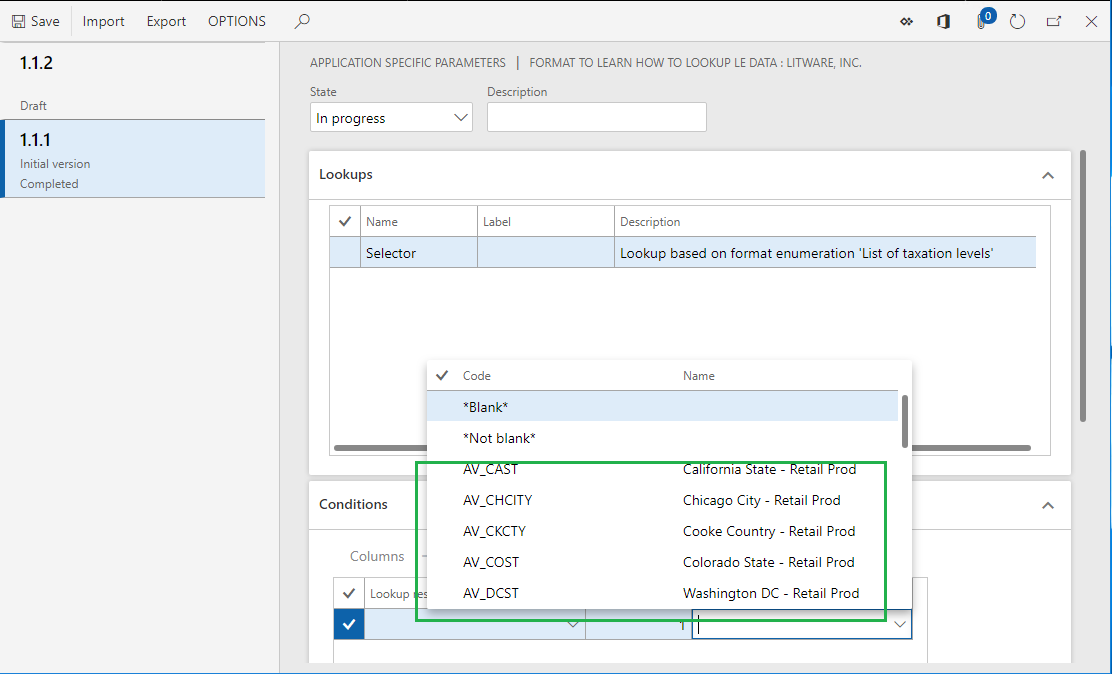
On the Application specific parameters page, you can configure the rules for the Selector data source of the Format to learn how to lookup LE data format.
If the base ER format will contain several data sources of the Lookup type, you must select the desired data source on the Lookups FastTab before you can start to configure the set of rules for the data source.
For each data source, you can configure separate rules for each version of the selected ER format.
The whole set of rules for all lookup data sources that are available in the selected version of the base ER format makes up the application-specific parameters for the ER format.
Select version 1.1.1 of the ER format.
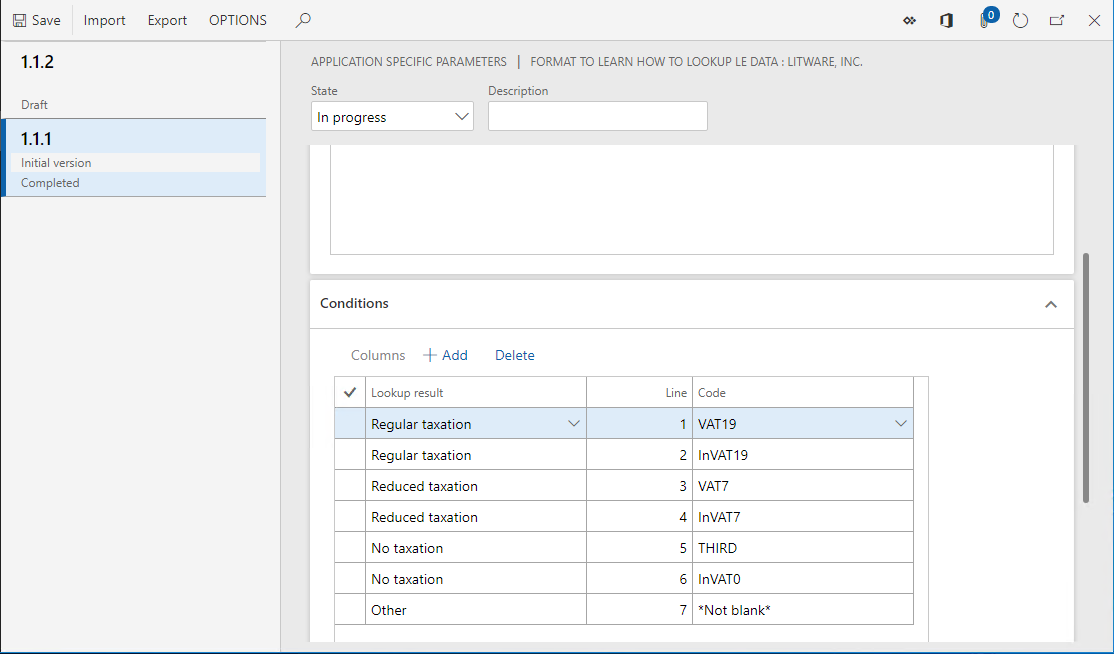
On the Conditions FastTab, select Add.
In the Code field of the new record, select the drop-down arrow to open the lookup.
The lookup presents the list of tax codes for selection. This list is returned by the Model.Data.Tax data source that has been configured in the base ER format. Because this data source contains the Name field, the name of each tax code appears in the lookup.
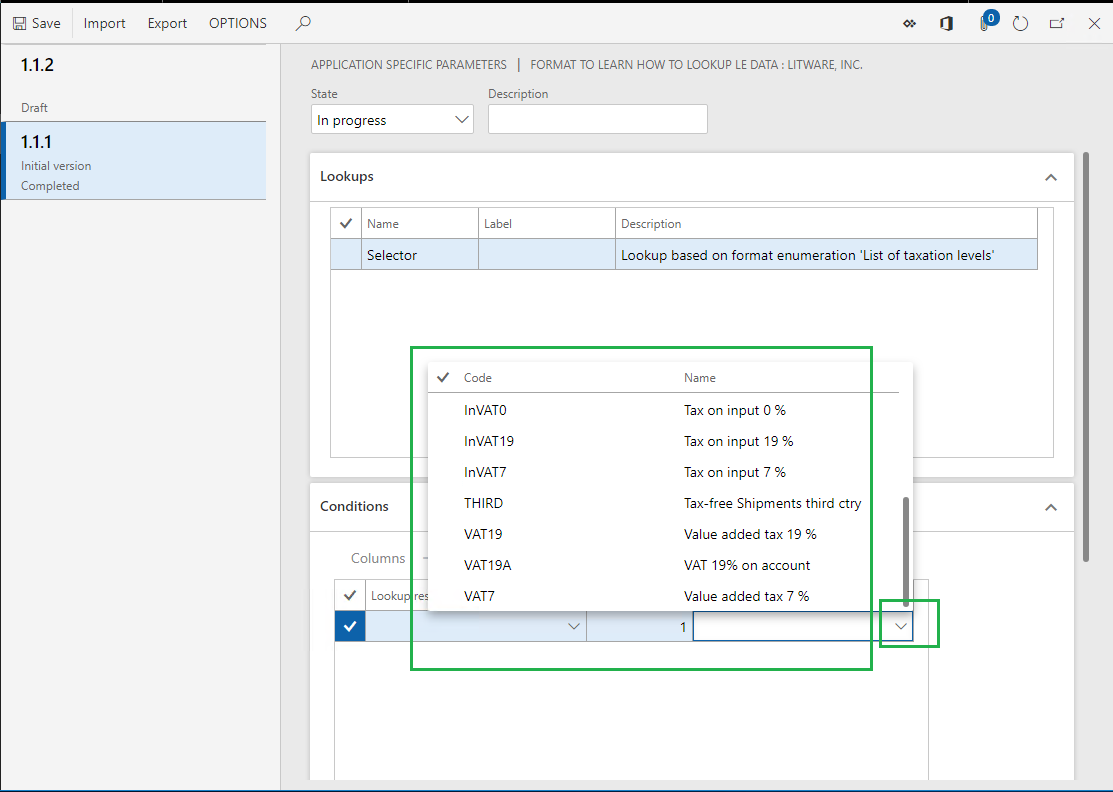
Select the VAT19 tax code.
In the Lookup result field of the new record, select the drop-down arrow to open the lookup. The lookup presents the list of values for the TaxationLevel format enumeration for selection.
Note that if you selected German as the preferred language for the user that you're signed in as, the labels of the values in the lookup will be in German, provided that they have been translated in the base ER format. Additionally, if the label of a lookup data source has been translated, that label will appear in the user's preferred language on the Lookups tab.
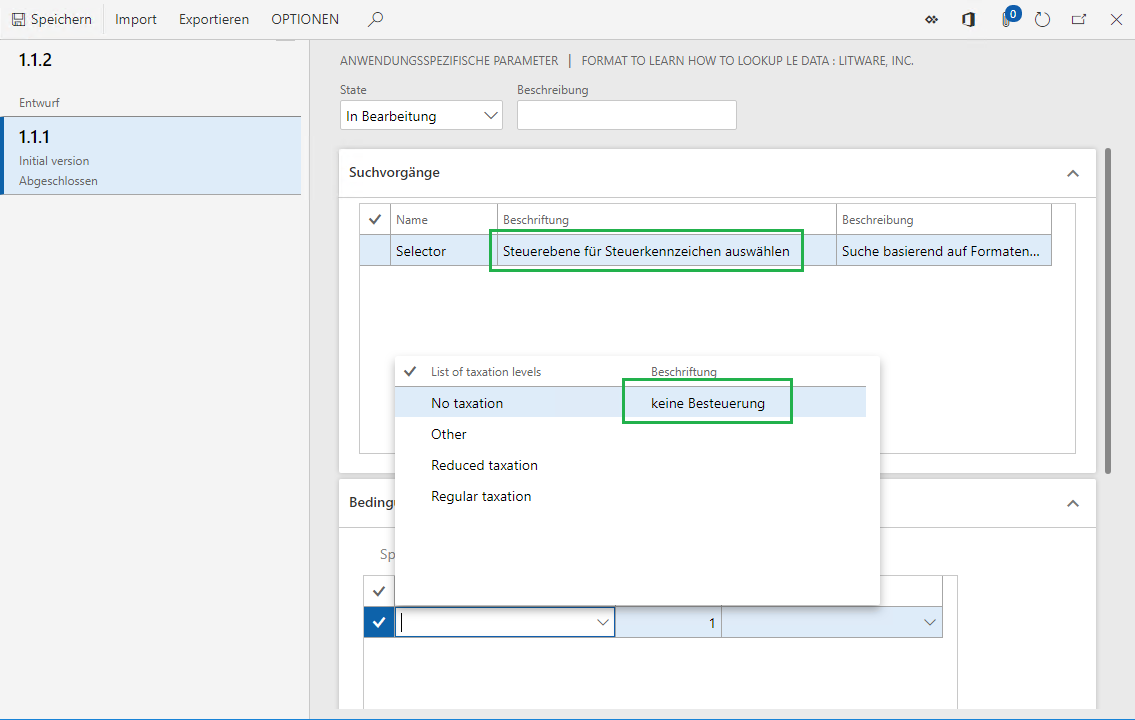
Select the Regular taxation value.
By adding this record, you define the following rule: When the Selector lookup data source is requested, and the VAT19 tax code is passed as an argument, Regular taxation will be returned as the requested taxation level.
Select Add, and then follow these steps:
- In the Code field, select the InVAT19 tax code.
- In the Lookup result field, select the Regular taxation value.
Select Add, and then follow these steps:
- In the Code field, select the VAT7 tax code.
- In the Lookup result field, select the Reduced taxation value.
Select Add , and then follow these steps:
- In the Code field, select the InVAT7 tax code.
- In the Lookup result field, select the Reduced taxation value.
Select Add, and then follow these steps:
- In the Code field, select the THIRD tax code.
- In the Lookup result field, select the No taxation value.
Select Add, and then follow these steps:
- In the Code field, select the InVAT0 tax code.
- In the Lookup result field, select the No taxation value.
Select Add, and then follow these steps:
- In the Code field, select the *Not blank* option.
- In the Lookup result field, select the Other value.
By adding this last record, you define the following rule: When the tax code that is passed as an argument doesn't satisfy any of the previous rules, the lookup data source will return Other as the requested taxation level.
In the State field, select Completed.
When you run an ER format version that has a status of either Completed or Shared, this set of rules must be in the Completed state. Otherwise, execution of the base ER format will be interrupted when the format tries to load data from this set of rules while the Selector lookup data source is being run.
When you run an ER format version that has a status of Draft, the base ER format can access this set of rules, regardless of its state.
Select Save.
Close the Application specific parameters page.
Run the ER format in the DEMF company
To run the ER format in the DEMF company, follow these steps:
In the configurations tree, select the Format to learn how to lookup LE data format.
On the Action Pane, select Run.
In the dialog box that appears, select OK.
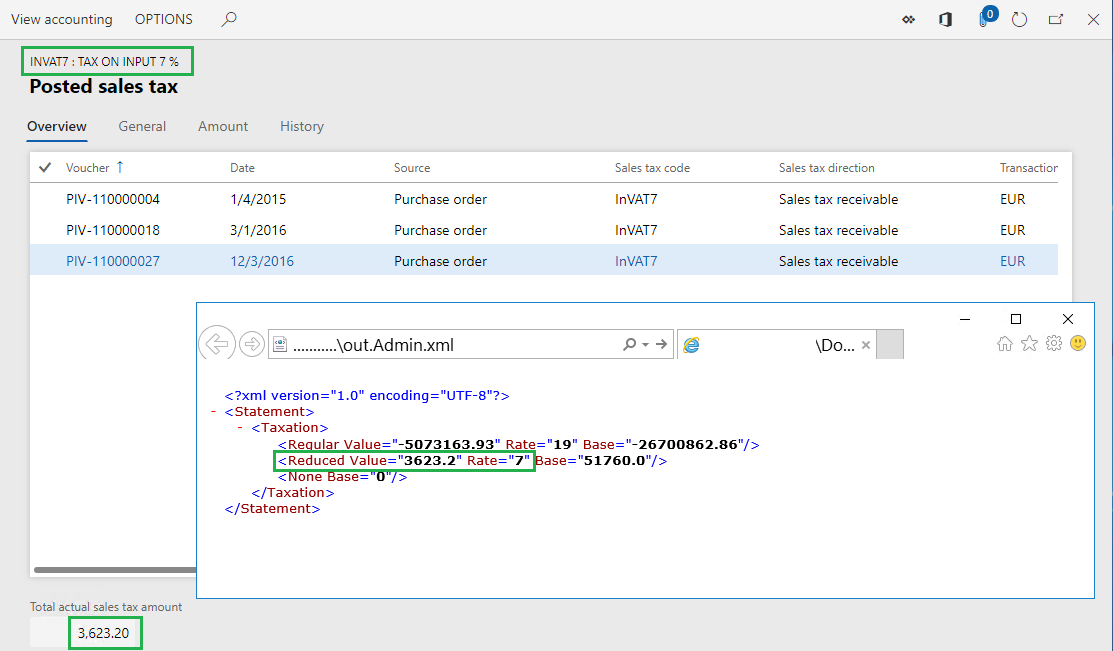
Download the statement that is generated and store it locally.
In the generated statement, notice that the summary of the InVAT7 tax code is on the Reduced level, and the summaries of the VAT19 and InVA19 tax codes is on the Regular level. This behavior is determined by the configuration in the legal entity–dependent set of rules.
Go to Tax > Indirect taxes > Sales tax > Sales tax codes.
Select the InVAT7 tax code.
On the Action Pane, on the Sales tax code tab, in the Inquiries group, select Posted sales tax to view information about the tax value and applied tax rate per tax code.
Close the Posted sales tax page.
Set up parameters for the USMF company
To set up parameters for the USMF company, complete the following steps:
Select the USMF legal entity.
Go to Organization administration > Electronic reporting > Configurations.
In the configurations tree, expand the Model to learn parameterized calls item, expand the Format to learn parameterized calls item, and select the Format to learn how to lookup LE data format.
On the Action Pane, on the Configurations tab, in the Application specific parameters group, select Setup.
Select version 1.1.1 of the selected ER format.
On the Conditions FastTab, select Add.
In the Code field of the new record, select the drop-down arrow to open the lookup.
The lookup now presents the list of tax codes for the USMF company tax for selection.
Select the EXEMPT tax code.
In the Lookup result field of the new record, select the No taxation value.
Select Add.
In the Code field of the new record, select the *Not blank* option.
In the Lookup result field of the new record, select the Regular taxation value.
In the State field, select Completed.
Select Save.

Close the Application specific parameters page.
Run the ER format in the USMF company
To run the ER format in the USMF company, complete the following steps:
In the configurations tree, select the Format to learn how to lookup LE data format.
On the Action Pane, select Run.
In the dialog box that appears, select OK.
Download the statement that is generated and store it locally.
In the generated statement, notice that you've now reused the same ER format for a different legal entity, but without making any adjustments to the ER format.
Reuse legal entity–dependent parameters
Duplicate existing parameters
Export parameters
To export parameters, complete the following steps:
Go to Organization administration > Workspaces > Electronic reporting.
Select Reporting configurations.
In the configurations tree, select the Format to learn how to lookup LE data format.
On the Action Pane, on the Configurations tab, in the Application specific parameters group, select Setup.
Select version 1.1.1 of the ER format.
On the Action Pane, select Export.
Download the file that is generated and store it locally.
The configured set of application-specific parameters has now been exported as an XML file.
Import parameters
To import parameters, complete the following steps:
Select version 1.1.2 of the ER format.
On the Action Pane, select Import.
Select Yes to confirm that you want to override the existing application-specific parameters for this format version.
Select Browse to find the file that contains the exported application-specific parameters for version 1.1.1.
Select OK.
Version 1.1.2 of the ER format now has the same application-specific parameters that you originally configured for version 1.1.1.
Applicability considerations
The application-specific parameters of an ER format are legal entity–dependent. To reuse the application-specific parameters that were configured for one legal entity in a different legal entity, you must export them while you're signed in to the first legal entity. Then import them after you sign in to the other legal entity.
You can also use this export-import approach to transfer ER format–related application-specific parameters that were originally configured in one instance of Finance to another instance of Finance.
If you configure application-specific parameters for one version of an ER format and then import a later version of the same format into the current Finance instance, the existing application-specific parameters won't be applied to the imported version unless you use the Use application specific parameters from previous versions of ER formats feature. For more information, see the Reuse existing parameters section later in this article.
When you select a file for import, the structure of the application-specific parameters in that file is compared with the structure of the corresponding data sources of the Lookup type in the ER format that is selected for import. By default, the import is completed only if the structure of each application-specific parameter matches the structure of the corresponding data source in the ER format that is selected for import. If the structures don't match, a warning message informs you that the import can't be completed. If you force the import, the existing application-specific parameters for the selected ER format will be cleaned up, and you must set them up from the beginning.
As of Finance version 10.0.24, you can change the default behavior and avoid receiving a warning message by enabling the Align ER application specific parameters while importing feature in the Feature management workspace. When this feature is enabled, if the structure of application-specific parameters that you're importing differs from the structure of the corresponding data sources in the target ER format that is selected for import, the import will succeed in the following cases:
- The structure of the target ER format has been changed by adding new condition columns to any existing data sources of the Lookup type. When the import is completed, the application-specific parameters are updated. In all the imported records of application-specific parameters, the values in every added condition column are initialized with the default value for the data type of that column.
- The structure of the target ER format has been changed by removing some condition columns from any existing data sources of the Lookup type. When the import is completed, the application-specific parameters are updated. In all the imported records of application-specific parameters, the values in every removed condition column are deleted.
- The structure of the target ER format has been changed by adding new data sources of the Lookup type. When the import is completed, the added lookups are appended to the application-specific parameters.
- The structure of the target ER format has been changed by removing some of the existing data sources of the Lookup type. When the import is completed, all artifacts that are related to the data sources of the Lookup type that were removed from the target ER format are deleted from the imported application-specific parameters.
When the import is completed, in addition to the changes that were just described, the state of the imported application-specific parameters is changed to In progress. A warning message informs you that the automatically adjusted application-specific parameters must be manually edited.
Replicate parameters
As of Finance version 10.0.27, you can copy the parameters that you configured in one company to other companies at the same time.
To copy parameters, complete the following steps.
Go to Organization administration > Workspaces > Electronic reporting.
Select Reporting configurations.
In the configurations tree, select the Format to learn how to lookup LE data format.
On the Action Pane, on the Configurations tab, in the Application specific parameters group, select Setup.
Select version 1.1.1 of the ER format.
On the Action Pane, select Replicate.
In the Replicate dialog box, on the Companies tab, select the companies that you want to copy parameters to.
Note
The list of target companies is offered only to users who are assigned a security role that is configured to grant access to all organizations.
Select OK.
Note
The confirmation dialog box informs you if some target companies contain previously configured parameters for the selected version of an ER format. Select Yes to override the parameters by copying them from the current company.
The configured set of application-specific parameters is now copied to the selected companies.
Reuse existing parameters
As of Finance version 10.0.23, you can reuse application-specific parameters that have been configured for one version of an ER format when you run a higher version of the same format. To reuse existing parameters, enable the Use application specific parameters from previous versions of ER formats feature in the Feature management workspace. When this feature is enabled and you run one version of an ER format that is trying to read application-specific parameters, ER will try to find application-specific parameters that have been configured for the running version of the format. If they aren't available, ER will try to find them for the nearest lower version of the format.
Note
You can reuse application-specific parameters only in the scope of the current legal entity.
An error is displayed at runtime when you run a higher version of an ER format that is trying to reuse application-specific parameters that have been configured for a lower version of the same format and the structure of at least one data source of the Lookup type in the higher format version has changed.
Relationship between application-specific parameters and an ER format
The relationship between an ER format and its application-specific parameters is established by the ER format's instance-independent unique identification code. Therefore, when you remove an ER format from Finance, the application-specific parameters that are configured for the ER format are kept in the current instance of Finance. They can be accessed when the base ER format is reimported into this instance of Finance.
Access application-specific parameters by using the ER framework
In the preceding example, you have accessed application-specific parameters of an ER format by using the ER framework. This approach doesn't let you restrict access to the application-specific parameters of a specific ER format. If you must apply such restrictions, follow these steps.
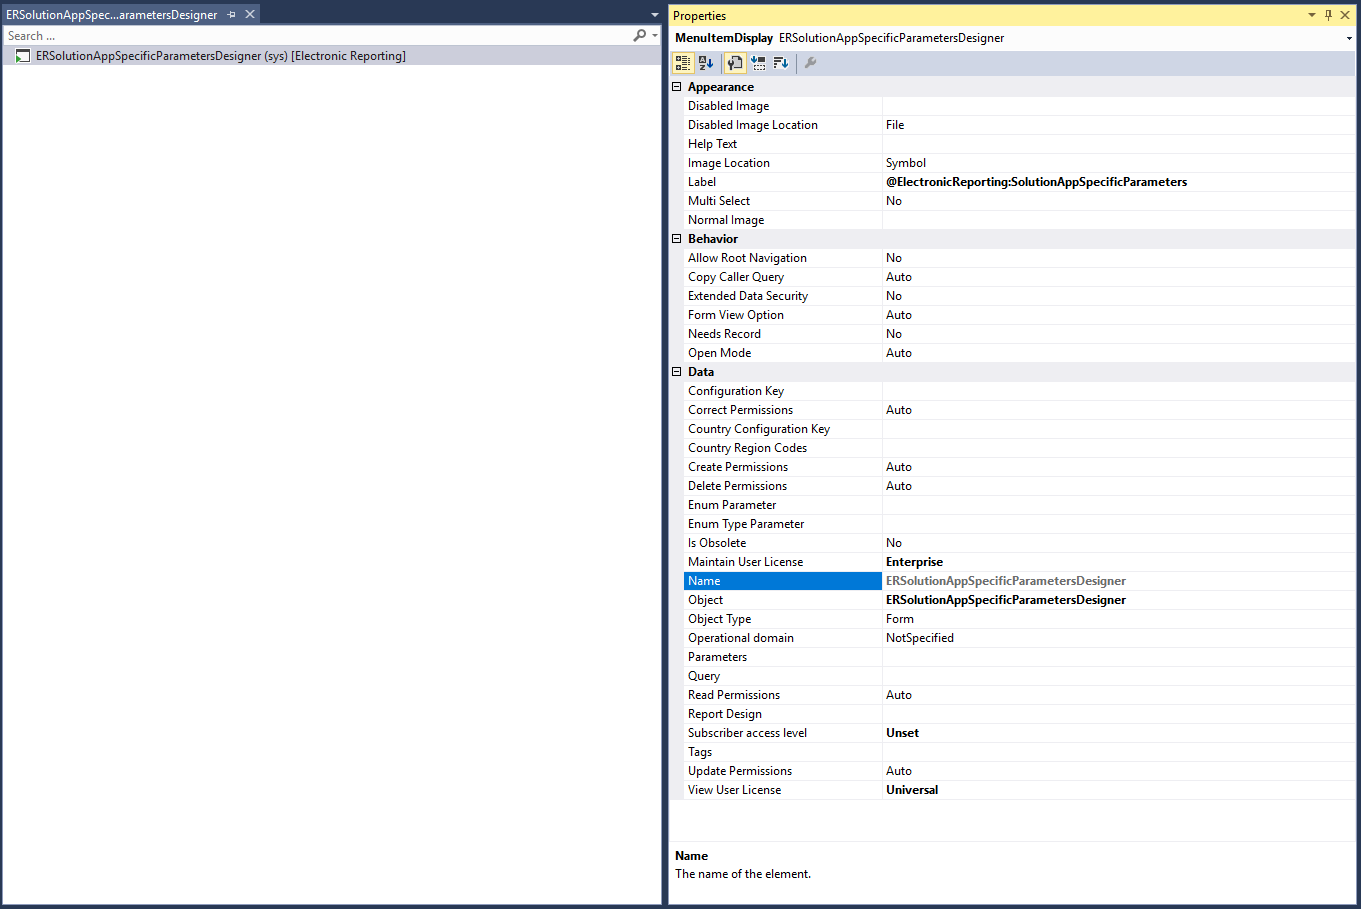
Either reuse an existing ERSolutionAppSpecificParametersDesigner menu item, or implement your own ERSolutionAppSpecificParametersDesigner menu item.
Follow one of these steps:
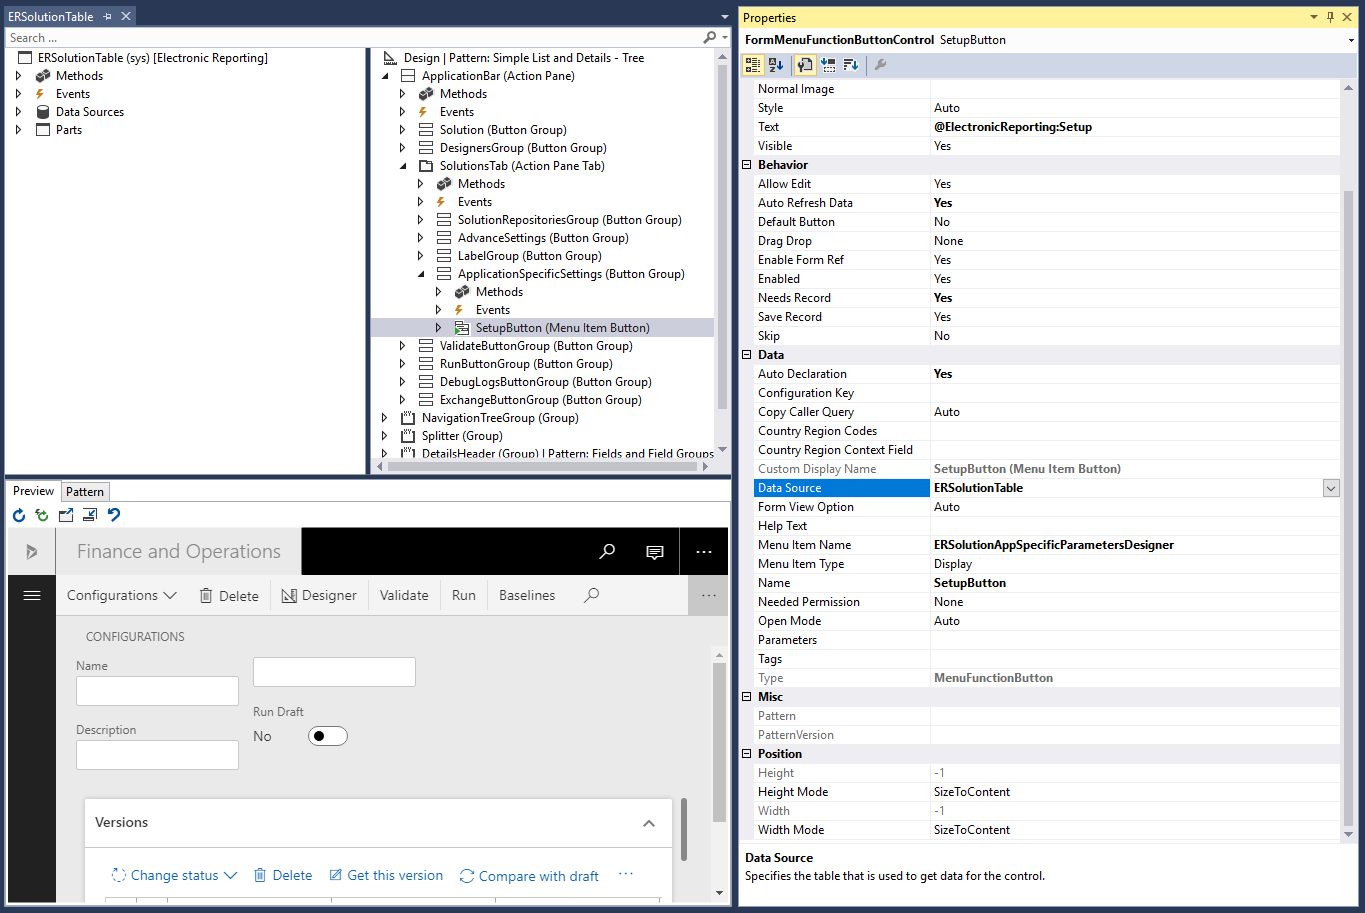
Create a new menu item button, and link it to the corresponding record from the ERSolutionTable table by setting its Data Source property to ERSolutionTable.
Create a simple button, and override the Clicked method as shown in the following example.
By using this approach, you can specify a unique solution ID (defined via the GUID value) to allow access to the application-specific parameters of only a specific ER format and descendant copies that have been derived from it.
public void clicked()
    {
        super();

        ERSolutionTable solutionTableRecord = ERSolutionTable::findByGUID(str2Guid('ADACCB2F-EFD1-4C90-877D-7E1E5D1AEE92'));

        Args args = new Args();
        args.record(solutionTableRecord);
        args.caller(this);

        new MenuFunction(menuItemDisplayStr(ERSolutionAppSpecificParametersDesigner), MenuItemType::Display)
            .run(args);
    }
Additional resources
Formula designer in Electronic reporting
Configure ER formats to use parameters that are specified per legal entity