Configure patient journeys
Important
This article covers the Patient journeys configuration and experience on the Patient outreach app. If you're looking for information on the outbound marketing capability, see Patient outreach - Outbound marketing. For the journey experience, ensure you've selected Patient journeys in the Change area section of the Patient outreach app.
For existing users of Microsoft Cloud for Healthcare who aren't using Patient outreach but intend to utilize the Patient journeys feature in conjunction with the Dynamics 365 Marketing application, this is possible. However, it is essential to install the latest version of the Patient outreach application from Microsoft Cloud Solution Center.
Note
Patient journey is a capability provided "AS IS" and "WITH ALL FAULTS".
Patient journey isn't intended or made available for use as a medical device, clinical support, diagnostic tool, or other technology intended to be used in the diagnosis, cure, mitigation, treatment, or prevention of diseases or other conditions, and no license or right is granted by Microsoft to use this capability for such purposes. This capability isn't designed or intended to be implemented or deployed as a substitute for professional medical advice or healthcare opinion, diagnosis, treatment, or the clinical judgment of a healthcare professional, and shouldn't be used as such.
Patient journey is intended for illustration only. The customer is solely responsible for any use of patient journey including, but not limited to, reviewing and customizing all aspects of a template before using it as a starting point. The customer must separately license any and all source vocabularies they intend to use under the terms set for that UMLS Metathesaurus License Agreement Appendix or any future equivalent link. The customer is responsible for ensuring compliance with those license terms, including any geographic or other applicable restrictions.
Patient journeys enable healthcare organizations to orchestrate personalized journeys across patient touchpoints. They facilitate the automation of repetitive tasks and allow patients to get personalized information faster, all within the Patient outreach app.
The capability includes the following features:
- Sample data for customizable patient journeys that target common healthcare scenarios.
- New ways to surface notifications within Microsoft and Microsoft Cloud for Healthcare applications.
- Trigger-based journeys that enable users to react faster to patient interactions and changes.
- Custom triggers on specific Microsoft Cloud for Healthcare virtual health data tables.
Patient journeys, thus, help organizations strengthen patient relationships, increase patient retention, and improve care.
Prerequisites
To use the patient journeys feature, install the Dynamics 365 Customer Insights - Journeys feature. For more information, see Real-time journeys user guide.
Limitations
Patient journeys currently has the following limitations:
All the artifacts of patient journeys such as journeys, triggers, segments, emails, and SMS templates are packaged in sample data. These records are in a "draft" state, and you can't edit them after publishing.
The journey artifacts aren't solution-aware. Hence, you should use the sample data only as a reference for creating orchestrations. For installed sample journeys, you wouldn't automatically receive updates when new versions are released. You would have to install new separate journeys to receive the latest updates.
Important
Solution aware means that a component of a solution knows that it's a part of that solution.
Set up patient journeys
This section shows you how to set up and configure the following patient journey artifacts:
- Segments
- Triggers
- Emails
- Text messages
- Journeys
- Connection references
- Power Automate flows
For more information on the artifacts, go to Customer Insights - Journeys overview.
Set up segments
On the Patient outreach app, select the Segments page to set up the following sample journey segments:
| Segment | Associated journey |
|---|---|
| Care plan goal overdue | Care plan goal overdue |
| Diabetes patients annual eye exam due | Annual diabetes eye exam |
| Diabetes patient has retinopathy | Diabetes eye exam follow-up scheduling |
| High-risk pregnancy | Pregnancy appointment and education |
| High-risk patients | Patient discharge |
Select and open the segment, and then select the Ready to use button in the ribbon. Repeat this step for all the required segments.

Note
The segments are dynamic in nature and populate based on the patient's conditions. The segment data is populated or refreshed based on a certain schedule. After any update, you may have to wait for the changes to reflect and trigger the journey.
Set up triggers
On the Patient outreach app, select the Triggers page to set up the following sample triggers. The triggers would either be Dataverse triggers or custom triggers.
| Trigger type | Triggers |
|---|---|
| Dataverse | • Patient checked in for appointment • Observation created or updated • Patient was discharged from hospital |
| Custom | • Send Teams message patient is checked in • Teams message for overdue care plan goal • Schedule task • Pregnancy appointment tomorrow • Pregnancy appointment completed • Diabetes eye exam tomorrow • Diabetes eye exam completed • Create task to call patient • Send a message through Patient Portal |
To set up the triggers, switch either to the Dataverse triggers view or the Custom triggers view. Then, select the required trigger and mark it ready to use.
Set up emails
On the Patient outreach app, select the Emails page to set up the following sample email alerts:
- Diabetes eye exam reminder
- Diabetes eye exam rescheduling
- Pregnancy appointment reminder
- Pregnancy education
- Pregnancy appointment rescheduling
- Patient discharge
- Care plan goal overdue
To update the placeholder content in the email template, use the following instructions:
| Placeholder content | Instructions |
|---|---|
| [PATIENT-NAME] | Select Personalization, and then select Full name |
| [PROVIDER-NAME] | Replace with a static value for the healthcare provider. Alternatively, select Personalization > New dynamic text > Choose an attribute > Trigger > Select the trigger > Select Health care provider |
| [DATE-TIME] or [DATE] | Select Personalization > New dynamic text > Choose an attribute > Trigger > Select the trigger > Select Appointment date |
| [APPOINTMENT-LOCATION] | Select Personalization > New dynamic text > Choose an attribute > Trigger > Select the trigger > Select Appointment location |
| [BUSINESS-PHONE] | Select Personalization > New dynamic text > Choose an attribute > Trigger > Select the trigger > Select Business phone number |
The following section lists the steps for setting up the Diabetes eye exam reminder and Patient discharge emails. You can refer to the same steps for setting up email alerts for other triggers.
Example 1: Diabetes eye exam reminder
Set up a Diabetes eye exam reminder email using the following steps:
Select the Diabetes eye exam reminder email.
Select the Settings icon on the sidebar and update the email header fields highlighted in the following screenshot:
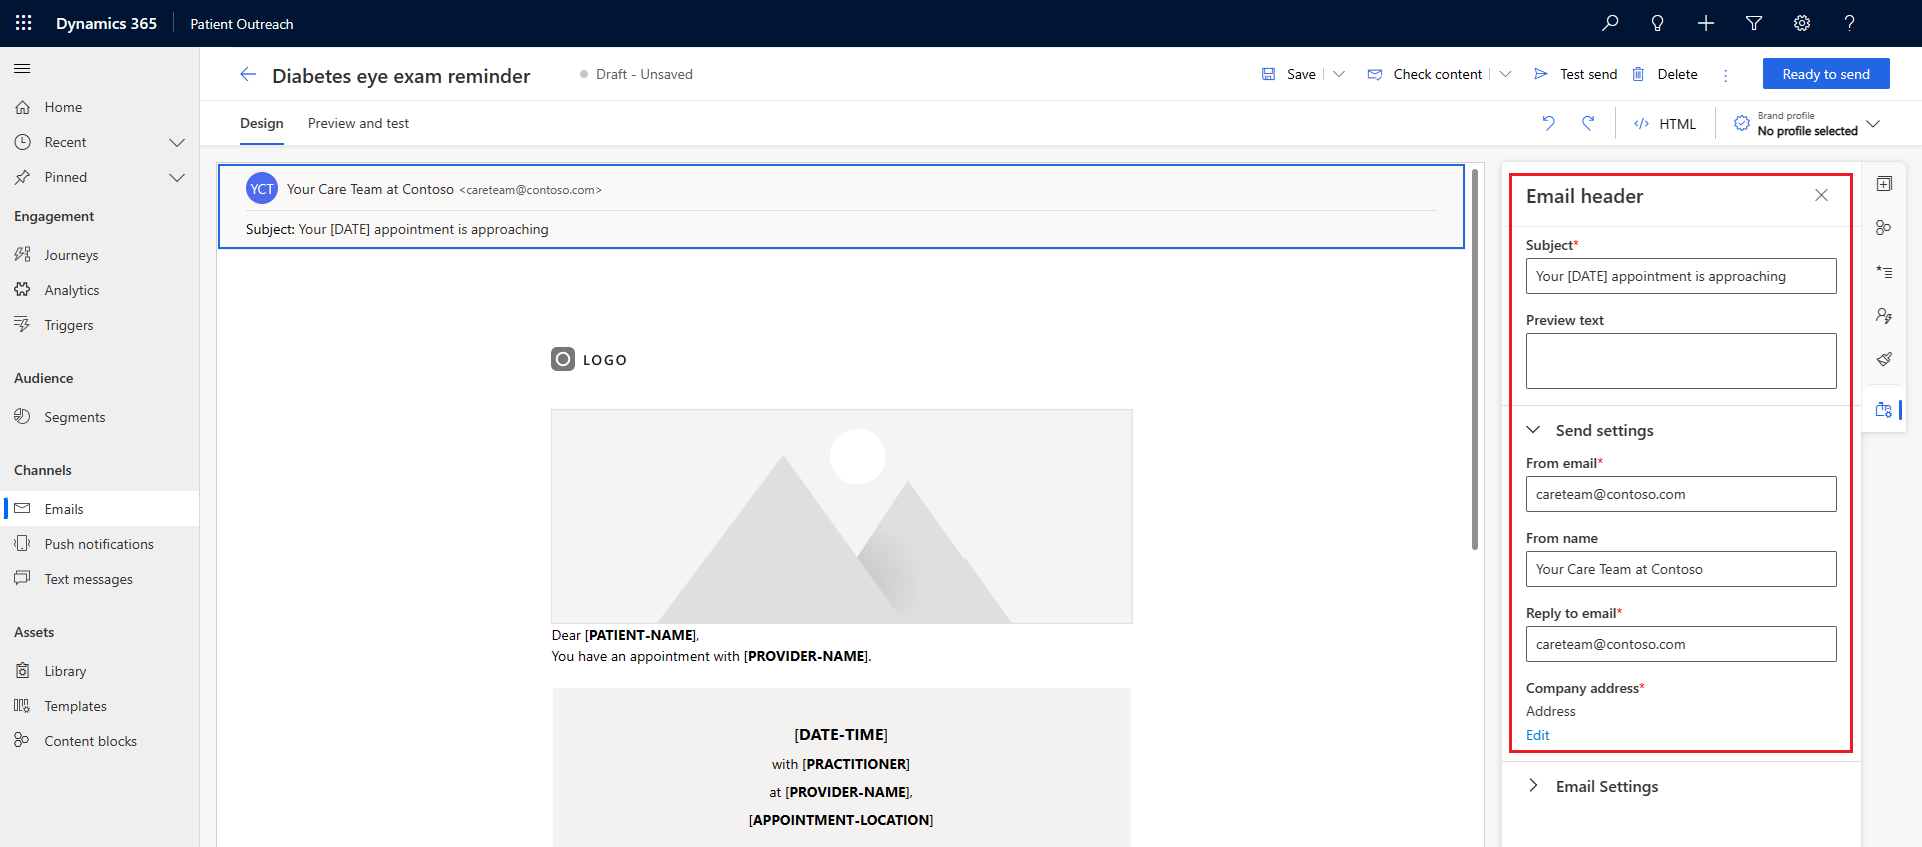
Update the placeholder content using the instructions in the previous section.
Replace all the other placeholder content with appropriate details. For more information, see Create Customer Insights - Journeys emails.
Select Save, and mark the email ready to send.

Example 2: Patient discharge
Set up a Patient discharge email using the following steps:
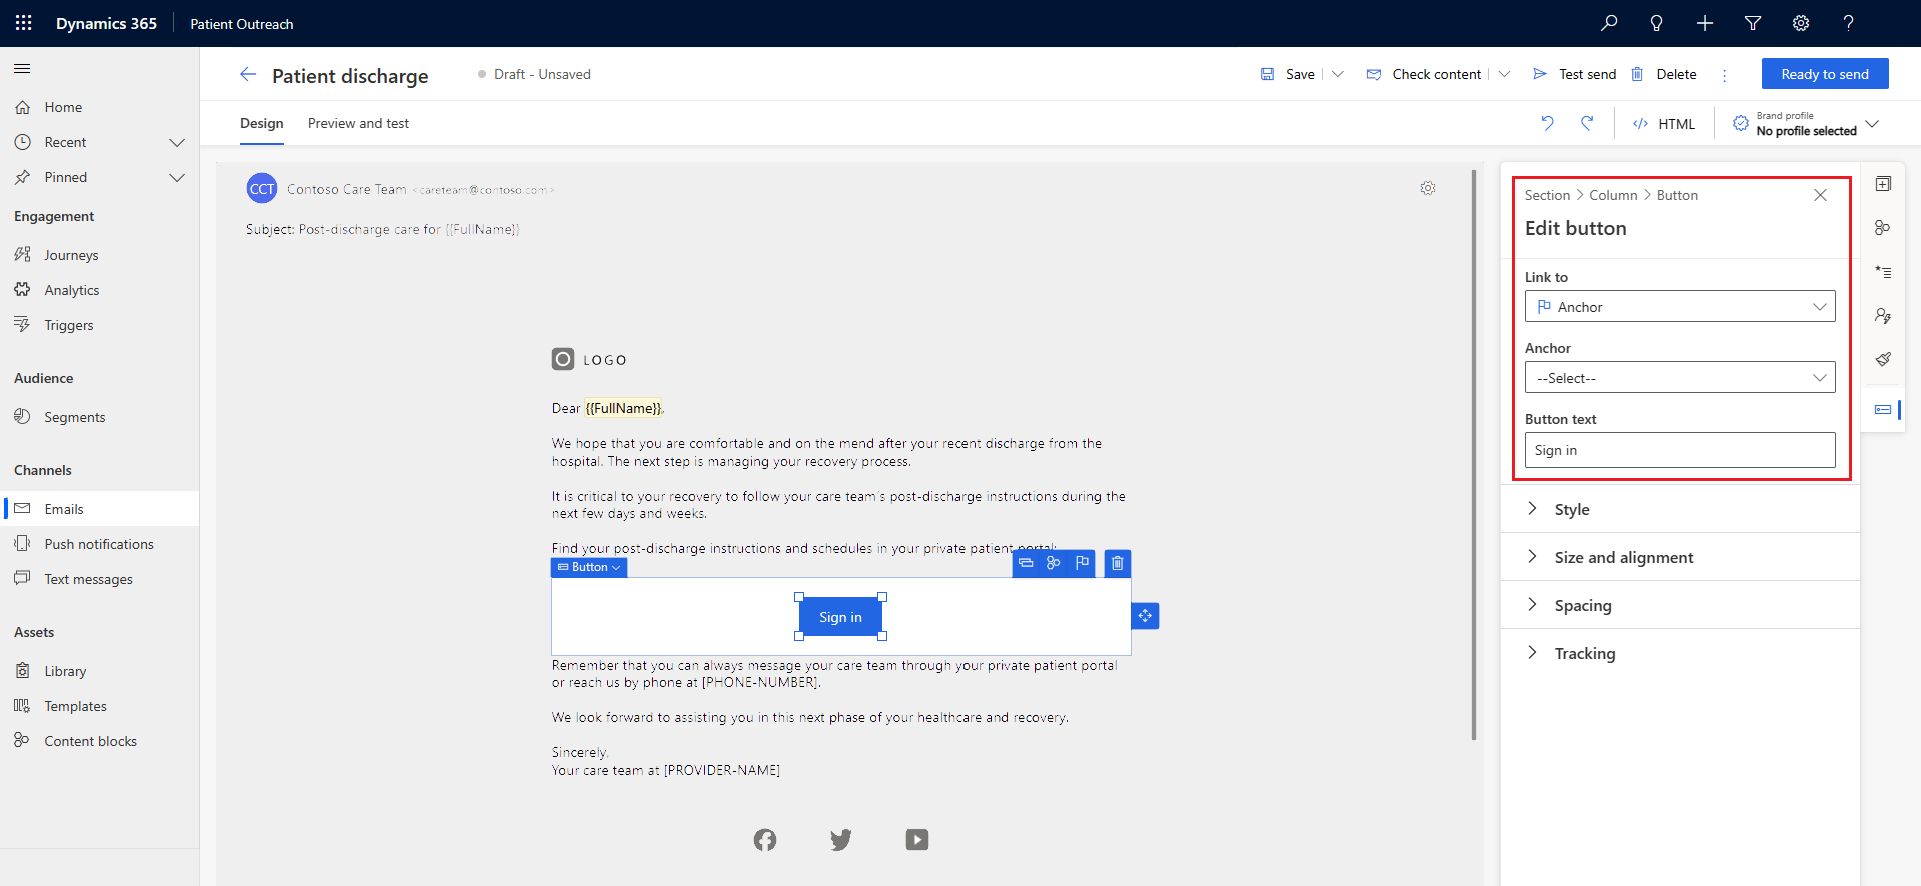
Select the Patient discharge email.
Select the Settings icon on the sidebar and update the email header fields.
Replace all the placeholder content with appropriate details.
Select the Sign in button to update the URL to point to your Patient access portal sign-in page.
Select Save, and mark the email ready to send.

Set up text messages
On the Patient outreach app, select the Text messages page to set up text messages for the following samples:
- Care plan goal overdue
- Patient discharge
To add the sender phone number, follow the instructions in Create outbound text messages.
Set up journeys
When you finish publishing the triggers, segments, emails, and text messages, navigate to the Journeys page on the Patient outreach app to set up the following sample journeys:
| Journey | Configuration |
|---|---|
| Patient is checked in | Select the Patient is checked in journey, and publish it. |
| Teams message for overdue care plan goal | 1. Select the Teams message for overdue care plan goal journey. 2. Switch to editing the Entry properties of the journey in the right-side panel. 3. Select the desired audience and frequency. 4. Set the End property in the Schedule section. 5. Publish the journey. |
| Initial pregnancy appointment | 1. Select the Initial pregnancy appointment journey. 2. Select the Schedule task step, and update the Task description and Task subject values. These values help the task assignee understand what task to accomplish. 3. Publish the journey. |
| Pregnancy appointment and education | 1. Select the Pregnancy appointment and education journey. 2. Select the Schedule task steps, and update the Task description and Task subject values. 3. Publish the journey. |
| Annual diabetes eye exam | 1. Select the Annual diabetes eye exam journey. 2. Switch to editing the Entry properties of the journey in the right-side panel. 3. Select the desired frequency. 4. Set the End property in the Schedule section. 5. Select the Schedule task step, and update the Task description and Task subject values. 6. Publish the journey. |
| Diabetes eye exam follow-up scheduling | 1. Select the Diabetes eye exam follow-up scheduling journey. 2. Select the Schedule task steps, and update the Task description and Task subject values. 3. Publish the journey. |
| Care plan goal overdue | 1. Select the Care plan goal overdue journey. 2. Switch to editing the Entry properties of the journey in the right-side panel. 3. Select the desired frequency. 4. Set the End property in the Schedule section. 5. Publish the journey. |
| Patient discharge | Select the Patient discharge journey, and publish it. |
Set up connection references
A connection reference is a Power Apps solution component that contains information about a connector. For more information, see Use a connection reference in a solution.
To set up the connection references for patient journeys,
Open your environment in the Power Apps Maker Portal.
Under the Dataverse panel, select Connections, and then select + New connection.
Create two connections - Microsoft Dataverse and Microsoft Teams.
Go to Solutions, and open the Patient outreach solution.
Select Connection references in the Objects side panel.
Select the Microsoft Dataverse connection reference, and then select the Microsoft Dataverse connection you created in step 3 in the connection dropdown.
Save the connection reference.
Select the Microsoft Teams connection reference, and then select the Microsoft Teams connection you created in step 3 in the connection dropdown.
Save the connection reference.
Set up Power Automate flows
Power Automate cloud flows enable flow creation when you want to trigger your automation automatically, instantly, or via a schedule. On the Power Apps Maker Portal, go to Solutions, select the Patient outreach solution, and then select the Cloud flows page to set up the following sample flows:
| Cloud flow | Associated journey(s) |
|---|---|
| Notify of overdue care plan goal | Teams message for overdue care plan goal |
| Notify practitioner of patient check-in | Patient is checked in |
| Create task to call patient | Patient discharge, Care plan goal overdue |
| Send a message through Patient Portal | Patient discharge, Care plan goal overdue |
| Appointment scheduling task | Initial pregnancy appointment, Annual diabetes eye exam |
| Check for tomorrow’s pregnancy appointment and completion | Pregnancy appointment and education |
| Activate pregnancy appointment tomorrow and completed trigger | Pregnancy appointment and education |
| Check for tomorrow’s diabetes eye exam and completion | Diabetes eye exam follow-up scheduling |
| Activate diabetes appointment tomorrow and completed trigger | Diabetes eye exam follow-up scheduling |
Select the required flow, and turn it on using the Turn on button.
Most of these cloud flows are ready to go after you turn them on. However, certain flows such as Activate pregnancy appointment tomorrow and completed trigger and Activate diabetes appointment tomorrow and completed trigger require extra setup steps and customization as per the journey. To set up these flows, refer to the following examples.
Example 1: Activate pregnancy appointment tomorrow and completed trigger
Select the Activate pregnancy appointment tomorrow and completed trigger flow.
On the flows page, select Edit.
Expand the Get all the appointment information step.
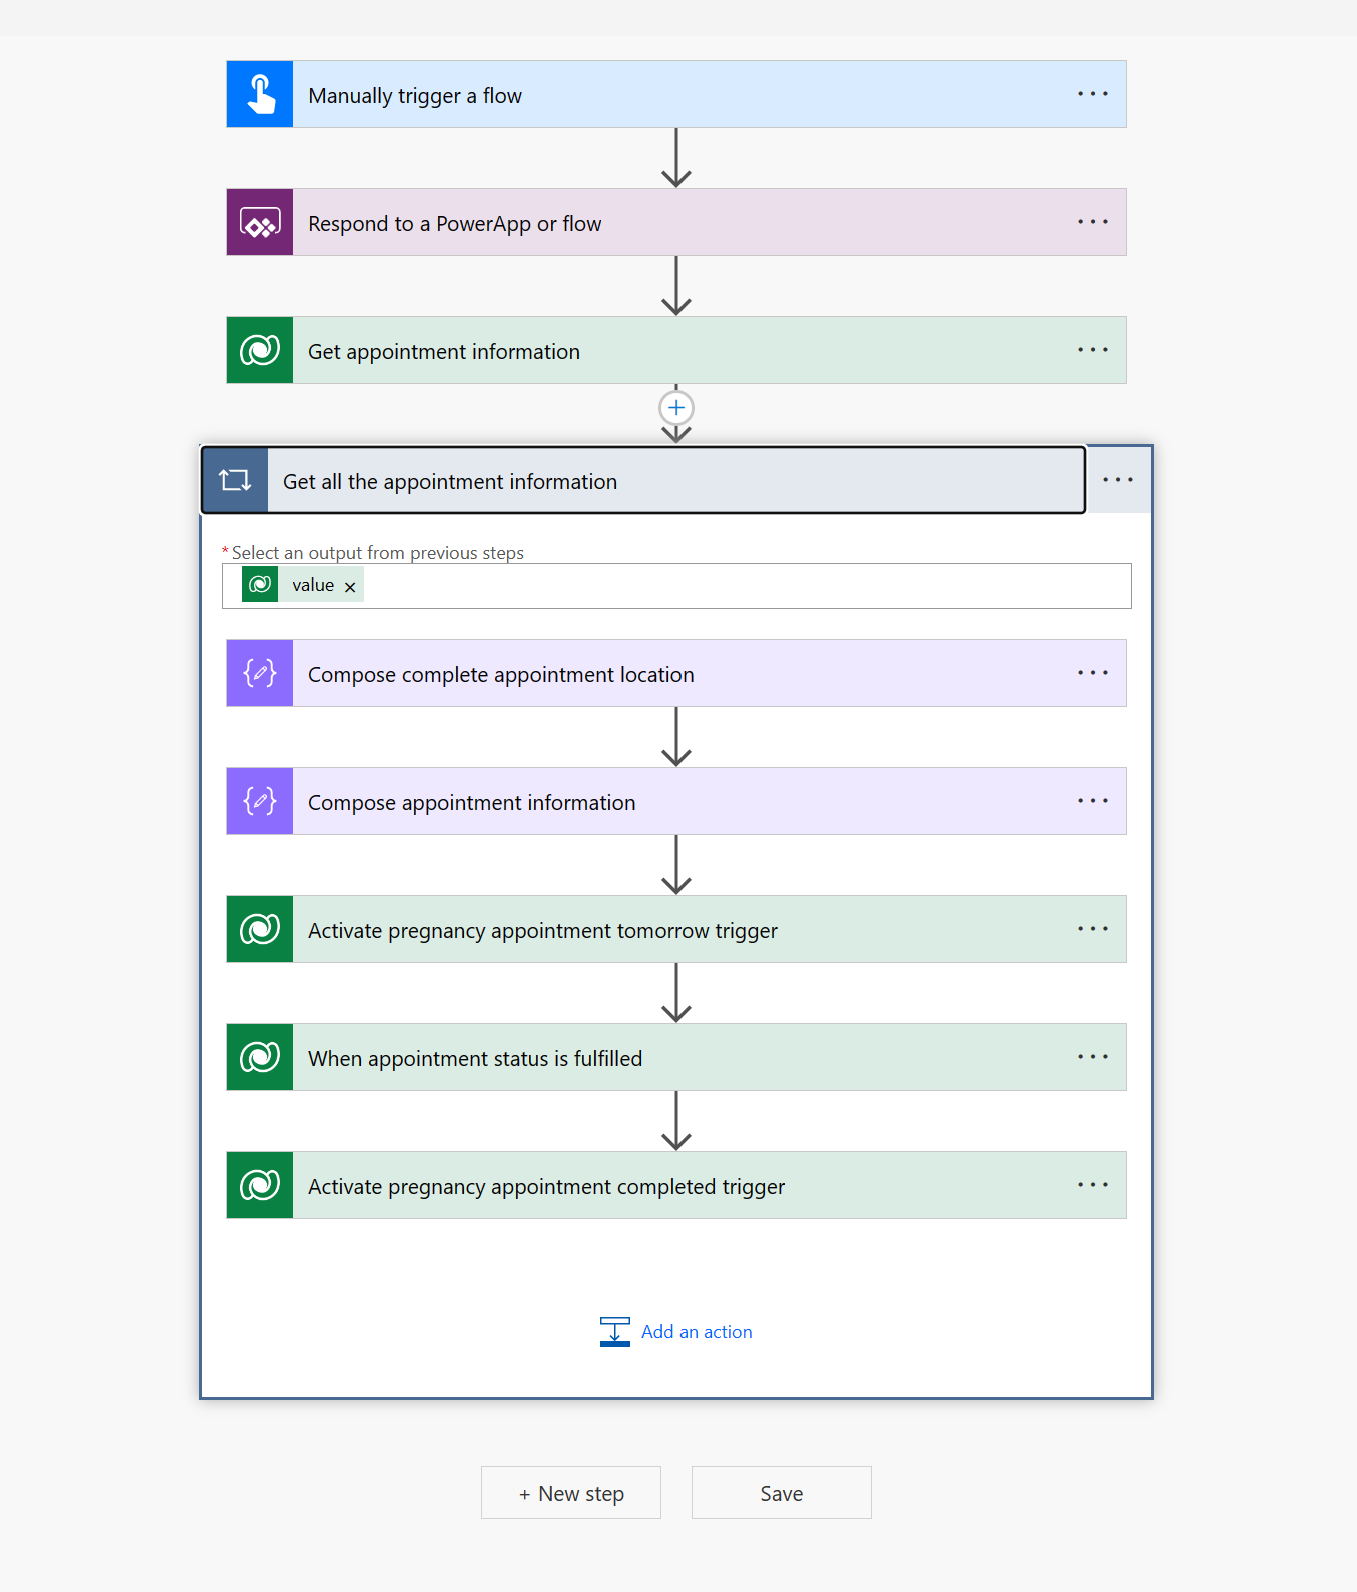
Expand the Activate pregnancy appointment tomorrow trigger step and paste the following values for the variables:
Variable name Description Value msdynmkt_appointmentdate The date of the appointment @{items('Get_all_the_appointment_information')?['msemr_starttime']} msdynmkt_appointmentlocation The location of the appointment @{outputs('_Compose_appointment_information')['Appointment location']} msdynmkt_businessphonenumber The business phone number of the healthcare provider @{outputs('_Compose_appointment_information')['Business phone number']} msdynmkt_healthcareprovider The name of the healthcare provider @{outputs('_Compose_appointment_information')['Health care provider']} msdynmkt_signalingestiontimestamp Timestamp of when the event to activate the trigger is ingested @{utcNow()} msdynmkt_signaltimestamp Time stamp of when the event was sent to the client to activate the trigger @{utcNow()} msdynmkt_signaluserauthid Contact or Patient ID @{items('Get_all_the_appointment_information')?['_msemr_actorpatient_value']} msdynmkt_profileid Contact or Patient ID @{items('Get_all_the_appointment_information')?['_msemr_actorpatient_value']} msdynmkt_bindingid An ID that uniquely identifies the instance of the journey msemr_appointmentemr
or
@{items('Get_all_the_appointment_information')?['activityid']}Expand the Activate pregnancy appointment completed trigger step and paste the following variable values:
Variable name Description Value msdynmkt_signalingestiontimestamp Timestamp of when the event to activate the trigger is ingested @{utcNow()} msdynmkt_signaltimestamp Time stamp of when the event was sent to the client to activate the trigger @{utcNow()} msdynmkt_signaluserauthid Contact or Patient ID @{items('Get_all_the_appointment_information')?['_msemr_actorpatient_value']} msdynmkt_profileid Contact or Patient ID @{items('Get_all_the_appointment_information')?['_msemr_actorpatient_value']} msdynmkt_bindingid An ID that uniquely identifies the instance of the journey msemr_appointmentemr
or
@{items('Get_all_the_appointment_information')?['activityid']}Turn on the flow.

Example 2: Activate diabetes appointment tomorrow and completed trigger
Select the Activate diabetes appointment tomorrow and completed trigger flow.
On the flows page, select Edit.
Expand the Get all the appointment information step.
Expand the Activate diabetes appointment tomorrow trigger step and paste the following values for the variables:
Variable name Description Value msdynmkt_appointmentdate The date of the appointment @{items('Get_all_the_appointment_information')?['msemr_starttime']} msdynmkt_appointmentlocation The location of the appointment @{outputs('_Compose_appointment_information')['Appointment location']} msdynmkt_businessphonenumber The business phone number of the healthcare provider @{outputs('_Compose_appointment_information')['Business phone number']} msdynmkt_healthcareprovider The name of the healthcare provider @{outputs('_Compose_appointment_information')['Health care provider']} msdynmkt_signalingestiontimestamp Timestamp of when the event to activate the trigger is ingested @{utcNow()} msdynmkt_signaltimestamp Time stamp of when the event was sent to the client to activate the trigger @{utcNow()} msdynmkt_signaluserauthid Contact or Patient ID @{items('Get_all_the_appointment_information')?['_msemr_actorpatient_value']} msdynmkt_profileid Contact or Patient ID @{items('Get_all_the_appointment_information')?['_msemr_actorpatient_value']} msdynmkt_bindingid An ID that uniquely identifies the instance of the journey msemr_appointmentemr
or
@{items('Get_all_the_appointment_information')?['activityid']}Expand the Activate diabetes appointment completed trigger step and paste the following variable values:
Variable name Description Value msdynmkt_signalingestiontimestamp Timestamp of when the event to activate the trigger is ingested @{utcNow()} msdynmkt_signaltimestamp Time stamp of when the event was sent to the client to activate the trigger @{utcNow()} msdynmkt_signaluserauthid Contact or Patient ID @{items('Get_all_the_appointment_information')?['_msemr_actorpatient_value']} msdynmkt_profileid Contact or Patient ID @{items('Get_all_the_appointment_information')?['_msemr_actorpatient_value']} msdynmkt_bindingid An ID that uniquely identifies the instance of the journey msemr_appointmentemr
or
@{items('Get_all_the_appointment_information')?['activityid']}Turn on the flow.
Configure patient journeys with virtual health data tables
The patient journey with virtual health data tables feature includes the addition of trigger-based journeys, where journeys can be initiated based on conditions and real-world interactions. The feature also includes designing real-time journeys using Microsoft Cloud for Healthcare Virtual health data table custom triggers. It enables you to connect with patients without the need to bring the entire health data into Dataverse. The capability also offers flexibility in journey design as you can enable trigger-based journeys based on select virtual tables using Azure FHIR servers.
This section explains how you can configure the virtual table custom trigger settings. For more information about how to use this feature, see Patient journeys with virtual health data tables.
Configure virtual table custom triggers
The latest release includes settings to enable real-time journeys and custom triggers with entity references on the following virtual health data tables:
- Allergy/Sensitivity (msemr_ve_allergyintolerance)
- Encounter (msemr_ve_encounter)
- Episode of care (msemr_ve_episodeofcare)
- Observation (msemr_ve_observation)
The following table describes the configuration settings for each virtual table enabled for custom triggers:
| Setting | Description |
|---|---|
| msemr_virtualtable | Name of the virtual table targeted in the event |
| msemr_virtualtableidfield | Column name for the unique identifier of the virtual table |
| msemr_contactidfield | Column name for the patient's unique identifier associated with the virtual table |
| msemr_customtrigger | The unique name of the custom trigger that is called from the virtual table event handler |
| msemr_status | Indicates if the configuration is enabled or disabled. Expected values are 0 (disabled) and 1 (enabled). |
These settings are represented in a JSON string that is stored in the Virtual table - custom trigger setting environment variable. The default value of the environment variable is set to:
{
    "msemr_virtualtablecustomtriggermappings": [
        {
            "msemr_virtualtable": "msemr_ve_allergyintolerance",
            "msemr_virtualtableidfield": "msemr_ve_allergyintoleranceid",
            "msemr_contactidfield": "msemr_patient",
            "msemr_customtrigger": "msdynmkt_allergysensitivity_virtualentity",
            "msemr_status": 1
        },
        {
            "msemr_virtualtable": "msemr_ve_encounter",
            "msemr_virtualtableidfield": "msemr_ve_encounterid",
            "msemr_contactidfield": "msemr_encounterpatientidentifier",
            "msemr_customtrigger": "msdynmkt_encounter_virtualentity",
            "msemr_status": 1
        },
        {
            "msemr_virtualtable": "msemr_ve_episodeofcare",
            "msemr_virtualtableidfield": "msemr_ve_episodeofcareid",
            "msemr_contactidfield": "msemr_patient",
            "msemr_customtrigger": "msdynmkt_episodeofcare_virtualentity",
            "msemr_status": 1
        },
        {
            "msemr_virtualtable": "msemr_ve_observation",
            "msemr_virtualtableidfield": "msemr_ve_observationid",
            "msemr_contactidfield": "msemr_subjecttypepatient",
            "msemr_customtrigger": "msdynmkt_observation_virtualentity",
            "msemr_status": 1
        }
    ]
}
You can override these default settings by customizing the environment value and setting the Current Value with the updated JSON configuration using the following steps:
Sign in to Power Apps
In the Solutions area, open the unmanaged solution you're using for development.
Select Add existing, select More, and then select Environment variable.
Select the Virtual table - custom trigger settings environment variable.
After you add the environment variable to the solution, select it to edit the value.
In the editing pane, select + New value under the Current Value property of the variable and paste your new JSON configuration.
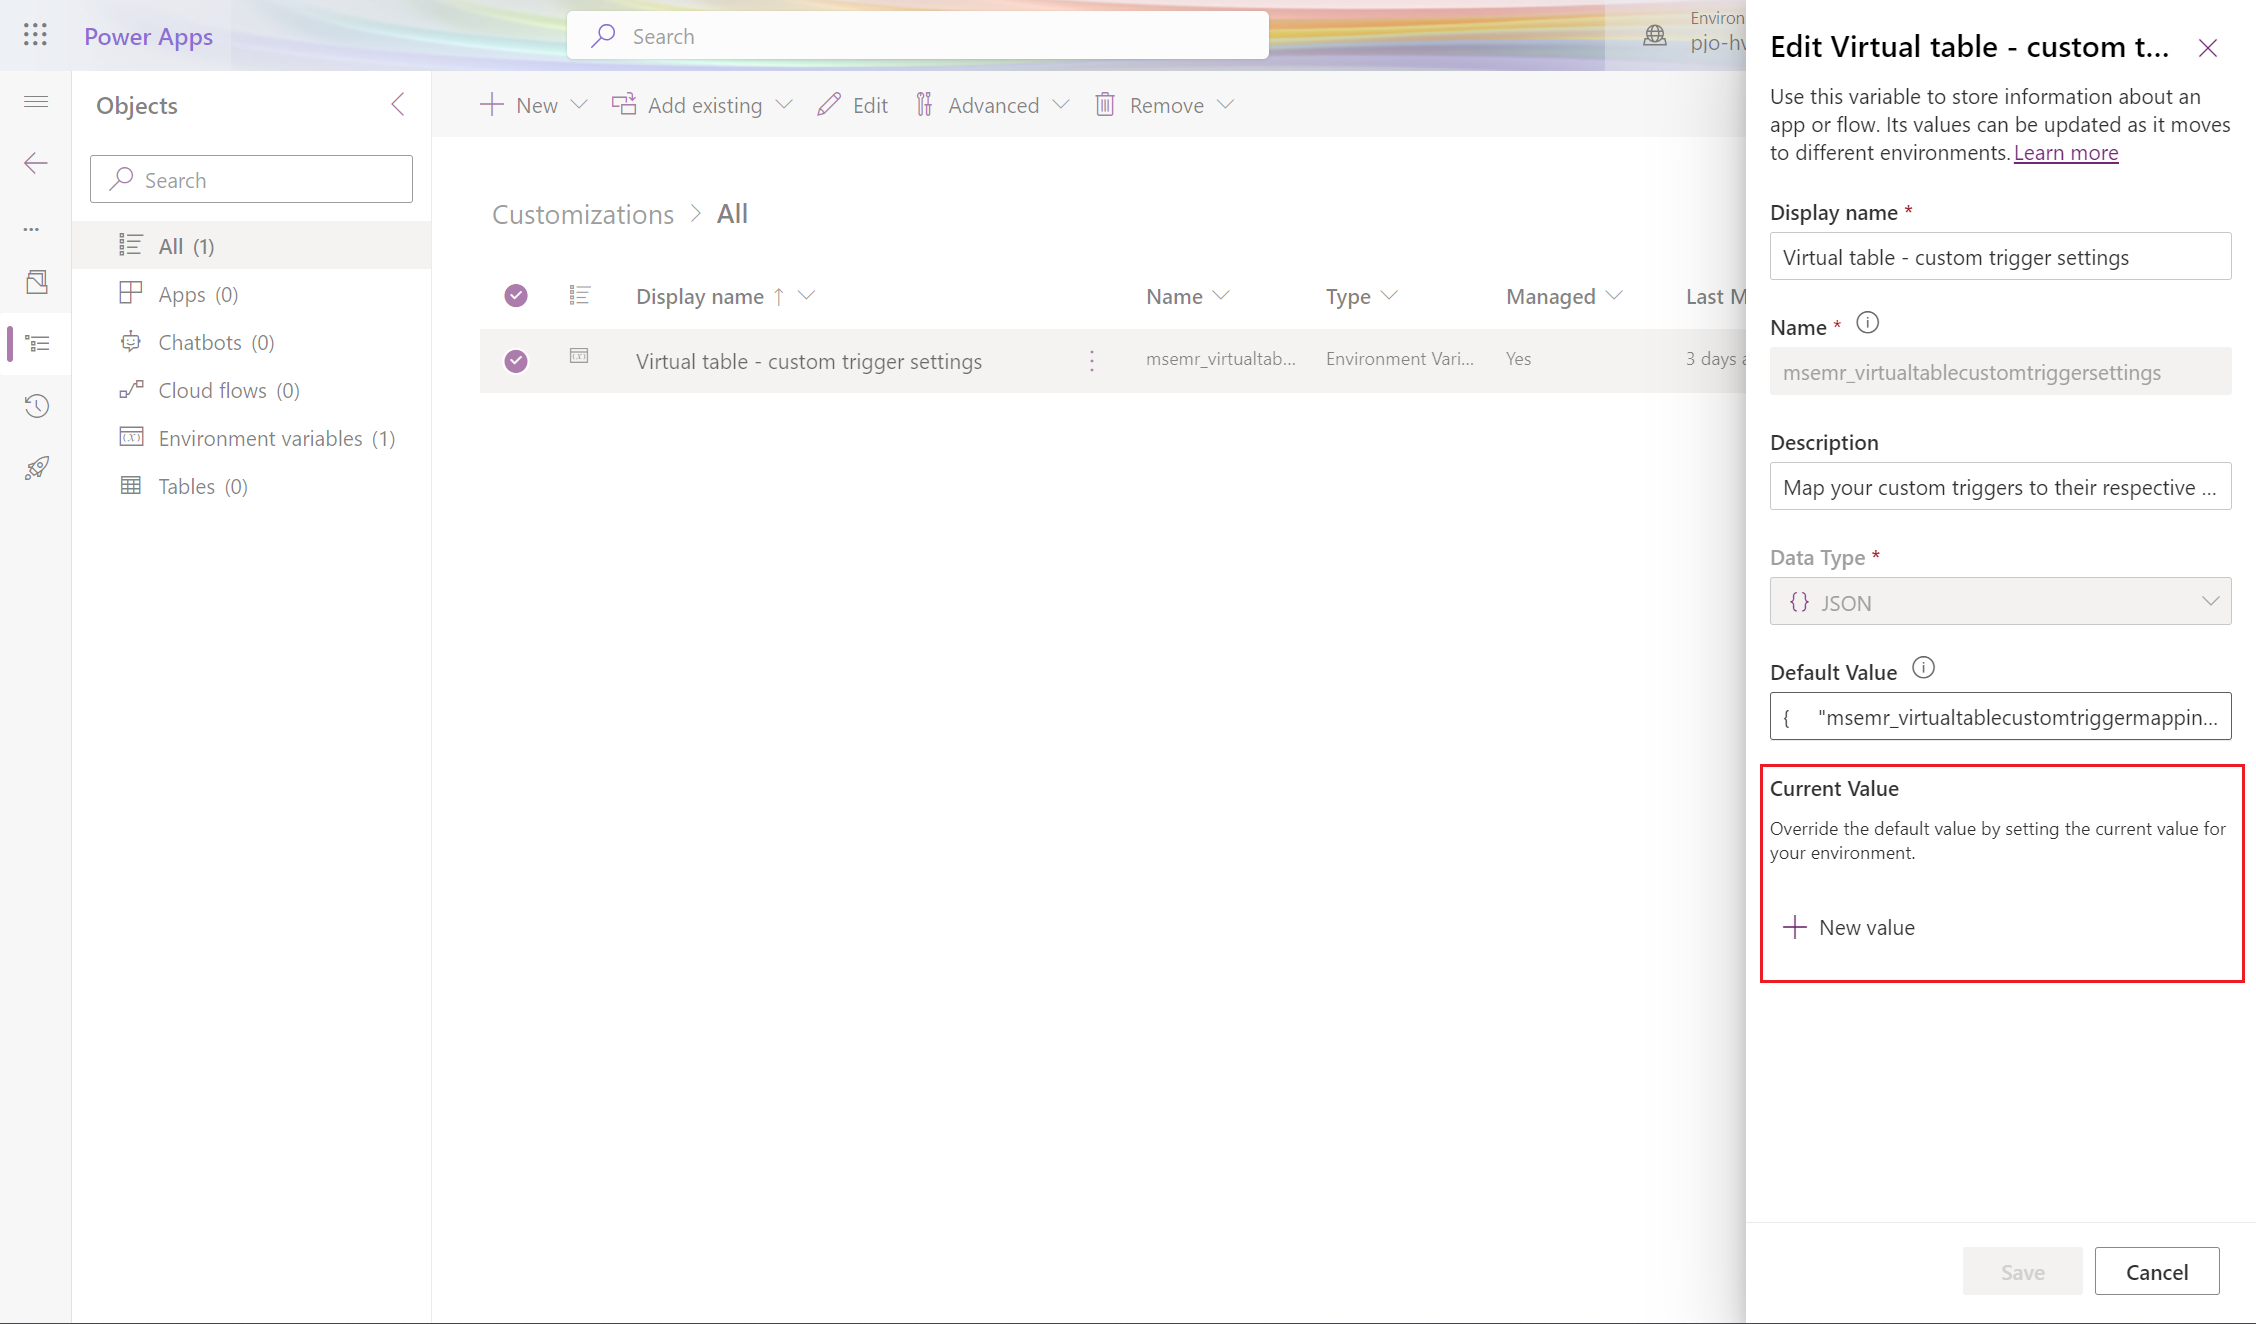
Save the updated variable.

Activate triggers
After you configure the trigger settings, select the Ready to use button to activate the custom trigger and consume it in journeys.
Before you use any trigger in a journey, ensure that the trigger status is set to Ready to use.
Note
After a trigger is live, any new updates to the trigger definition won't be applied to the trigger.
See also
What is Microsoft Cloud for Healthcare?
Real-time journeys user guide
Patient outreach: Reach out to patients for personalized care
Use patient journeys