Note
Access to this page requires authorization. You can try signing in or changing directories.
Access to this page requires authorization. You can try changing directories.
Tip
Dynamics 365 Remote Assist customers now have access to Remote Assist in Microsoft Teams mobile. Learn more: Collaborate with other users and Use spatial annotations on Teams.
Once a video call connects, the Microsoft Teams user sees everything the HoloLens user sees in their space – including holograms.
Annotations are useful for pointing out different parts of your space, including parts that might be difficult or dangerous to reach. All call participants can see each others’ additions, and can make annotations of their own. Once an annotation is placed, it remains anchored in your space until the person who placed the annotation deletes it. Adding annotations to files works the same way.
The gestures for adding arrows or drawing are the same for HoloLens and HoloLens 2.
Note
Multiple Teams users (desktop or mobile) can join a Dynamics 365 Remote Assist call and can add annotations.
The following combinations are supported:
- One-to-one call with one Dynamics 365 Remote Assist HoloLens user and one Teams desktop or mobile user
- Group call with one or more Dynamics 365 Remote Assist HoloLens users and one or more Teams desktop or mobile users
- Meetings with one or more Dynamics 365 Remote Assist HoloLens users and one or more Teams desktop or mobile users
Add an arrow
Select the Arrow tool (
 ).
).To position the arrow in space:
If you're using HoloLens, use your gaze cursor to position the arrow. You see a ghost arrow on your gaze cursor.
If you're using HoloLens 2, use your hand ray to position the arrow. You see a ghost arrow at the end of your hand ray.
Note
If hand rays are turned off in the HoloLens app, they're automatically turned back on again when you select the Arrow tool.
To control the direction of the arrow, air tap, hold, and move your hand in a circle until the ghost arrow appears at the desired direction. Release the air tap to place the arrow.
Once you place the arrow, you can't adjust its location or direction. To redo, select Undo, and then place the arrow again.
Tip
To use voice commands, select the arrow tool by saying "Remote Assist, Arrow." Then say "Remote Assist, Place arrow". You can't use voice commands to rotate the arrow before placing it. To redo, say "Remote Assist, Undo", and then place the arrow again.
The above video shows how to place an arrow using HoloLens gestures. If you’re using HoloLens 2, remember that you can select the Arrow tool by touching it directly, and position the arrow in space by using your hand ray.
Draw in your space
Select the Ink tool (
 ).
).To determine where to start drawing:
If you're using HoloLens, use your gaze cursor.
If you're using HoloLens 2, use your hand ray.
Note
If hand rays are turned off in the HoloLens app, they're automatically turned back on again when you select the Ink tool.
Air tap, keep your index finger and thumb together, and start drawing in space. Release the air tap to stop drawing.
Tip
To use voice commands, select the Ink tool by saying "Remote Assist, Ink." Then say "Remote Assist, Start inking" and "Remote Assist, Stop inking" to start and stop inking with your head gaze.
The above video shows how to draw using HoloLens gestures. If you’re using HoloLens 2, remember that you can select the Ink tool by touching it directly, and you can use your hand rays to determine where to start your drawing.
Change arrow or ink color
Select Colors  (or say "Remote Assist, Colors"), and then select the color you want (or say “Remote Assist, <color>”, for example, say "Remote Assist, Red"). The next annotation you place will be that color.
Erase annotations
To erase all the arrows and ink you add during a video call, select Erase all ( ) at the top of the call window (or say "Erase all").
To undo your most recent action, including Erase All, select Undo  at the top of the call window (or say "Undo").
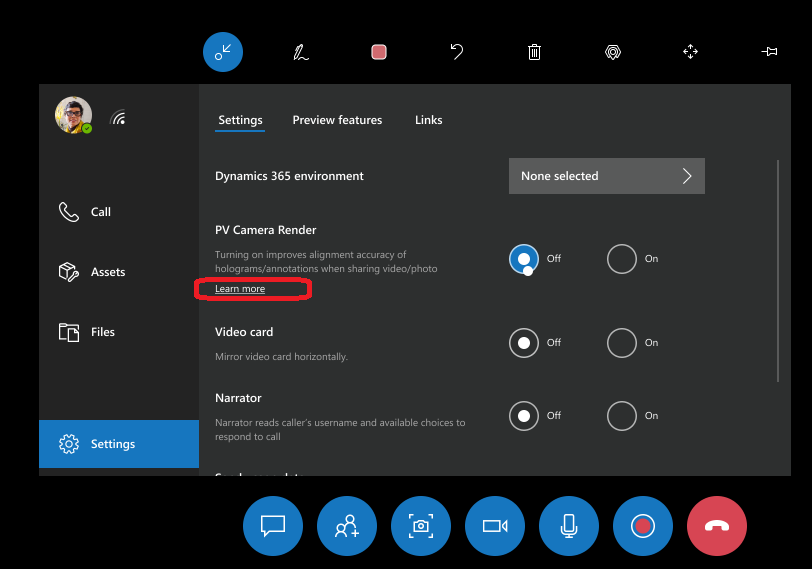
PV camera render
Enabling the PV Camera Render setting improves the alignment accuracy of annotations as seen by Microsoft Teams users. This rendering ensures that annotations placed by the HoloLens 2 Remote Assist user are represented accurately in their environment for the remote expert. When this setting is turned off, annotations placed by the HoloLens 2 user might appear slightly out of place to the Microsoft Teams user.
 .
.
To accommodate the extra system resources required for utilizing the PV camera render, turning on the PV Camera Render setting limits the maximum outgoing video resolution of the HoloLens 2p to 720p. Turning off the PV Camera Render setting increases the maximum outgoing video resolution to 1080p.