Note
Access to this page requires authorization. You can try signing in or changing directories.
Access to this page requires authorization. You can try changing directories.
[This article is prerelease documentation and is subject to change.]
As an admin, you need to set up the Sales Qualification Agent before your sellers can use it for lead research, ideal customer profile (ICP) fit assessment, and initial email outreach. This article discusses how to configure the details about your company and products you sell, your ideal customer profile, and other settings to help the agent align with your company's sales strategy and goals.
Important
- This is a preview feature.
- Preview features aren’t meant for production use and might have restricted functionality. These features are subject to supplemental terms of use, and are available before an official release so that customers can get early access and provide feedback.
Prerequisites
Ensure that the following prerequisites are met:
Your tenant admin has granted consent for the agent to use Bing search and Copilot Studio and assigned sufficient capacity to run the agent. Consent settings are available in the General Settings > Copilot > Agents (Preview) page in the Sales Hub app settings.
The agent uses the same capacity as other Copilot features in Copilot Studio. Learn more in Manage Copilot Studio messages and capacity.
You have admin permissions in Dynamics 365 Sales.
You have a Copilot Studio license. Learn more in Copilot Studio licensing.
You turned on the modern UI for the Sales Hub app. Learn more in Enabling the modern look for my app and removing the toggle.
You modified Data Loss Prevention (DLP) policies to allow external connections. Learn more in Configure data loss prevention policies for agents.
You configured server-side synchronization by integrating Dynamics 365 with Exchange. Learn more in Set up email by integrating with Exchange. If server-side synchronization isn't set up, the agent doesn't generate outreach emails.
(Optional but recommended) You turned on Copilot in Dynamics 365 Sales to allow your sellers to get a 360-degree view of the lead and their company. Learn more in Turn on and set up Copilot in Dynamics 365 Sales and Get information from Copilot.
Before you begin
Determine the products that you want the Sales Qualification Agent to help with and the ideal customer profile (ICP) for those products.. The products should be handled by a single sales team and have a similar ideal customer profile. If your company sells multiple products through different sales teams, pick one product line.
Create a custom security role and grant permissions
To ensure accurate insights and optimal capacity usage, create a security role—or use an existing one—that includes only the sellers who are responsible for the products you're configuring the agent for. Learn more in Create or edit a security role to manage access.
Important
- Avoid assigning security roles that include sellers who handle other products. It might lead to incorrect insights and unnecessary consumption of Copilot Studio capacity.
- Ensure that the sellers are also assigned the Salesperson security role. Otherwise, they won't be able to see the lead insights generated by the agent.
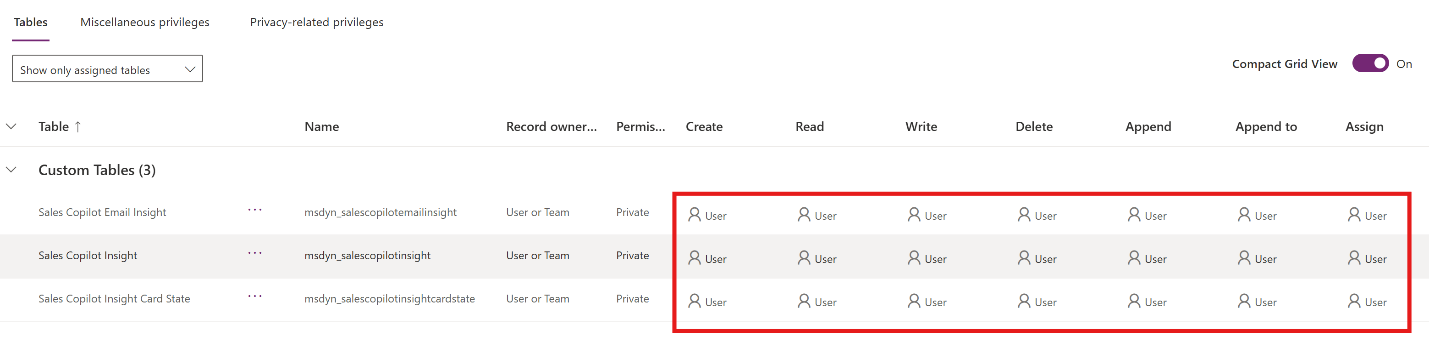
Grant User-level permissions for read, write, create, append, append to, and assign to the following entities:
- Sales Copilot Email Insight
- Sales Copilot Insight
- Sales Copilot Insight Card State
Set up and activate the agent
In the Sales Hub app, go to Change area in the lower-left corner of the page and select App Settings.
Go to General Settings > Copilot > Agents (preview).
If the Before you get started section appears on the Agents page, it means that the required consents and capacity aren't configured. A tenant admin needs to complete the prerequisites before you can set up the agent.
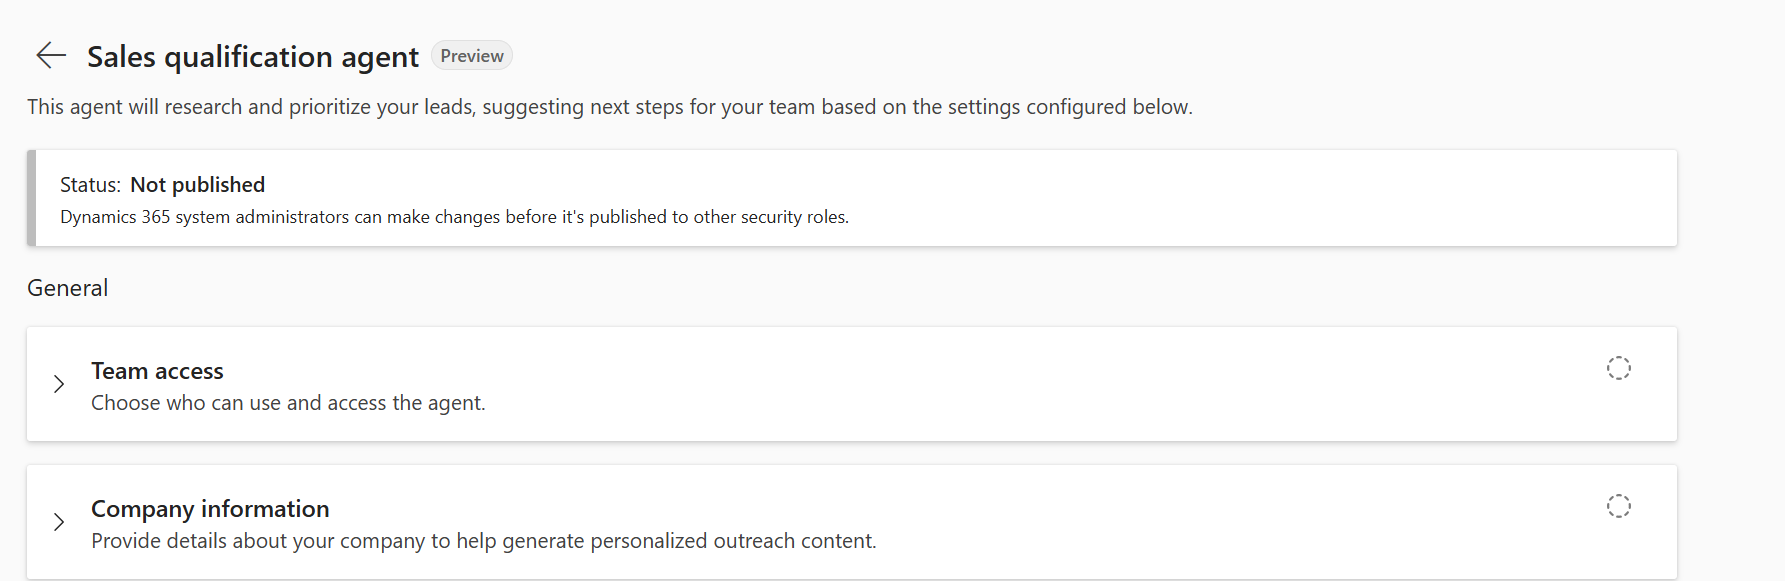
In the General section, enter details about your company, products you sell, and who should have access to the agent. The following table describes the fields you need to fill out and provides example input.
Field Input Example input Team access Select the seller security role that you created or identified earlier. Also select the system administrator role if the admin needs to view the agent's insights. ContosoSalesTeam, System Administrator Company info Enter your company's name and website URL. Contoso Ltd.; https://www.contoso.comValue proposition of your offering Describe the products or product line that the sellers in the Team access list handle, in natural language. A cloud-based CRM solution that helps businesses streamline sales processes, improve customer relationships, and drive revenue growth. Our platform includes features such as lead management, opportunity tracking, email integration, and analytics. In the Research section, review the resources that the agent uses to gather information about leads. The following sources are set for you and can't be edited:
- Default basic research: Includes insights gathered from Copilot summaries, who knows whom, related opportunities, and so on.
- Default web research: Includes insights from predefined web resources to gather authentic information about the company's business, finances, and news.
To help the agent identify leads that are a good fit for further engagement, in the Qualification section, define your Ideal customer profile.
Enter or select the criteria that describe your target customer, including industries, company size, customer location, and job titles.
Under Where to find these criteria in Dataverse, verify the prepopulated fields from out-of-the-box Dataverse tables that the agent should look at to compare the criteria.
Tip
If you're just testing the agent, you can create a simple ideal customer profile that includes only a few criteria, such as industry and job title. This will make it easier to create leads that match the profile and validate the agent's functionality. For example, you can set the industry to "Technology" and the job title to "Manager". After this succeeds, you can gradually add more criteria that are relevant to your business.
If you want to use custom fields or tables, add custom criteria to your ideal customer profile.

Review the settings to make sure that they align with your company's sales strategy and goals.
Select Activate.
The status changes to Active. The agent starts processing the last 100 leads, starting with the most recently created ones. You can now test the agent to ensure it's working as expected. Learn more in Test the Sales Qualification Agent.
The agent uses the capacity assigned to your tenant to process leads and generate insights. If you don't have enough capacity to activate it, a banner appears at the top of the page. Select the Power Platform admin center link in the banner to add more capacity, or save the agent settings and come back later to activate it.
Add custom criteria to your ideal customer profile
Use custom criteria to define characteristics that are important for your ideal customer profile. You can map your criteria to custom fields in Dataverse or add public URLs that provide the relevant information. For example, you could add a custom criterion for "Environmental Sustainability Initiatives" and map it to a custom field in Dataverse or provide a URL that lists the company's key environmental initiatives.
On the Sales qualification agent settings page, scroll down to Qualification > Ideal customer profile.
Select Add custom criterion.
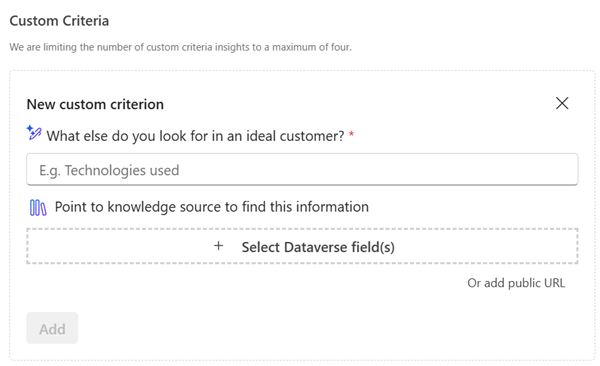
Enter the name of the custom criterion. For example, enter Environmental Sustainability Initiatives.
Tell the agent where to find the information to evaluate the custom criterion. You can choose one of the following options:
Select Select Dataverse field(s), and then select the field that you want to map to the custom criterion.
Select Or add public URL, and then enter the URL of the website that provides the information. Make sure that the website is publicly accessible and doesn't require authentication.
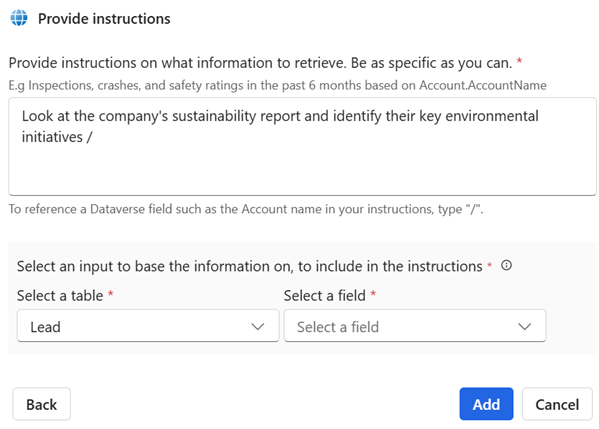
If you added a URL, provide instructions for the agent to extract the information you're looking for.
- Specify what information you want the agent to extract from the website.
- Select the Dataverse field that's most relevant to the information you want to extract by adding a forward slash (/).
For example, you could say, "Look at the company's sustainability report and identify their key environmental initiatives /". The forward slash opens a dropdown list of available fields in the Dataverse table. Select a table and field from the list. In this example, Lead > Company Name is selected. The instruction is now "Look at the company's sustainability report and identify their key environmental initiatives based on {{Lead.Company Name}}."
Select Add.
Enter a value for the newly added custom criterion. For example, if the company should have at least three major environmental initiatives, enter >=3.
View the agent's usage consumption
After the agent is published, you can start monitoring the capacity it consumes and how much capacity is left. Learn more in What activities consume Copilot Studio capacity? in the Sales Qualification Agent FAQ.
In the Sales Hub app Change area, select App Settings > Copilot > Agents (preview).

On the Copilot agents page, select View usage consumption. You're redirected to the Licensing page in the Power Platform admin center.
This option is available only after the agent is published.
on the Licensing page, under Products, select Copilot Studio.
The page displays usage consumption by product, agent, and environment.
Deactivate the agent
If you no longer want the Sales Qualification Agent to run in your environment or need to save capacity, you can deactivate it.
When the agent is deactivated, it doesn't process new leads or update existing lead insights. However, insights it already generated remain available.
- Open the Sales Qualification Agent settings page.
- Scroll down to the bottom of the page.
- Select Deactivate.
The agent's status changes to Deactivating until the process is complete. Once deactivated, the status changes to Inactive.