Clone and edit a sequence
If your organization changes its selling process, you might want to edit a sequence to reflect the changes. You can only edit a sequence that's in an inactive state, so you must deactivate or create a copy of it.
License and role requirements
| Requirement type | You must have |
|---|---|
| License | Dynamics 365 Sales Enterprise, Dynamics 365 Sales Premium, or Microsoft Relationship Sales More information: Dynamics 365 Sales pricing |
| Security roles | System Administrator or Sequence Manager More information: Predefined security roles for Sales |
Clone a sequence
Cloning a sequence makes it easier to add or remove steps, and save the changes to create new sequence. Also, cloning pulls down a full copy of the sequence data that you're cloning at that point in time, including all steps and configurations. After you make the changes, you can save and activate the cloned sequence and apply it to records.
Sign in to your sales app.
Go to Change area in the lower-left corner of the page and select Sales Insights settings.
Under Sales accelerator, select Sequence.
Open the sequence that you want to clone and select Create a copy.
Tip
Alternatively, hover over a sequence, and then select More options > Create a copy.

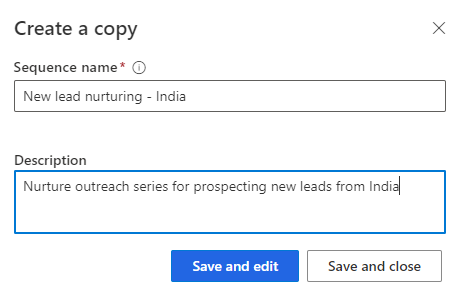
On the Create a copy dialog, enter the name of the sequence and description.

Select one of the buttons:
- Save and edit: Select this button to open the sequence editor and add steps as necessary. To edit a sequence, see Edit a sequence.
- Save and close: Select this button to save and create the sequence.
Edit a sequence
Sign in to your sales app.
Go to Change area in the lower-left corner of the page and select Sales Insights settings.
Under Sales accelerator, select Sequences.
On the Sequences page, select and open the sequence that you want to edit.
Note
If the sequence is Active state, you can one of the following actions to edit.
- Deactivate or create a copy
- Select Edit sequence. More information: Edit an active sequence and view version history
Do one of the following activities:
- To add an activity, perform step 7 from Create and activate a sequence.
- To edit an activity, select the activity and the details open in the right pane.
Make the edits you want, and then select Save.
(Optional) If you want the sequence to be available to connect with records, select Activate.
Save and exit the sequence designer.
Can't find the options in your app?
There are three possibilities:
- You don't have the necessary license or role.
- Your administrator hasn't turned on the feature.
- Your organization is using a custom app. Check with your administrator for exact steps. The steps described in this article are specific to the out-of-the-box Sales Hub and Sales Professional apps.
See also
Feedback
Coming soon: Throughout 2024 we will be phasing out GitHub Issues as the feedback mechanism for content and replacing it with a new feedback system. For more information see: https://aka.ms/ContentUserFeedback.
Submit and view feedback for