Note
Access to this page requires authorization. You can try signing in or changing directories.
Access to this page requires authorization. You can try changing directories.
Important
This topic is pre-release documentation and is subject to change.
The email validation feature in Dynamics 365 Sales helps validate the primary email address of contact and lead records. By default, this feature is enabled for the main lead and contact forms in the Sales Hub app. However, if you've customized the main lead form, you must manually enable email validation.
Note
These customizations can be applied only to main forms of the Contact and Lead tables.
Enable email validation
You can add the following customizations for email validation:
- To validate email addresses while an email is being composed, add an event handler to the OnLoad event. If an email address isn't valid, a validation message is displayed.
- To add an email validation icon to the email address field, add the email control to the custom form.
Add an event handler to the OnLoad event
Note
This example uses the Contact table. Use the same basic steps to add an event handler to the OnLoad event for the main lead form.
Sign in to the Power Apps portal.
Search for and select your organization's environment.
In the site map, select Tables, and then select the
Contacttable.In the Data experiences section, select Forms, and then select your custom contact form of the Main type.
In the Main form pane that opens on the right, select the Events tab.
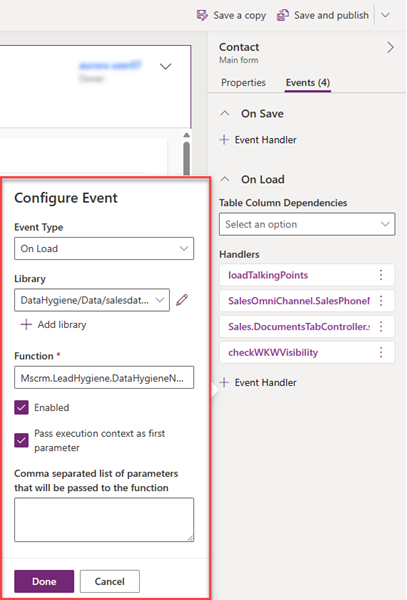
In the On Load section, select + Event Handler.
In the Configure Event dialog box, select + Add library.
Add the
DataHygiene/Data/salesdatahygiene_form_notification_library.jslibrary, and then select it in the list.In the Function field, enter Mscrm.LeadHygiene.DataHygieneNotificationLibrary.emailAddressValidationFormOnLoad.
Select the Pass execution context as first parameter checkbox.
Select Done.
Save and publish the form.
In the Handlers section, notice that the required event handler has been added to the form. Ensure that the email validation feature is enabled. Learn how to enable email validation.
Add the email control
You must add the email control only to the primary email address field.
Note
This example uses the Contact table. You can use the same steps to add the email control for the main lead form.
Open the contact form as described in the Add an event handler to the OnLoad event section.
In the New Contact form, in the Contact Information section, select Email.
On the Properties tab, in the Components section, select + Component.
In the Add component dialog box, add the ValidatedField_Control component, and then select it.
Select the options for web, mobile, and tablet, and then select Done.
Note
Verify that the Show component on options for Email address (default) are removed.
Save and publish the form.
The email control is added to the email address field. Ensure that the email validation feature is enabled. Learn how to enable email validation.
Can't find the feature in your app?
There are a few possibilities:
- You don't have the necessary license to use this feature. Check out the comparison table and the licensing guide to see which features are available with your license.
- You don't have the necessary security role to use this feature.
- To configure or setup a feature, you need to have the Administration and customization roles
- To use sales-related features, you need to have the Primary sales roles
- Some tasks require specific Functional roles.
- Your administrator hasn't turned on the feature.
- Your organization is using a custom app. Check with your administrator for exact steps. The steps described in this article are specific to the out-of-the-box Sales Hub and Sales Professional apps.