Note
Access to this page requires authorization. You can try signing in or changing directories.
Access to this page requires authorization. You can try changing directories.
The Microsoft platform for education simplifies the management of Windows devices with Intune and Microsoft 365 Education. The first, fundamental step, is to configure the identity infrastructure to manage user access and permissions for your school.
Microsoft Entra ID, which is included with the Microsoft 365 Education subscription, provides authentication and authorization to any Microsoft cloud services. Identity objects are defined in Microsoft Entra ID for human identities, like students and teachers, as well as non-human identities, like devices, services, and applications. With Microsoft 365 licenses, users can consume services and access resources within the tenant. With Microsoft 365 Education, you can manage identities for your teachers and students, assign licenses to devices and users, and create groups for the classrooms.
Create a Microsoft 365 tenant
If you don't already have a Microsoft 365 tenant, you need to create one.
For more information, see Create your Office 365 tenant.
Explore the Microsoft 365 admin center
The Microsoft 365 admin center is the hub for all administrative consoles for the Microsoft 365 cloud. To access the Microsoft 365 admin center, sign in with the same account when you created the Microsoft 365 tenant.
From the Microsoft 365 admin center, you can access different administrative dashboards: Microsoft Entra ID, Microsoft Intune, Intune for Education, and others:

For more information, see Overview of the Microsoft 365 admin center.
Note
Setting up your school's basic cloud infrastructure does not require you to complete the rest of the Microsoft 365 setup. For this reason, we will skip directly to adding students and teachers as users in the Microsoft 365 tenant.
Set up your domain
You can configure a custom domain so that you can create users and groups with an organization-specific email. For more information, use these links:
- Add a domain to Microsoft 365
- Set your default domain name under Settings > Domain names > custom domain
Add users, create groups, and assign licenses
With the Microsoft 365 tenant in place, it's time to add users, create groups, and assign licenses. All students and teachers need a user account before they can sign in and access the different Microsoft 365 services. There are multiple ways to do this, including using School Data Sync (SDS), synchronizing an on-premises Active Directory, manually, or both.
Note
Synchronizing your Student Information System (SIS) with School Data Sync is the preferred way to create students and teachers as users in a Microsoft 365 Education tenant. However, if you want to integrate an on-premises directory and synchronize accounts to the cloud, skip to Microsoft Entra Connect Sync.
School Data Sync
✅ Provision users and groups using your SIS data
School Data Sync (SDS) imports and synchronizes SIS data to create classes in Microsoft 365, such as Microsoft 365 groups and class teams in Microsoft Teams. SDS can be used to create new, cloud-only, identities or to evolve existing identities. Users evolve into students or teachers and are associated with a grade, school, and other education-specific attributes.
For more information, see Overview of School Data Sync.
Tip
To learn more and practice with School Data Sync, follow the Microsoft School Data Sync demo, which provides detailed steps to access, configure, and deploy School Data Sync in your Microsoft 365 Education tenant.
Note
You can perform a test deployment by cloning or downloading sample SDS CSV school data from the O365-EDU-Tools GitHub site.
Remember that you should typically deploy test SDS data (users, groups, and so on) in a separate test tenant, not your school production environment.
Microsoft Entra Connect Sync
✅ Configure sync between Active Directory and Microsoft Entra ID
To integrate an on-premises directory with Microsoft Entra ID, you can use Microsoft Entra Connect to synchronize users, groups, and other objects. Microsoft Entra Connect lets you configure the authentication method appropriate for your school, including:
For more information, see Set up directory synchronization for Microsoft 365.
Create users manually
✅ Create users one by one
In addition to the above methods, you can manually add users and groups, and assign licenses through the Microsoft 365 admin center.
There are two options for adding users manually, either individually or in bulk:
- To add students and teachers as users in Microsoft 365 Education individually:
- Sign in to the Microsoft Entra admin center.
- Select Microsoft Entra ID > Users > All users > New user > Create new user. For more information, see Add users and assign licenses at the same time.
- To add multiple users to Microsoft 365 Education:
- Sign in to the Microsoft Entra admin center.
- Select Microsoft Entra ID > Users > All users > Bulk operations > Bulk create.
For more information, see Add multiple users in the Microsoft 365 admin center.
Create groups
✅ Organize your users and devices
Creating groups is important to simplify multiple tasks, like assigning licenses, delegating administration, deploy settings, applications or to distribute assignments to students. To create groups:
- Sign in to the Microsoft Entra admin center.
- Select Microsoft Entra ID > Groups > All groups > New group.
- On the New group page, select Group type > Security.
- Provide a group name and add members, as needed.
- Select Next.
For more information, see Create a group in the Microsoft 365 admin center.
Assign licenses
✅ Assign licenses to users
The recommended way to assign licenses is through group-based licensing. With this method, Microsoft Entra ID ensures that licenses are assigned to all members of the group. Any new members who join the group are assigned the appropriate licenses, and when members leave, their licenses are removed.
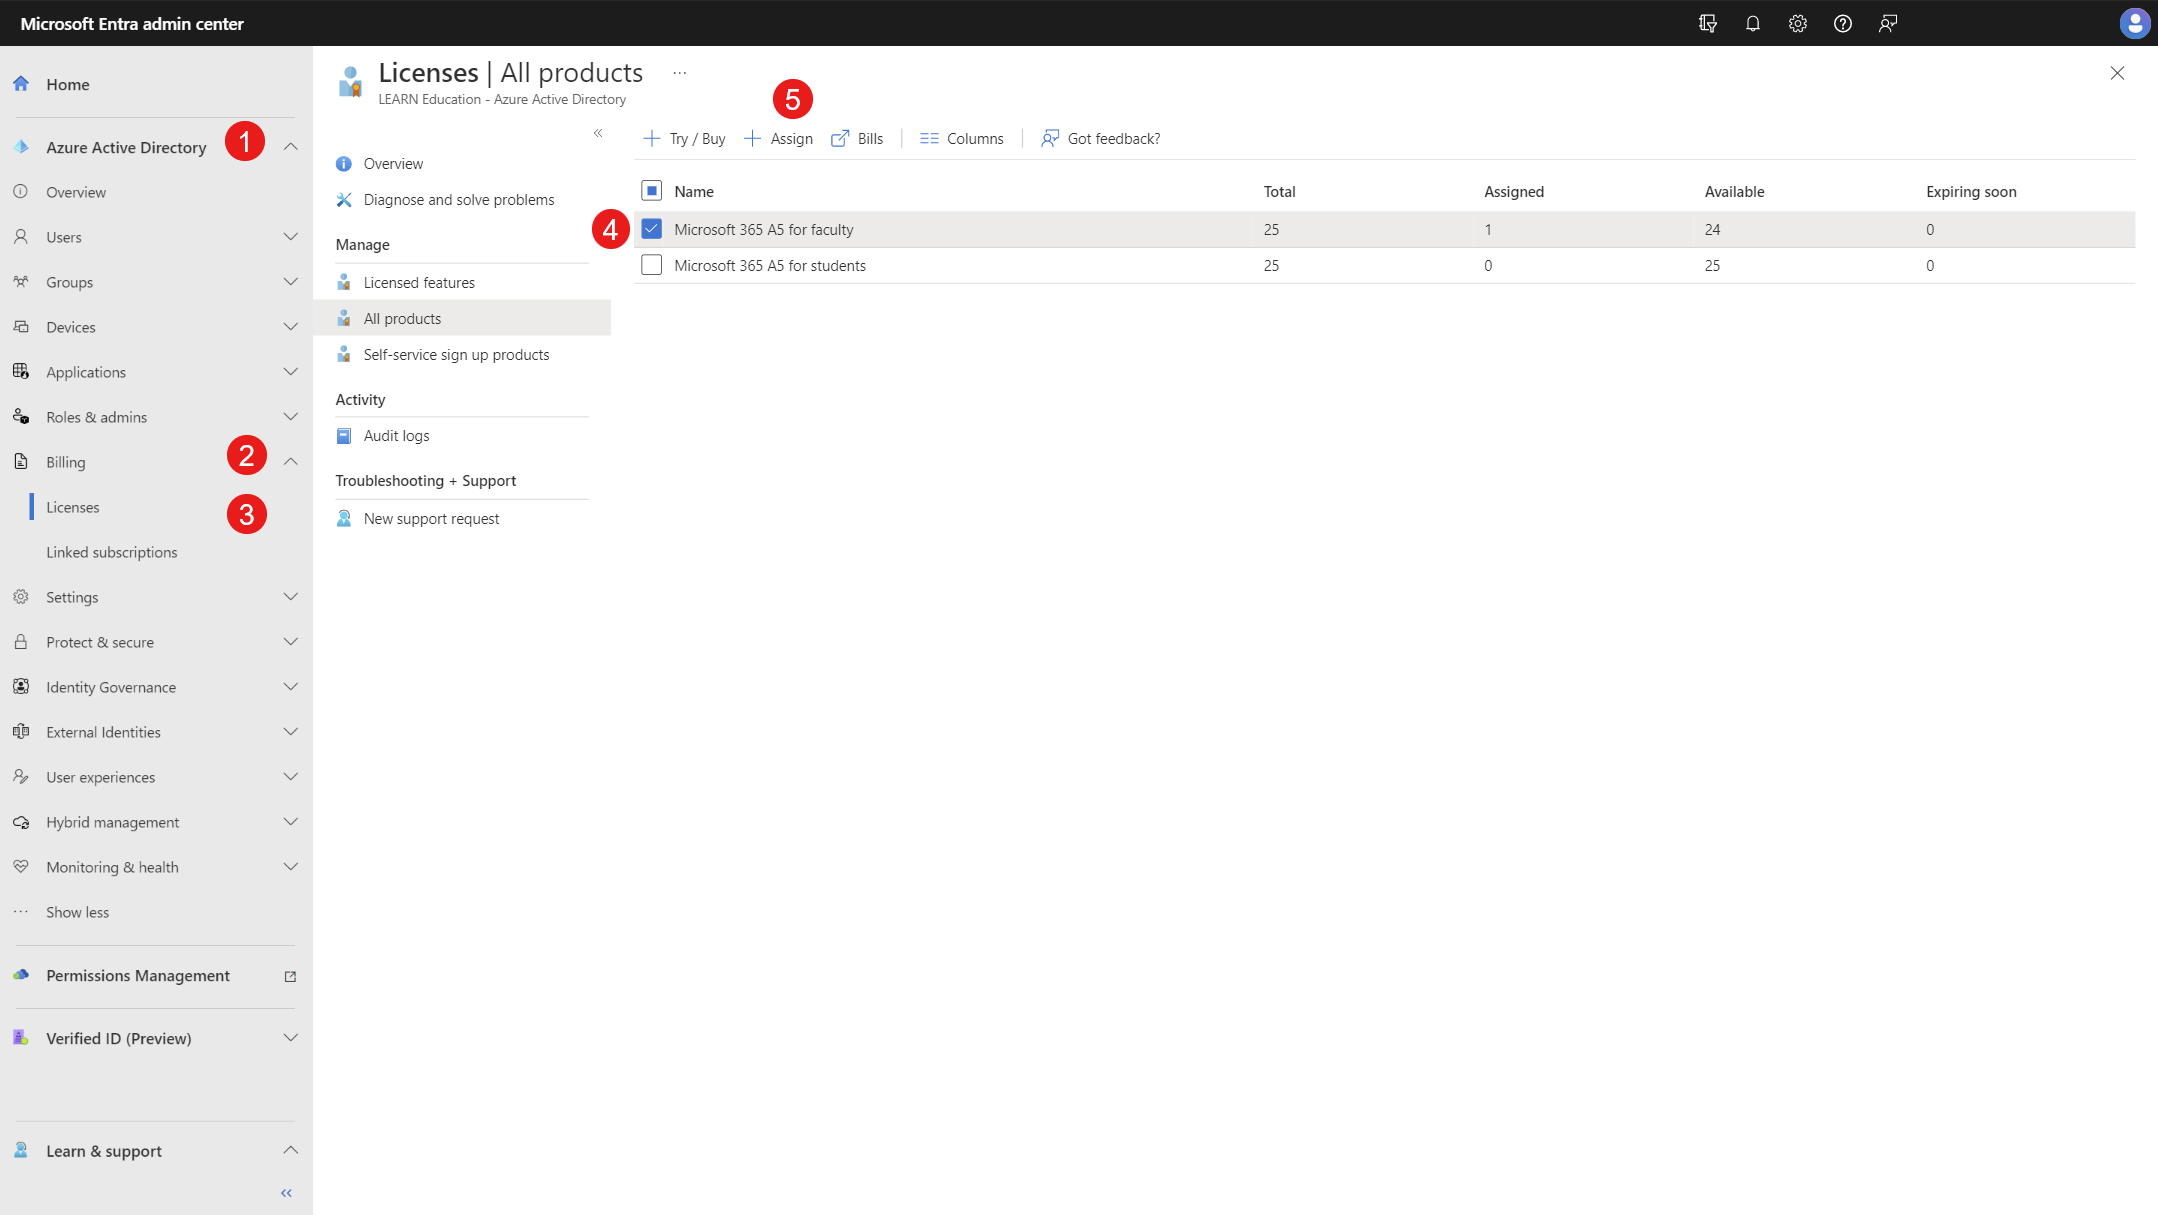
To assign a license to a group:
- Sign in to the Microsoft Entra admin center.
- Select Microsoft Entra ID > Show More > Billing > Licenses.
- Select the required products that you want to assign licenses for > Assign.
- Add the groups to which the licenses should be assigned.

For more information, see Group-based licensing using Microsoft Entra admin center.
Configure school branding
✅ Customize your tenant branding
Configuring your school branding enables a more familiar Windows Autopilot experience to students and teachers. With a custom school branding, you can define a custom logo and a welcome message, which is visible during the Windows out-of-box experience (OOBE).
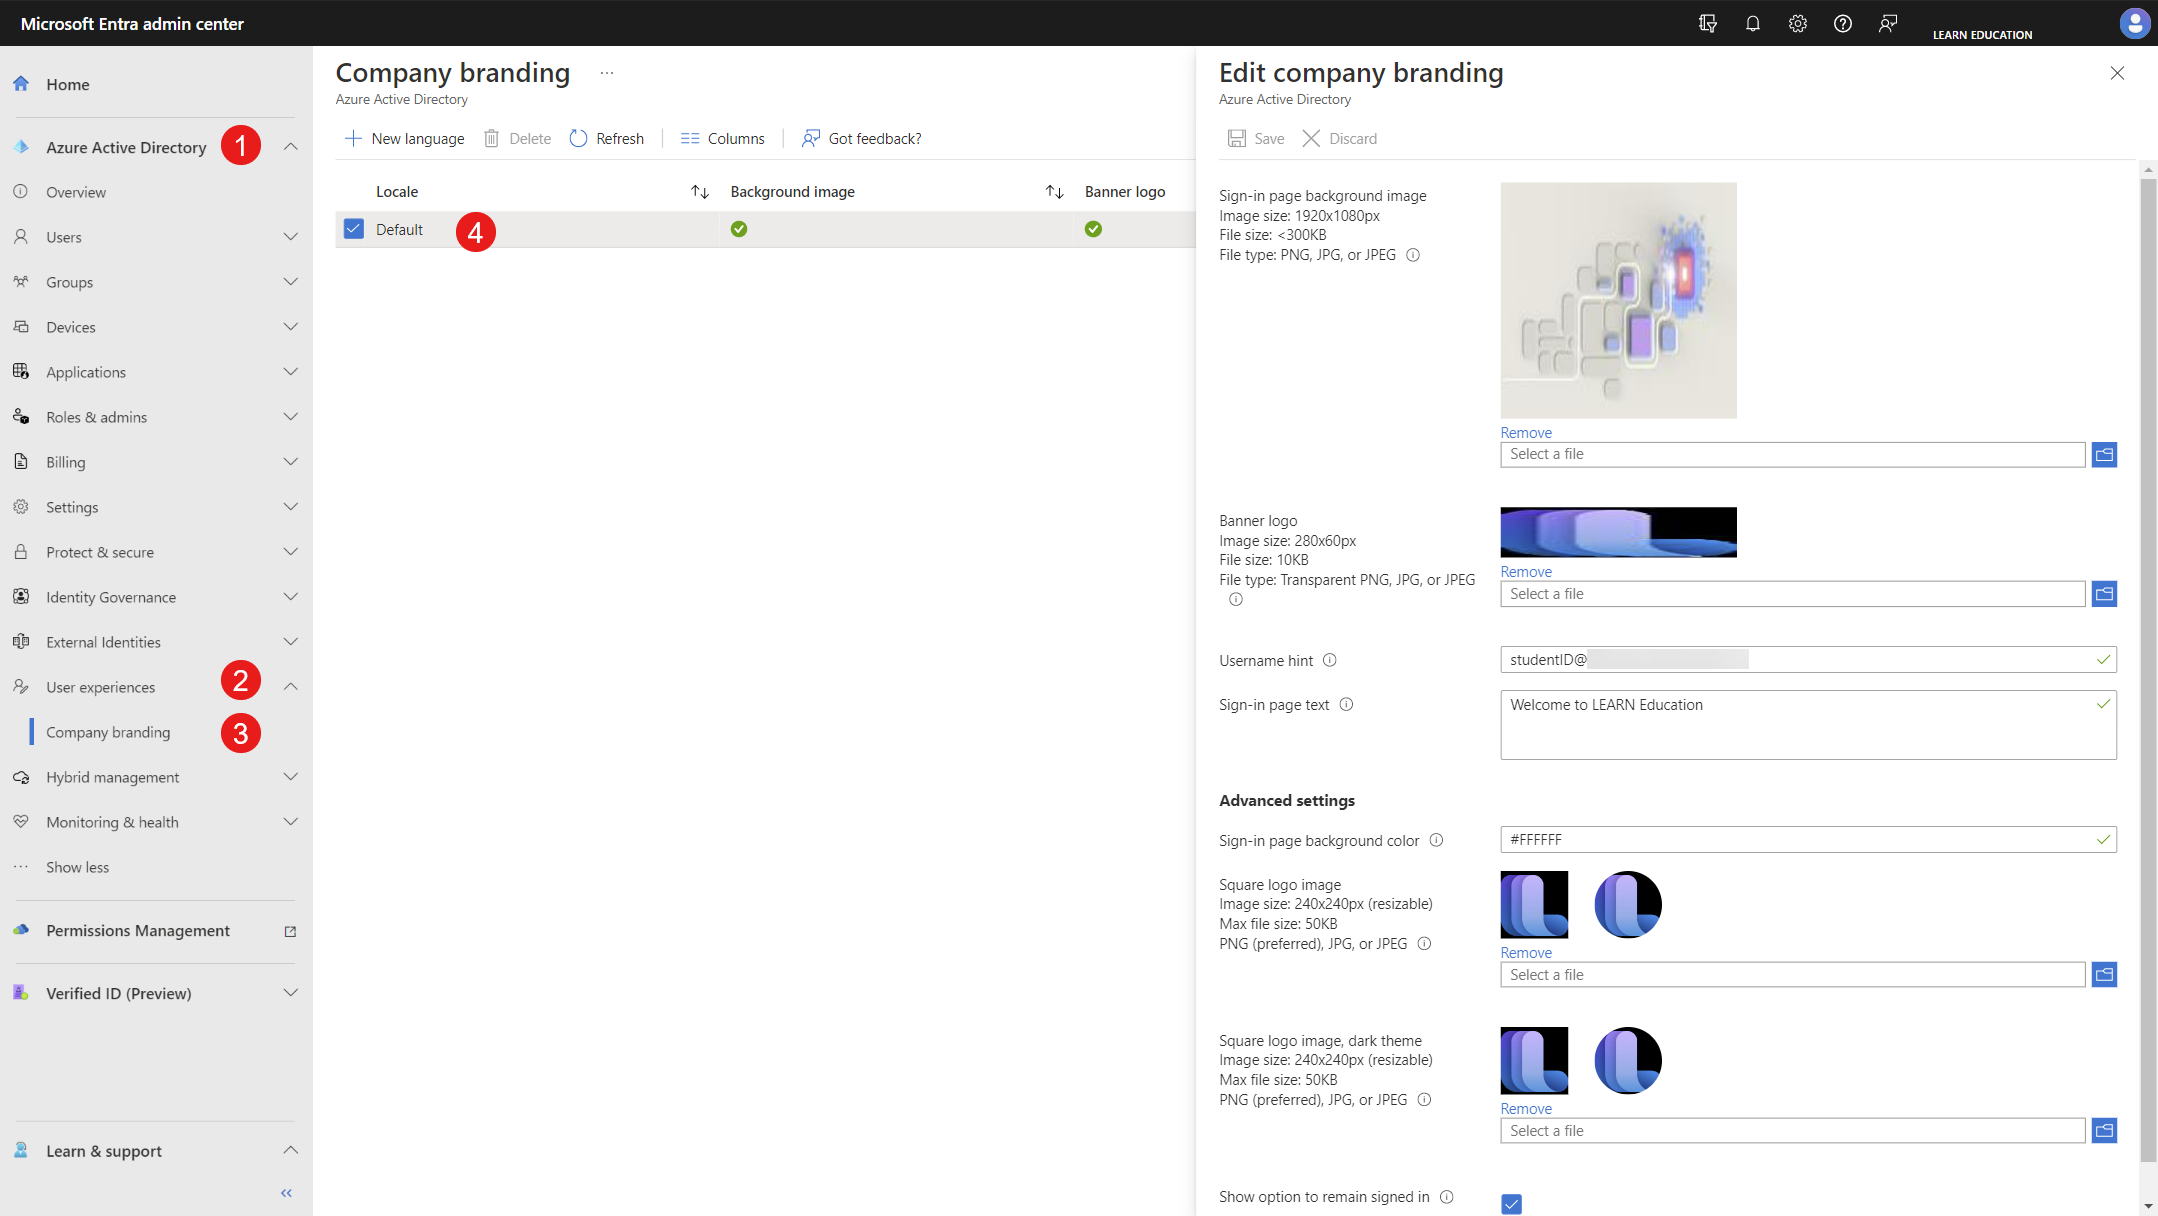
To configure your school's branding:
- Sign in to the Microsoft Entra admin center.
- Select Microsoft Entra ID > Show More > User experiences > Company branding.
- You can specify brand settings like background image, logo, username hint and a sign-in page text.
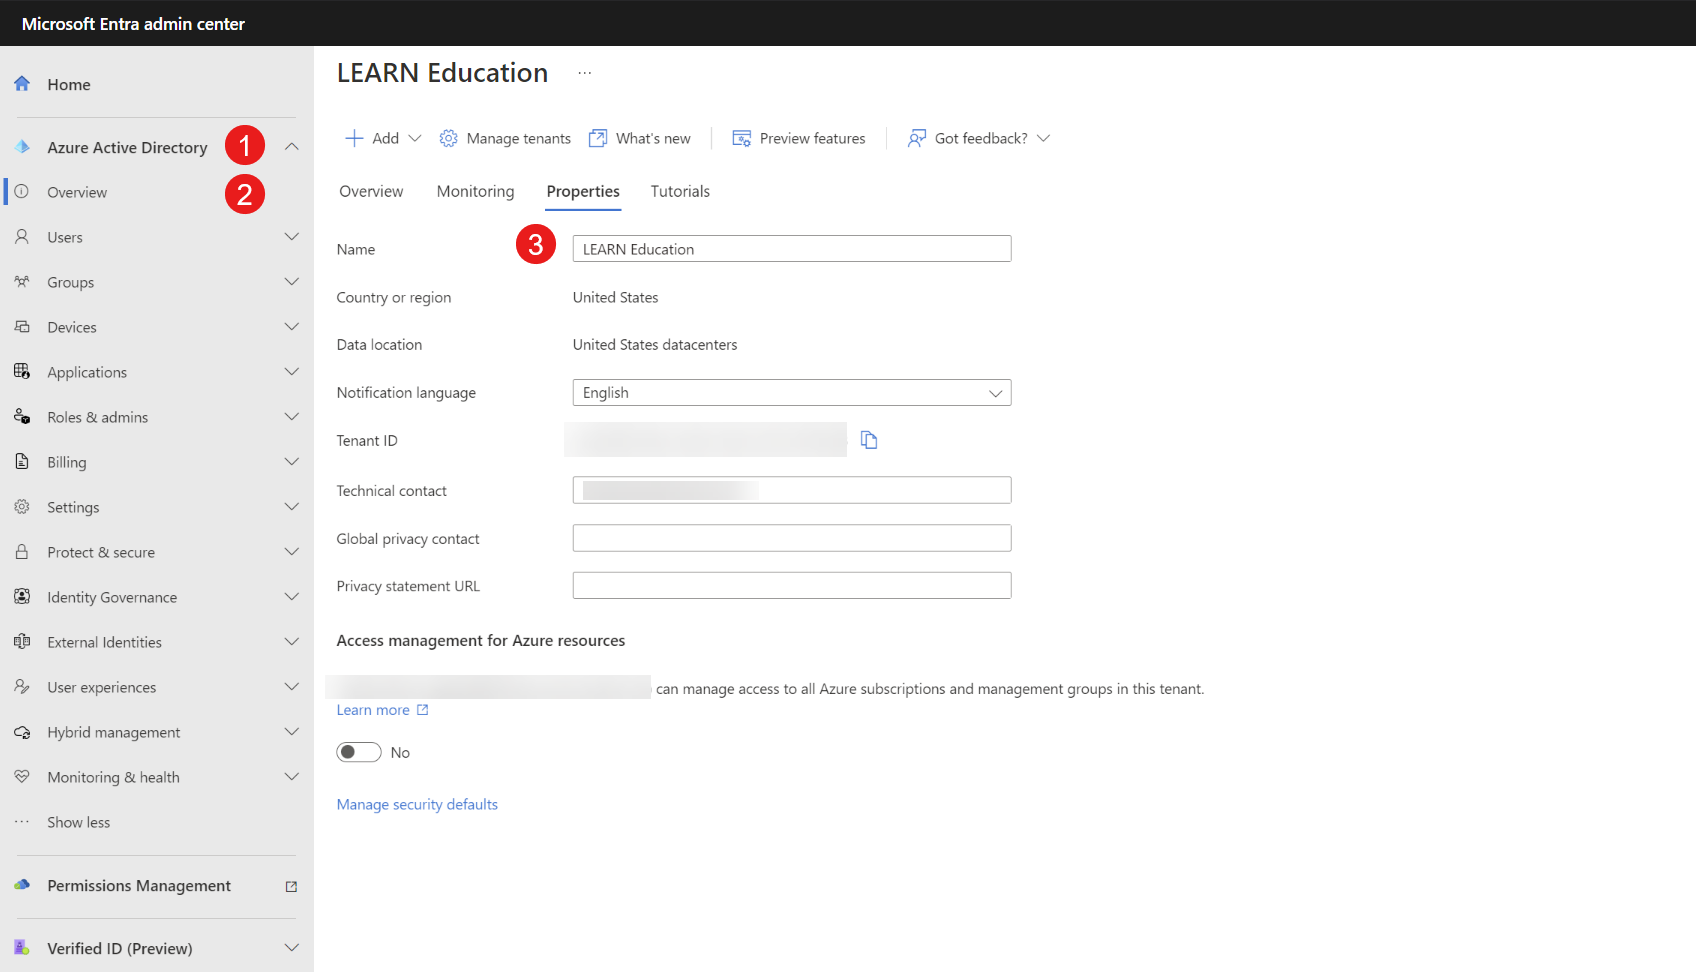
- To adjust the school tenant's name displayed during OOBE, select Microsoft Entra ID > Overview > Properties.
- In the Name field, enter the school district or organization's name > Save.


For more information, see Add branding to your directory.
Configure device settings
In this section, you configure Microsoft Entra device settings.
Enable Microsoft Entra join
✅ Enable Microsoft Entra join and device limits
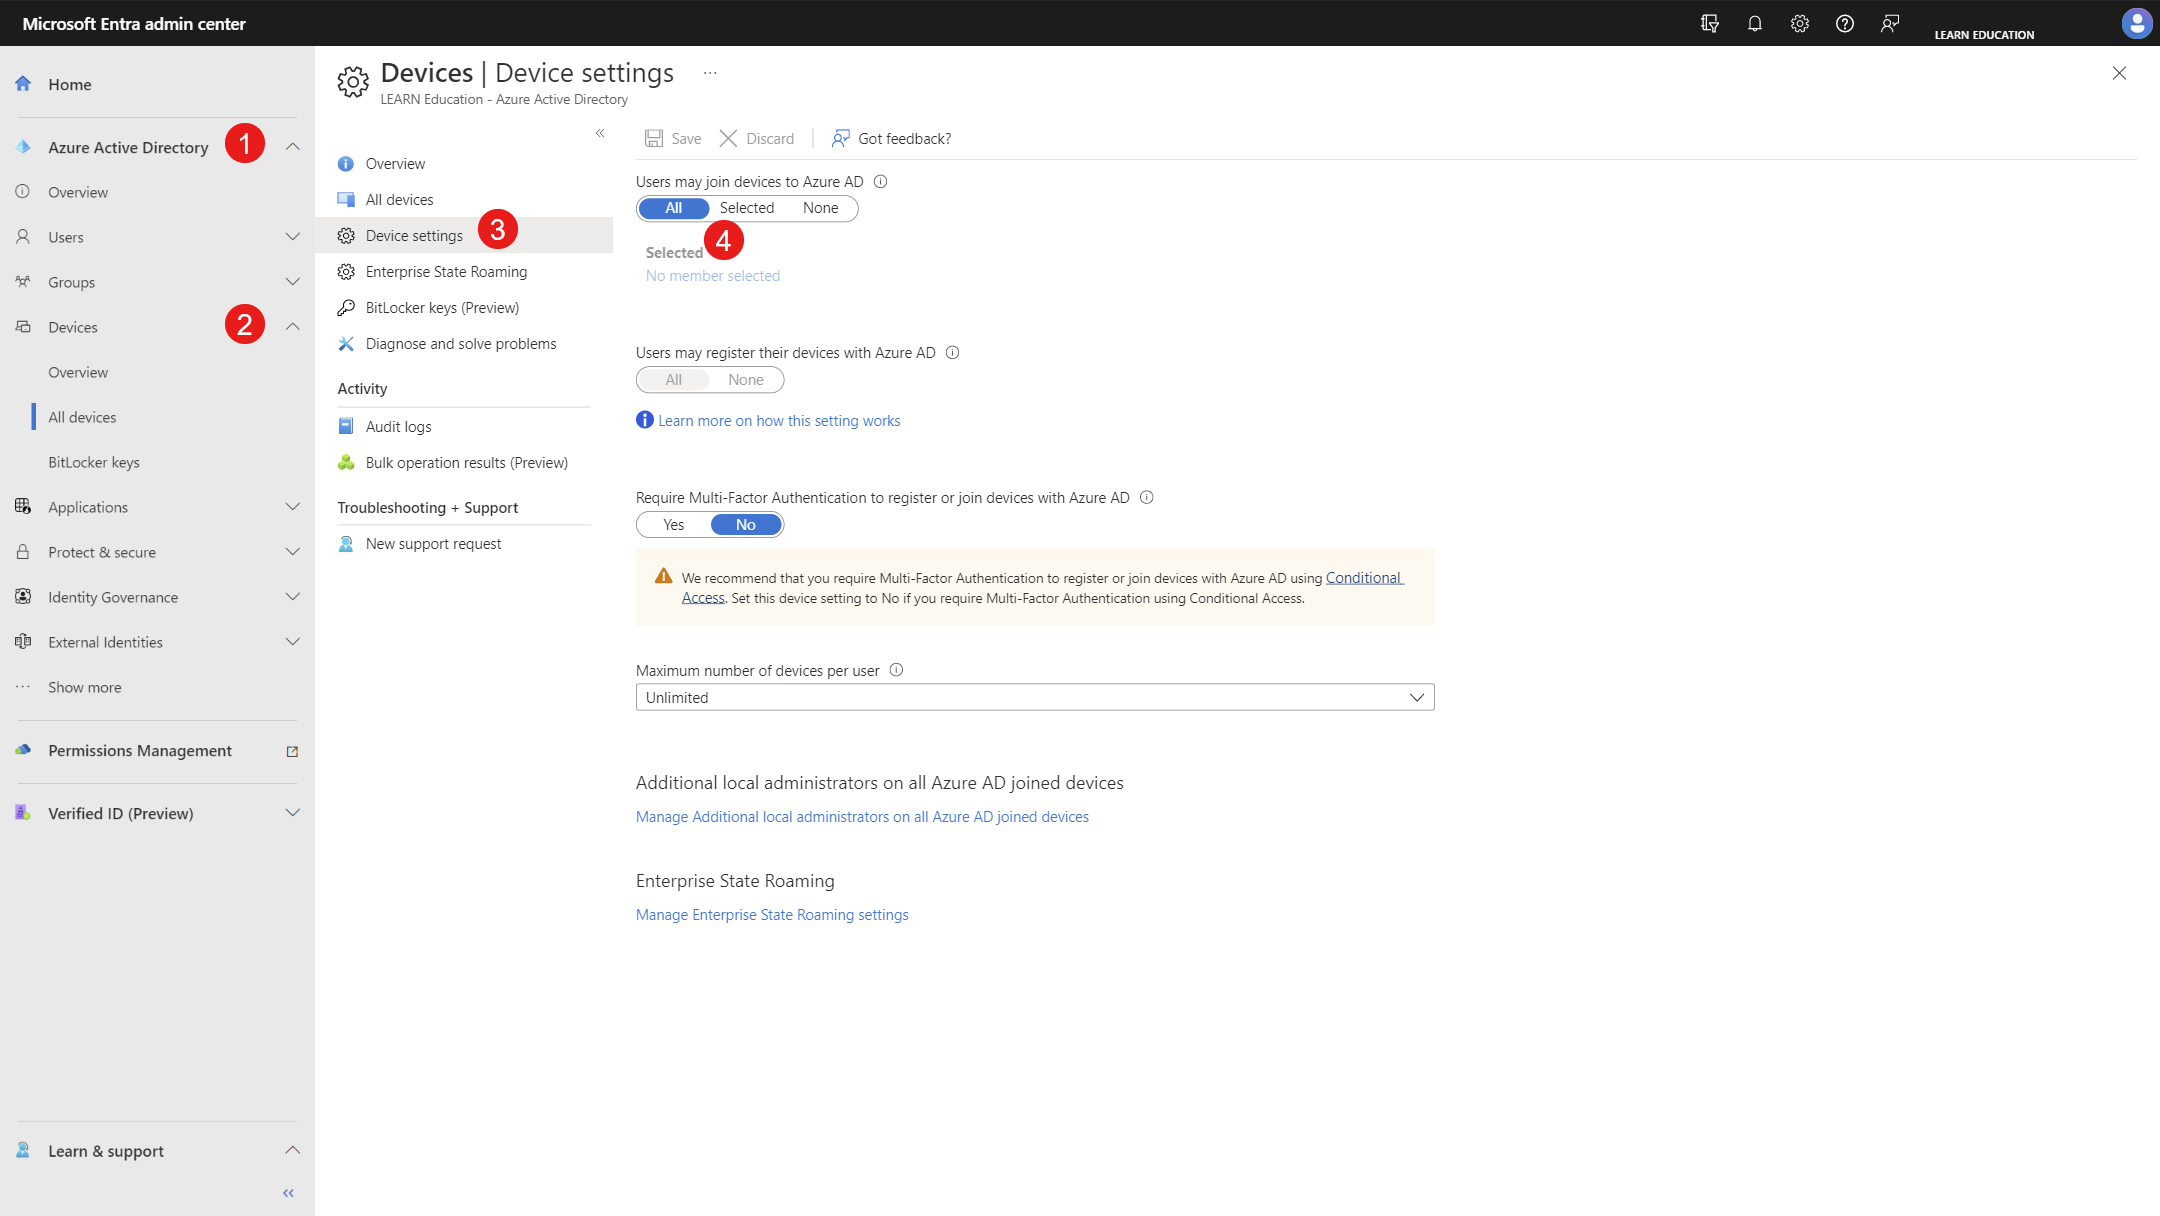
To allow Microsoft Entra join:
- Sign in to the Microsoft Entra admin center.
- Select Microsoft Entra ID > Devices > Device Settings.
- Under Users may join devices to Microsoft Entra ID, select All.
Note
If it is required that only specific users can join devices to Microsoft Entra ID, select Selected. If using provisioning packages, ensure that the user account that will create provisioning packages is included in the list of users.
- You may also want to review the Maximum number of devices per user value on this page, which Education customers commonly set to Unlimited.
- Select Save

Note
To create a bulk enrollment token (used by a provisioning package to perform Entra join), you must have a supported Microsoft Entra role assignment and must not be scoped to an administrative unit in Microsoft Entra ID. The supported roles are:
- Cloud Device Administrator
- Intune Administrator
- Password Administrator
For more information, see Give admin permissions in Microsoft Intune admin center.
Enable storage of local administrator passwords (optional)
✅ Enable Microsoft Entra to store local administrator passwords
Microsoft Entra can store the local administrator passwords for devices. Devices must be configured through Intune to store the password in Entra, this allows Entra to accept the password from devices.
To allow Entra to store the local administrator password:
| Blade | Configuration group | Setting | Value |
|---|---|---|---|
| All devices\Device settings | Local administrator settings | Enable Microsoft Entra Local Administrator Password Solution (LAPS) (Preview) | Yes |
| All devices\Device settings | Other settings | Restrict users from recovering the BitLocker key(s) for their owned devices | No |
For more information, see Windows Local Administrator Password Solution in Microsoft Entra ID.
Configure Enterprise State Roaming (optional)
✅ Disable Enterprise State Roaming
| Blade | Configuration group | Setting | Value |
|---|---|---|---|
| All devices\Enterprise State Roaming | Users may sync settings and app data across devices | Users may sync settings and app data across devices | None |
For more information, see Enable Enterprise State Roaming in Microsoft Entra ID.
Restrict access to administrative actions (optional)
✅ Configure your tenant to reduce user access
Microsoft Entra has several controls that allow you to limit administrative functionality for users with no administrative role in Microsoft Entra.
This table contains a list of commonly configured settings.
| Blade | Configuration group | Setting | Value |
|---|---|---|---|
| User settings | Default user role permissions | Users can register applications | No |
| User settings | Default user role permissions | Restrict nonadmin users from creating tenants | Yes |
| User settings | Default user role permissions | Users can create security groups | No |
| User settings | Guest user access | Guest user access restrictions | Guest user access is restricted to properties and memberships of their own directory objects (most restrictive) |
| User settings | Administration portal | Restrict access to Microsoft Entra ID administration portal | Yes |
| User settings | LinkedIn account connections | Allow users to connect their work or school account with LinkedIn | No |
| User settings | Show keep user signed in | Show keep user signed in | Yes |
You can apply additional controls to manage access to your directory with these articles:
- Restrict member users' default permissions
- Managing Directory Access
- Blocking PowerShell for EDU Tenants
Restrict access to Groups (optional)
✅ Configure your tenant to reduce group management capabilities
Microsoft Entra has several controls that allow you to limit group functionality for users.
This table contains a list of commonly configured settings.
| Blade | Configuration group | Setting | Value |
|---|---|---|---|
| Group settings | General\Self Service Group Management | Owners can manage group membership requests in My Groups | Yes |
| Group settings | General\Self Service Group Management | Restrict user ability to access groups features in My Groups | Yes |
| Group settings | General\Security Groups | Users can create security groups in Azure portals, API or PowerShell | No |
| Group settings | General\Microsoft 365 Groups | Users can create Microsoft 365 groups in Azure portals, API or PowerShell | No |
For more information, see Learn about groups and access rights in Microsoft Entra ID.
Next steps
With users and groups created, and licensed for Microsoft 365 Education, you can now configure Microsoft Intune.