Note
Access to this page requires authorization. You can try signing in or changing directories.
Access to this page requires authorization. You can try changing directories.
In this tutorial, learn to migrate user provisioning from Okta to Microsoft Entra ID and migrate User Sync or Universal Sync to Microsoft Entra Connect. This capability enables provisioning into Microsoft Entra ID and Office 365.
Note
When migrating synchronization platforms, validate steps in this article against your environment before you remove Microsoft Entra Connect from staging mode or enable the Microsoft Entra cloud provisioning agent.
Prerequisites
When you switch from Okta provisioning to Microsoft Entra ID, there are two choices. Use a Microsoft Entra Connect server or Microsoft Entra cloud provisioning.
Learn more: Comparison between Microsoft Entra Connect and cloud sync.
Microsoft Entra cloud provisioning is the most familiar migration path for Okta customers who use Universal Sync or User Sync. The cloud provisioning agents are lightweight. You can install them on, or near, domain controllers like the Okta directory sync agents. Don't install them on the same server.
When you synchronize users, use a Microsoft Entra Connect server if your organization needs any of the following technologies:
- Device synchronization: Microsoft Entra hybrid join or Hello for Business
- Pass-through authentication
- Support for more than 150,000 objects
- Support for writeback
To use Microsoft Entra Connect, you need to sign in with a Hybrid Identity Administrator role.
Note
Take all prerequisites into consideration when you install Microsoft Entra Connect or Microsoft Entra cloud provisioning. Before you continue with installation, see Prerequisites for Microsoft Entra Connect.
Confirm ImmutableID attribute synchronized by Okta
The ImmutableID attribute ties synchronized objects to their on-premises counterparts. Okta takes the Active Directory objectGUID of an on-premises object and converts it to a Base-64-encoded string. By default, it then stamps that string to the ImmutableID field in Microsoft Entra ID.
You can connect to Microsoft Graph PowerShell and examine the current ImmutableID value. If you haven't used the Microsoft Graph PowerShell module, run:
Install-Module Microsoft.Graph -Scope CurrentUser -Repository PSGallery -Force in an administrative session before you run the following commands:
Connect-MgGraph
If you have the module, a warning might appear to update to the latest version.
Import the installed module.
In the authentication window, sign in as at least a Hybrid Identity Administrator.
Connect to the tenant.
Verify ImmutableID value settings. The following example is the default of converting the objectGUID into the ImmutableID.
Manually confirm the conversion from objectGUID to Base64 on-premises. To test an individual value, use these commands:
Get-MgUser onpremupn | fl objectguid
$objectguid = 'your-guid-here-1010'
[system.convert]::ToBase64String(([GUID]$objectGUID).ToByteArray())
ObjectGUID mass-validation methods
Before you move to Microsoft Entra Connect, it's critical to validate that the ImmutableID values in Microsoft Entra ID match their on-premises values.
The following command gets on-premises Microsoft Entra users and exports a list of their objectGUID values and ImmutableID values already calculated to a CSV file.
Run the following command in Microsoft Graph PowerShell on an on-premises domain controller:
Get-ADUser -Filter * -Properties objectGUID | Select-Object
UserPrincipalName, Name, objectGUID, @{Name = 'ImmutableID';
Expression = {
[system.convert]::ToBase64String((GUID).tobytearray())
} } | export-csv C:\Temp\OnPremIDs.csv
Run the following command in a Microsoft Graph PowerShell session to list the synchronized values:
Get-MgUser -all $true | Where-Object {$_.dirsyncenabled -like
"true"} | Select-Object UserPrincipalName, @{Name = 'objectGUID';
Expression = {
[GUID][System.Convert]::FromBase64String($_.ImmutableID) } },
ImmutableID | export-csv C:\\temp\\AzureADSyncedIDS.csv
After both exports, confirm user ImmutableID values match.
Important
If your ImmutableID values in the cloud don't match objectGUID values, you've modified the defaults for Okta sync. You've likely chosen another attribute to determine ImmutableID values. Before going the next section, identify which source attribute populates ImmutableID values. Before you disable Okta sync, update the attribute Okta is syncing.
Install Microsoft Entra Connect in staging mode
After you prepare your list of source and destination targets, install a Microsoft Entra Connect server. If you use Microsoft Entra Connect cloud provisioning, skip this section.
Download and install Microsoft Entra Connect on a server. See, Custom installation of Microsoft Entra Connect.
In the left panel, select Identifying users.
On the Uniquely identifying your users page, under Select how users should be identified with Microsoft Entra ID, select Choose a specific attribute.
If you didn't modify the Okta default, select mS-DS-ConsistencyGUID.
Warning
This step is critical. Ensure the attribute you select for a source anchor populates your Microsoft Entra users. If you select the wrong attribute, uninstall and reinstall Microsoft Entra Connect to reselect this option.
Select Next.
In the left panel, select Configure.
On the Ready to configure page, select Enable staging mode.
Select Install.
Verify the ImmutableID values match.
When the configuration is complete, select Exit.
Open Synchronization Service as an administrator.
Find the Full Synchronization to the domain.onmicrosoft.com connector space.
Confirm there are users under the Connectors with Flow Updates tab.
Verify no pending deletions in the export.
Select the Connectors tab.
Highlight the domain.onmicrosoft.com connector space.
Select Search Connector Space.
In the Search Connector Space dialog, under Scope, select Pending Export.
Select Delete.
Select Search. If all objects match, no matching records appear for Deletes.
Record objects pending deletion and their on-premises values.
Clear Delete.
Select Add.
Select Modify.
Select Search.
Update functions appear for users being synchronized to Microsoft Entra ID via Okta. Add new objects Okta isn't syncing, which are in the organizational unit (OU) structure selected during Microsoft Entra Connect installation.
To see what Microsoft Entra Connect communicates with Microsoft Entra ID, double-click an update.
Note
If there are add functions for a user in Microsoft Entra ID, their on-premises account doesn't match the cloud account. Entra Connect creates a new object and records new and unexpected adds.
- Before you exit the staging mode, correct the ImmutableID value in Microsoft Entra ID.
In this example, Okta stamped the mail attribute to the user's account, although the on-premises value wasn't accurate. When Microsoft Entra Connect takes over the account, the mail attribute is deleted from the object.
- Verify updates include attributes expected in Microsoft Entra ID. If multiple attributes are being deleted, you can populate on-premises AD values before you remove the staging mode.
Note
Before you continue, ensure user attributes are syncing and appear on the Pending Export tab. If they're deleted, ensure the ImmutableID values match and the user is in a selected OU for synchronization.
Install Microsoft Entra Connect cloud sync agents
After you prepare your list of source and destination targets, install and configure Microsoft Entra Connect cloud sync agents. See, Tutorial: Integrate a single forest with a single Microsoft Entra tenant.
Note
If you use a Microsoft Entra Connect server, skip this section.
Disable Okta provisioning to Microsoft Entra ID
After you verify the Microsoft Entra Connect installation, disable Okta provisioning to Microsoft Entra ID.
Go to the Okta portal
Select Applications.
Select the Okta app that provisions users to Microsoft Entra ID.
Select the Provisioning tab.
Select the Integration section.
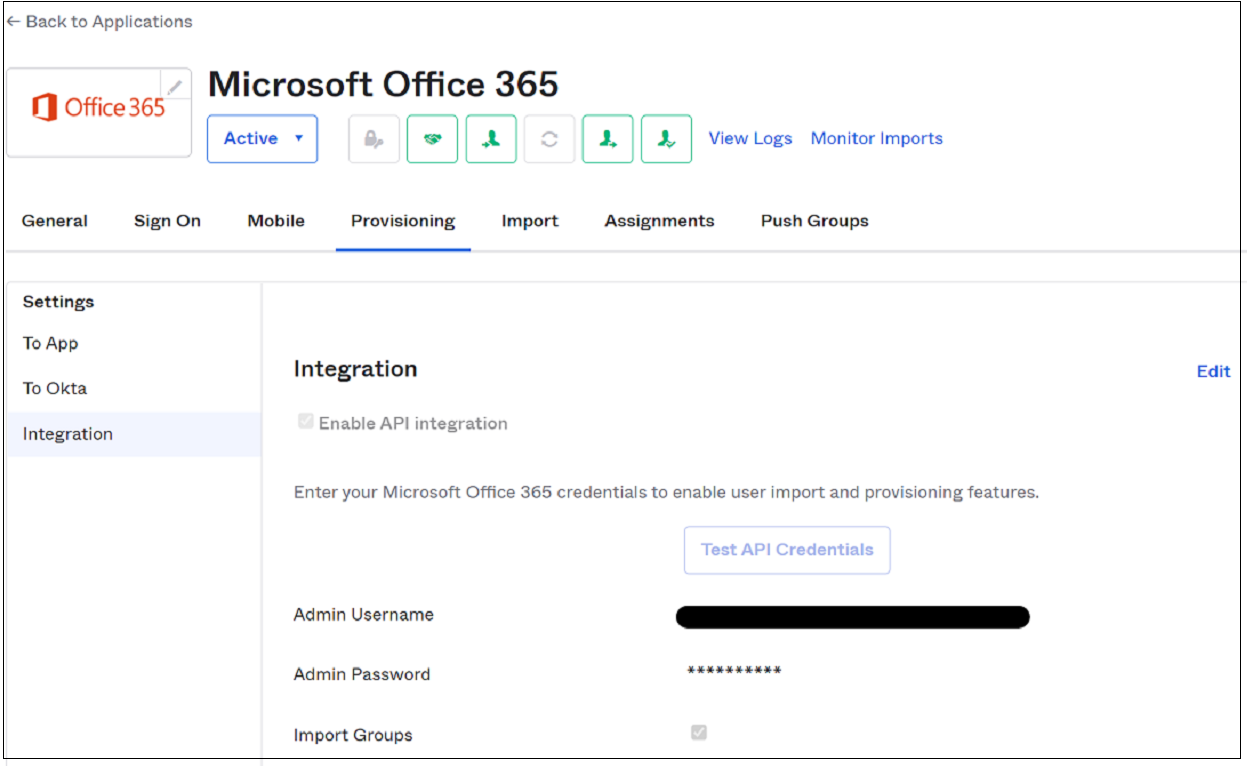
Select Edit.
Clear the Enable API integration option.
Select Save.

Note
If you have multiple Office 365 apps that handle provisioning to Microsoft Entra ID, ensure they switched off.
Disable staging mode in Microsoft Entra Connect
After you disable Okta provisioning, the Microsoft Entra Connect server can synchronize objects.
Note
If you use Microsoft Entra Connect cloud sync agents, skip this section.
- From the desktop, run the installation wizard from the desktop.
- Select Configure.
- Select Configure staging mode
- Select Next.
- Enter the credentials of the Hybrid Identity Administrator account for your environment.
- Clear Enable staging mode.
- Select Next.
- Select Configure.
- After configuration, open the Synchronization Service as an administrator.
- On the domain.onmicrosoft.com connector, view the Export.
- Verify additions, updates, and deletions.
- Migration is complete. Rerun the installation wizard to update and expand Microsoft Entra Connect features.
Enable cloud sync agents
After you disable Okta provisioning, the Microsoft Entra Connect cloud sync agent can synchronize objects.
- Sign in to the Microsoft Entra admin center as at least a Hybrid Identity Administrator.
- Browse to Entra ID > Entra Connect > Connect Sync.
- Select Configuration profile.
- Select Enable.
- Return to the provisioning menu and select Logs.
- Confirm the provisioning connector updated in-place objects. The cloud sync agents are nondestructive. Updates fail if a match isn't found.
- If a user is mismatched, make updates to bind the ImmutableID values.
- Restart the cloud provisioning sync.