Note
Access to this page requires authorization. You can try signing in or changing directories.
Access to this page requires authorization. You can try changing directories.
Device sync lets you synchronize computer objects from Active Directory (AD) to Microsoft Entra ID by using the AD2AADDeviceSync job in an AD to Microsoft Entra ID Cloud Sync configuration. After synchronization, the devices can become Microsoft Entra hybrid joined.
Device sync is disabled by default. Before you begin, make sure your environment meets the prerequisites. Then configure a service connection point (SCP), enable device sync, provision a device on demand, manage device sync with Microsoft Graph, and recover deleted devices.
Important
Device sync with Microsoft Entra Cloud Sync is in preview. See the Supplemental Terms of Use for Microsoft Azure Previews for legal terms that apply to Azure features that are in beta, preview, or otherwise not yet released into general availability.
Prerequisites
Make sure your environment meets these requirements:
- Install the Microsoft Entra provisioning agent in your on-premises environment. The agent must be version 1.1.1107 or later. Download the latest available agent version from the Microsoft Entra admin center. For agent versions, see the Microsoft Entra provisioning agent release history.
- Create an AD to Microsoft Entra ID Cloud Sync configuration. For configuration steps, see Configure provisioning from Active Directory to Microsoft Entra ID.
- Your Microsoft Entra tenant ID and the verified domain that devices use for authentication. For federated environments, use a federated domain. Otherwise, use the primary
*.onmicrosoft.comdomain. - If you need to configure the SCP, temporary access to an account that's a member of the Enterprise Admins group in each AD forest that contains domain-joined computers. Use your organization's just-in-time privileged access process, if available.
- To configure device sync in the Microsoft Entra admin center, use an account with at least the Hybrid Identity Administrator role.
Configure a service connection point
Configure an SCP in each AD forest that contains domain-joined computers. Devices use the SCP to discover the Microsoft Entra tenant where they register.
An SCP might already be configured in the forest. Before you run the script, verify the existing SCP values, and record the current azureADName and azureADId values so that you can restore them if necessary. If the values already identify the intended tenant, skip to Enable device sync.
Warning
If the SCP already exists, the script clears its current keywords values and replaces them with the supplied azureADName and azureADId values. Verify the domain and tenant ID before you run it.
To configure the SCP, follow these steps:
Sign in to a domain-joined administrative workstation or domain controller by using an account that's a member of Enterprise Admins for the current forest. Use a Windows PowerShell session where your organization's policy permits local scripts.
Save the following script as
ConfigureSCP.ps1:# # ConfigureSCP.ps1 # Configures the service connection point (SCP) for Microsoft Entra hybrid join in the current forest. # # REQUIREMENT: Must be run by an Enterprise Admin of the current forest. # # EXAMPLES: # .\ConfigureSCP.ps1 -Domain contoso.com -TenantId <guid> # .\ConfigureSCP.ps1 -Domain contoso.onmicrosoft.com -TenantId <guid> # [CmdletBinding()] param( # Verified domain used for device authentication. # If you use federation, enter a federated domain name. # Otherwise, enter your primary *.onmicrosoft.com domain name. [Parameter(Mandatory = $true)] [ValidateNotNullOrEmpty()] [string]$Domain, # Microsoft Entra tenant identifier (GUID). [Parameter(Mandatory = $true)] [guid]$TenantId ) $ErrorActionPreference = "Stop" Write-Output "Configuring the SCP for Microsoft Entra hybrid join in your Active Directory forest." try { ## Set variables $azureADName = "azureADName:" + $Domain.Trim() $azureADId = "azureADId:" + $TenantId.ToString() $keywords = "keywords" $ldap = "LDAP://" $rootDSE = New-Object System.DirectoryServices.DirectoryEntry($ldap + "RootDSE") $configCN = $rootDSE.Properties["configurationNamingContext"][0].ToString() $servicesCN = "CN=Services," + $configCN $drcCN = "CN=Device Registration Configuration," + $servicesCN $scpCN = "CN=62a0ff2e-97b9-4513-943f-0d221bd30080," + $drcCN ## Get/Create: CN=Device Registration Configuration,CN=Services if ([System.DirectoryServices.DirectoryEntry]::Exists($ldap + $drcCN)) { $deDRC = New-Object System.DirectoryServices.DirectoryEntry($ldap + $drcCN) } else { $de = New-Object System.DirectoryServices.DirectoryEntry($ldap + $servicesCN) $deDRC = $de.Children.Add("CN=Device Registration Configuration", "container") $deDRC.CommitChanges() } ## Edit/Create: CN=62a0ff2e-97b9-4513-943f-0d221bd30080,CN=Device Registration Configuration,CN=Services if ([System.DirectoryServices.DirectoryEntry]::Exists($ldap + $scpCN)) { $deSCP = New-Object System.DirectoryServices.DirectoryEntry($ldap + $scpCN) $deSCP.Properties[$keywords].Clear() } else { $deSCP = $deDRC.Children.Add("CN=62a0ff2e-97b9-4513-943f-0d221bd30080", "serviceConnectionPoint") } $deSCP.Properties[$keywords].Add($azureADName) | Out-Null $deSCP.Properties[$keywords].Add($azureADId) | Out-Null $deSCP.CommitChanges() Write-Output "Configuration complete!" } catch { Write-Output "Configuration could not be completed." Write-Output $_ exit 1 }Run the script by using the values for the intended tenant:
- For
Domain, use a federated domain for federated environments. Otherwise, use the primary*.onmicrosoft.comdomain. - For
TenantId, use the Microsoft Entra tenant GUID.
.\ConfigureSCP.ps1 -Domain <verified-domain> -TenantId <tenant-id>- For
Confirm that PowerShell displays
Configuration complete!. If it displaysConfiguration could not be completed., review the accompanying error and resolve it before continuing.In each additional AD forest that contains domain-joined computers, verify the existing SCP values and, if needed, repeat this procedure.
After you configure all required forests, sign out of any Enterprise Admins accounts and remove or deactivate the temporary access according to your organization's privileged access process.
Enable device sync
Enable device sync in the existing AD to Microsoft Entra ID Cloud Sync configuration.
Sign in to the Microsoft Entra admin center as at least a Hybrid Identity Administrator.
Browse to Entra ID > Entra Connect > Cloud sync.


Select your existing AD to Microsoft Entra ID configuration.
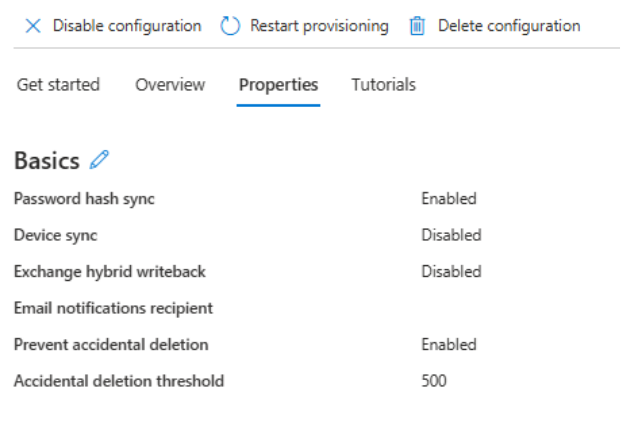
Select Properties. Under Basics, confirm that Device sync is Disabled.
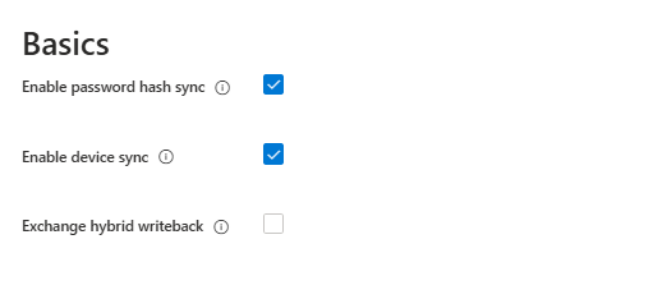
Next to Basics, select the edit icon.
Select Enable device sync, and then select Apply.
Review synchronized device attributes
Cloud Sync device sync supports the following device attribute mappings.
| Microsoft Entra attribute | AD attribute | Mapping type |
|---|---|---|
AccountEnabled |
userAccountControl |
Expression |
DeviceId |
objectGUID |
Direct |
DeviceOSType |
operatingSystem |
Expression |
DeviceTrustType |
None. The value is always ServerAd. |
Expression |
DisplayName |
displayName, dNSHostName |
Expression |
OnPremiseSecurityIdentifier |
objectSid |
Direct |
RegisteredOwnerReference |
mS-DS-CreatorSID |
Once |
SourceAnchor |
objectGUID |
Direct |
UserCertificate |
userCertificate |
Direct |
The RegisteredOwnerReference mapping is applied only the first time Cloud Sync finds the computer object in AD.
Provision a device on demand
Provision a device on demand to run device synchronization for a specific AD computer object.
Sign in to the Microsoft Entra admin center as at least a Hybrid Identity Administrator.
Browse to Entra ID > Entra Connect > Cloud sync.
- Select your existing AD to Microsoft Entra ID configuration.
- Select Provision on demand.
- Select the Device tab.
- Enter the distinguished name of the AD computer.
- Select Provision.
Manage device sync with Microsoft Graph
You can create and start the device sync job, or provision a device on demand, by using Microsoft Graph.
Create and start a device sync job
Use Create synchronizationJob to create a device sync job.
In the request:
- Use the service principal ID of your AD to Microsoft Entra ID service principal.
- Set
templateIdtoAD2AADDeviceSync.
Use Start synchronizationJob to start the device sync job.
Provision a device on demand with Microsoft Graph
Use Get synchronizationSchema with your device sync job.
In the response, get the device sync rule ID from
synchronizationRules.Use synchronizationJob: provisionOnDemand. In the request body, set:
objectIdto the computer's distinguished name from Active Directory Users and Computers.objectTypeNametocomputer.ruleIdto the device sync rule ID.
Recover a deleted device
A device can be deleted from Microsoft Entra ID when:
- The corresponding computer is deleted in AD, which causes Cloud Sync to delete the device in Microsoft Entra ID.
- The device is unjoined from the cloud after
dsregcmd /leaveruns, which causes Azure Device Registration Service to delete the device in Microsoft Entra ID. - An administrator manually deletes the device from Entra ID > Devices in the Microsoft Entra admin center.
If a service or administrator other than Cloud Sync deletes a device, Cloud Sync doesn't re-create the device during the next synchronization cycle unless the corresponding AD computer object changes.
Use one of these options to recover the device and restore its hybrid join state:
- In the Microsoft Entra admin center, go to Entra ID > Devices > Deleted devices, and then restore the device.
- Change the corresponding computer object in AD, and then wait for the next device sync cycle.
- Provision the device on demand.