Note
Access to this page requires authorization. You can try signing in or changing directories.
Access to this page requires authorization. You can try changing directories.
This tutorial walks you through how to configure Cloud Sync to sync groups to on-premises Active Directory Domain Services (AD DS).
Important
We recommend using Selected security groups as the default scoping filter when you configure group provisioning to AD DS. This default scoping filter helps prevent any performance issues when you provision groups.
Provision Microsoft Entra ID to Active Directory Domain Services - Prerequisites
The following prerequisites are required to implement provisioning groups to Active Directory Domain Services (AD DS).
License requirements
Using this feature requires Microsoft Entra ID P1 licenses. To find the right license for your requirements, see Compare generally available features of Microsoft Entra ID.
General requirements
- Microsoft Entra account with at least a Hybrid Identity Administrator role.
- On-premises AD DS schema with the msDS-ExternalDirectoryObjectId attribute, which is available in Windows Server 2016 and later.
- Provisioning agent with build version 1.1.1373.0 or later.
Note
The permissions to the service account are assigned during clean install only. If you're upgrading from the previous version, then permissions need to be assigned manually by using PowerShell:
$credential = Get-Credential

Set-AADCloudSyncPermissions -PermissionType UserGroupCreateDelete -TargetDomain "FQDN of domain" -EACredential $credential
If the permissions are set manually, you need to assign Read, Write, Create, and Delete all properties for all descendant Groups and User objects.
These permissions aren't applied to AdminSDHolder objects by default. For more information, see Microsoft Entra provisioning agent gMSA PowerShell cmdlets.
- The provisioning agent must be installed on a server that runs Windows Server 2022, Windows Server 2019, or Windows Server 2016.
- The provisioning agent must be able to communicate with one or more domain controllers on ports TCP/389 (LDAP) and TCP/3268 (Global Catalog).
- Required for Global Catalog lookup to filter out invalid membership references
- Microsoft Entra Connect Sync with build version 2.2.8.0
- Required to support on-premises user membership synchronized using Microsoft Entra Connect Sync
- Required to synchronize
AD DS:user:objectGUIDtoAAD DS:user:onPremisesObjectIdentifier
Scale limits for Provisioning groups to Active Directory
Group Provision to Active Directory feature's performance is impacted by the size of the tenant and the number of groups and memberships that are in scope for provisioning to Active Directory. This section provides guidance on how to determine if GPAD supports your scale requirement and how to pick the right group scoping mode to achieve quicker initial and delta sync cycles.
What is not supported?
- Groups that are larger than 50K members aren't supported.
- The use of "All security groups" scoping without applying attribute scope filtering is not supported.
Scale limits
| Scoping Mode | Number of in-scope groups | Number of membership links (Direct members only) | Notes |
|---|---|---|---|
| "Selected security groups" mode | Up to 10K groups. The CloudSync pane in Microsoft Entra portal only allows selecting up to 999 groups as well as displaying up to 999 groups. If you need to add more than 1000 groups into scope, see: Expanded group selection via API. | Up to 250K total members across all the groups in scope. | Use this scoping mode if your tenant exceeds ANY of these limits 1. Tenant has more than 200k users 2. Tenant has more than 40K groups 3. Tenant has more than 1M group memberships. |
| “All Security groups” mode with at least one attribute scoping filter. | Up to 20K groups. | Up to 500K total members across all the groups in scope. | Use this scoping mode if your tenant satisfies ALL the below limits: 1. Tenant has less than 200k users 2. Tenant has less than 40K groups 3. Tenant has less than 1M group memberships. |
What to do if you exceed limits
Exceeding the recommended limits will slow initial and delta sync, possibly causing sync errors. If this happens, follow these steps:
Too many groups or group members in ‘Selected security groups’ scoping mode:
Reduce the number of in-scope groups (target higher value groups), or split provisioning into multiple, distinct jobs with disjoint scopes.
Too many groups or group members in ‘All security groups’ scoping mode:
Use Selected security groups scoping mode as recommended.
Some group exceeds 50K members:
Split membership across multiple groups or adopt staged groups (for example, by region or business unit) to keep each group under the cap.
Expanded group selection via API
If you need to select more than 999 groups, you must use the Grant an appRoleAssignment for a service principal API call.
An example of the API calls is as follows:
POST https://graph.microsoft.com/v1.0/servicePrincipals/{servicePrincipalID}/appRoleAssignedTo
Content-Type: application/json

{
  "principalId": "",
  "resourceId": "",
  "appRoleId": ""
}
where:
- principalId: Group object ID.
- resourceId: Job's service principal ID.
- appRoleId: Identifier of app role exposed by the resource service principal.
The following table is a list of App Role IDs for Clouds:
| Cloud | appRoleId |
|---|---|
| Public | 1a0abf4d-b9fa-4512-a3a2-51ee82c6fd9f |
| AzureUSGovernment | d8fa317e-0713-4930-91d8-1dbeb150978f |
| AzureUSNatCloud | 50a55e47-aae2-425c-8dcb-ed711147a39f |
| AzureUSSecCloud | 52e862b9-0b95-43fe-9340-54f51248314f |
More information
Here are more points to consider when you provision groups to AD DS.
- Groups provisioned to AD DS using Cloud Sync can only contain on-premises synchronized users or other cloud-created security groups.
- These users must have the onPremisesObjectIdentifier attribute set on their account.
- The onPremisesObjectIdentifier must match a corresponding objectGUID in the target AD DS environment.
- An on-premises user objectGUID attribute can be synchronized to a cloud user onPremisesObjectIdentifier attribute by using either sync client.
- Only global Microsoft Entra ID tenants can provision from Microsoft Entra ID to AD DS. Tenants such as B2C aren't supported.
- The group provisioning job is scheduled to run every 20 minutes.
Group and User SOA Scenarios
| Use case | Parent group type | User member group type | Sync Direction | How sync works |
|---|---|---|---|---|
| A security group whose SOA is in cloud and all user members have SOA on-premises | Security group whose SOA is in cloud | Users whose SOA is on-premises | Entra to AD (AAD2ADGroup provisioning) | The job provisions the parent group with all its member references (member users). |
| A security group whose SOA is in cloud and all user members have SOA in cloud | Security group whose SOA is in cloud | Users whose SOA is in cloud | Entra to AD (AAD2ADGroup provisioning) | The job provisions the security group but does not provision any member references. |
| A security group whose SOA is in cloud and some user members have SOA in cloud while others have SOA on-premises | Security group whose SOA is in cloud | Some users have SOA in cloud while some have SOA on-premises | Entra to AD (AAD2ADGroup provisioning) | The job provisions the security group and includes only member references whose SOA is on-premises. It skips member references whose SOA is in cloud. |
| A security group whose SOA is in cloud and has no user members | Security group whose SOA is in cloud | No user members | Entra to AD (AAD2ADGroup provisioning) | The job provisions the security group (empty membership). |
| A security group whose SOA is in on-premises and all user members have SOA on-premises | Security group whose SOA is on-premises | Users whose SOA is on-premises | Entra to AD (AAD2ADGroup provisioning) | The job does not provision the security group. |
| A security group whose SOA is in on-premises and all user members have SOA in cloud | Security group whose SOA is on-premises | Users whose SOA is in cloud | Entra to AD (AAD2ADGroup provisioning) | The job does not provision the security group. |
| A security group whose SOA is in on-premises and some user members have SOA in cloud while others have SOA on-premises | Security group whose SOA is on-premises | Some users have SOA in cloud while some have SOA on-premises | Entra to AD (AAD2ADGroup provisioning) | The job does not provision the security group. |
| A security group whose SOA is in on-premises and all user members have SOA on-premises | Security group whose SOA is on-premises | Users whose SOA is on-premises | AD to Entra (AD2AADprovisioning) | The job provisions the security group with all its member references (member users). |
| A security group whose SOA is in on-premises and all user members have SOA in cloud | Security group whose SOA is on-premises | Users whose SOA is in cloud | AD to Entra (AD2AADprovisioning) | The job provisions the security group with all its member references (member users). So member references whose SOA is converted to cloud for these on-prem groups will also be synced. |
| A security group whose SOA is in on-premises and some user members have SOA in cloud while others have SOA on-premises | Security group whose SOA is on-premises | Some users have SOA in cloud while some have SOA on-premises | AD to Entra (AD2AADprovisioning) | The job provisions the parent group with all its member references (member users). So member references whose SOA is converted to cloud for these on-prem groups will also be synced. |
| A security group whose SOA is in on-premises and has no user members | Security group whose SOA is on-premises | No user members | AD to Entra (AD2AADprovisioning) | The job provisions the security group (empty membership). |
| A security group whose SOA is in cloud and all user members have SOA on-premises | Security group whose SOA is cloud | Users whose SOA is on-premises | AD to Entra (AD2AADprovisioning) | The job does not provision the security group. |
| A security group whose SOA is in cloud and all user members have SOA in cloud | Security group whose SOA is cloud | Users whose SOA is in cloud | AD to Entra (AD2AADprovisioning) | The job does not provision the security group. |
| A security group whose SOA is in cloud and some user members have SOA in cloud while others have SOA on-premises | Security group whose SOA is cloud | Some users have SOA in cloud while some have SOA on-premises | AD to Entra (AD2AADprovisioning) | The job does not provision the security group. |
Assumptions
This tutorial assumes:
You have an AD DS on-premises environment
You have cloud sync setup to synchronize users to Microsoft Entra ID.
You have two users that are synchronized: Britta Simon and Lola Jacobson. These users exist on-premises and in Microsoft Entra ID.
An organizational unit (OU) is created in AD DS for each of the following departments:
Display name Distinguished name Marketing OU=Marketing,DC=contoso,DC=com Sales OU=Sales,DC=contoso,DC=com Groups OU=Groups,DC=contoso,DC=com
Add users to cloud-native or Source of Authority (SOA) converted security groups
To add synced users, follow these steps:
Note
Only synced user member references are provisioned to AD DS.
- Sign in to the Microsoft Entra admin center as at least a Hybrid Identity Administrator.
- Browse to Entra ID > Groups > All groups.
- At the top, in the search box, enter Sales.
- Select the new Sales group.
- On the left, select Members.
- At the top, select Add members.
- At the top, in the search box, enter Britta Simon.
- Put a check next to Britta Simon and select Select.
- It should successfully add the user to the group.
- On the far left, select All groups. Repeat this process by using the Sales group, and add Lola Jacobson to that group.
Prepare SOA converted groups for provisioning to their original organizational unit (OU) path
Complete these steps to prepare groups that you plan to convert to be cloud-managed for provisioning from Microsoft Entra ID back to their original OU path in Active Directory Domain Services (AD DS) on-premises:
- Change the AD DS group scope to Universal.
- Create a special application.
- Create the directory extension property for groups.
Change the group scope for the AD DS groups to Universal
- Open Active Directory Administrative Center.
- Right-click a group, click Properties.
- In the Group section, select Universal as the group scope.
- Click Save.
Create the extension
Cloud Sync only supports extensions created on a special application called CloudSyncCustomExtensionsApp. If the app doesn't exist in your tenant, you must create it. This step is performed once per tenant.
For more information about how to create the extension, see Cloud sync directory extensions and custom attribute mapping.
Open an elevated PowerShell window and run the following commands to install modules and connect:
Install-Module Microsoft.Graph -Scope CurrentUser -Force
Connect-MgGraph -Scopes "Application.ReadWrite.All","Directory.ReadWrite.All","Directory.AccessAsUser.All"
Check if the application exists. If it doesn't, create it. Also ensure a service principal is present.
$tenantId = (Get-MgOrganization).Id
$app = Get-MgApplication -Filter "identifierUris/any(uri:uri eq 'API://$tenantId/CloudSyncCustomExtensionsApp')"
if (-not $app) {
  $app = New-MgApplication -DisplayName "CloudSyncCustomExtensionsApp" -IdentifierUris "API://$tenantId/CloudSyncCustomExtensionsApp"
}
$app

$sp = Get-MgServicePrincipal -Filter "AppId eq '$($app.AppId)'"
if (-not $sp) {
  $sp = New-MgServicePrincipal -AppId $app.AppId
}
$sp
Now add a directory extension property named GroupDN. This will be a string attribute available on group objects.
New-MgApplicationExtensionProperty `
  -ApplicationId $app.Id `
  -Name "GroupDN" `
  -DataType "String" `
  -TargetObjects Group
For more information about how to create the directory extension property for groups, see Cloud sync directory extensions and custom attribute mapping.
Configure Cloud Sync attribute mapping
Next, tell Cloud Sync to populate this extension property with the group’s Distinguished Name (DN) from Active Directory. This step ensures the original OU and CN information are preserved in Microsoft Entra ID.
- Open Microsoft Entra admin center > Entra ID > Entra Connect > Cloud Sync.
- Select your AD-to-Microsoft Entra ID configuration.
- Go to Attribute mappings.
- At the top, switch Object type to Group.
- Add a new attribute mapping.
- Mapping type: Direct
- Source attribute: distinguishedName (the on-premises group’s DN)
- Target attribute:
extension_<appIdWithoutHyphens>_GroupDN
- Save the schema to trigger a sync.
By mapping distinguishedName directly, you capture the group’s full DN (CN + OU path) in the extension property, making it easier to later reconstruct both CN and OU when provisioning back to AD.
Verify that the mapping worked
Once sync runs, you should verify that the extension property is populated with the DN. Use Microsoft Graph PowerShell:
$groupDisplayName = 'My Security Group'
$clientId = $app.AppId
$propName = "extension_{0}_GroupDN" -f ($clientId -replace "-","")
$grp = Get-MgGroup -Filter "displayName eq '$groupDisplayName'" -ConsistencyLevel eventual
Get-MgGroup -GroupId $grp.Id -Property "id,displayName,$propName" |
  Select-Object id, displayName, @{n=$propName; e={$_."$propName"}}
This command returns the group with its DN stored in the extension property. You can also test using Graph Explorer by querying:
GET /v1.0/groups/{id}?$select=displayName,extension_<appIdNoHyphens>_GroupDN
Convert Source of Authority (SOA)
Once you have validated the DN is stored in the extension, you can convert the group’s Source of Authority to Microsoft Entra ID. This change makes the group cloud-managed while preserving its original DN in the extension for later use in group provisioning to AD DS.
Configure provisioning
To configure provisioning, follow these steps:
Sign in to the Microsoft Entra admin center as at least a Hybrid Identity Administrator.
Browse to Entra ID > Entra Connect > Cloud sync.


Select New configuration.
Select Microsoft Entra ID to AD sync.

On the configuration screen, select your domain. Select Create.
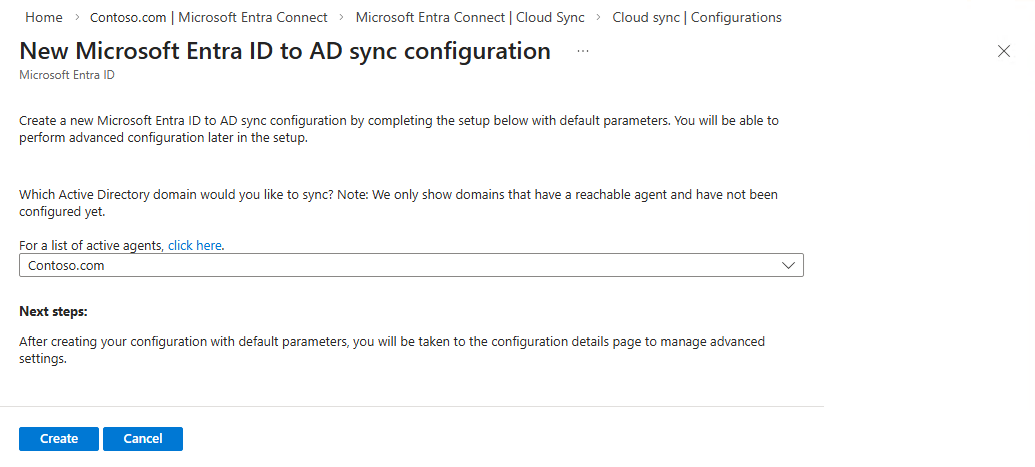
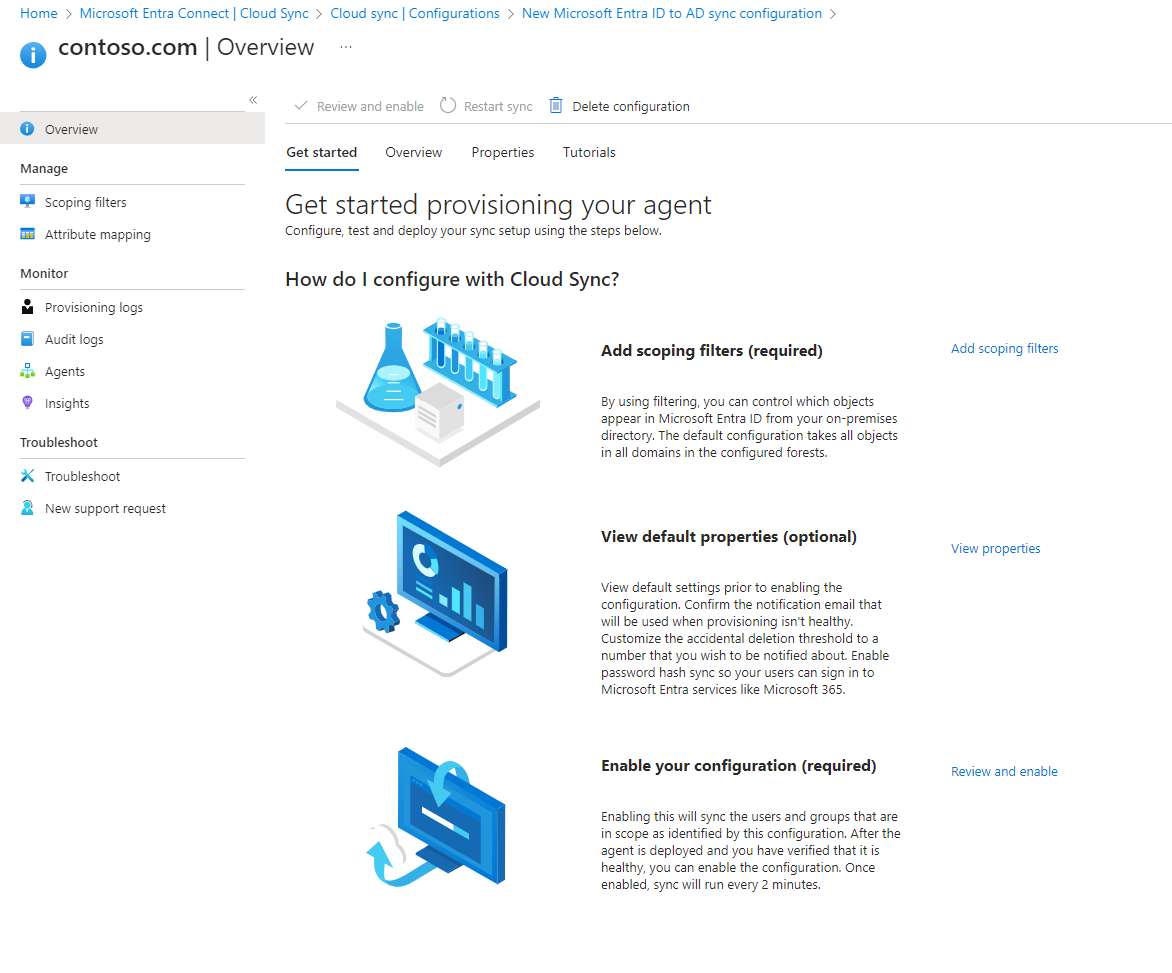
The Get started screen opens. From here, you can continue configuring cloud sync.
On the left, select Scoping filters.
For Groups scope, select Selected security groups.
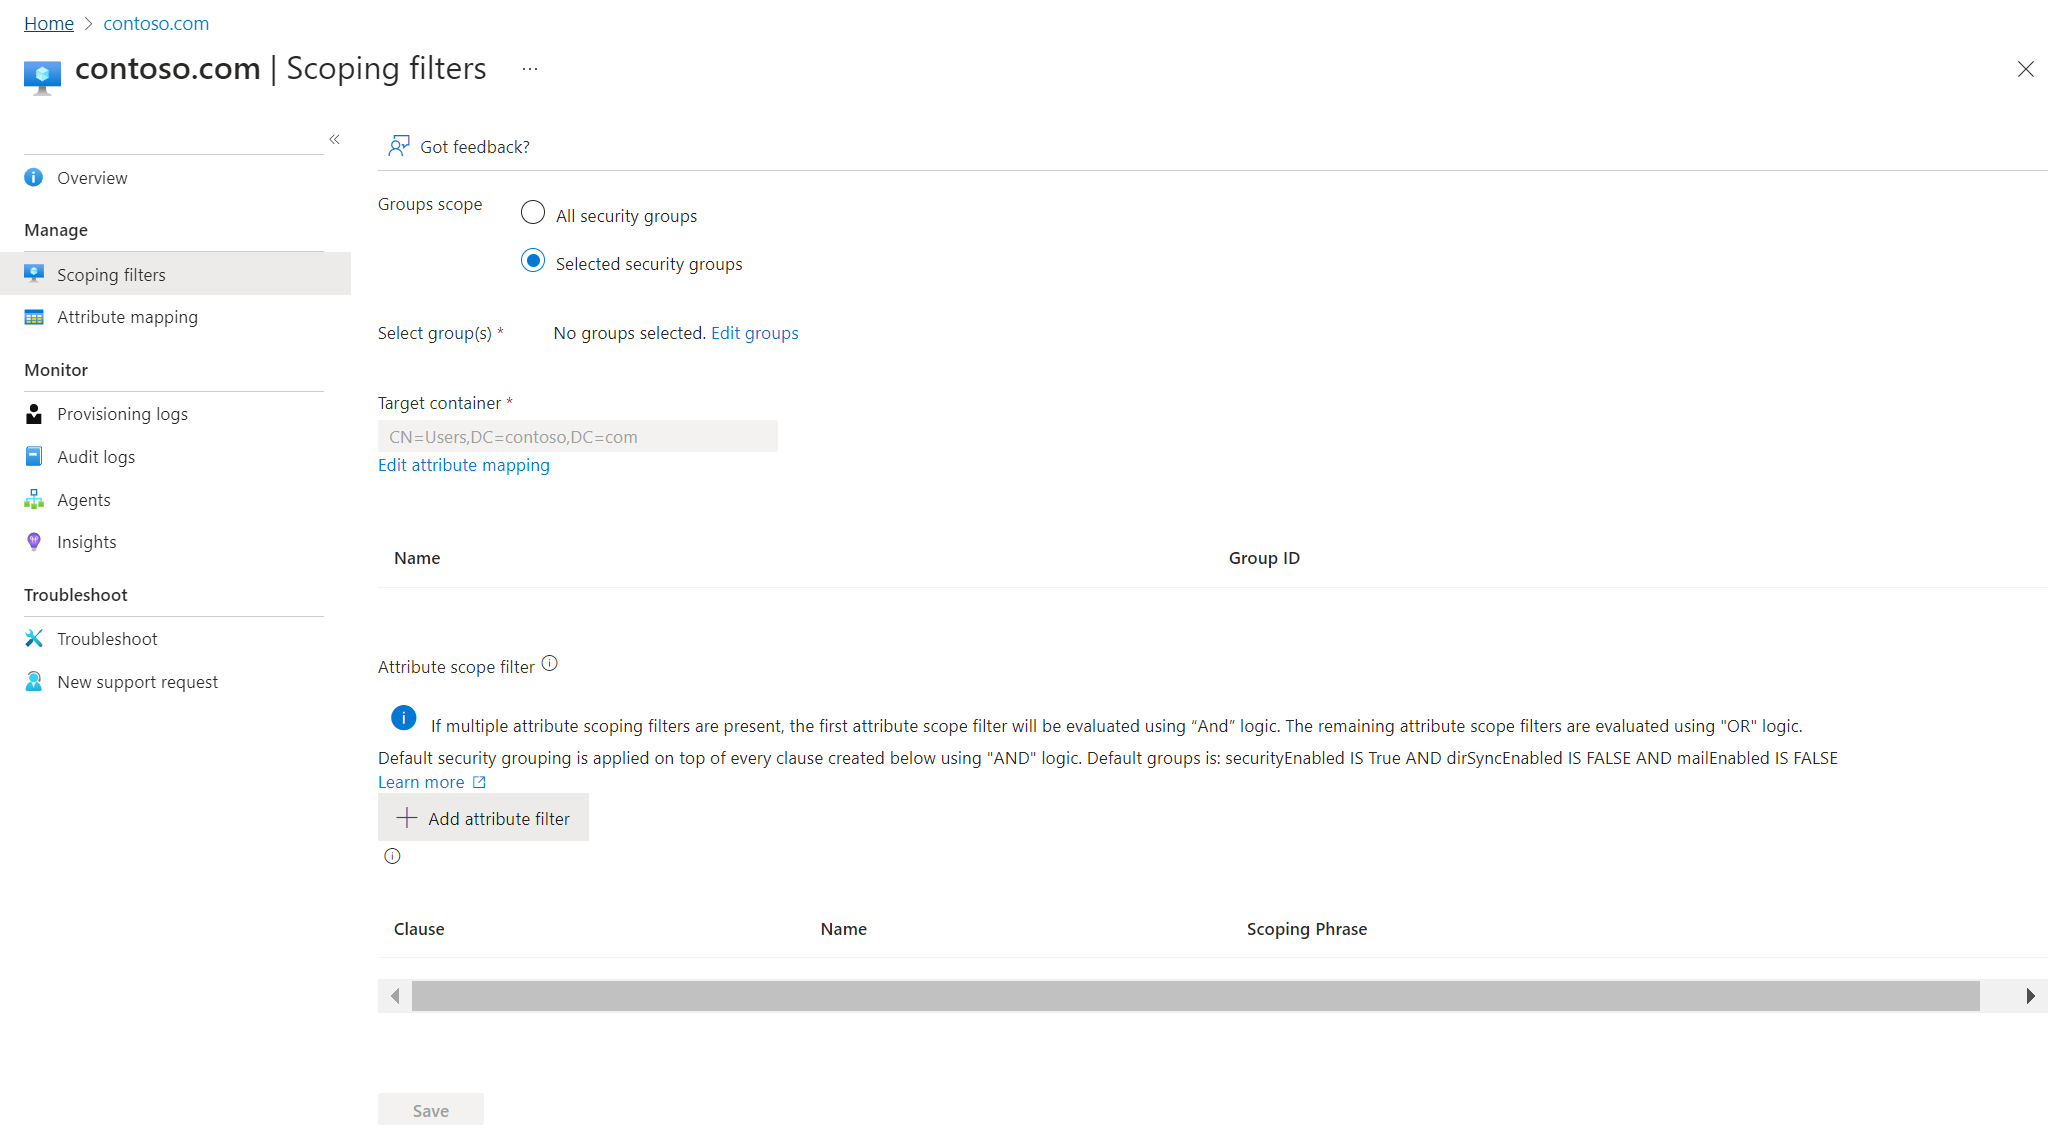
There are three possible approaches to set the target OU where the groups are provisioned:
You can use a constant OU mapping to provision all groups in the same OU:
Under Target container, select Edit attribute mapping.
For Constant value, enter the DistinguishedName for the target OU.
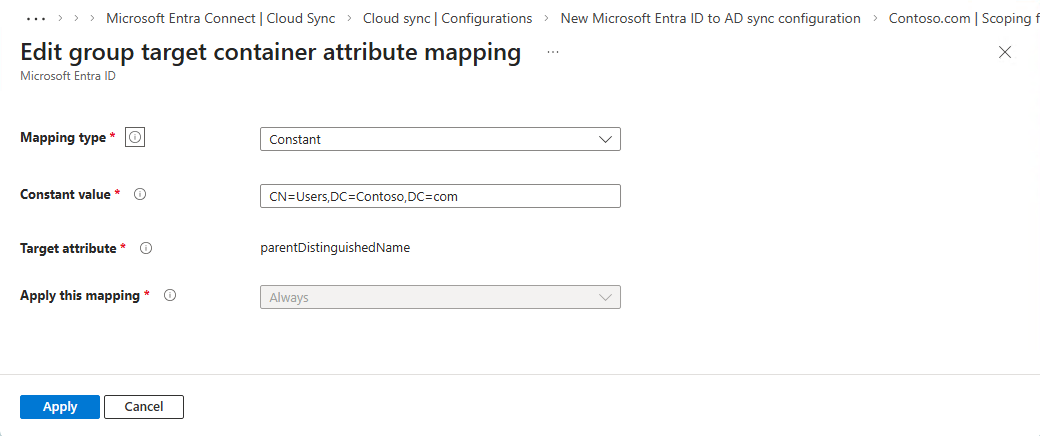
Select Apply.
Select Save.
You can use custom expressions to ensure the group is re-created with the same OU. This expression can strip the CN portion of the Group's DN and preserve the parent DN path, handling escaped commas, and provide a default OU if the extension value is empty. Use the following expression for
ParentDistinguishedNamemapping by adapting the sample expression, or by running the PowerShell script to generate the final expression.Note
This expression assumes you have already created an extension property for GroupDN. If not, please do that first before using the sample expression or running the script.
- From the following sample expression, replace the placeholders with your respective values for your extension attribute name
extension_<AppIdWithoutHyphens>_GroupDN. For your default target OU (in case the extension value isNULL), replace the<Default ParentDistinguishedName>:
IIF( IsPresent([extension_<AppIdWithoutHyphens>_GroupDN]), Replace( Mid( Mid( Replace([extension_<AppIdWithoutHyphens>_GroupDN], "\,", , , "\2C", , ), Instr(Replace([extension_<AppIdWithoutHyphens>_GroupDN], "\,", , , "\2C", , ), ",", , ), 9999 ), 2, 9999 ), "\2C", , , ",", , ), "<Default ParentDistinguishedName>" )- Or, provide the value for the
$defaultGroupOUparameter and execute the script to generate the final expression as a text file:
# Provide the Default OU for groups that don't have the GroupDN extension populated. $defaultGroupOU = 'OU=Groups,OU=SYNC,DC=adatum,DC=com' # Get the extension name $tenantId = (Get-MgOrganization).Id $app = Get-MgApplication -Filter "identifierUris/any(uri:uri eq 'API://$tenantId/CloudSyncCustomExtensionsApp')" $ext = Get-MgApplicationExtensionProperty -ApplicationId $app.Id | Where-Object { $_.Name -like '*GroupDN' } $groupDN_extension = $ext.Name "GroupDN extension name: $groupDN_extension" # Sample expression $groupDN_expression = @' IIF( IsPresent([{groupDN_extension}]), Replace( Mid( Mid( Replace([{groupDN_extension}], "\,", , , "\2C", , ), Instr(Replace([{groupDN_extension}], "\,", , , "\2C", , ), ",", , ), 9999 ), 2, 9999 ), "\2C", , , ",", , ), "{defaultGroupOU}" ) '@ # Generate the expression by replacing the placeholders with actual values $groupDN_expression -replace ('{groupDN_extension}', $groupDN_extension) -replace ('{defaultGroupOU}', $defaultGroupOU) | Out-File -FilePath '.\GroupDN_expression.txt' -Encoding utf8 &'.\GroupDN_expression.txt'- Change Mapping type to Expression.
- In the expression box, insert the updated expression and select Apply.
- Select Save.
- From the following sample expression, replace the placeholders with your respective values for your extension attribute name
If you want to place groups into different organizational units based on their DisplayName:
Adapt the following expression and place it in expression box:
Switch([displayName],"OU=Groups,DC=contoso,DC=com","Marketing","OU=Marketing,DC=contoso,DC=com","Sales","OU=Sales,DC=contoso,DC=com")Update the Default value to be the default target OU, for example,
OU=Groups,DC=contoso,DC=com.
Select Apply. The target container changes depending on the group displayName attribute.
Select Save.
Note
These changes cause a full sync and don’t affect existing groups. Test setting the GroupDN attribute for an existing group using Microsoft Graph and ensure that it writes back to original OU.
You can use a custom expression to ensure the group is re-created with the same CommonName (CN). This expression can extract the CN value, handling escaped commas by temporarily replacing them with hex values, and provide a fallback CN from DisplayName + ObjectId if the extension is empty. Use the following expression for
cnmapping by adapting the sample expression, or by running the PowerShell script to generate the final expression.Note
This expression assumes you have already created an extension property for GroupDN. If not, do that first before using the sample expression or running the script.
- If you want to adapt a sample expression, replace the placeholders with your respective values for your extension attribute name
extension_<AppIdWithoutHyphens>_GroupDN.
IIF( IsPresent([extension_<AppIdWithoutHyphens>_GroupDN]), Replace( Replace( Replace( Word(Replace([extension_<AppIdWithoutHyphens>_GroupDN], "\,", , , "\2C", , ), 1, ","), "CN=", , , "", , ), "cn=", , , "", , ), "\2C", , , ",", , ), Append(Append(Left(Trim([displayName]), 51), "_"), Mid([objectId], 25, 12)) )- Or, if you want to use a Microsoft Graph PowerShell script:
# Get the extension name $tenantId = (Get-MgOrganization).Id $app = Get-MgApplication -Filter "identifierUris/any(uri:uri eq 'API://$tenantId/CloudSyncCustomExtensionsApp')" $ext = Get-MgApplicationExtensionProperty -ApplicationId $app.Id | Where-Object { $_.Name -like '*GroupDN' } $groupDN_extension = $ext.Name "GroupDN extension name: $groupDN_extension" # Sample expression $groupCN_expression = @' IIF( IsPresent([{groupDN_extension}]), Replace( Replace( Replace( Word(Replace([{groupDN_extension}], "\,", , , "\2C", , ), 1, ","), "CN=", , , "", , ), "cn=", , , "", , ), "\2C", , , ",", , ), Append(Append(Left(Trim([displayName]), 51), "_"), Mid([objectId], 25, 12)) ) '@ # Generate the expression by replacing the placeholders with actual values $groupCN_expression -replace ('{groupDN_extension}', $groupDN_extension) | Out-File -FilePath '.\GroupCN_expression.txt' -Encoding utf8 &'.\GroupCN_expression.txt'- Go to Attribute mapping.
- Edit the
cnattribute mapping. - Change Mapping type to Expression.
- In the expression box, insert the updated expression and select Apply.
- Select Save schema.
- If you want to adapt a sample expression, replace the placeholders with your respective values for your extension attribute name
On the left, select Overview.
At the top, select Review and enable.
On the right, select Enable configuration.


Test configuration
Note
When you run on-demand provisioning, members aren't automatically provisioned. You need to select the members you want to test, and the limit is five members. If you want to test after removing a member, select View all users and then select the member(s) that have been removed from the group.
Sign in to the Microsoft Entra admin center as at least a Hybrid Identity Administrator.
Browse to Entra ID > Entra Connect > Cloud sync.
Under Configuration, select your configuration.
On the left, select Provision on demand.
Enter Sales in the Selected group box.
From the Selected users section, select some users to test.

Select Provision.
You should see the group provisioned.


Verify in AD DS
Follow these steps to make sure the group is provisioned to AD DS:
Sign in to your on-premises environment.
Launch Active Directory Users and Computers.
Verify the new group is provisioned.


Group provision to AD DS behavior for SOA converted objects
When you convert the Source of Authority (SOA) to cloud for an on-premises group, that group becomes eligible for group provisioning to AD DS.
For example, in the following diagram, the SOA or SOATestGroup1 is converted to the cloud. As a result, it becomes available for the job scope in group provisioning to AD DS.

When a job runs, SOATestGroup1 is provisioned successfully.
In the Provisioning logs, you can search for SOATestGroup1 and verify that the group was provisioned.

The details show that SOATestGroup1 was matched with an existing target group.

You can also confirm that the adminDescription and cn of the target group are updated.

When you look at AD DS, you can find that the original group is updated.


Cloud skips provisioning converted SOA objects to Microsoft Entra ID
If you try to edit an attribute of a group in AD DS after you convert SOA to the cloud, Cloud Sync skips the object during provisioning.
Let's say we have a group SOAGroup3, and we update its group name to SOA Group3.1.

In the Provisioning Logs, you can see that SOAGroup3 was skipped.

The details explain that the object isn't synced because its SOA is converted to the cloud.

Nested groups and membership references handling
The following table explains how the provisioning handles membership references after you convert SOA in different use cases.
| Use case | Parent group type | Member group type | Job | How sync works |
|---|---|---|---|---|
| A Microsoft Entra parent security group has only Microsoft Entra members. | Microsoft Entra security group | Microsoft Entra security group | AAD2ADGroupProvisioning (group provisioning to AD DS) | The job provisions the parent group with all its member references (member groups). |
| A Microsoft Entra parent security group has some members that are synced groups. | Microsoft Entra security group | AD DS security groups (synced groups) | AAD2ADGroupProvisioning (group provisioning to AD DS) | The job provisions the parent group, but all the member references (member Groups) that are AD DS groups aren't provisioned. |
| A Microsoft Entra parent security group has some members that are synced groups whose SOA is converted to cloud. | Microsoft Entra security group | AD DS security groups whose SOA is converted to cloud. | AAD2ADGroupProvisioning (group provisioning to AD DS) | The job provisions the parent group with all its member references (member groups). |
| You convert the SOA of a synced group (parent) that has cloud-owned groups as members. | AD DS security groups with SOA converted to cloud | Microsoft Entra security group | AAD2ADGroupProvisioning (group provisioning to AD DS) | The job provisions the parent group with all its member references (member groups). |
| You convert the SOA of a synced group (parent) that has other synced groups as members. | AD DS security groups with SOA converted to cloud | AD DS security groups (synced groups) | AAD2ADGroupProvisioning (group provisioning to AD DS) | The job provisions the parent group, but all the member references (member Groups) that are AD DS security groups aren't provisioned. |
| You convert the SOA of a synced group (parent) whose members are other synced groups that have SOA converted to cloud. | AD DS security groups with SOA converted to cloud | AD DS security groups with SOA converted to cloud | AAD2ADGroupProvisioning (group provisioning to AD DS) | The job provisions the parent group with all its member references (member groups). |
Group provision to AD DS behavior after you roll back SOA converted groups
If you have SOA converted groups in scope and you roll back the SOA converted group to make it owned by AD DS, group provisioning to AD DS stops syncing the changes, but it doesn't delete the on-premises group. It also removes the group from configuration scope. On-premises control of the group resumes in the next sync cycle.
You can verify in the Audit Logs that sync doesn't happen for this object because it's managed on-premises.

You can also check in AD DS that the group is still intact and not deleted.


