Note
Access to this page requires authorization. You can try signing in or changing directories.
Access to this page requires authorization. You can try changing directories.
A Microsoft Fabric notebook is a primary code item for developing Apache Spark jobs and machine learning experiments. It's a web-based interactive surface used by data scientists and data engineers to write code benefiting from rich visualizations and Markdown text. This article explains how to develop notebooks with code cell operations and run them.
Develop notebooks
Notebooks consist of cells, which are individual blocks of code or text that can be run independently or as a group.
We provide rich operations to develop notebooks:
- Add a cell
- Set a primary language
- Use multiple languages
- IDE-style IntelliSense
- Code snippets
- Drag and drop to insert snippets
- Drag and drop to insert images
- Format text cell with toolbar buttons
- Undo or redo cell operation
- Move a cell
- Delete a cell
- Collapse a cell input
- Collapse a cell output
- Cell output security
- Lock or freeze a cell
- Notebook contents
- Markdown folding
- Find and replace
- Full‑size mode on a cell
Add a cell
There are multiple ways to add a new cell to your notebook.
Hover over the space between two cells and select Code or Markdown.
Use Shortcut keys in command mode. Press A to insert a cell above the current cell. Press B to insert a cell below the current cell.
Set a primary language
Fabric notebooks currently support four Apache Spark languages:
- PySpark (Python)
- Spark (Scala)
- Spark SQL
- SparkR
You can set the primary language for new added cells from the drop-down list in the top command bar.
Use multiple languages
You can use multiple languages in a notebook by specifying the language magic command at the beginning of a cell. You can also switch the cell language from the language picker. The following table lists the magic commands for switching cell languages.

| Magic command | Language | Description |
|---|---|---|
| %%pyspark | Python | Execute a Python query against Apache Spark Context. |
| %%spark | Scala | Execute a Scala query against Apache Spark Context. |
| %%sql | SparkSQL | Execute a SparkSQL query against Apache Spark Context. |
| %%html | Html | Execute n HTML query against Apache Spark Context. |
| %%sparkr | R | Execute a R query against Apache Spark Context. |
IDE-style IntelliSense
Fabric notebooks are integrated with the Monaco editor to bring IDE-style IntelliSense to the cell editor. Syntax highlight, error marker, and automatic code completions help you to quickly write code and identify issues.
The IntelliSense features are at different levels of maturity for different languages. The following table shows what Fabric supports:
| Languages | Syntax highlight | Syntax error marker | Syntax code completion | Variable code completion | System function code completion | User function code completion | Smart indent | Code folding |
|---|---|---|---|---|---|---|---|---|
| PySpark (Python) | Yes | Yes | Yes | Yes | Yes | Yes | Yes | Yes |
| Python | Yes | Yes | Yes | Yes | Yes | Yes | Yes | Yes |
| Spark (Scala) | Yes | Yes | Yes | Yes | Yes | Yes | Yes | Yes |
| SparkSQL | Yes | Yes | Yes | Yes | Yes | No | Yes | Yes |
| SparkR | Yes | Yes | Yes | Yes | Yes | Yes | Yes | Yes |
| T-SQL | Yes | Yes | Yes | No | Yes | Yes | Yes | Yes |
Note
You must have an active Apache Spark session to use IntelliSense code completion.
Enhance Python Development with Pylance
Pylance, a powerful and feature-rich language server, is now available in Fabric notebook. Pylance makes Python development easier with smart completions, better error detection, and improved code insights. Key improvements include smarter autocompletion, enhanced lambda support, parameter suggestions, improved hover information, better docstring rendering, and error highlighting. With Pylance, writing Python and PySpark code becomes faster, more accurate, and more efficient.
Code snippets
Fabric notebooks provide code snippets that help you easily write commonly used code patterns, like:
- Reading data as an Apache Spark DataFrame
- Drawing charts with Matplotlib
Snippets appear in Shortcut keys of IDE style IntelliSense mixed with other suggestions. The code snippet contents align with the code cell language. You can see available snippets by typing Snippet. You can also type any keyword to see a list of relevant snippets. For example, if you type read, you see the list of snippets to read data from various data sources.

Drag and drop to insert snippets
Use drag and drop to read data from Lakehouse explorer conveniently. Multiple file types are supported here; you can operate on text files, tables, images, etc. You can either drop to an existing cell or to a new cell. The notebook generates the code snippet accordingly to preview the data.

Drag and drop to insert images
Use drag and drop to easily insert images from your browser or local computer to a markdown cell.

Format text cell with toolbar buttons
To complete common markdown actions, use the format buttons in the text cell toolbar.

Undo or redo cell operations
Select Undo or Redo, or press Z or Shift+Z to revoke the most recent cell operations. You can undo or redo up to 10 of the latest historical cell operations.

Supported undo cell operations:
- Insert or delete cell. You can revoke the deleted operations by selecting Undo (the text content is kept along with the cell).
- Reorder cell.
- Toggle parameter.
- Convert between code cell and Markdown cell.
Note
In-cell text operations and code cell commenting operations can't be undone. You can undo or redo up to 10 of the latest historical cell operations.
Move a cell
You can drag from the empty part of a cell and drop it to the desired position.
You can also move the selected cell using Move up and Move down on the ribbon.

Delete a cell
To delete a cell, select the delete button at the right side of the cell.
You can also use shortcut keys in command mode. Press D,D (D twice) to delete the current cell.
Collapse a cell input
Select the More commands ellipses (...) on the cell toolbar and Hide input to collapse the current cell's input. To expand it again, select Show input when the cell is collapsed.
Collapse a cell output
Select the More commands ellipses (...) on the cell toolbar and Hide output to collapse the current cell's output. To expand it again, select Show output when the cell output is collapsed.
Cell output security
You can use OneLake data access roles (preview) to configure access to only specific folders in a lakehouse during notebook queries. Users without access to a folder or table see an unauthorized error during query execution.
Important
Security only applies during query execution. Notebook cells that contain query results can be viewed by users that aren't authorized to run queries against the data directly.
Lock or freeze a cell
The lock and freeze cell operations allow you to make cells read-only or stop code cells from being run on an individual basis.

Merge and split cells
You can use Merge with previous cell or Merge with next cell to merge related cells conveniently.
Selecting Split cell helps you split irrelevant statements to multiple cells. The operation splits the code according to your cursor's line position.

Notebook contents
Selecting Outlines or Table of Contents presents the first markdown header of any markdown cell in a sidebar window for quick navigation. The Outlines sidebar is resizable and collapsible to fit the screen in the best way possible. Select the Contents button on the notebook command bar to open or hide the sidebar.

Markdown folding
The markdown folding option allows you to hide cells under a markdown cell that contains a heading. The markdown cell and its hidden cells are treated the same as a set of contiguous multi-selected cells when performing cell operations.

Find and replace
The find and replace option can help you match and locate the keywords or expression within your notebook content. You can also easily replace the target string with a new string.

Full‑size mode on a cell
Full‑size mode lets you fully focus on writing and editing code within a single cell - perfect for long or complex logic. You can toggle this mode by clicking the expand cell button in the cell toolbar to expand the cell, and exit by clicking return to default size.

Copilot inline code completion (preview)
Copilot inline code completion is an AI-powered feature that helps you to write Python code faster and more efficiently in Fabric Notebooks. This feature provides intelligent, context-aware code suggestions as you type code. It reduces repetitive tasks, minimizes syntax errors, and accelerates development by integrating seamlessly into your notebook workflow.
Key benefits
- AI-driven completions: Generates suggestions based on your notebook's context using a model trained on millions of lines of code.
- Boosts productivity: Helps write complex functions, reduces repetitive coding, and speeds up exploration of unfamiliar libraries.
- Reduces errors: Minimizes typos and syntax mistakes with intelligent, context-aware completions.
- Minimal setup: Built into Fabric notebooks and doesn't require any installation. You can just enable it and start coding.
How it works
Enable inline code suggestions using the toggle at the bottom of your notebook.

As you type, suggestions appear in light gray text, press tab to accept or modify. Suggestions are based on previous notebook cells.

Note
Enabling Copilot inline code completion consumes more capacity units.
Current limitations
- Copilot Inline Code Completion currently supports Python language and uses context from previous cells and Lakehouse schemas.
- Suggestions consider data from Lakehouse schemas.
- Only a subset of schema elements is used when there are many tables or columns.
- Dynamically created tables (via Spark) aren't recognized in real time.
- Inline completions are primarily scoped to context from prior cells and Lakehouse schemas. The notebook-wide Copilot actions and diagnostics described in the following sections can use broader notebook context (structure and runtime state) without requiring a Spark session to start.
Copilot notebook-wide actions
Copilot supports multi-step, notebook-wide capabilities that go beyond individual cells. You can use Copilot to generate code across cells, refactor logic into reusable functions, summarize entire workflows, and validate notebook output. Copilot understands the workspace context, attached Lakehouse schemas, tables, and files, notebook structure, and runtime state, and is immediately context-aware without requiring a Spark session to start.
For details on the chat pane and slash commands, see Use the Copilot chat pane.
Performance insights with Copilot
Copilot surfaces optimization recommendations based on data size, join patterns, and runtime behavior. For example, it can propose efficient join strategies, help you avoid data shuffles, spot data quality issues, and suggest refactors for better reuse and maintainability. These insights appear in Copilot conversations and align with the /optimize command.
Fix with Copilot
When a cell or Spark job fails, a Fix with Copilot option appears below the failed cell. Copilot provides an error summary, likely root cause, recommended fixes, and the ability to auto-apply changes with an approval diff. You can also use the /fix command in Copilot chat to run targeted diagnostics on a specific cell or the entire notebook.
For more information, see Diagnose notebook failures with Copilot.
Run notebooks
You can run the code cells in your notebook individually or all at once. The status and progress of each cell is displayed in the notebook.
Run a cell
There are several ways to run the code in a cell.
Hover on the cell you want to run and select the Run cell button or press Ctrl+Enter.
Use Shortcut keys in command mode. Press Shift+Enter to run the current cell and select the next cell. Press Alt+Enter to run the current cell and insert a new cell.
Run all cells
Select the Run all button to run all the cells in the current notebook in sequence.
Run all cells above or below
Expand the drop-down list from Run all, then select Run cells above to run all the cells above the current in sequence. Select Run cells below to run the current cell and all the cells below the current in sequence.

Cancel all running cells
Select Cancel all to cancel the running cells or cells waiting in the queue.
Stop session
Stop session cancels the running and waiting cells and stops the current session. You can restart a brand new session by selecting the run option again.

Reference run
Reference run a Notebook
In addition to notebookutils reference run API, you can also use the %run <notebook name> magic command to reference another notebook within current notebook's context. All the variables defined in the reference notebook are available in the current notebook. The %run magic command supports nested calls but doesn't support recursive calls. You receive an exception if the statement depth is larger than five.
Example:
%run Notebook1 { "parameterInt": 1, "parameterFloat": 2.5, "parameterBool": true, "parameterString": "abc" }.
Notebook reference works in both interactive mode and pipeline.
Note
- The
%runcommand currently only supports reference notebooks in the same workspace with the current notebook. - The
%runcommand currently only supports up to four parameter value types:int,float,bool, andstring. Variable replacement operation isn't supported. - The
%runcommand doesn't support nested reference with a depth larger than five.
Reference run a script
The %run command also allows you to run Python or SQL files that are stored in the notebook’s built-in resources, so you can execute your source code files in notebook conveniently.
%run [-b/--builtin -c/--current] [script_file.py/.sql] [variables ...]
For options:
- -b/--builtin: This option indicates that the command finds and runs the specified script file from the notebook’s built-in resources.
- -c/--current: This option ensures that the command always uses the current notebook’s built-in resources, even if the current notebook is referenced by other notebooks.
Examples:
To run script_file.py from the built-in resources:
%run -b script_file.pyTo run script_file.sql from the built-in resources:
%run -b script_file.sqlTo run script_file.py from the built-in resources with specific variables:
%run -b script_file.py { "parameterInt": 1, "parameterFloat": 2.5, "parameterBool": true, "parameterString": "abc" }
Note
If the command doesn't contain -b/--builtin, it attempts to find and execute notebook item inside the same workspace rather than the built-in resources.
Usage example for nested run case:
- Suppose we have two notebooks.
- Notebook1: Contains script_file1.py in its built-in resources
- Notebook2: Contains script_file2.py in its built-in resources
- Let's use Notebook1 work as a root notebook with the content:
%run Notebook2. - Then in the Notebook2 the usage instruction is:
- To run script_file1.py in Notebook1(the root Notebook), the code would be:
%run -b script_file1.py - To run script_file2.py in Notebook2(the current Notebook), the code would be:
%run -b -c script_file2.py
- To run script_file1.py in Notebook1(the root Notebook), the code would be:
Variable explorer
Fabric notebooks provide a built-in variables explorer that displays the list of the variables name, type, length, and value in the current Spark session for PySpark (Python) cells. More variables show up automatically as they're defined in the code cells. Clicking on each column header sorts the variables in the table.
To open or hide the variable explorer, select Variables on the notebook ribbon View.

Note
The variable explorer only supports Python.
Cell status indicator
A step-by-step cell execution status is displayed beneath the cell to help you see its current progress. Once the cell run is complete, an execution summary with the total duration and end time appears and is stored there for future reference.

Session status indicator
Session timeout config
In the bottom left corner, you can select the session status to get more information about the current session:

In the pop-up, there's an option to reset the timeout to x minutes or hours.

Take your pick in how long you want an uninterrupted session, and hit apply. The session timeout resets itself with the new value and you're good to go!
You can also set timeout as described in:
- Data Engineering workspace administration settings in Microsoft Fabric
- Spark session configuration magic command
Stay signed in: During sign in, if you see the Stay signed in dialog, select Yes to deactivate the idle session timeout for your current session.
Important
Don't select the Don’t show this again checkbox, as this will lock in your sign-in settings permanently. This option might not appear if your tenant admin has disabled the Keep Me Signed In (KMSI) setting.
Request a policy change: If you need a longer session duration, ask your tenant admin to extend the idle session timeout duration policy. They can do this by navigating to Org Settings > Security & Privacy > Idle Session Timeout within the Microsoft 365 Admin Center.
Note
Selecting KMSI and/or extending the idle session timeout duration time extends the risk of an unlocked machine being accessed.
How do ABT and idle session timeout impact long-running Fabric Notebook executions?
If your tenant uses activity-based timeout (ABT), long-running interactive jobs in Fabric notebooks might be impacted by Microsoft 365's idle session timeout policy. This security feature is designed to sign out users on inactive, nonmanaged devices, even if a notebook job is still running. While activity in other Microsoft 365 apps can keep the session alive, idle devices are signed out by design.
Why are users signed out even when a notebook job is still running?
Idle session timeout prioritizes security by ending sessions on inactive devices to prevent unauthorized access. Even when a notebook execution is in progress, the session ends if the device shows no activity. Keeping sessions open on idle devices would compromise security, which is why the current behavior is enforced.
Inline Apache Spark job indicator
Fabric notebooks are Apache Spark based. Code cells are executed on the Apache Spark cluster remotely. A Spark job progress indicator is provided with a real-time progress bar that appears to help you understand the job execution status. The number of tasks per each job or stage helps you to identify the parallel level of your Spark job. You can also drill deeper to the Spark UI of a specific job (or stage) via selecting the link on the job (or stage) name.
You can also find the Cell level real-time log next to the progress indicator, and Diagnostics can provide you with useful suggestions to help refine and debug the code. When prompted, Copilot can use runtime job information to help surface performance and reliability recommendations. If a job or cell fails, the Fix with Copilot entry point is available to help diagnose and resolve the issue.

In More actions, you can easily navigate to the Spark application details page and Spark web UI page.

Secret redaction
To prevent credentials being accidentally leaked when running notebooks, Fabric notebooks support Secret redaction to replace the secret values that are displayed in cell output with [REDACTED]. Secret redaction is applicable for Python, Scala, and R.

Magic commands in a notebook
Built-in magic commands
You can use familiar Ipython magic commands in Fabric notebooks. Review the following list of currently available magic commands.
Note
These are the only magic commands supported in Fabric pipeline: %%pyspark, %%spark, %%csharp, %%sql, %%configure.
Available line magic commands: %lsmagic, %time, %timeit, %history, %run, %load, %alias, %alias_magic, %autoawait, %autocall, %automagic, %bookmark, %cd, %colors, %dhist, %dirs, %doctest_mode, %killbgscripts, %load_ext, %logoff, %logon, %logstart, %logstate, %logstop, %magic, %matplotlib, %page, %pastebin, %pdef, %pfile, %pinfo, %pinfo2, %popd, %pprint, %precision, %prun, %psearch, %psource, %pushd, %pwd, %pycat, %quickref, %rehashx, %reload_ext, %reset, %reset_selective, %sx, %system, %tb, %unalias, %unload_ext, %who, %who_ls, %whos, %xdel, %xmode.
Fabric notebook also supports the improved library management commands %pip and %conda. For more information about usage, see Manage Apache Spark libraries in Microsoft Fabric.
Available cell magic commands: %%time, %%timeit, %%capture, %%writefile, %%sql, %%pyspark, %%spark, %%csharp, %%configure, %%html, %%bash, %%markdown, %%perl, %%script, %%sh.
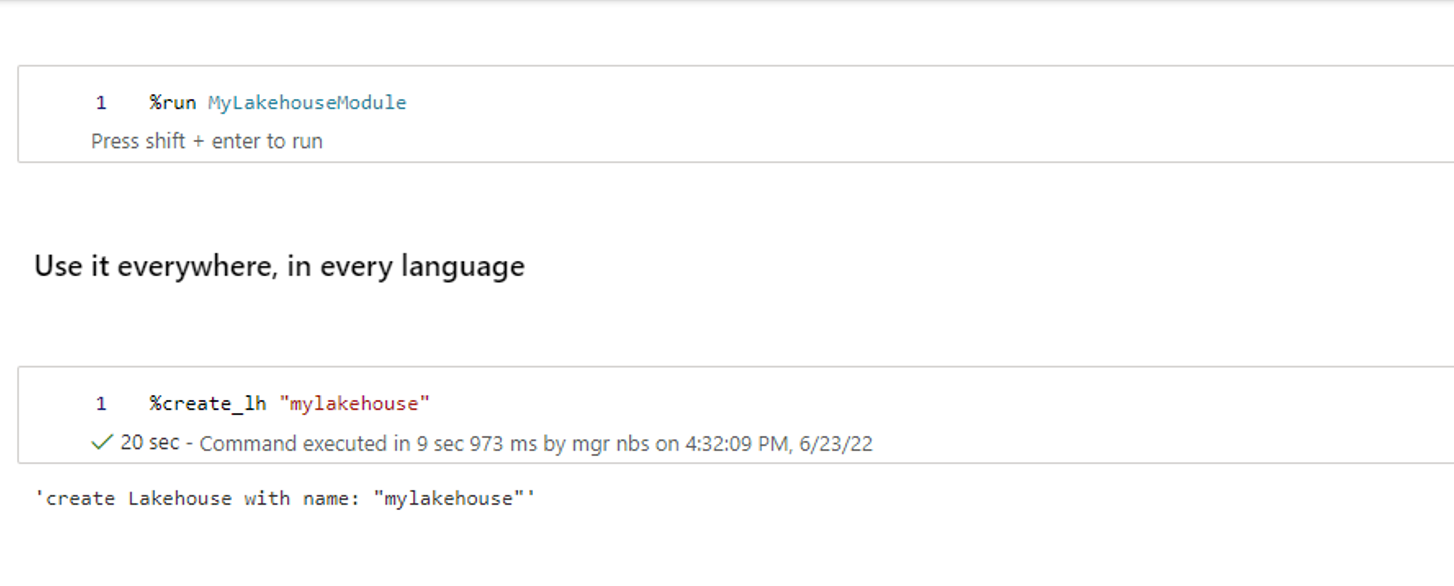
Custom magic commands
You can also build out more custom magic commands to meet your specific needs. Here's an example:
Create a notebook with name "MyLakehouseModule".
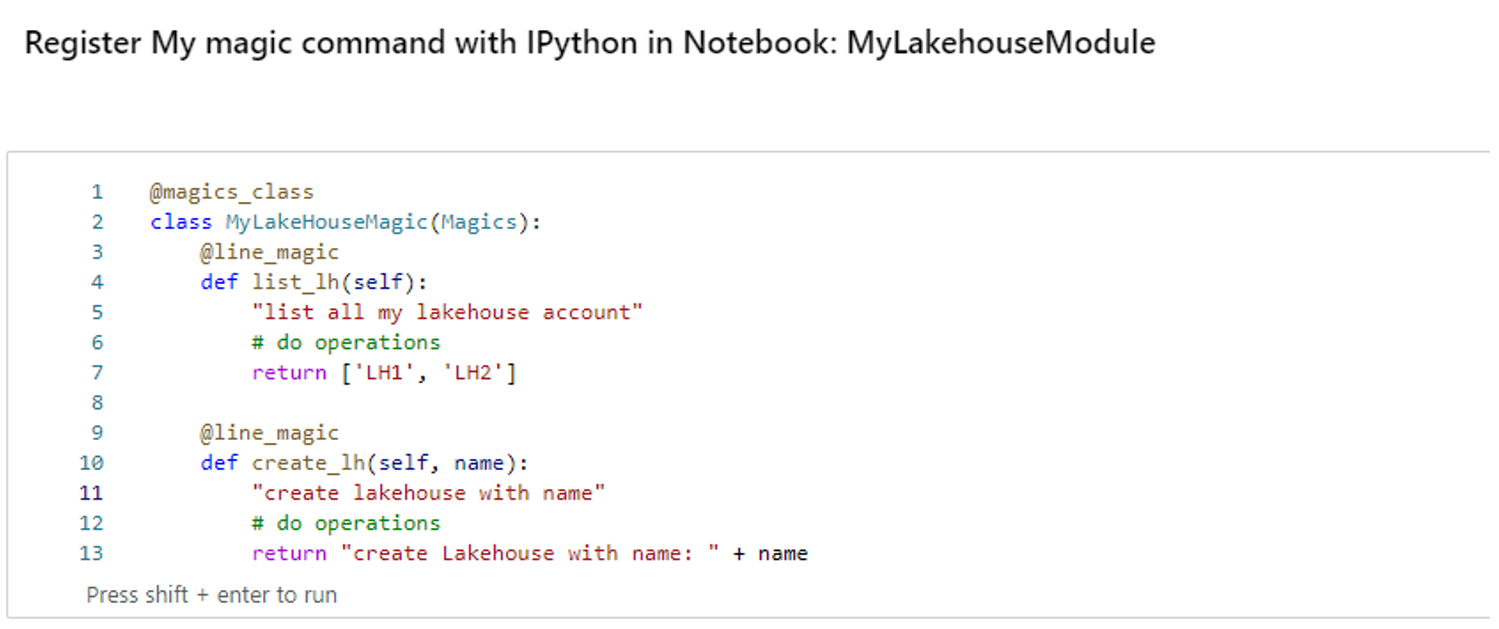
In another notebook, reference the "MyLakehouseModule" and its magic commands. This process is how you can conveniently organize your project with notebooks that use different languages.


IPython Widgets
IPython Widgets are eventful Python objects that have a representation in the browser. You can use IPython Widgets as low-code controls (for example, slider or text box) in your notebook, just like the Jupyter notebook. Currently it only works in a Python context.
To use IPython Widgets
Import the ipywidgets module first to use the Jupyter Widget framework.
import ipywidgets as widgetsUse the top-level display function to render a widget, or leave an expression of widget type at the last line of the code cell.
slider = widgets.IntSlider()
display(slider)
Run the cell. The widget displays in the output area.
slider = widgets.IntSlider()
display(slider)
Use multiple display() calls to render the same widget instance multiple times. They remain in sync with each other.
slider = widgets.IntSlider()
display(slider)
display(slider)
To render two widgets independent of each other, create two widget instances:
slider1 = widgets.IntSlider()
slider2 = widgets.IntSlider()
display(slider1)
display(slider2)


Supported widgets
| Widgets type | Widgets |
|---|---|
| Numeric widgets | IntSlider, FloatSlider, FloatLogSlider, IntRangeSlider, FloatRangeSlider, IntProgress, FloatProgress, BoundedIntText, BoundedFloatText, IntText, FloatText |
| Boolean widgets | ToggleButton, Checkbox, Valid |
| Selection widgets | Dropdown, RadioButtons, Select, SelectionSlider, SelectionRangeSlider, ToggleButtons, SelectMultiple |
| String widgets | Text, Text area, Combobox, Password, Label, HTML, HTML Math, Image, Button |
| Play (animation) widgets | Date picker, Color picker, Controller |
| Container or layout widgets | Box, HBox, VBox, GridBox, Accordion, Tabs, Stacked |
Known limitations
The following widgets aren't supported yet. The following workarounds are available:
Functionality Workaround Output widget You can use print() function instead to write text into stdout. widgets.jslink() You can use widgets.link() function to link two similar widgets. FileUpload widget Not supported yet. The Fabric global display function doesn't support displaying multiple widgets in one call (for example, display(a, b)). This behavior is different from the IPython display function.
If you close a notebook that contains an IPython widget, you can't see or interact with it until you execute the corresponding cell again.
The interact function (ipywidgets.interact) isn't supported.
Integrate a notebook
Designate a parameters cell
To parameterize your notebook, select the ellipses (...) to access the More commands at the cell toolbar. Then select Toggle parameter cell to designate the cell as the parameters cell.

The parameter cell is useful for integrating a notebook in a pipeline. Pipeline activity looks for the parameters cell and treats this cell as the default for the parameters passed in at execution time. The execution engine adds a new cell beneath the parameters cell with input parameters in order to overwrite the default values.
Assign parameters values from a pipeline
After you create a notebook with parameters, you can execute it from a pipeline with the Fabric notebook activity. After you add the activity to your pipeline canvas, you can set the parameters values under the Base parameters section of the Settings tab.

When assigning parameter values, you can use the pipeline expression language or functions and variables.
Notebook parameters support simple types such as int, float, bool, and string. Complex types such as list and dict aren't yet supported. To pass a complex type, consider serializing it to a string format (for example, JSON) and then deserializing it within the notebook. The following sample shows how to pass a JSON string from pipeline to notebook and deserialize it:

The following python code demonstrates how to deserialize the JSON string into a Python dictionary:
import json

# Deserialize the JSON string into a Python dictionary
params = json.loads(json_string)

# Access the individual parameters
param1 = params.get("param1")
param2 = params.get("param2")
Make sure that the parameter name in the parameter code cell matches the parameter name in the pipeline.
Spark session configuration magic command
You can personalize your Spark session with the magic command %%configure. Fabric notebook supports customized vCores, Memory of the Driver and Executor, Apache Spark properties, mount points, pool, and the default lakehouse of the notebook session. They can be used in both interactive notebook and pipeline notebook activities. We recommend that you run the %%configure command at the beginning of your notebook, or you must restart the Spark session to make the settings take effect.
%%configure
{
    // You can get a list of valid parameters to config the session from https://github.com/cloudera/livy#request-body.
    "driverMemory": "28g", // Recommended values: ["28g", "56g", "112g", "224g", "400g"]
    "driverCores": 4, // Recommended values: [4, 8, 16, 32, 64]
    "executorMemory": "28g",
    "executorCores": 4,
    "jars": ["abfs[s]: //<file_system>@<account_name>.dfs.core.windows.net/<path>/myjar.jar", "wasb[s]: //<containername>@<accountname>.blob.core.windows.net/<path>/myjar1.jar"],
    "conf":
    {
        // Example of customized property, you can specify count of lines that Spark SQL returns by configuring "livy.rsc.sql.num-rows".
        "livy.rsc.sql.num-rows": "3000",
        "spark.log.level": "ALL"
    },
    "defaultLakehouse": {  // This overwrites the default lakehouse for current session
        "name": "<lakehouse-name>",
        "id": "<(optional) lakehouse-id>",
        "workspaceId": "<(optional) workspace-id-that-contains-the-lakehouse>" // Add workspace ID if it's from another workspace
    },
    "mountPoints": [
        {
            "mountPoint": "/myMountPoint",
            "source": "abfs[s]://<file_system>@<account_name>.dfs.core.windows.net/<path>"
        },
        {
            "mountPoint": "/myMountPoint1",
            "source": "abfs[s]://<file_system>@<account_name>.dfs.core.windows.net/<path1>"
        },
    ],
    "environment": {
        "id": "<environment-id>",
        "name": "<environment-name>"
    },
    "sessionTimeoutInSeconds": 1200,
    "useStarterPool": false,  // Set to true to force using starter pool
    "useWorkspacePool": "<workspace-pool-name>"
}
Note
- We recommend that you set the same value for "DriverMemory" and "ExecutorMemory" in %%configure. The "driverCores" and "executorCores" values should also be the same.
- The "defaultLakehouse" will overwrite your pinned lakehouse in Lakehouse explorer, but that only works in your current notebook session.
- You can use %%configure in Fabric pipelines, but if it's not set in the first code cell, the pipeline run fails due to can't restart session.
- The %%configure used in notebookutils.notebook.run is ignored but used in %run notebook continues executing.
- The standard Spark configuration properties must be used in the "conf" body. Fabric doesn't support first level reference for the Spark configuration properties.
- Some special Spark properties, including "spark.driver.cores", "spark.executor.cores", "spark.driver.memory", "spark.executor.memory", and "spark.executor.instances" don't take effect in "conf" body.
You can also use %%configure magic command to dynamically inject configuration values from the Variable Library into your notebook.
%%configure
{
  "defaultLakehouse": {
    "name": {
      "variableName": "$(/**/myVL/LHname)"
    },
    "id": {
      "variableName": "$(/**/myVL/LHid)"
    },
    "workspaceId": {
      "variableName": "$(/**/myVL/WorkspaceId)"
    }
  }
}
In this example:
myVLis the name of your Variable Library.LHname,LHid, andWorkspaceIdare variable keys defined in the library.- All variables should be defined as String type in the variable library, even for GUID values.
- The
workspaceIdis required when the lakehouse is in a different workspace than the current notebook. - These values are resolved at runtime depending on the active environment (for example, Dev, Test, Prod).
This allows you to switch configurations like default lakehouse without modifying your notebook code.
Parameterized session configuration from a pipeline
Parameterized session configuration allows you to replace the value in %%configure magic with the pipeline run notebook activity parameters. When preparing %%configure code cell, you can override default values (also configurable, 4 and "2000" in the below example) with an object like this:
{
      "parameterName": "paramterNameInPipelineNotebookActivity",
      "defaultValue": "defaultValueIfNoParamterFromPipelineNotebookActivity"
}
%%configure

{
    "driverCores":
    {
        "parameterName": "driverCoresFromNotebookActivity",
        "defaultValue": 4
    },
    "conf":
    {
        "livy.rsc.sql.num-rows":
        {
            "parameterName": "rows",
            "defaultValue": "2000"
        }
    }
}
A notebook uses the default value if you run a notebook in interactive mode directly or if the pipeline notebook activity gives no parameter that matches "activityParameterName."
During a pipeline run, you can configure pipeline notebook activity settings as follows:

If you want to change the session configuration, pipeline notebook activity parameters name should be same as parameterName in the notebook. In this example of running a pipeline, driverCores in %%configure are replaced by 8, and livy.rsc.sql.num-rows are replaced by 4000.
Note
- If a pipeline run fails because you used the %%configure magic command, find more error information by running the %%configure magic cell in the interactive mode of the notebook.
- Notebook scheduled runs don't support parameterized session configuration.
Python logging in a notebook
You can find Python logs and set different log levels and format like the sample code shown here:
import logging

# Customize the logging format for all loggers
FORMAT = "%(asctime)s - %(name)s - %(levelname)s - %(message)s"
formatter = logging.Formatter(fmt=FORMAT)
for handler in logging.getLogger().handlers:
    handler.setFormatter(formatter)

# Customize log level for all loggers
logging.getLogger().setLevel(logging.INFO)

# Customize the log level for a specific logger
customizedLogger = logging.getLogger('customized')
customizedLogger.setLevel(logging.WARNING)

# logger that use the default global log level
defaultLogger = logging.getLogger('default')
defaultLogger.debug("default debug message")
defaultLogger.info("default info message")
defaultLogger.warning("default warning message")
defaultLogger.error("default error message")
defaultLogger.critical("default critical message")

# logger that use the customized log level
customizedLogger.debug("customized debug message")
customizedLogger.info("customized info message")
customizedLogger.warning("customized warning message")
customizedLogger.error("customized error message")
customizedLogger.critical("customized critical message")
View the history of input commands
Fabric notebook support magic command %history to print the input command history that executed in the current session, comparing to the standard Jupyter Ipython command the %history works for multiple languages context in notebook.
%history [-n] [range [range ...]]
For options:
- -n: Print execution number.
Where range can be:
- N: Print code of Nth executed cell.
- M-N: Print code from Mth to Nth executed cell.
Example:
- Print input history from 1st to 2nd executed cell:
%history -n 1-2
Shortcut keys
Similar to Jupyter Notebooks, Fabric notebooks have a modal user interface. The keyboard does different things depending on which mode the notebook cell is in. Fabric notebooks support the following two modes for a given code cell: Command mode and Edit mode.
A cell is in Command mode when there's no text cursor prompting you to type. When a cell is in Command mode, you can edit the notebook as a whole but not type into individual cells. Enter Command mode by pressing ESC or using the mouse to select outside of a cell's editor area.

Edit mode can be indicated from a text cursor that prompting you to type in the editor area. When a cell is in Edit mode, you can type into the cell. Enter Edit mode by pressing Enter or using the mouse to select a cell's editor area.


Shortcut keys in command mode
| Action | Notebook shortcuts |
|---|---|
| Run the current cell and select below | Shift+Enter |
| Run the current cell and insert below | Alt+Enter |
| Run current cell | Ctrl+Enter |
| Select cell above | Up |
| Select cell below | Down |
| Select previous cell | K |
| Select next cell | J |
| Insert cell above | A |
| Insert cell below | B |
| Delete selected cells | D,D |
| Switch to edit mode | Enter |
Shortcut keys in edit mode
Using the following keystroke shortcuts, you can easily navigate and run code in Fabric notebooks when in Edit mode.
| Action | Notebook shortcuts |
|---|---|
| Move up cursor | Up |
| Move down cursor | Down |
| Undo | Ctrl + Z |
| Redo | Ctrl + Y |
| Comment or Uncomment | Ctrl + / Comment: Ctrl + K + C Uncomment: Ctrl + K + U |
| Delete word before | Ctrl + Backspace |
| Delete word after | Ctrl + Delete |
| Go to cell start | Ctrl + Home |
| Go to cell end | Ctrl + End |
| Go one word left | Ctrl + Left |
| Go one word right | Ctrl + Right |
| Select all | Ctrl + A |
| Indent | Ctrl + ] |
| Dedent | Ctrl + [ |
| Switch to command mode | Esc |
To find all shortcut keys, select View on the notebook ribbon, and then select Key bindings.