Note
Access to this page requires authorization. You can try signing in or changing directories.
Access to this page requires authorization. You can try changing directories.
The Microsoft Fabric notebook is a primary code item for developing Apache Spark jobs and machine learning experiments. It's a web-based interactive surface used by data scientists and data engineers to write code benefiting from rich visualizations and Markdown text. Data engineers write code for data ingestion, data preparation, and data transformation. Data scientists also use notebooks to build machine learning solutions, including creating experiments and models, model tracking, and deployment.
With a Fabric notebook, you can:
- Get started with zero set-up effort.
- Easily explore and process data with intuitive low-code experience.
- Keep data secure with built-in enterprise security features.
- Analyze data across raw formats (CSV, txt, JSON, etc.), processed file formats (parquet, Delta Lake, etc.), using powerful Spark capabilities.
- Be productive with enhanced authoring capabilities and built-in data visualization.
- Leverage Copilot for context-aware code generation, refactoring, and validation across your notebook.
- Quickly diagnose and repair failed cells or Spark jobs with Fix with Copilot, including approval-based code changes.
This article describes how to use notebooks in data science and data engineering experiences.
Security context of running notebook
Notebook execution can be triggered in three ways, each with a different security context:
- Interactive run: You manually trigger execution through the UI or REST API. The notebook runs under your security context (the current user).
- Run as pipeline activity: Execution is triggered from a Fabric Data Factory pipeline. See Notebook activity for details. The notebook runs under the identity of the pipeline's last modified user—not the pipeline owner or notebook owner. This means whoever last edited the pipeline determines the security context for data access, API calls, and permissions.
- Scheduler: Execution is triggered from a scheduled run. The notebook runs under the identity of the user who created or last updated the schedule.
Automate execution via APIs
You can also execute notebooks on demand through the Job Scheduler API. API-triggered runs support parameterized execution, session configuration (such as compute vCores and Spark settings), environment and runtime selection, and choosing the target Fabric Lakehouse. You can monitor run status and cancel job instances through the same API. Runs return an exit value that external schedulers and Fabric pipelines can read to enable conditional orchestration and downstream signaling.
The Items REST API and the Job Scheduler API both support service principal authentication for secure unattended automation and CI/CD. Note that some downstream services (such as T-SQL endpoints) don't support service principals and require a user principal.
These execution options provide flexibility for different scenarios, but you must understand which identity runs your notebook. The security context affects data access permissions, API call authorization, and resource availability.
The first time when a notebook is created, a warning message is shown to remind you the risk of running the code without reviewing it.

Follow these best practices to avoid security issues:
- Before running a notebook manually: Check who last modified the notebook and use the version history panel to review the actual content changes before executing code you didn't write.
- Before adding a notebook to a pipeline: Verify who last modified the pipeline, because the notebook runs under that user's identity. Open the notebook from the pipeline to review its latest content. If the identity doesn't have the required permissions (or if you need a user principal instead of a service principal for certain APIs), have the appropriate user edit the pipeline to update the last modified identity.
- Before creating or updating a schedule: The notebook runs under the identity of whoever creates or updates the schedule. Ensure that user has the necessary permissions for all operations in the notebook.
- Use workspace stages: Separate workspaces into dev, test, and prod stages. Restrict access to production workspaces to trusted users only.
Create notebooks
You can either create a new notebook or import an existing notebook.
Create a new notebook
Like other standard Fabric item creation processes, you can easily create a new notebook from the Fabric Data Engineering homepage, the workspace New option, or the Create Hub.
For step-by-step notebook creation guidance in specific workflows, see:
- Explore the data in your lakehouse with a notebook for creating a notebook from a lakehouse context in the Fabric portal.
- Author notebooks in Microsoft Fabric with Visual Studio Code for creating notebooks from VS Code.
- Public APIs for notebooks for creating and managing notebooks through the Items REST API (CRUD operations).
- Execute notebooks via Job Scheduler API for on-demand notebook execution with parameterization, session configuration, environment and Lakehouse selection, run monitoring, and cancellation.
Import existing notebooks
You can import one or more existing notebooks from your local computer using the entry in the workspace toolbar. Fabric notebooks recognize the standard Jupyter Notebook .ipynb files, and source files like .py, .scala, and .sql, and create new notebook items accordingly.

Export a notebook
You can export your notebook to other standard formats. The Fabric notebook can be exported into:

Save a notebook
In Fabric, a notebook will by default save automatically after you open and edit it; you don't need to worry about losing code changes. You can also use Save a copy to clone another copy in the current workspace or to another workspace.

If you prefer to save a notebook manually, you can switch to the Manual save option to have a local branch of your notebook item, and then use Save or CTRL+s to save your changes.

You can also switch to manual save mode by selecting Edit -> Save options -> Manual. To turn on a local branch of your notebook then save it manually, select Save or use the Ctrl+s keyboard shortcut.
Connect lakehouses and notebooks
Fabric notebooks now support close interactions with lakehouses; you can easily add a new or existing lakehouse from the Lakehouse explorer.
You can navigate to different lakehouses in the Lakehouse explorer and set one lakehouse as the default by pinning it. Your default is then mounted to the runtime working directory, and you can read or write to the default lakehouse using a local path.

Note
You must restart the session after pinning a new lakehouse or renaming the default lakehouse.
Add or remove a lakehouse
Selecting the X icon beside a lakehouse name removes it from the notebook tab, but the lakehouse item still exists in the workspace.
Select Add lakehouse to add more lakehouses to the notebook, either by adding an existing one or creating a new lakehouse.
Explore a lakehouse file
The subfolder and files under the Tables and Files section of the Lake view appear in a content area between the lakehouse list and the notebook content. Select different folders in the Tables and Files section to refresh the content area.
Folder and file operations
If you select a file (.csv,.parquet,.txt,.jpg,.png, etc.) with a right mouse click, you can use the Spark or Pandas API to load the data. A new code cell is generated and inserted beneath the focus cell.
You can easily copy a path with a different format from the select file or folder and use the corresponding path in your code.

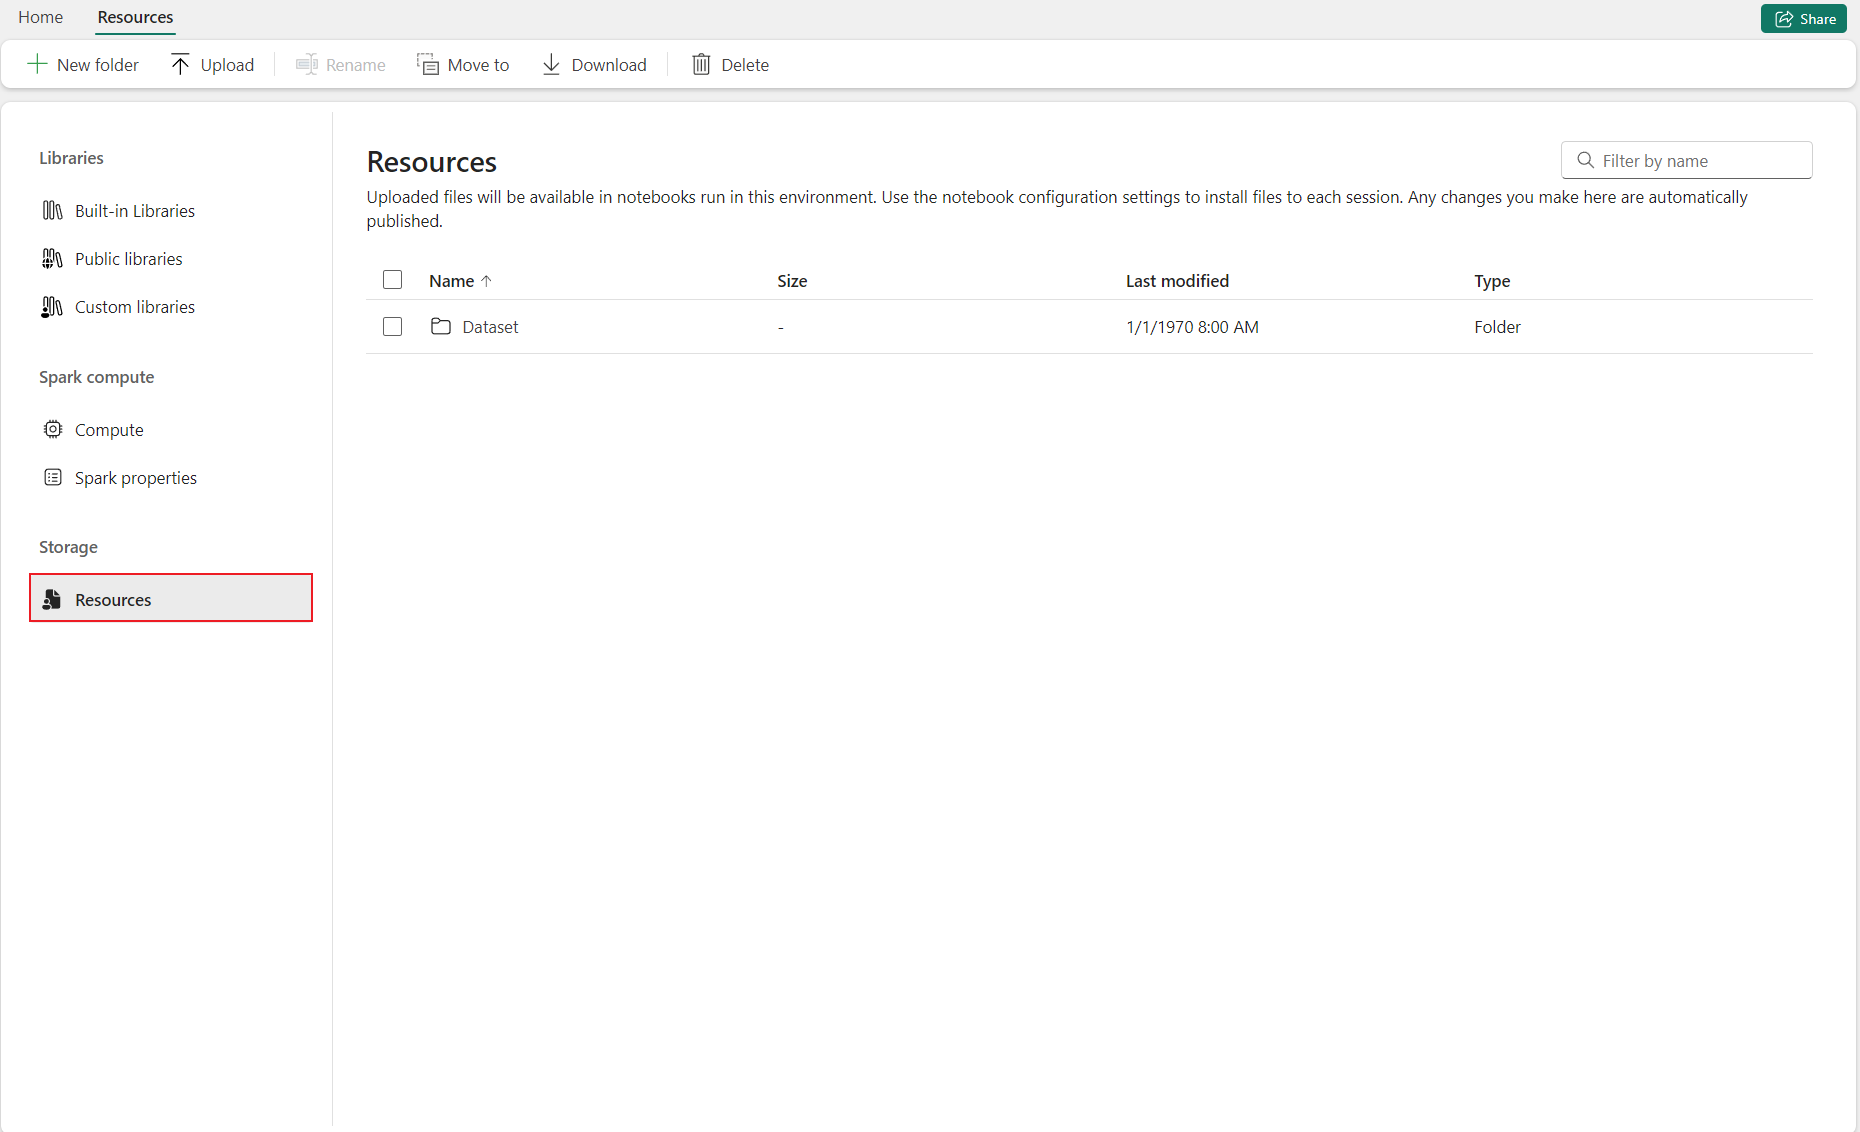
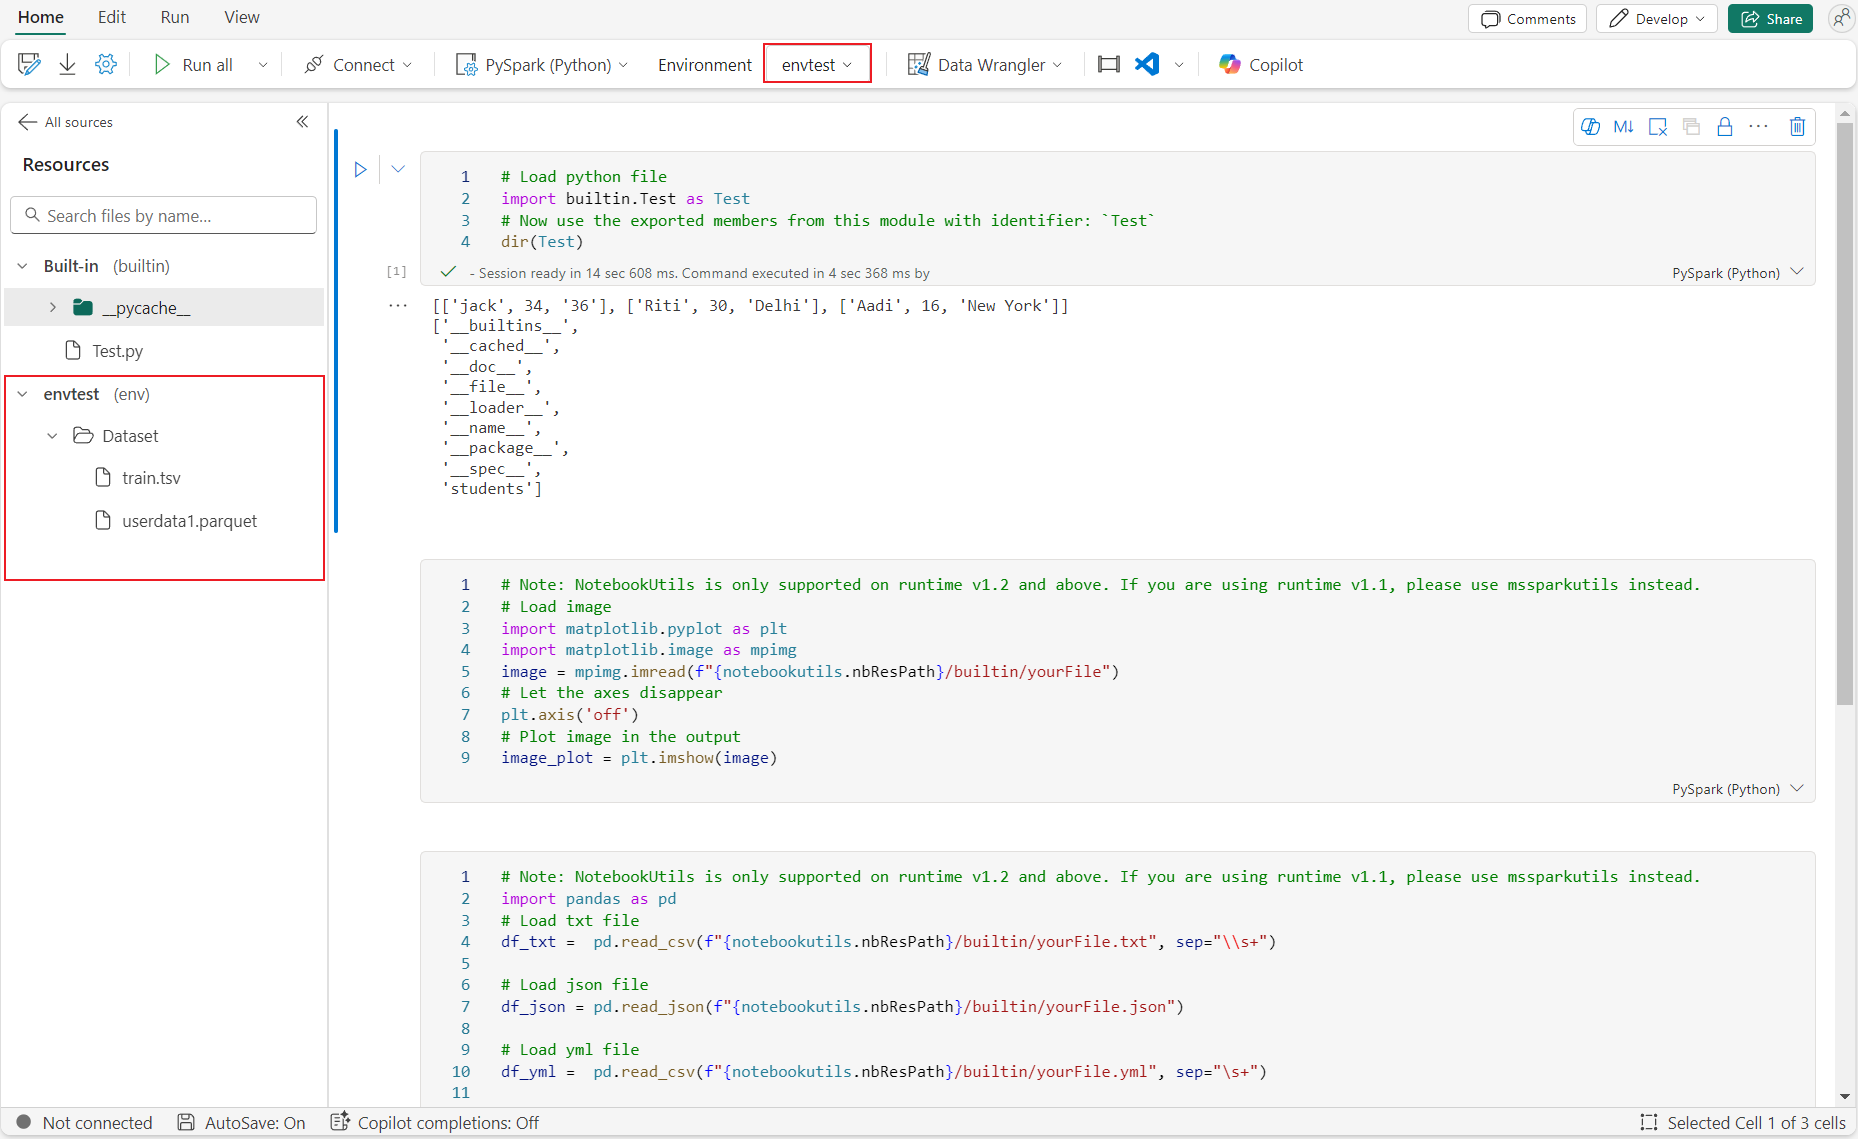
Notebook resources
The notebook resource explorer provides a Unix-like file system to help you manage your folders and files. It offers a writeable file system space where you can store small-sized files, such as code modules, semantic models, and images. You can easily access them with code in the notebook as if you were working with your local file system.

Note
- The maximum Resource storages for both built-in folder and environment folder are 500 MB, with a single file size up to 100 MB. They both allow up to 100 file/folder instances in total.
- When using
notebookutils.notebook.run(), use thenotebookutils.nbResPathcommand to access the target notebook resource. The relative path builtin/ will always point to the root notebook’s built-in folder.
Note
Files in the Resources folder (both built-in and environment) and libraries installed through inline commands (such as %pip install or install.packages()) are scoped to the current notebook session. They aren't affected by environment publishing in either Quick mode or Full mode.
Built-in resources folder
The built-in resources folder is a system-defined folder unique to each notebook. It is recommended to use built-in resource folder to storage any data used in the current notebook. Here are the key capabilities for the notebook resources.
- You can use common operations such as create/delete, upload/download, drag/drop, rename, duplicate, and search through the UI.
- You can use relative paths like
builtin/YourData.txtfor quick exploration. Thenotebookutils.nbResPathmethod helps you compose the full path. - You can easily move your validated data to a lakehouse via the Write to lakehouse option. Fabric embeds rich code snippets for common file types to help you quickly get started.
- These resources are also available for use in the Reference notebook run case via
notebookutils.notebook.run().
Environment resources folder
Environment Resources Folder is a shared repository designed to streamline collaboration across multiple notebooks.
You can find the Resources tab inside the environment and have the full operations to manage the resource files here. These files can be shared across multiple notebooks once the notebook is attached to the current environment.
In the Notebook page, you can easily find a second root folder under Resources inherited from the attached environment.
You can also operate on the files/folders same with the Built-in resources folder.
The Environment resource path is automatically mounted to the notebook cluster. You can use the relative path /env to access the environment resources.


Fabric Environments support two library publishing modes that affect how libraries are delivered to your notebook sessions:
- Quick mode publishes in about 5 seconds and installs libraries when your notebook session starts. Quick mode can override library versions published through Full mode, but only for the current session.
- Full mode creates a stable, reproducible library snapshot. Publishing typically takes 3 to 6 minutes, and session startup adds 1 to 3 minutes for dependency deployment. Using Full mode with a custom live pool can bring session start times back to approximately 5 seconds while maintaining the stable snapshot.
For details on each mode, see Manage libraries in Fabric environments.
Use environment libraries in notebooks
Choose a library publishing mode based on your workflow:
- Quick mode for iterative development: Use Quick mode when you're actively experimenting in notebooks and need fast library iteration. Libraries install at session start with minimal publish time.
- Full mode for reproducibility: Use Full mode when you need consistent library versions across collaborators, scheduled runs, or pipeline jobs. The snapshot ensures every session starts with the same dependencies.
- Full mode with a custom live pool for fast and stable sessions: When both fast session startup and reproducibility matter, configure Full mode with a custom live pool. This combination achieves approximately 5-second session starts while preserving the stable library snapshot.
Note
Reading/writing with a relative path is not functioning in a High concurrency session.
File editor
The file editor allows you to view and edit files directly within the notebook's resource folder and environment resource folder in notebook. Supported file types include CSV, TXT, HTML, YML, PY, SQL, and more. With the file editor, you can easily access and modify files within the notebook, it supports Keyword highlighting and provides necessary language service when opening and editing code files like .py and .sql.
You can access this feature through 'View and edit' in the file menu. Double-click on file is a faster way.
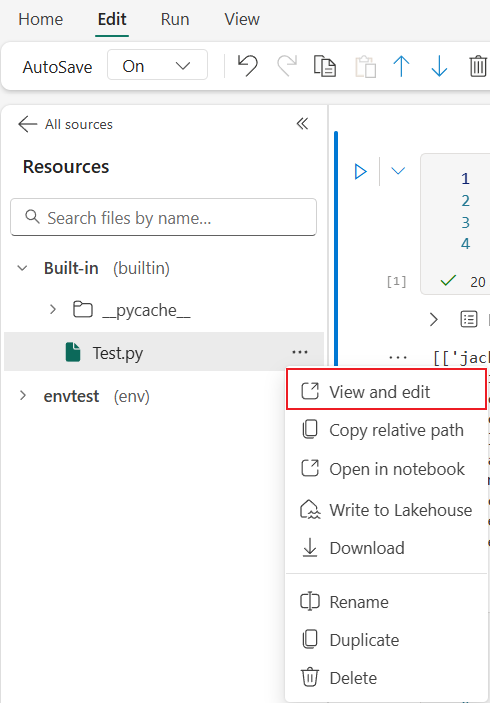
Content change on file editor needs to be saved manually by clicking the Save button or keyboard shortcut: Ctrl+S, file editor doesn't support autosave.
notebook mode also affects the file editor. You can only view files but cannot edit them if you are in the notebook mode without editing permission.

Note
Here are some limitations for file editor.
- File size limit is 1 MB.
- These file types are not supported for viewing and editing: .xlsx and .parquet.
Collaborate in a notebook
The Fabric notebook is a collaborative item that supports multiple users editing the same notebook.
When you open a notebook, you enter the coediting mode by default, and every notebook edit is automatically saved. If your colleagues open the same notebook at the same time, you see their profile, run output, cursor indicator, selection indicator, and editing trace. By using the collaboration features, you can easily accomplish pair programming, remote debugging, and tutoring scenarios.

Use Copilot in notebooks
Copilot is immediately context-aware of the workspace, attached Lakehouse schemas, tables, and files, the notebook's structure, and the current runtime state. You don't need to start a session for Copilot to begin helping you. Copilot supports multi-step, notebook-wide code generation, refactoring, summarization, and validation across entire workflows, so you can work across cells without losing context.
Performance insights from Copilot
Copilot surfaces performance guidance based on data size, join patterns, and runtime behavior. For example, it can recommend efficient join strategies, help you avoid costly shuffles, propose refactoring into reusable functions, and highlight potential data quality issues observed during execution. These insights appear as part of your Copilot conversations and align with the /optimize command.
Troubleshoot with Copilot
When a cell or Spark job fails, a Fix with Copilot option appears below the failed cell. It provides an error summary, root-cause analysis, and recommended fixes. Copilot can auto-apply code changes with an approval diff so you can review before committing. You can also use the /fix command in Copilot chat to run targeted diagnostics for a specific cell or the entire notebook. For more information, see Diagnose notebook failures with Copilot.
Share a notebook
Sharing a notebook is a convenient way for you to collaborate with team members. Authorized workspace roles can view or edit/run notebooks by default. You can share a notebook with specified permissions granted.
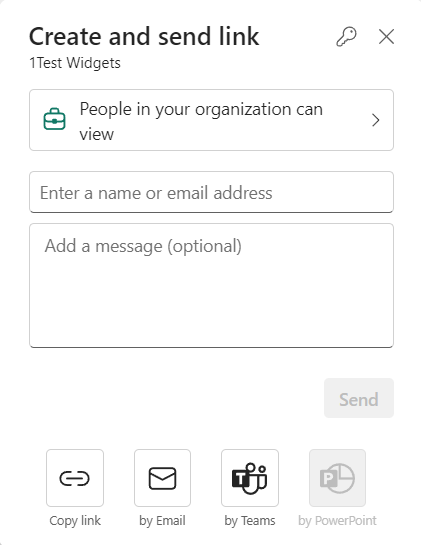
Select Share on the notebook toolbar.

Select the corresponding category of people who can view this notebook. You can choose Share, Edit, or Run permissions for the recipients.
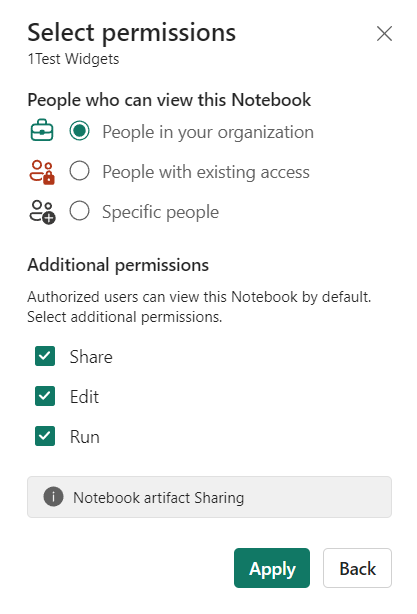
After you select Apply, you can either send the notebook directly or copy the link to others. Recipients can then open the notebook with the corresponding view granted by their permission level.
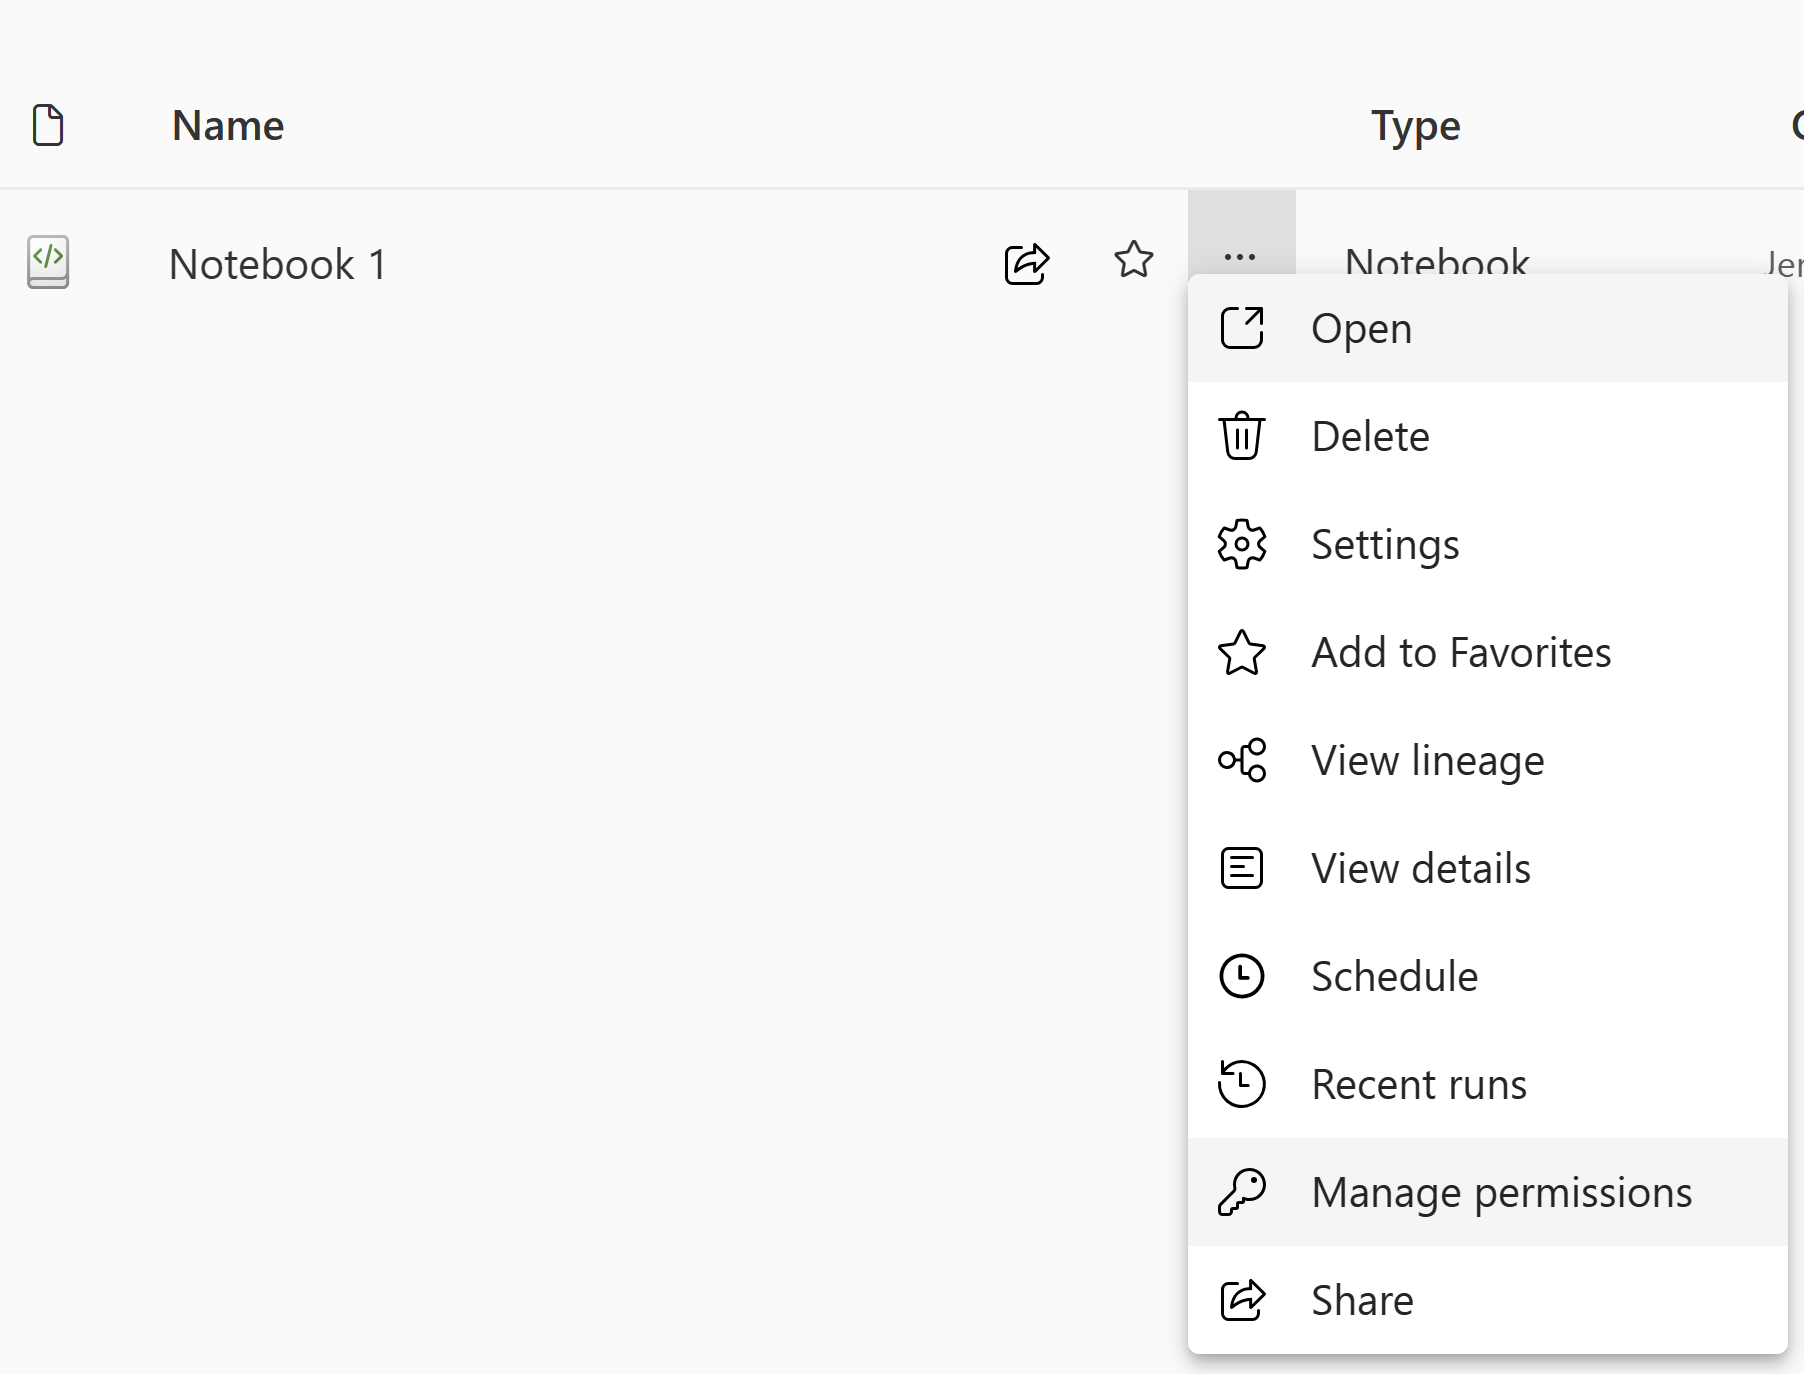
To further manage your notebook permissions, select Workspace item list > More options, and then select Manage permissions. From that screen, you can update the existing notebook access and permissions.


Comment a code cell
Commenting is another useful feature for collaborative scenarios. Currently, Fabric supports adding cell-level comments.
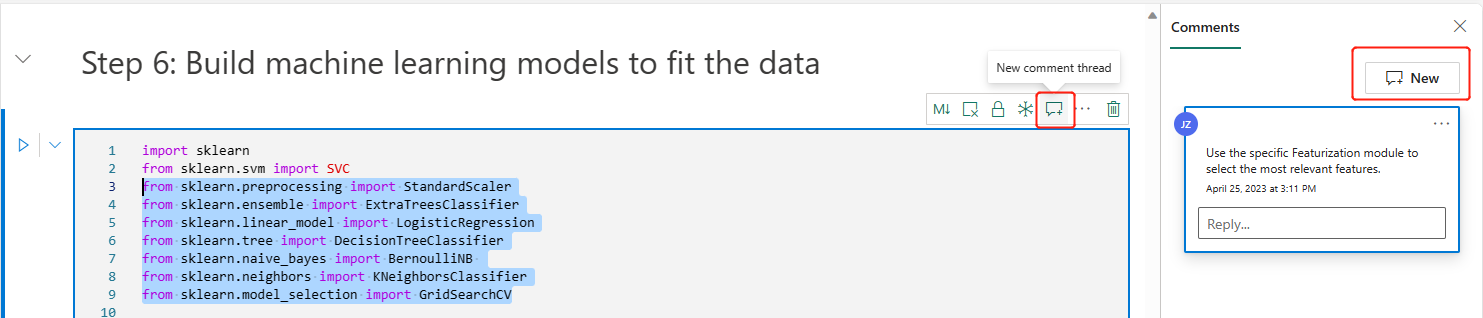
Select the Comments button on the notebook toolbar or cell comment indicator to open the Comments pane.
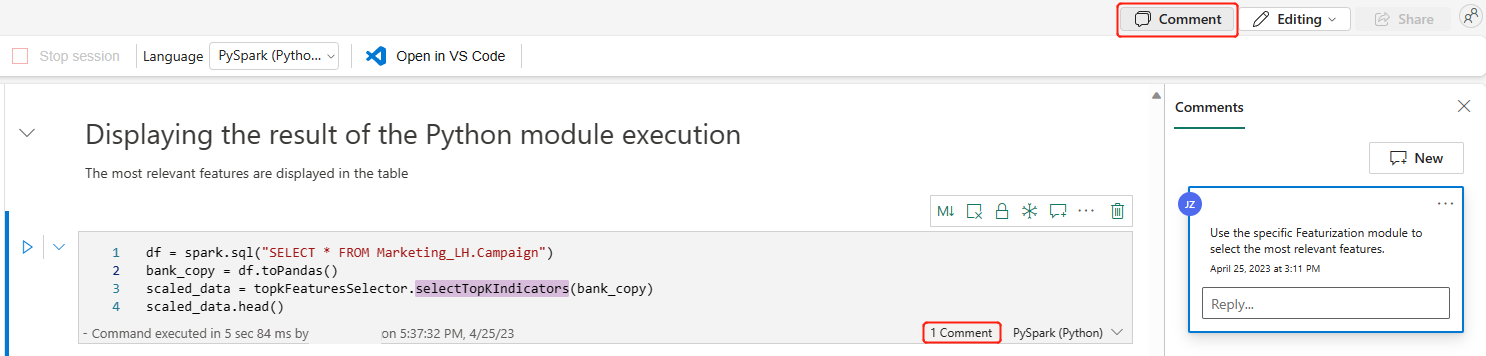
Select code in the code cell, select New in the Comments pane, add comments, and then select Post comment to save.
If you need them, find the Edit comment, Resolve thread, and Delete thread options by selecting the More option next to your comment.


Tagging others in a comment
"Tagging" refers to mentioning and notifying a user in a comment thread, enhancing collaboration efficiently on the specifics.
Select a section of code in a cell and new a comment thread.
Enter the user name and choose the correct one from the suggestion list if you want to mention someone in a discussion about a certain section.
Share your insights and Post them.
An Email notification is triggered, and user clicks on Open Comments link to quickly locate this cell.
Moreover, authorize and configure the permissions for users when tagging someone who doesn’t have access, ensuring that your code assets are well managed.

Note
For a comment item, the tagged user will not receive an Email notification anymore if you update the comment within one hour. But it sends Email notification to the new tagged user.
Version history
Important
This feature is in preview.
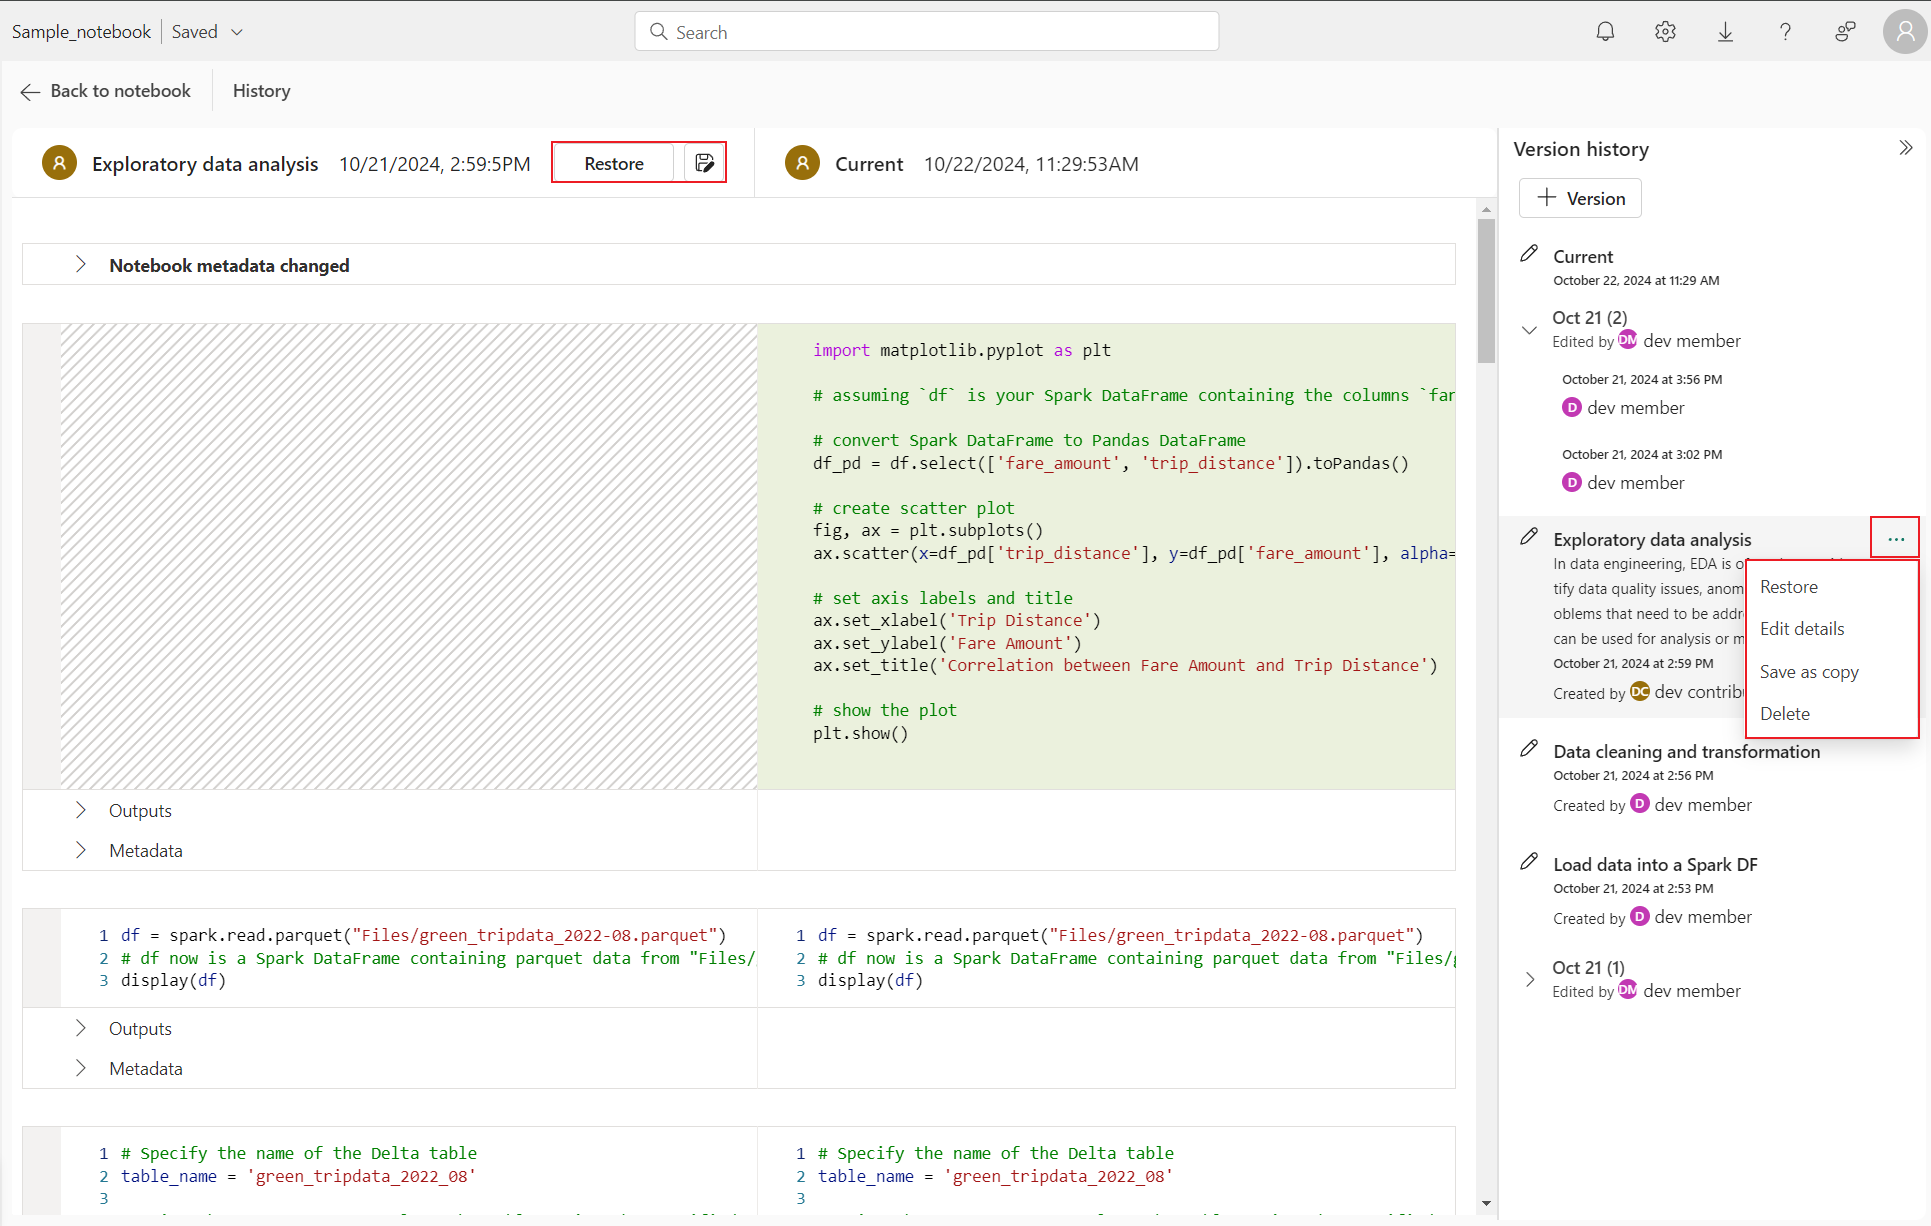
Version history allows you to easily version your live notebook changes. It supports history tracking and notebook management with robust built-in version control capabilities, which is especially helpful for collaborative work with multiple contributors on the same notebook.
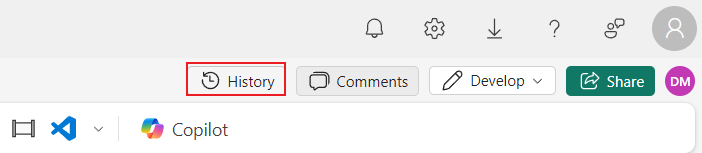
Access version history from notebook global toolbar.
Notebook supports two ways of creating checkpoints.
Manual checkpoint: You can manually create new version to record your development milestones, providing flexibility for managing your notebook versions.
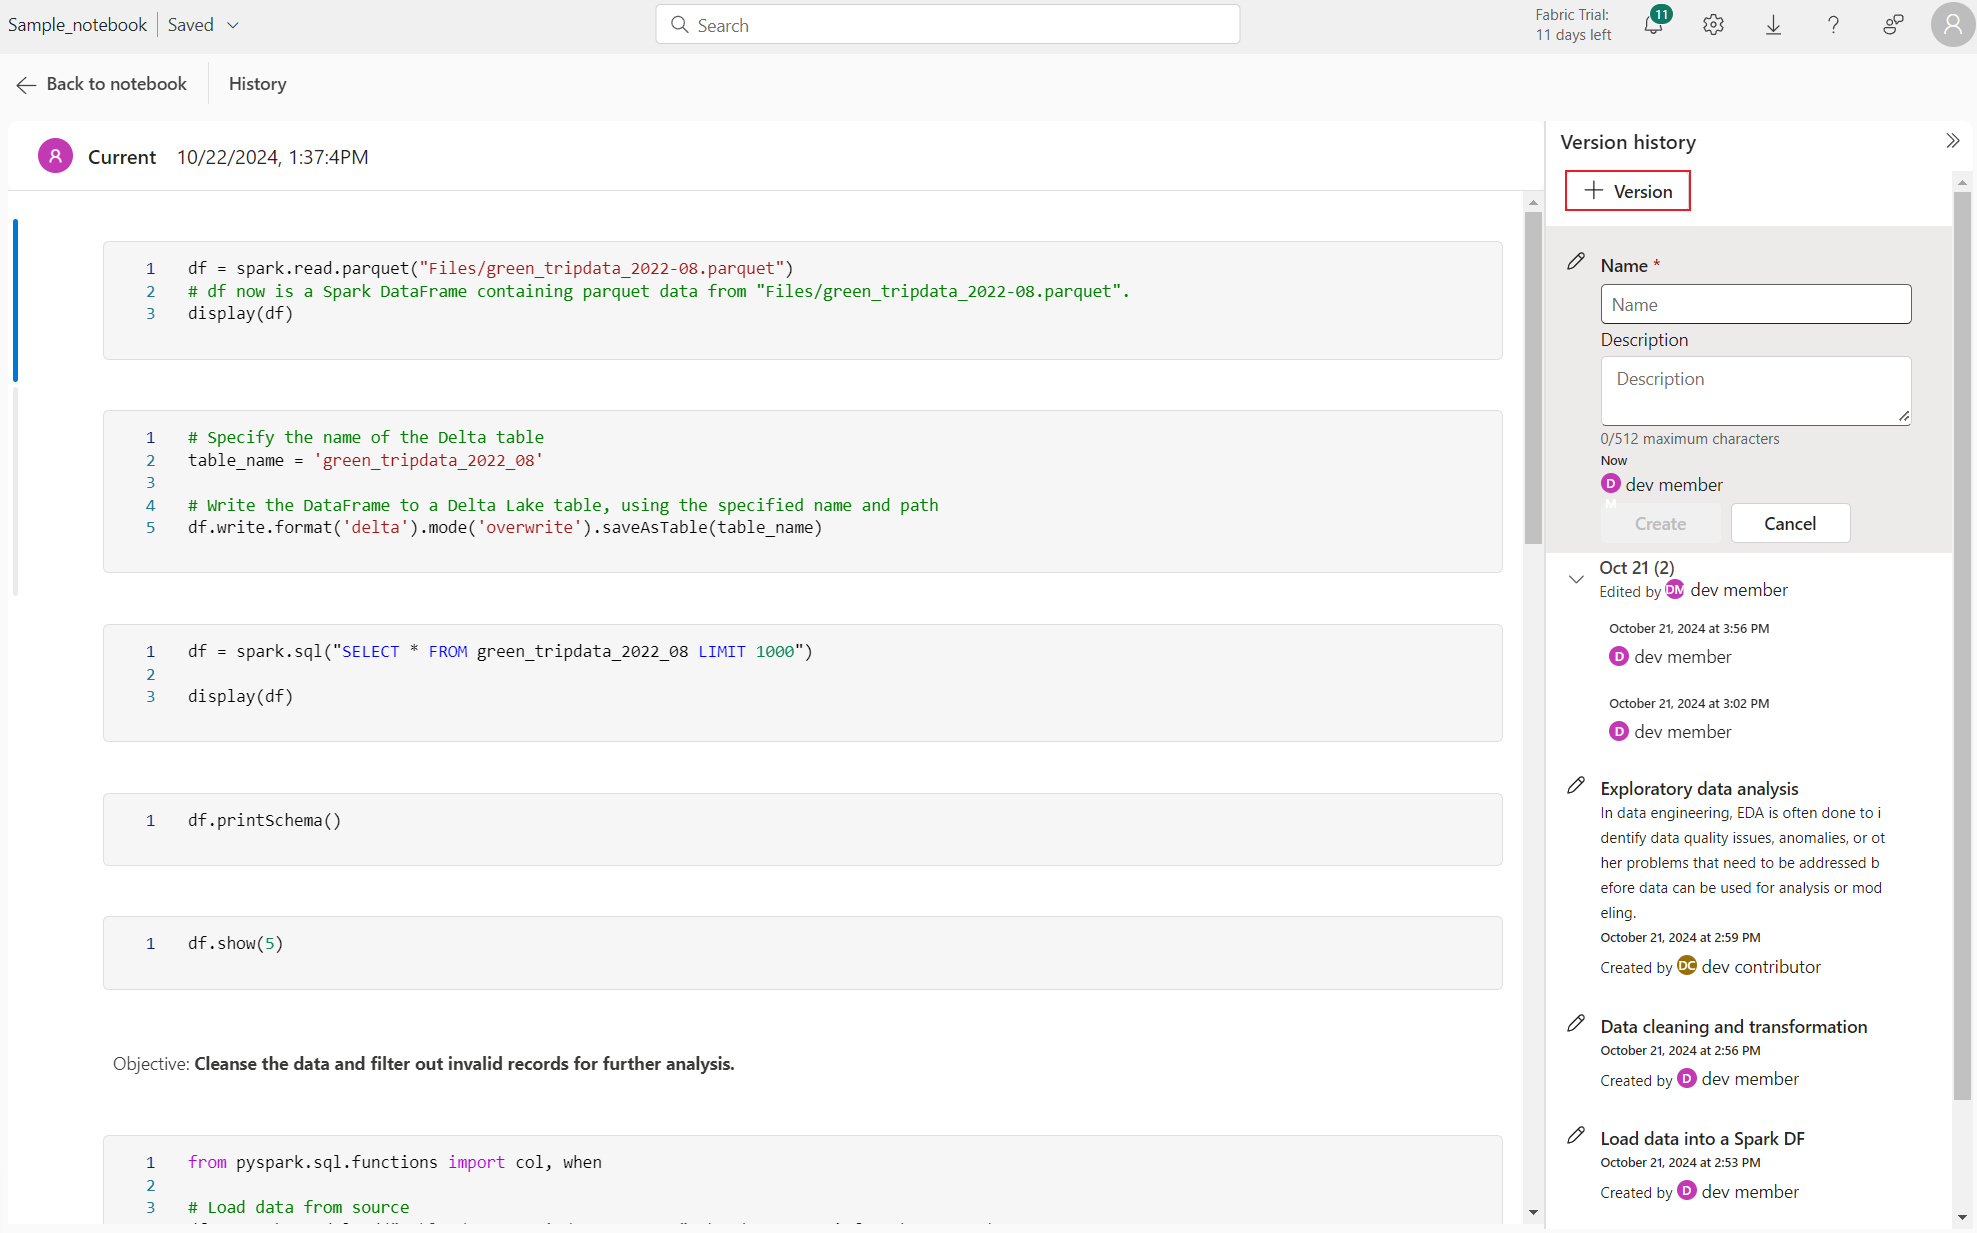
System checkpoint: These checkpoints are created automatically every 5 minutes based on editing time interval by Notebook system, ensuring that your work is consistently saved and versioned. You can find the modification records from all the contributors in the system checkpoint timeline list.
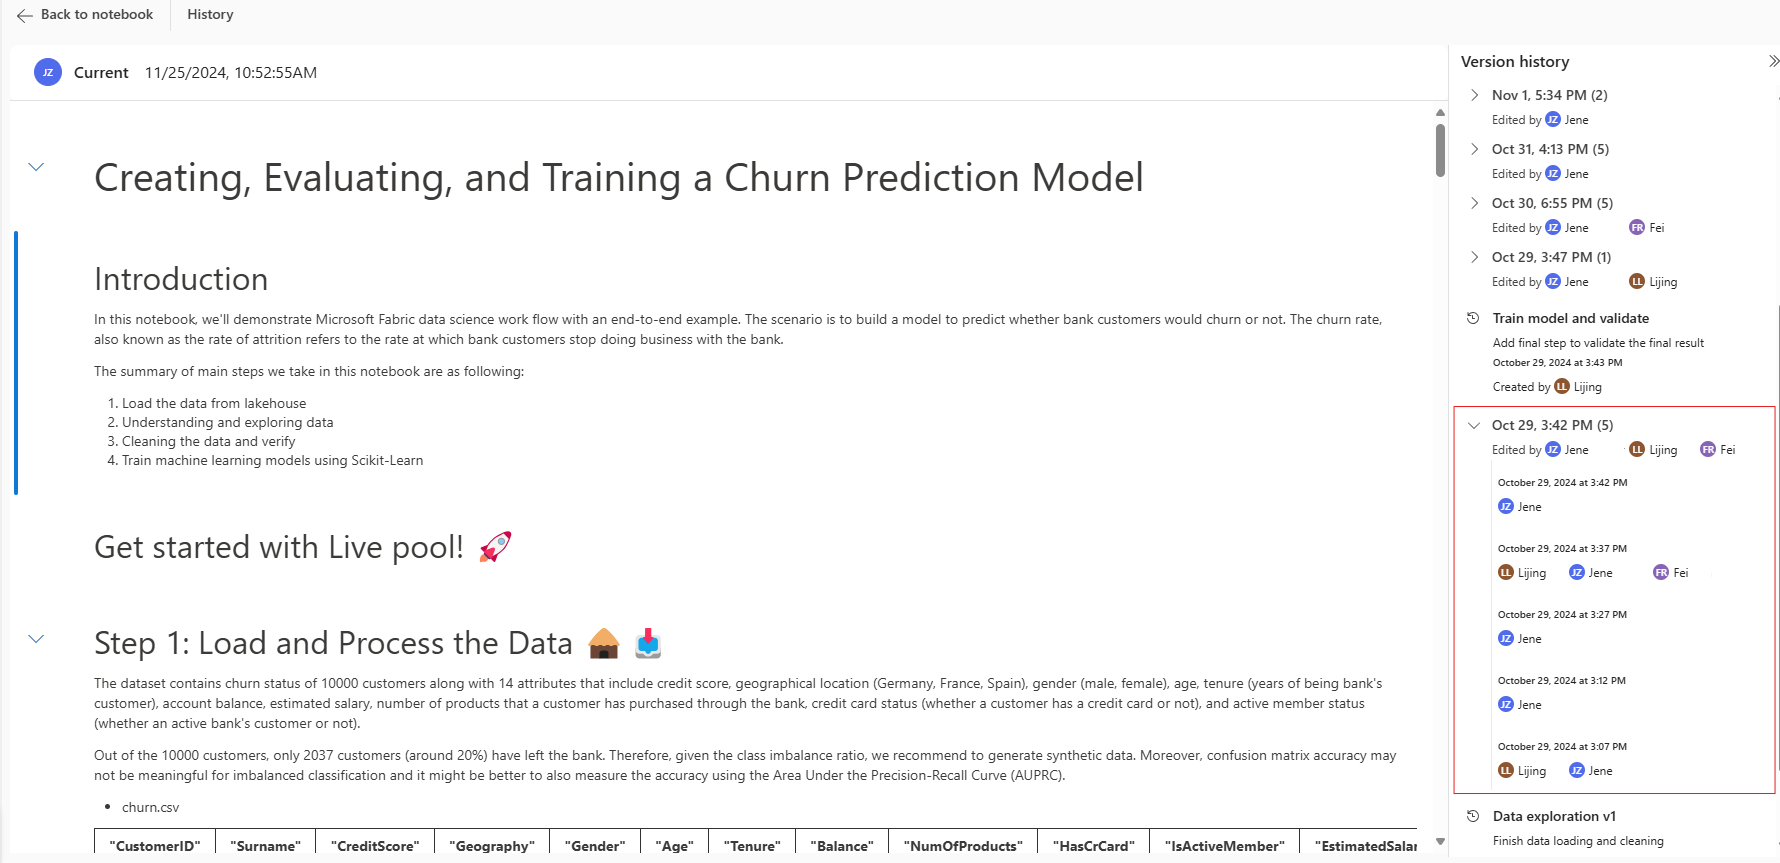
Multi-Source Checkpointing for Notebook
Fabric notebooks seamlessly integrate with Git, deployment pipelines, and Visual Studio Code. Each saved version is automatically captured in the notebook’s version history. Versions may originate from direct edits within the notebook, Git synchronizations, deployment pipeline activities, or publishing via VS Code. The source of each version is clearly labeled in version history to provide full traceability.
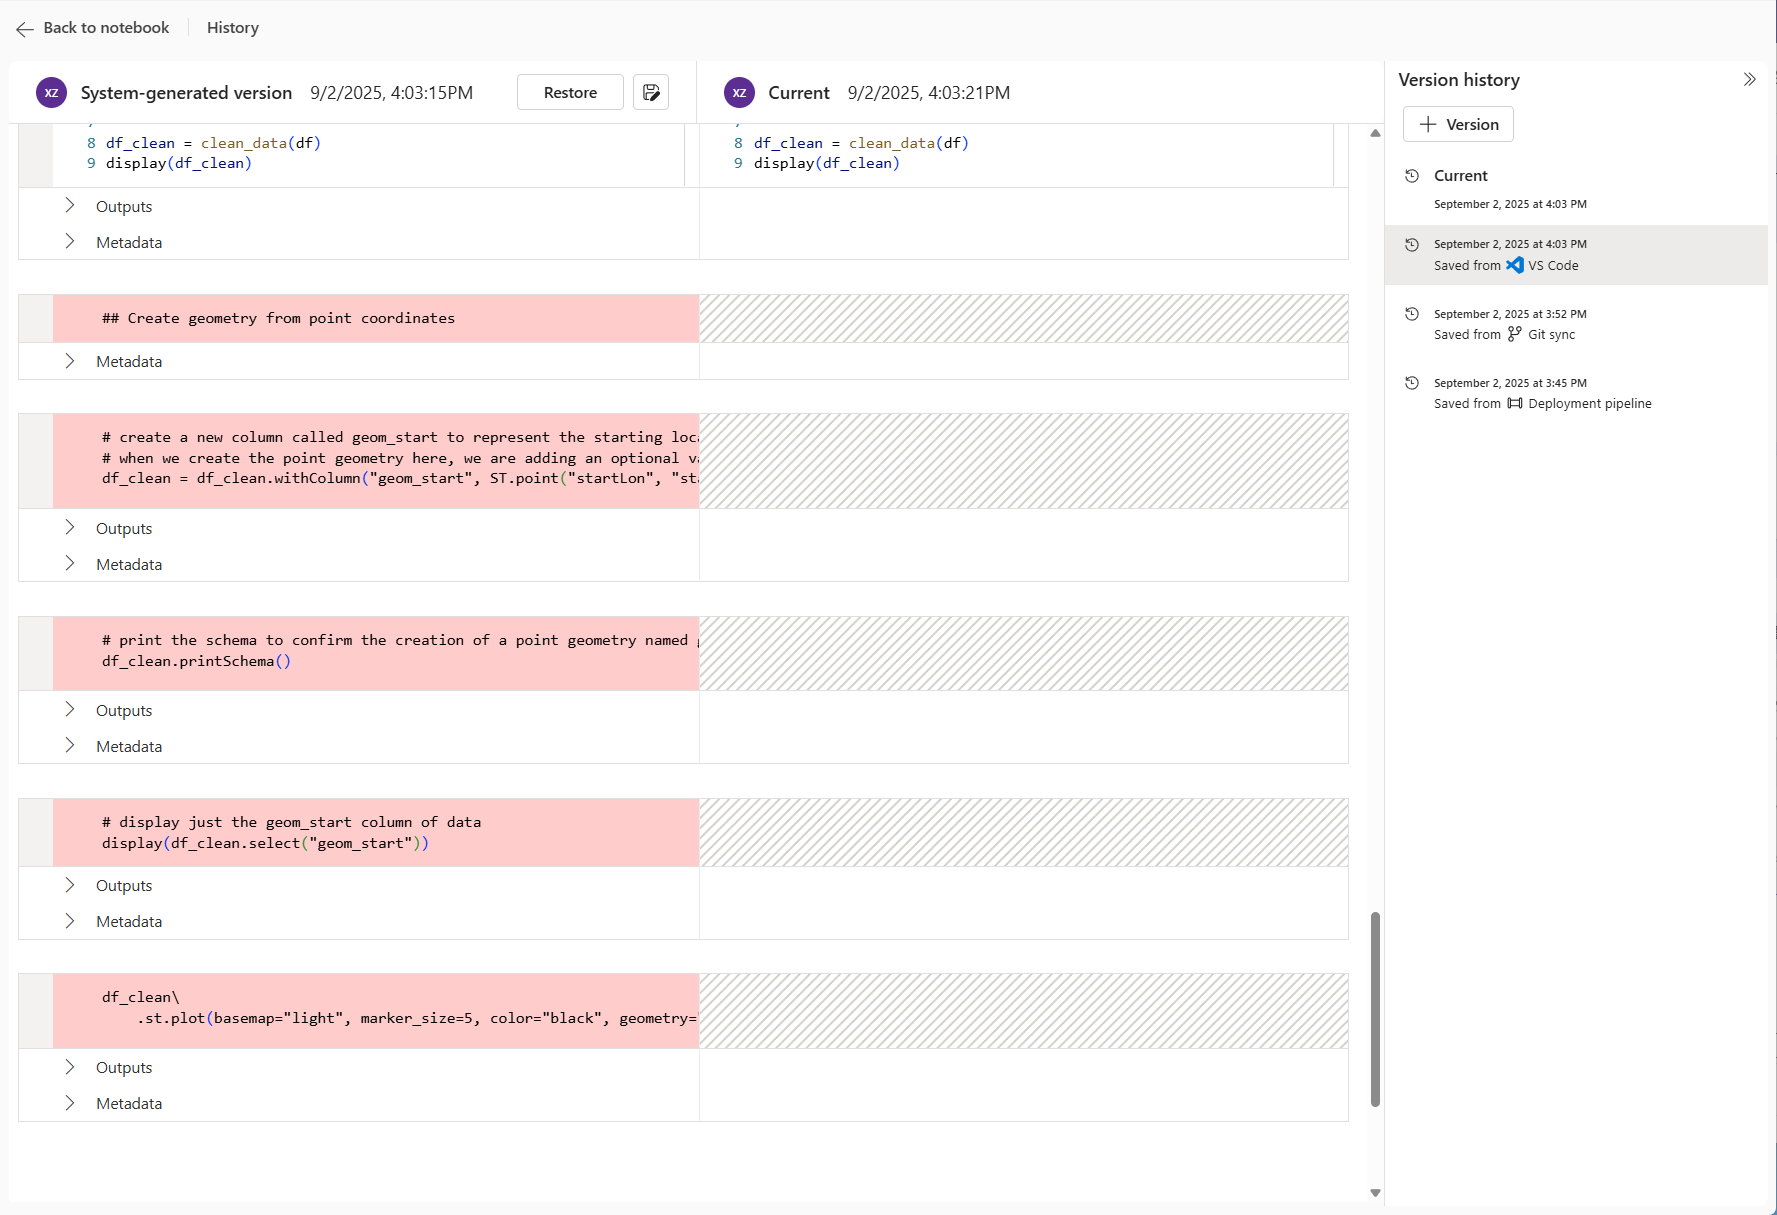
You can click on a checkpoint to open the diff view, it highlights the content differences between the selected checkpoint and the current live version, including the differences of cell content, cell output, and metadata. The version of this checkpoint can be managed individually in 'more options' menu.

You can manage the version from the checkpoint drop-down menu, if you want to keep a previous version, click restore from checkpoint and overwrite the current notebook, or use save as copy to clone it to a new notebook.


Note
- Known limitation: When multiple collaborators are editing, if one of them clicks the Restore button and then navigates Back to notebook, the notebook won't be immediately recovered from the checkpoint. A message bar prompts you to view the changes. You need to click the View changes button and select keeping the Saved version to finish the restore.

- System checkpoints will expire after 1 year.

Notebook mode switcher
Fabric notebooks support four modes that you can switch between: Develop, Run only, Edit, and View. Each mode aligns with a set of permissions.
When you share a notebook, you assign permissions to users. Based on those permissions, users can access and switch between the modes available to them.

- Develop mode: Requires read, execute, and write permissions.
- Run only mode: Requires read and execute permissions.
- Edit mode: Requires read and write permissions (cannot run).
- View mode: Requires read permissions.
Permissions and access
Permissions can be set at the workspace or notebook level in Microsoft Fabric. They determine which modes a user can access:
- Permissions limit the set of available modes.
- They don't automatically select a mode for the user.
- Modes can't grant capabilities beyond what permissions allow.