Note
Access to this page requires authorization. You can try signing in or changing directories.
Access to this page requires authorization. You can try changing directories.
Tip
You can download the Power Query Template file that has the full Slowly changing dimension type 2 pattern solution to follow along this tutorial. To learn more about how to use a Power Query template file, check out the documentation article on Power Query Templates.
Slowly changing dimension type 2 is a method used in data warehousing to manage and track historical changes in dimension data. When an attribute value changes, a new record is created with a unique identifier, and the old record is retained. It allows for a complete historical record of changes over time, enabling accurate reporting and analysis based on different points in time.
The article showcases a tutorial and an example of how you can implement a solution for the slowly changing dimension type 2 concept using Dataflow Gen2 inside of Data Factory for Microsoft Fabric.
Solution architecture
When implementing a solution for a Slowly changing dimension type 2, it's important to define your source table and what fields from your source table drive the logic to identify new records.
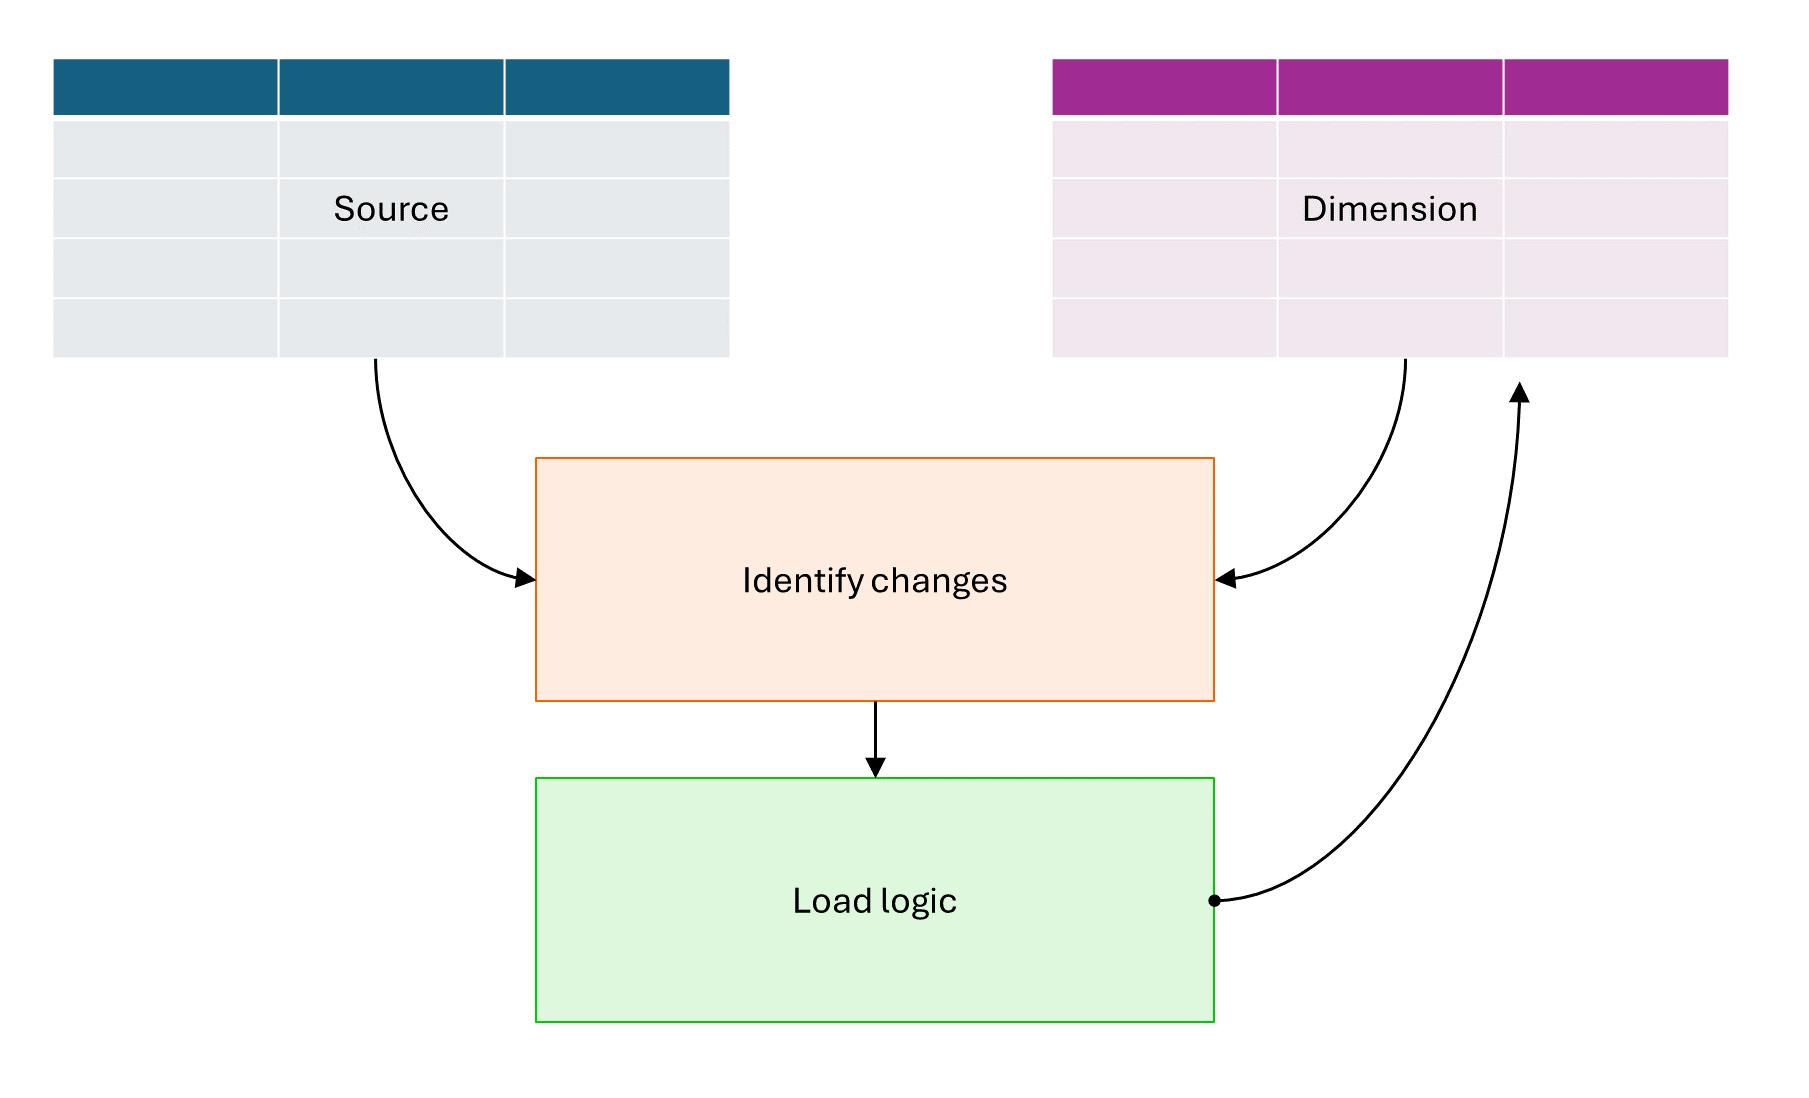
As a whole, the architecture requires a minimum of four components:
- Source table: your operational table where you can change the values as needed
- Dimension table: historical table of all states that the Source table had. Defined by a custom logic to identify changes and the effective dates of those changes
- Logic to identify changes: fundamentally done by taken a snapshot of the current state of your Source table and comparing it to the available records in the Dimension table.
- Logic to update Dimension table: Once all changes are identified in the logic to identify changes, a table with the records to be added and updated can be used to update the Dimension table.
Note
The solution uses Dataflow Gen2 in Microsoft Data Factory. While the logic can be changed and modified to fit your specific needs, the goal of the tutorial is to showcase a simple way to accomplish the slowly changing dimension type 2 pattern using a low code and visual solution like Dataflow Gen2.
Source table
The tutorial starts with a sample source table for employees that contains four columns:
| RepSourceID | FirstName | LastName | Region |
|---|---|---|---|
| 312 | Vance | DeLeon | Southwest |
| 331 | Adrian | King | Northwest |
The data in the table is expected to change. People can have changes in their last names or the region where they might be assigned to work for.
Dimension table
The dimension table for the tutorial looks at changes that could be happening for the fields FirstName, LastName, and Region. The dimension table and its data:
| SalesRepID | RepSourceID | FirstName | LastName | Region | StartDate | EndDate | IsCurrent | Hash |
|---|---|---|---|---|---|---|---|---|
| 1 | 312 | Vance | DeLeon | Southwest | 3/20/2021 | 12/31/9999 | TRUE | 3331327c56616e63657c44654c656f6e7c536f75746877657374 |
| 2 | 331 | Adrian | King | Southcentral | 3/20/2021 | 12/31/9999 | TRUE | 3333317c41647269616e7c4b696e677c536f75746863656e7472616c |
| 3 | 334 | Devon | Torres | Panama | 2/14/2024 | 12/31/9999 | TRUE | 3333347c4465766f6e7c546f727265737c50616e616d61 |
This is the definition of the schema for this table and description for the fields:
| Field name | Data type | Description |
|---|---|---|
| SalesRepID | Number | A surrogate key used to uniquely identify records throughout the entire Dimension table |
| RepSourceID | Number | A natural key from the source table that represents an identifier for an employee |
| FirstName | Text | The first name of the employee. This field comes from the Source table |
| LastName | Text | The last name of the employee. This field comes from the Source table |
| Region | Text | The region in which the employee works. This field comes from the Source table |
| StartDate | Date | Date stamp that establishes when the record becomes effective |
| EndDate | Date | Date stamp that establishes until when the record is effective |
| IsCurrent | Logical | Simple flag to denote if the record is current or not. True represents that the record is current |
| Hash | Text | The hash encoding of the fields RepSourceID, FirstName, LastName, and Region combined |
Note
It is highly encouraged that you create a dimension table with the correct schema before establishing this process. The tutorial takes into consideration that you've already created the dimension table in advance and have already established a hashing or lookup mechanism that could be used within your Dataflow Gen2 logic.
The desired outcome is an updated dimension table that has updates to SalesRepID two and three, and a new record four. That table looks as follows:
| SalesRepID | RepSourceID | FirstName | LastName | Region | StartDate | EndDate | IsCurrent | Hash |
|---|---|---|---|---|---|---|---|---|
| 1 | 312 | Vance | DeLeon | Southwest | 3/20/2021 | 12/31/9999 | TRUE | 3331327c56616e63657c44654c656f6e7c536f75746877657374 |
| 2 | 331 | Adrian | King | Southcentral | 3/20/2021 | 8/16/2024 | FALSE | 3333317c41647269616e7c4b696e677c536f75746863656e7472616c |
| 3 | 334 | Devon | Torres | Panama | 2/14/2024 | 8/16/2024 | FALSE | 3333347c4465766f6e7c546f727265737c50616e616d61 |
| 4 | 331 | Adrian | King | Northwest | 8/16/2024 | 12/31/9999 | TRUE | 3333317c41647269616e7c4b696e677c4e6f72746877657374 |
Logic to identify changes
In order to identify the changes, you first need to take a snapshot of your source table and establish a logic to compare it against the records from your dimension table. There are many ways in which you can establish a logic to compare these tables. Some of them are:
- Merge / JOIN patterns
- Using Natural keys
- Using Hashing techniques to create lookup fields
- Explicit Joins between tables
- Custom logic using dynamic record matching with Table.SelectRows
The tutorial demonstrates a hashing technique to use a single value that could be created within both tables for a JOIN, also known as Merge operation, to compare the records from the two tables.
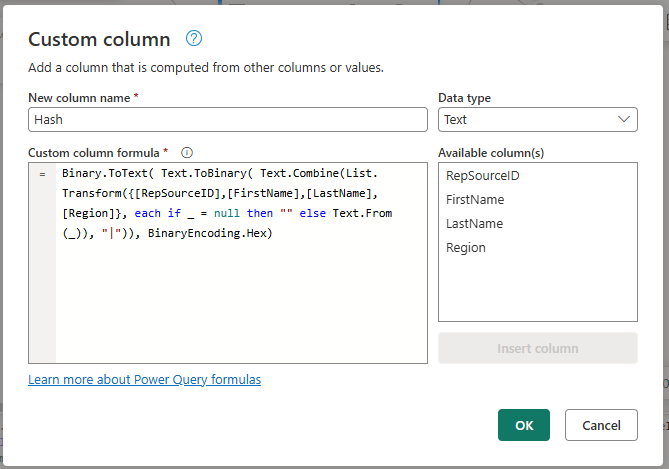
Once you load the Source table into a Dataflow Gen2, you can select the Add column tab from the ribbon and use the Add Custom column option. In the Custom column dialog you can create a new column with the name Hash with the Text data type and using the formula:
Binary.ToText( Text.ToBinary( Text.Combine(List.Transform({[RepSourceID],[FirstName],[LastName],[Region]}, each if _ = null then "" else Text.From(_)), "|")), BinaryEncoding.Hex)
Important
While this sample formula showcases how to use these four columns, you can change the reference of the columns to your own columns and define what specific fields from your table need to be used to create the hash.
Now with the Hash column in your Source table, you now have a simple way to compare both tables to find exact matches.

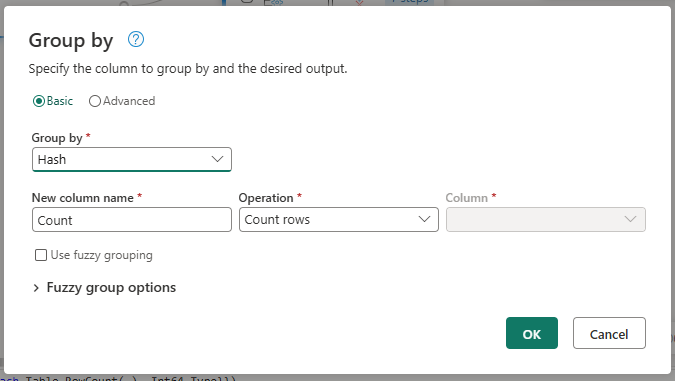
Once you load your Dimension table, create a reference of this query by either right clicking the query in the queries pane or in the diagram view and select the option to reference. Rename this new query to AggregatedDimHash. You can aggregate the count of records in the table by the Hash field. To do so, go to the Home tab in the ribbon and select the Group by option within the Transform group. Within the dialog, make sure to group by the Hash column and select the Operation for the new Count column to be Count rows.
New records
Note
Comparing the source table against the dimension table will fundamentally gives you what new records need to be added to the dimension table.
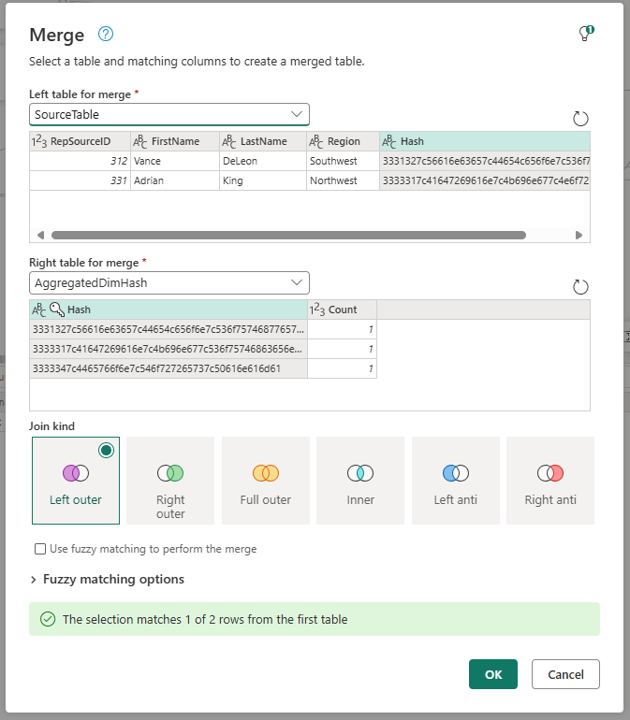
Select the Source query, go to the Home tab in the ribbon and select the option to Merge queries as new inside the Combine group. Rename this query to be Compare. Within the Merge dialog, make sure to pick the AggregatedDimHash in the "Right table for merge" dropdown and select the Hash columns from both tables while leaving the default Join kind of Left outer.
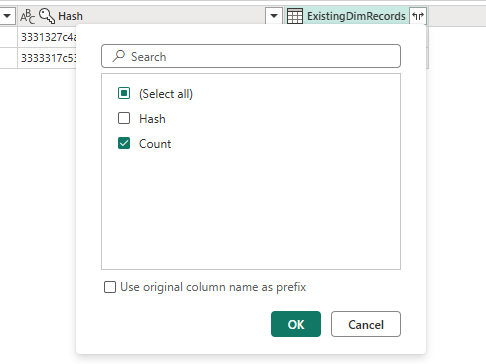
Once the merge completes, be sure to expand the newly created column by only selecting the Count column to be expanded.
Filter this column to only keep null values, which represent the values that don't exist in the Dimension table today. The result yields a single record for Adrian King in the Northwest region.

Remove the Count column and rename this query to be called CompareStoM.
The next step requires you to add missing fields to your record such as the StartDate, EndDate, IsCurrent, and even the SalesRepID. However, while the first three are easy to define with a simple formula, the SalesRepID requires you to first calculate this value from the existing values in the Dimension table.
Get the sequence of identifiers from the Dimension table
Reference the existing Dimension table and rename the query to LastID. You'll reference this query in the future.
Assuming that the value of the query is an integer that increments by one every time there are new records added, you can implement a logic that finds the maximum value in the SalesRepID. Right select the SalesRepID and select the option to drill down.

This yields a list and in the ribbon you'll now have the statistics options where you can choose the option to calculate the maximum value of this list:

Add another custom step after the previous step added and replace the formula for this step of your query with the formula below that calculates the max value from the SalesRepID and add one to it or establish the value one as the seed for new records in case your table doesn't have any records
try #"Calculated maximum" +1 otherwise 1
The output of the LastID query for this example is the number four.
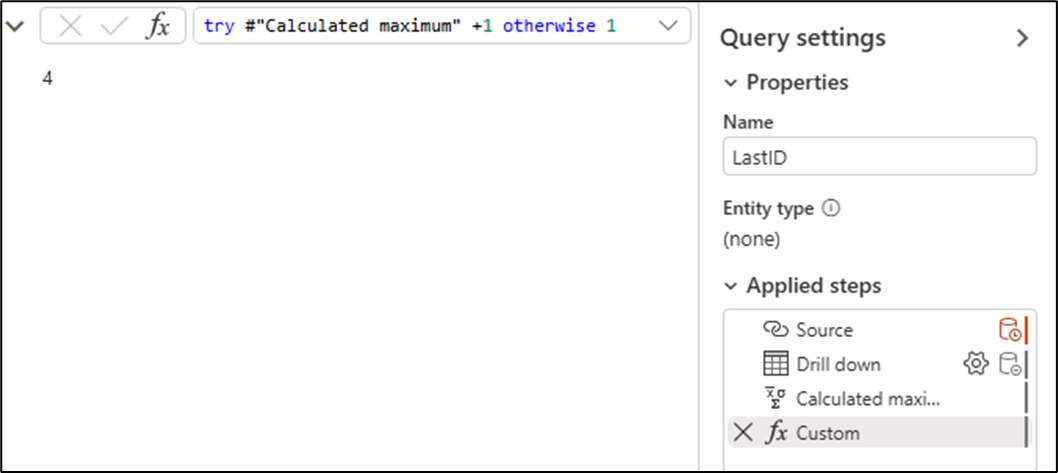
Important
#"Calculated maximum" represents the name of your previous step. If this is not the exact name of your query, modify the formula accordingly to reflect the name of your previous step.
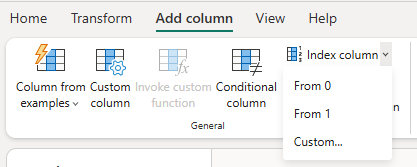
Reference the CompareStoM query where you had the single record for Adrian King in the Northwest region and call this new query "NewRecords". Add a new Index column through the Add column tab in the ribbon that starts from the number zero.
Check the formula of the step that was created and replace the 0 with the name of the query LastID. This yields starting value that represents the new values for your records in the Dimension table.

Rename this Index column to be SalesRepID.
Add missing fields to new records
It's time to add the missing columns using the Add custom column. Below is a table with all the formulas to use for each of the new columns
| Column name | Data type | Formula |
|---|---|---|
| StartDate | Date | Date.From(DateTime.LocalNow()) |
| EndDate | Date | #date(9999,12,31) |
| IsCurrent | True/False | true |
The result now conforms to the schema expected by the Dimension table.

Records to update
Note
Comparing the dimension table against the source table will give you what records should be updated in the dimension table.
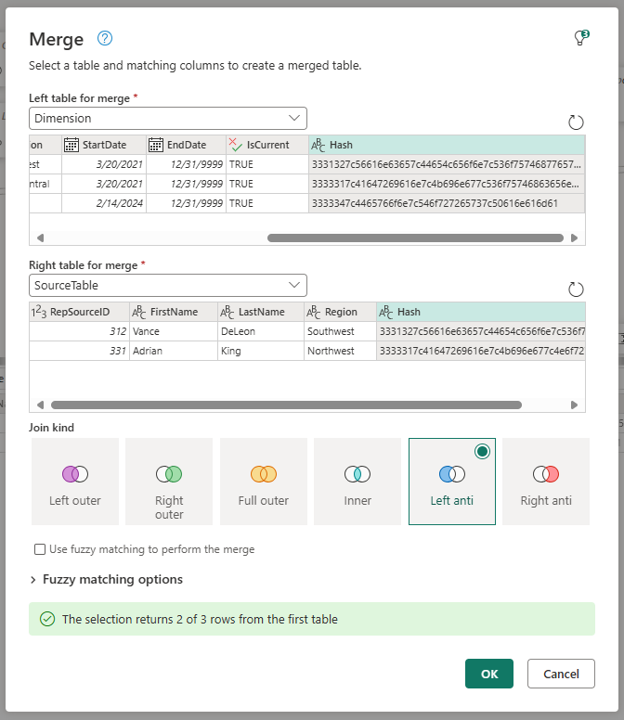
Using the original Dimension query (Dimension), perform a new Merge queries as new operation and select the Source table query as the right table. Select the Hash columns from both tables and select Left anti as the join kind.
The output is a table with records that are no longer used in the Source table. Make sure to expand the newly created column with table values and only expand the Hash column and then later delete it. Rename the query to be RecordsToUpdate.
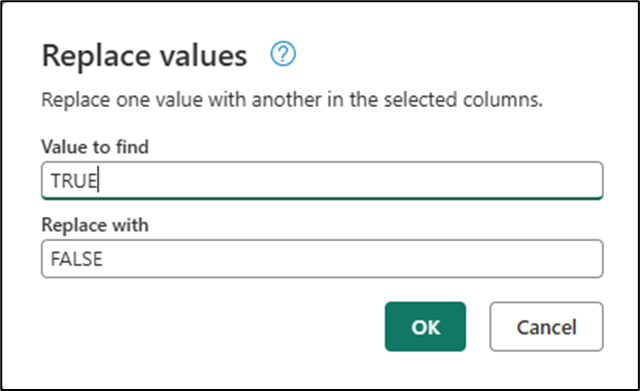
You now need to update the records from the Dimension table to reflect this change in the source table. The changes are trivial and will require you to update the values on the EndDate and IsCurrent fields. To do so, you can right select the IsCurrent field and select the option to Replace values.... Within the Replace value dialog you can replace the value TRUE with FALSE.
You can right select the EndDate field and select the Replace values... as well. Input a value of 12/31/1999 or any date of your choice as you'll replace this value later on.
Once you've committed the dialog, a new replace values step is added. Go to the formula bar of the step and change the component that has #date(1999,12,31) with the formula from below.
Date.From(DateTime.LocalNow())
This new formula adds a date stamp as to when the logic runs to determine the EndDate for that particular record.
The result of this will be a table with exactly the records that should be updated with their corresponding new values.

Combining records to add and update into a single table
You can append the query for NewRecords with the one that has records to be updated (RecordsToUpdate) into a single query to simplify the following process to update your dimension table.
To append the queries, be sure to select the NewRecords query, go to the home tab of the ribbon and inside the Combine group you find the option to Append queries as new. From the Append dialog, make sure to also select the query with the records to update as the second table.

Rename this new query as StagingTableForUpdates and it should contain 3 rows. This query is used in the logic to update the dimension table. You can move the SalesRepID or rearrange the columns as you wish. For simplicity and demonstration purposes, this tutorial shows the output of this query using the same order of fields as in the Dimension table.

Logic to update the Dimension table
The solution so far provides a query with all records for an upsert operation into the destination. From this point, you can define the logic that you wish to use to load your data to the Dimension table but you typically have two:
- Upsert operation: You can accomplish this today by storing the results of the StagingTableForUpdates query to a staging table in your data source and then running a stored procedure in your Server / Data source engine. You could also use other mechanisms such as a notebook within Microsoft Fabric. Finally, you can then establish a Data Pipeline that can trigger the notebook or the stored procedure after your Dataflow Gen2 finishes its operation and automate this for future operations and set it on a schedule.
- Delete existing data and recreate table: You can accomplish this today within Dataflow Gen2 without the need for other tools, but you could potentially use other tools as well to implement this logic. This tutorial showcases this approach.
Using Dataflow Gen2 to load data to your Dimension destination table
You can create a logic that uses three queries to come up with a query with all the records that should exist in the Dimension table. With the new query, you can use the data destinations feature in Dataflow Gen2 to load your data.
Records to keep from original Dimension table
The first logic to implement is the records from the original Dimension table to keep.
With the Dimension query selected, go to the Home tab in the Ribbon and use the Merge queries as new option. In the Merge dialog, select the RecordsToUpdate query as the right table. Select the SalesRepID columns from both columns and use the Left anti as the join kind. Select Ok.

Make sure to expand the Hash field from the newly created column. Once expanded, you can delete that column.
Now that you know exactly what records need to be kept from the original Dimension table, you can append the StagingTableForUpdates to the existing query to have a query will all records that should be in the Dimension table. To do that, in the Home tab of the ribbon select the option to Append within the existing query and append the StagingTableForUpdates query.

You can sort this table using the SalesRepID field in ascending order and the output can be used with the data destination feature to load the data to the Dimension table.

You can read more about how to set a data destination for your query and load the output of the query to your Dimension table from the article on Dataflow Gen2 data destinations and managed settings.

Note
Take into consideration that in Dataflow Gen2 you can leverage a staging mechanism at the query level. Read more about the staging mechanism in Dataflow Gen2