Note
Access to this page requires authorization. You can try signing in or changing directories.
Access to this page requires authorization. You can try changing directories.
In plan (preview), you can insert rows in matrix reports and enter data manually.
Important
This feature is in preview.
In some scenarios, data retrieved from a source might be incomplete. For example, a financial statement report might include revenue and expense metrics but not the number of shares outstanding. Similarly, a sales report might not include data for a newly launched product category. To address such cases, you can insert data input rows in the report and enter the required data.
This article explains how to insert data input rows and enter values directly in the report.
Insert a data input row
Insert a data input row using either of the following methods:
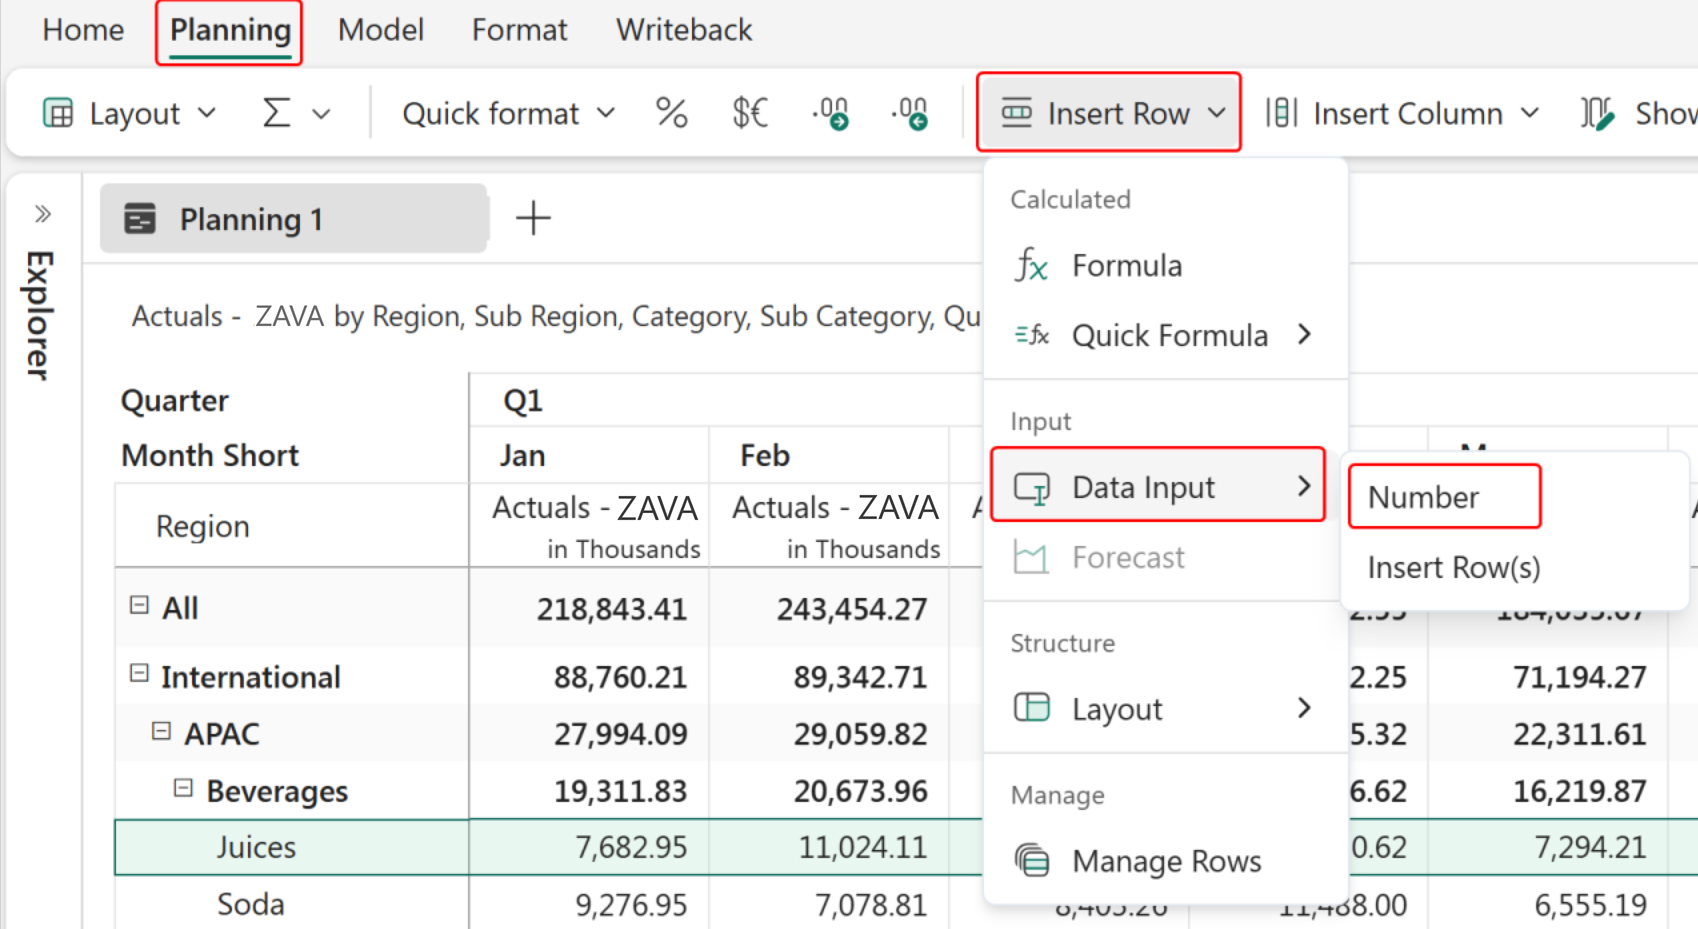
From the Planning tab
- Select a row at the level where you want to insert the new row in the report.
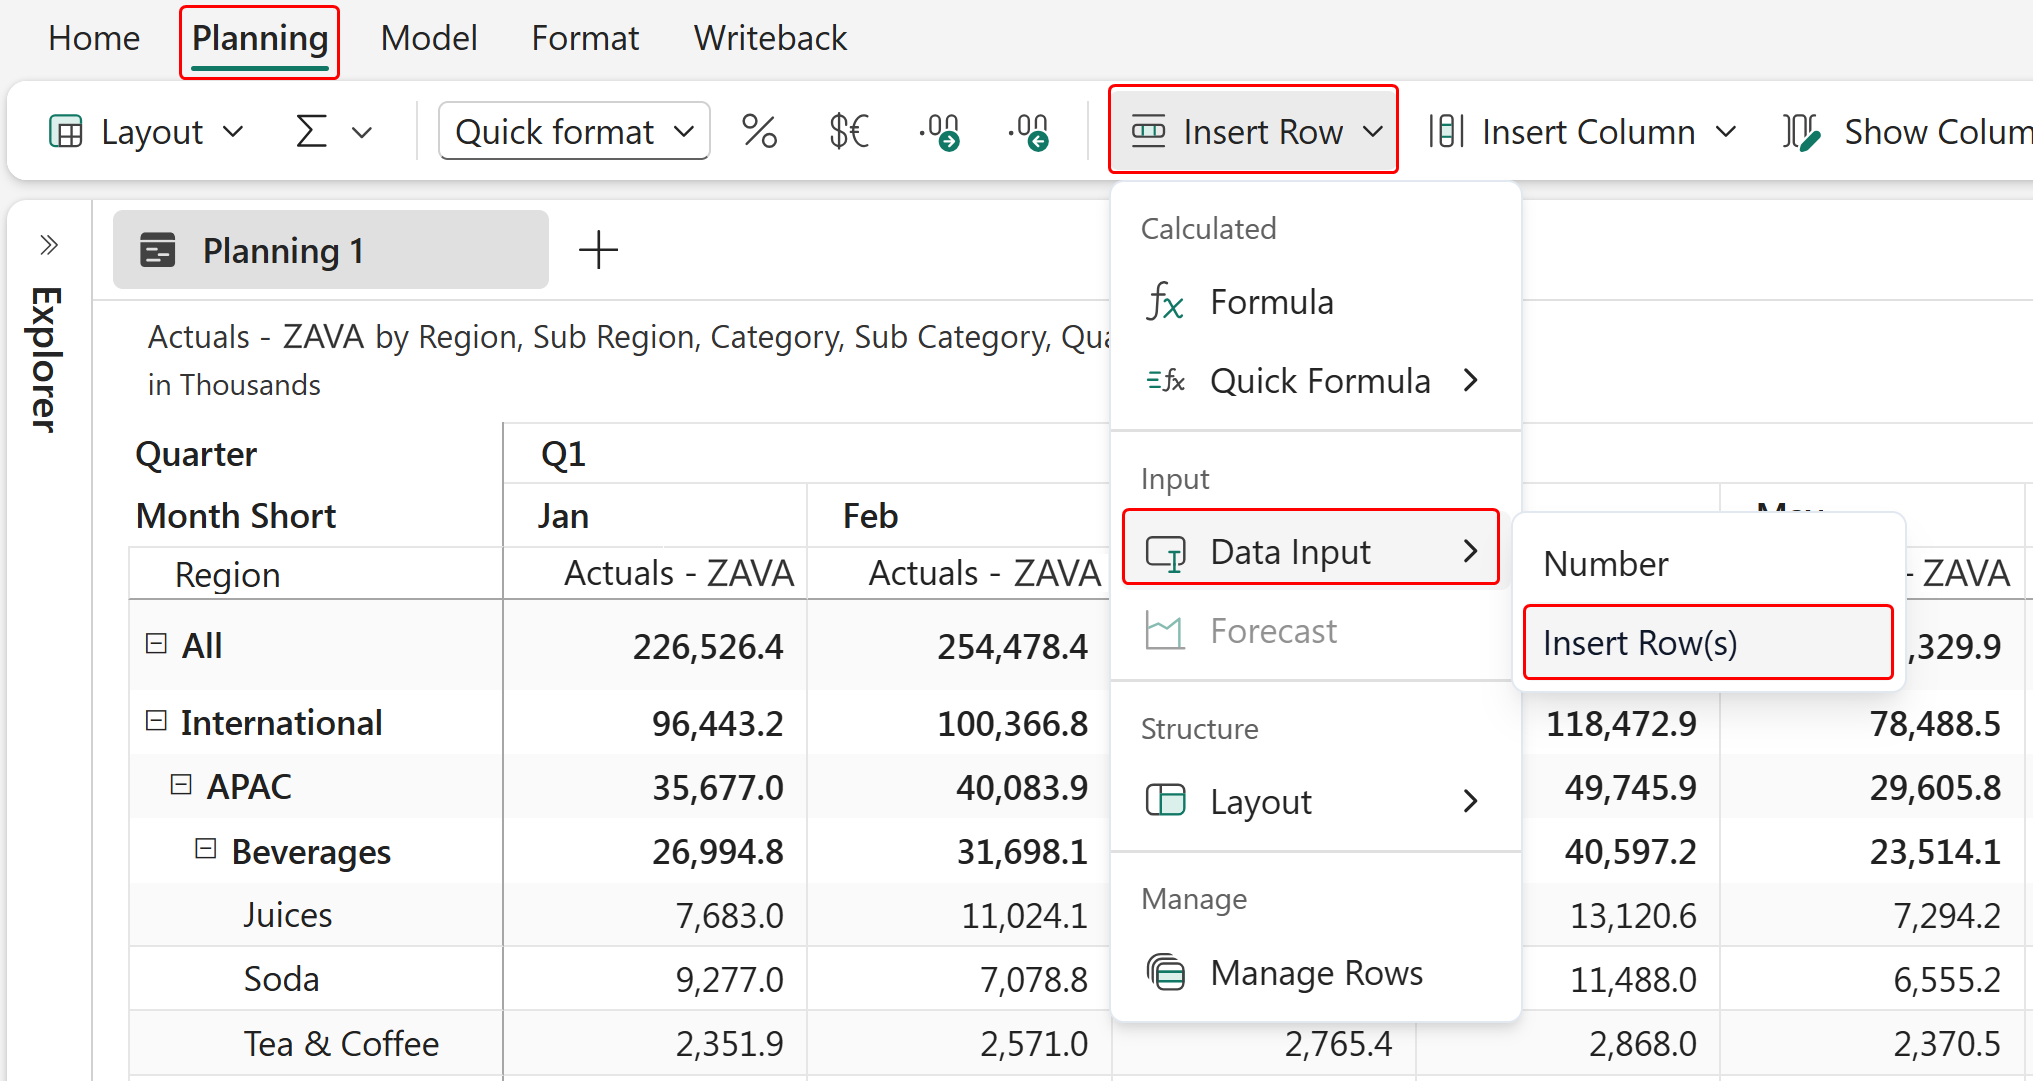
- Go to Planning > Insert Row. This option is disabled if no row is selected.
- Navigate to Data Input and select Number.
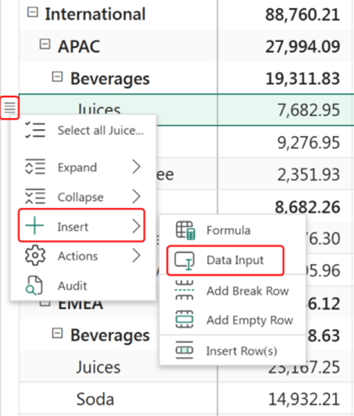
Using the row gripper
Hover over a row to highlight the row gripper icon.
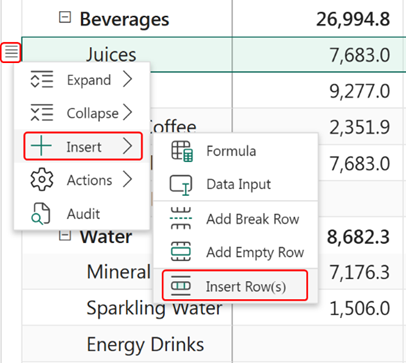
Select the gripper and choose Insert > Data Input.
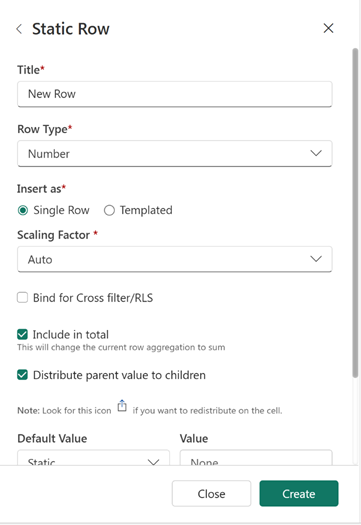
A side pane opens where you can configure row properties.
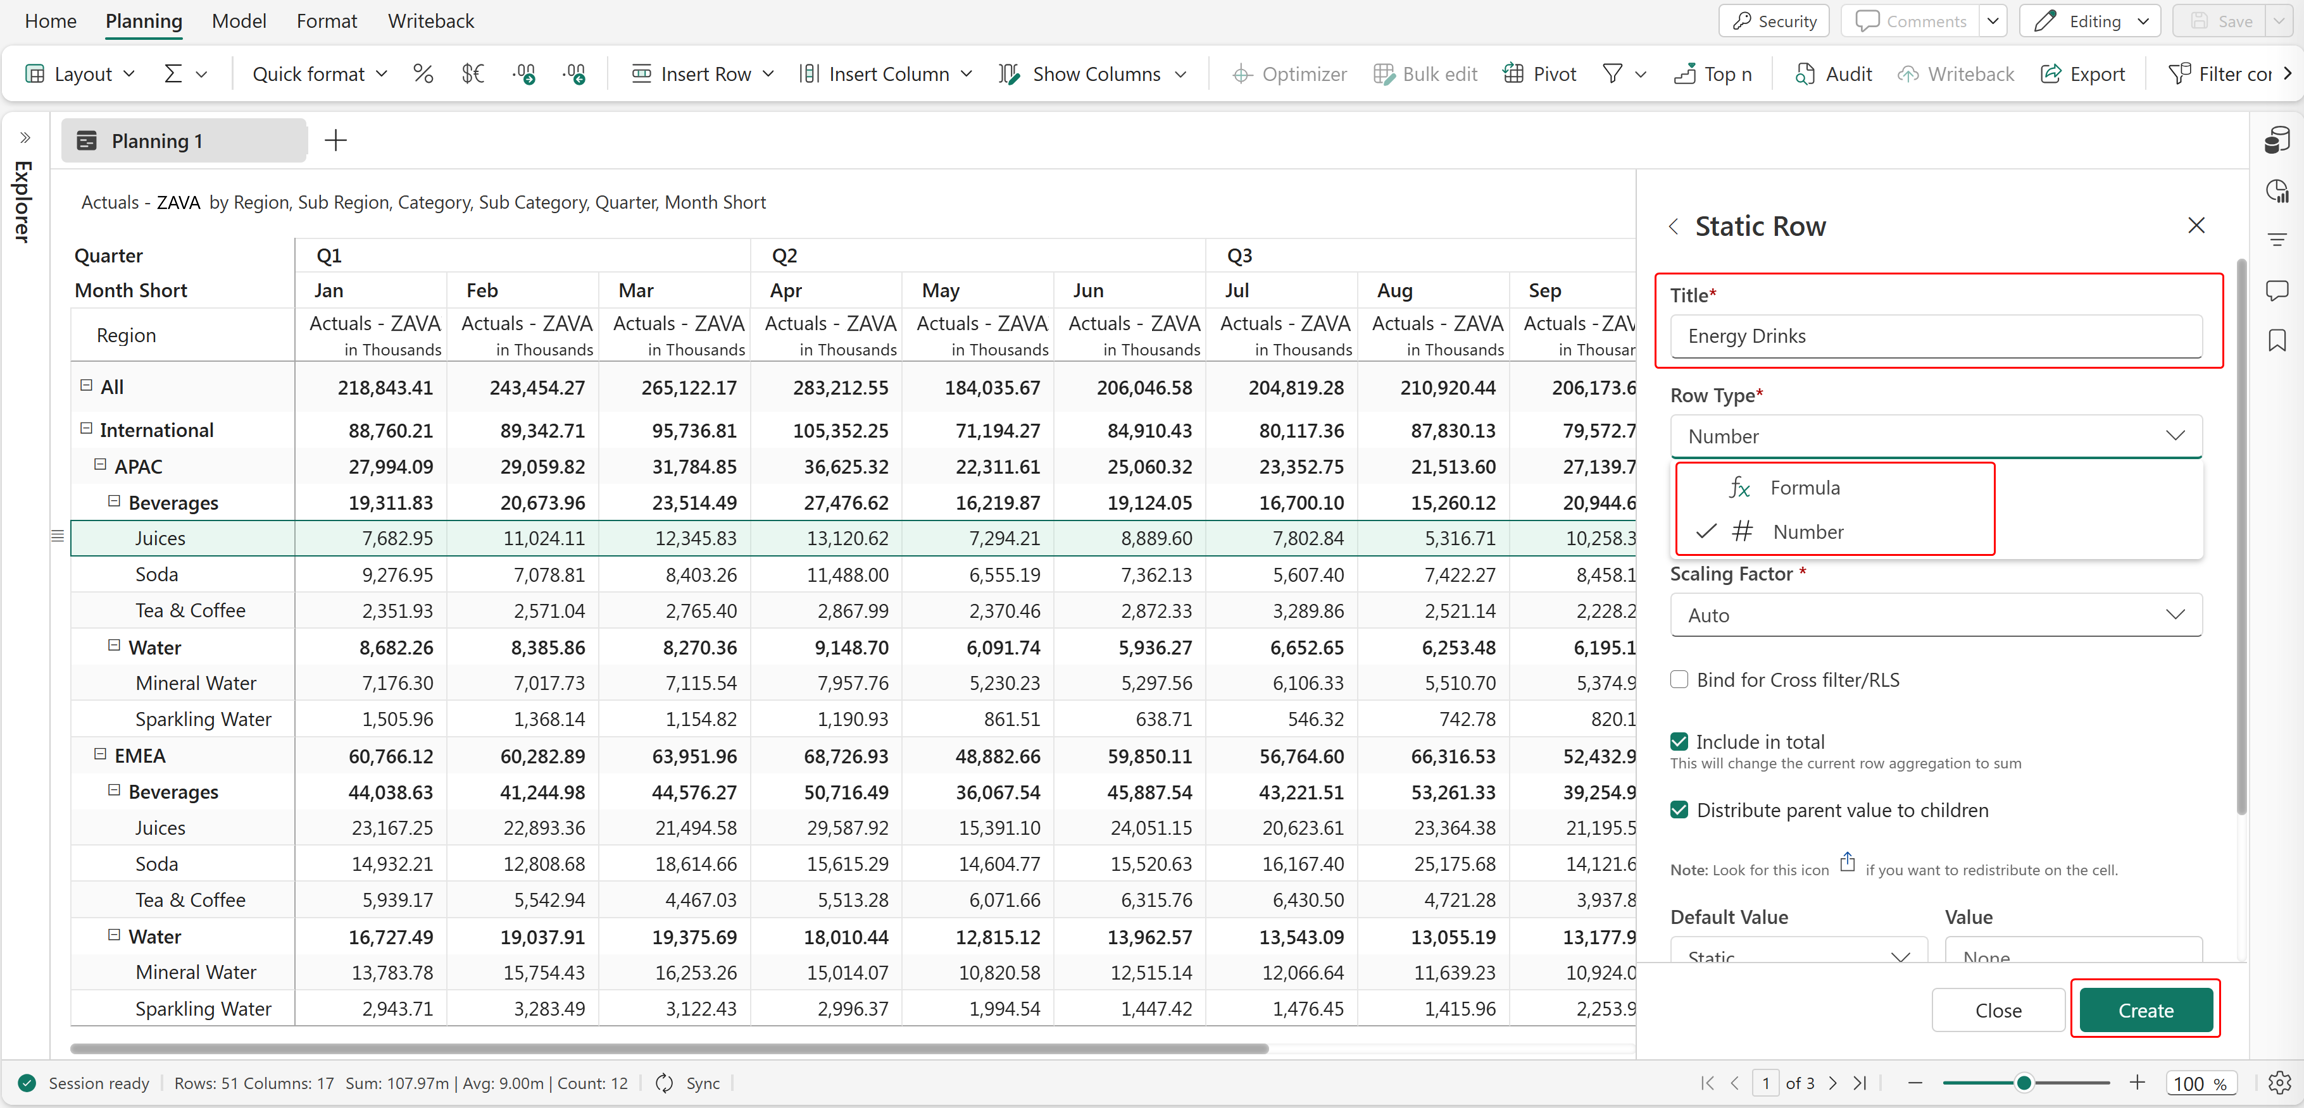
Enter a name in the Title field, configure additional settings as needed (described in the following sections), and select Create. The system adds an empty row with default properties at the selected level.
Before you select Create, you can modify default row properties by configuring additional settings. The following sections describe these settings.
Data input row properties
Row type: Use the dropdown to select the type of row to insert:
- Calculated row (Formula)
- Data input row (Number)
You can switch between row types at any time.
Insert As: Choose how the row is inserted:
- Single Row: Inserts one row.
- Templated: Inserts the row across all hierarchy levels. For example, you can create a product line and replicate it across all region levels.
Scaling factor: Set the scale for values in the data input row to thousands, millions, billions, or trillions. By default, it's set to Auto.
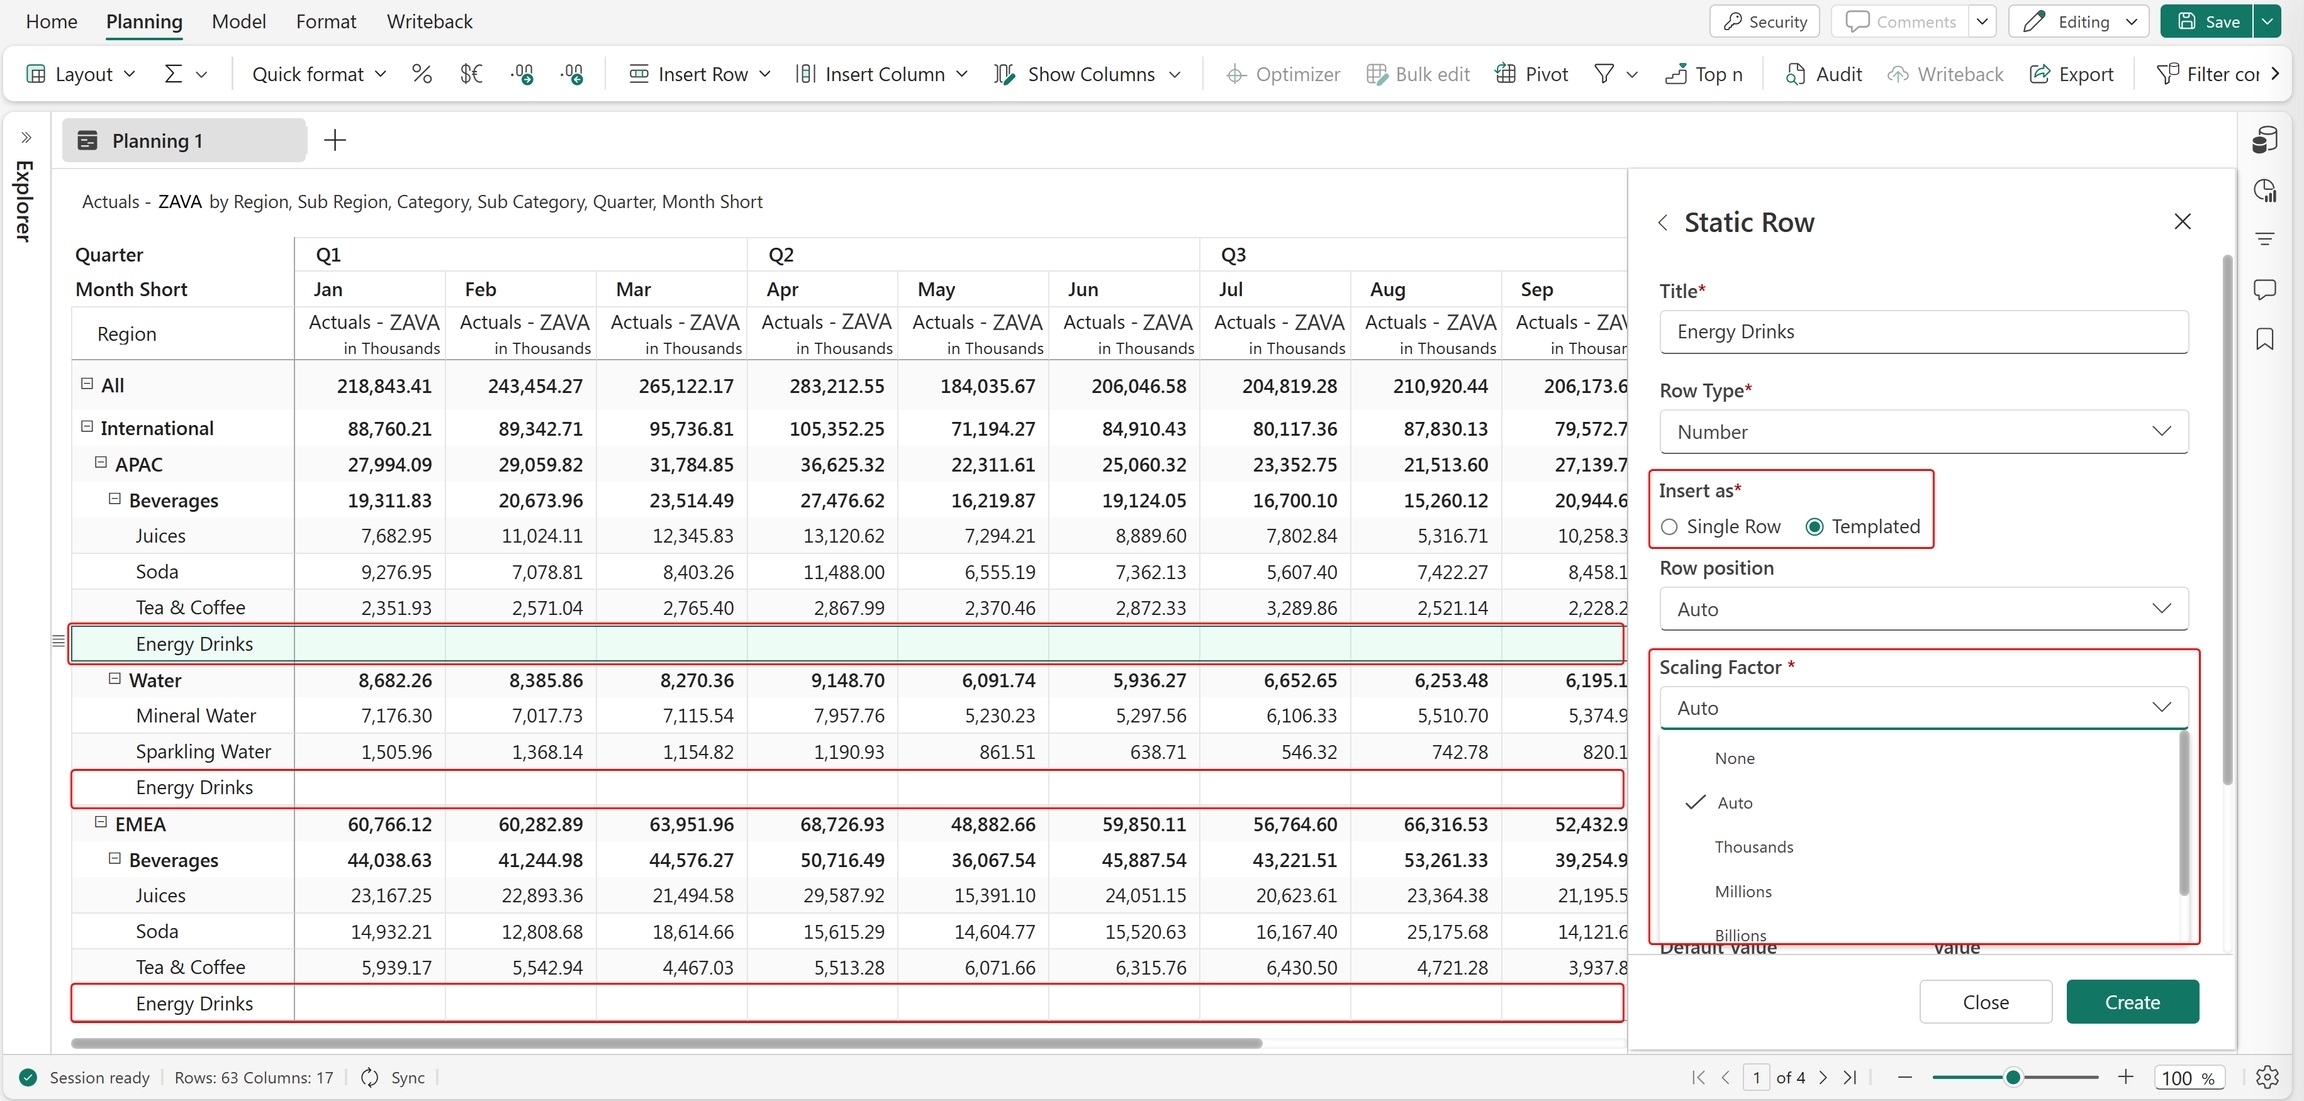
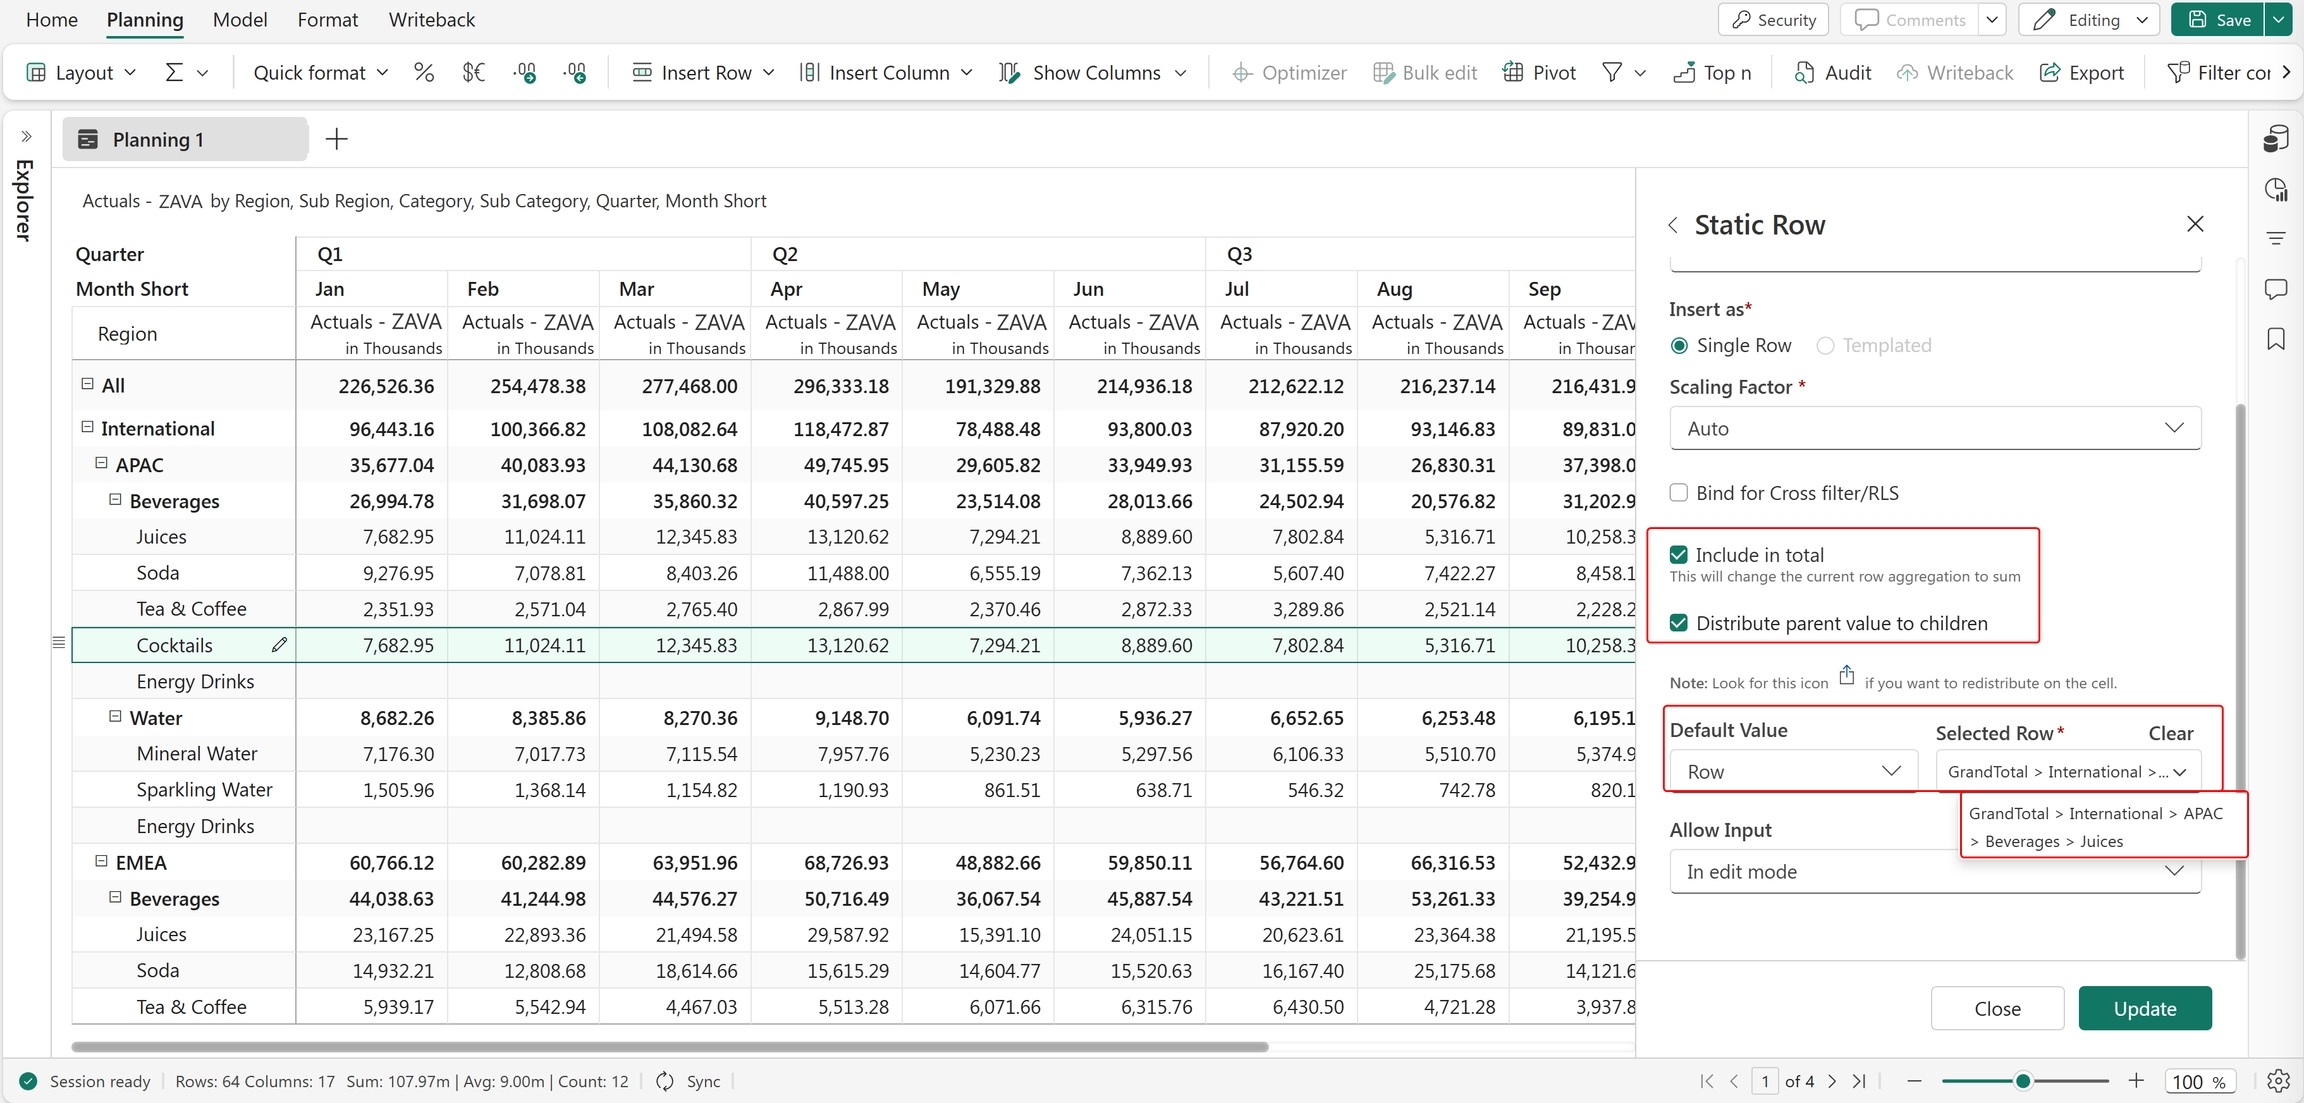
Include in total: When enabled, the row values are included in the parent total. It's enabled by default.
Distribute parent value to children: When enabled, row values entered at the parent level are distributed to child levels.
Default value: Set the initial value for the row, which can be either a static value or a value sourced from another row.
Choose Static to enter a static row value. Choose Row to source values from another row in the report. Enter the required row name in the Selected Row.
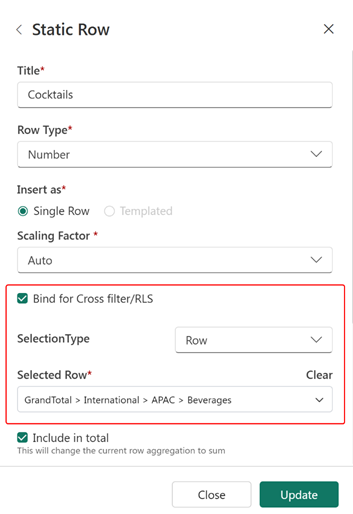
Bind for cross filter/RLS: Enable Bind for Cross filter/RLS to ensure that cross-filter selections and row-level security (RLS) rules are applied to formula rows and data input rows that reference other rows. For more information about binding rows, see Configure formula row properties.
Note
If the Bind for cross filter/RLS option is disabled, a manager responsible for Canada accounts might see a manually inserted row that references US data.
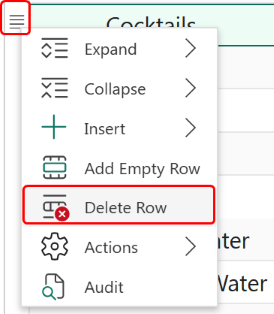
Delete a static row: Hover over the row, select the row gripper, and then select Delete Row. Alternatively, delete rows from the Manage Rows interface.
Allow Input: Choose when users are allowed to enter inputs into a data input row.
- Edit mode: Users can enter values only in edit mode.
- Read mode: Users can enter values even in read mode.
Bulk insert data input rows
You can bulk insert leaf-level rows or row hierarchies by using the Insert Row(s) option from the Planning tab or row gripper.
Insert rows
Select any child row or the parent row under which you want to create new rows. The new rows will be created below the selected row.
Use the row gripper and select Insert > Insert Row(s), or go to Planning > Insert Row > Data Input > Insert Row(s).
In the Insert Row(s) pop-up window, the parent row levels are already filled in. Enter the new row name.
To insert another row, select Add New or use the + icon next to the parent category.
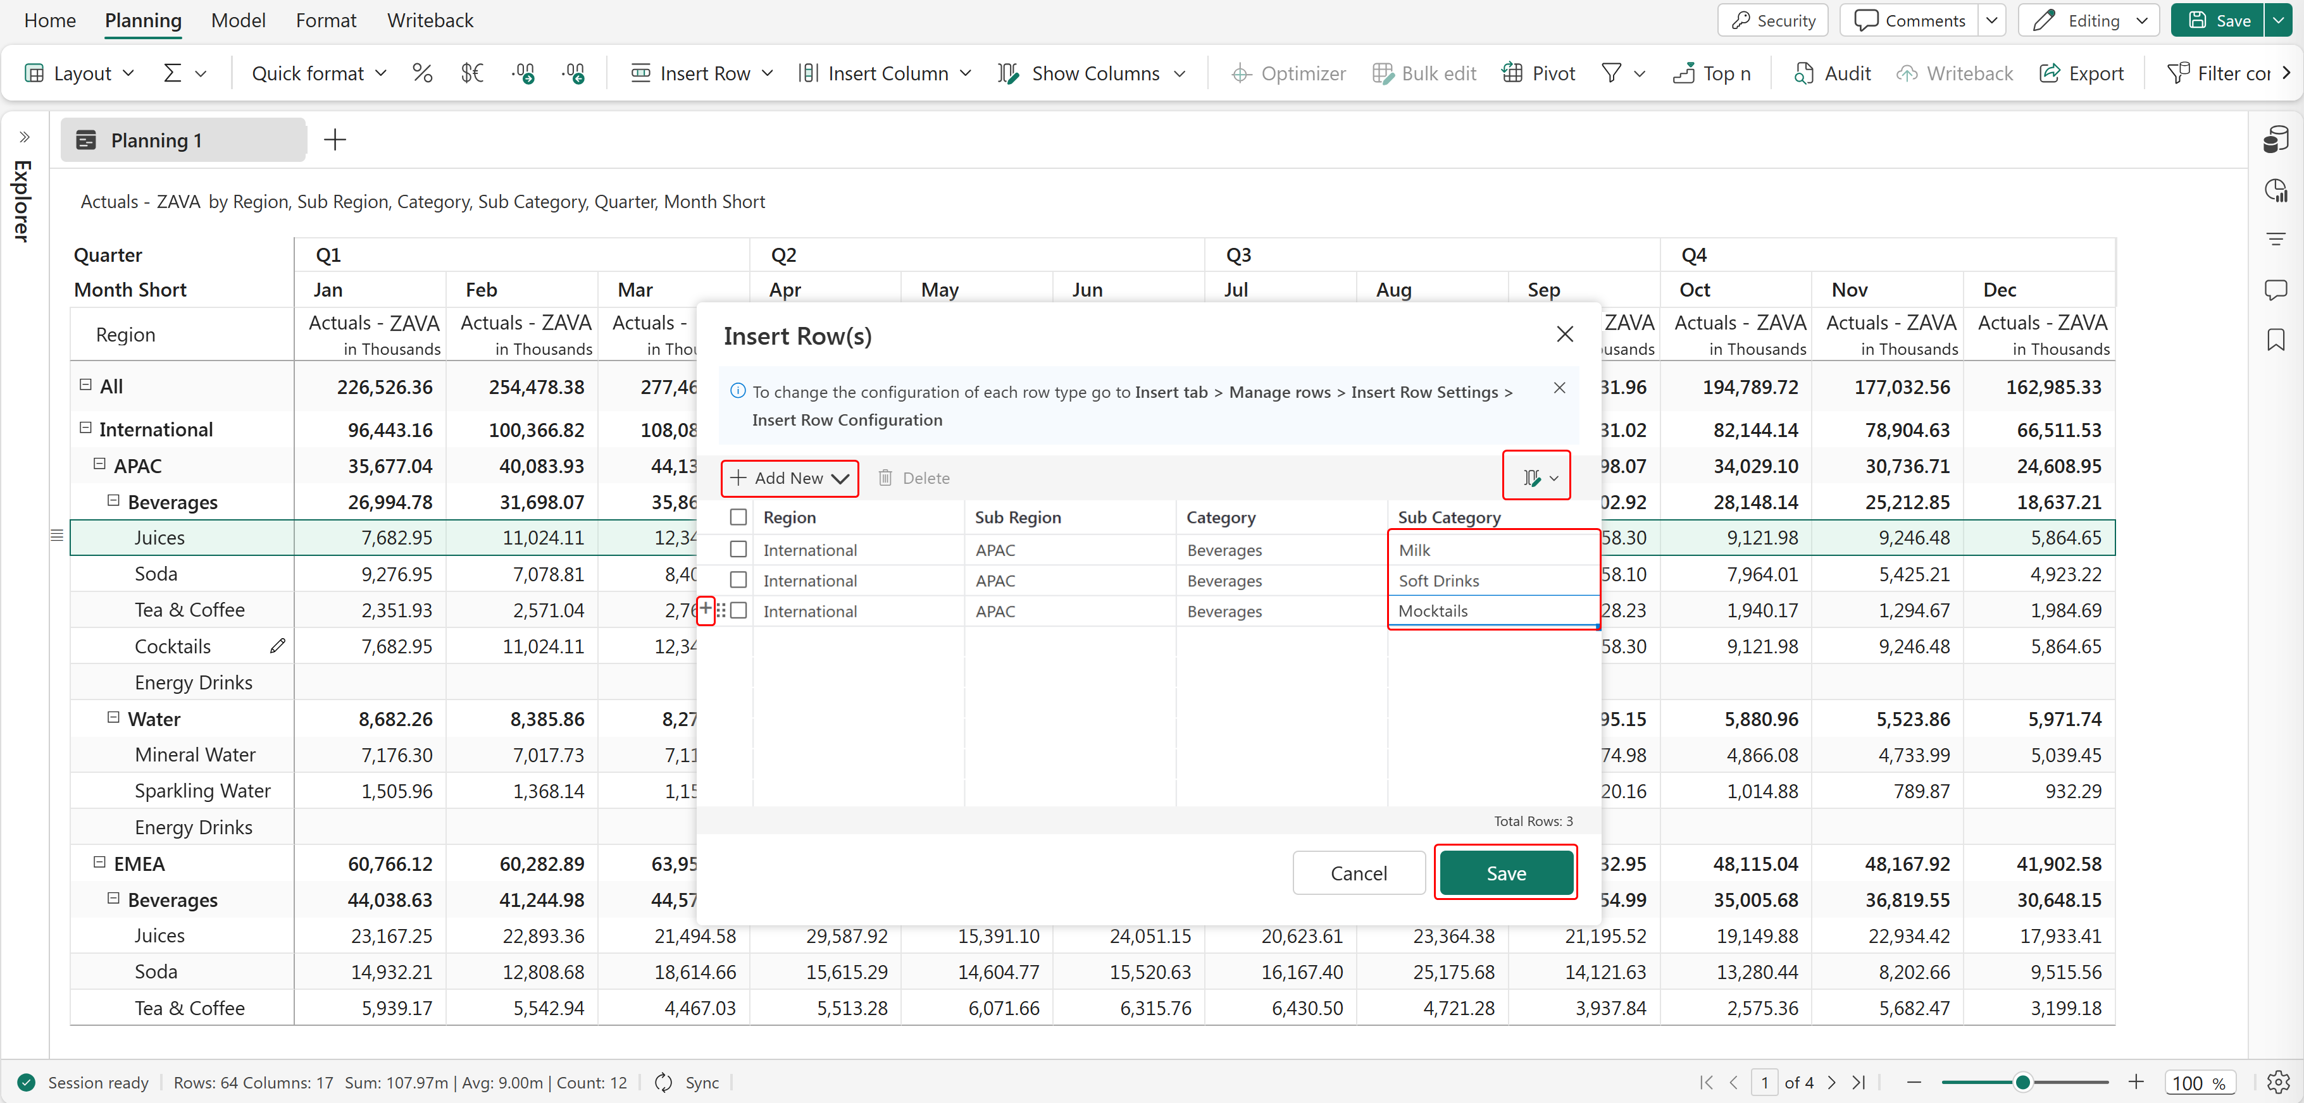
To insert multiple rows at once, use the dropdown next to Add New and choose whether you want to insert 1, 5, or 10 rows.
Enter row names and select Save.
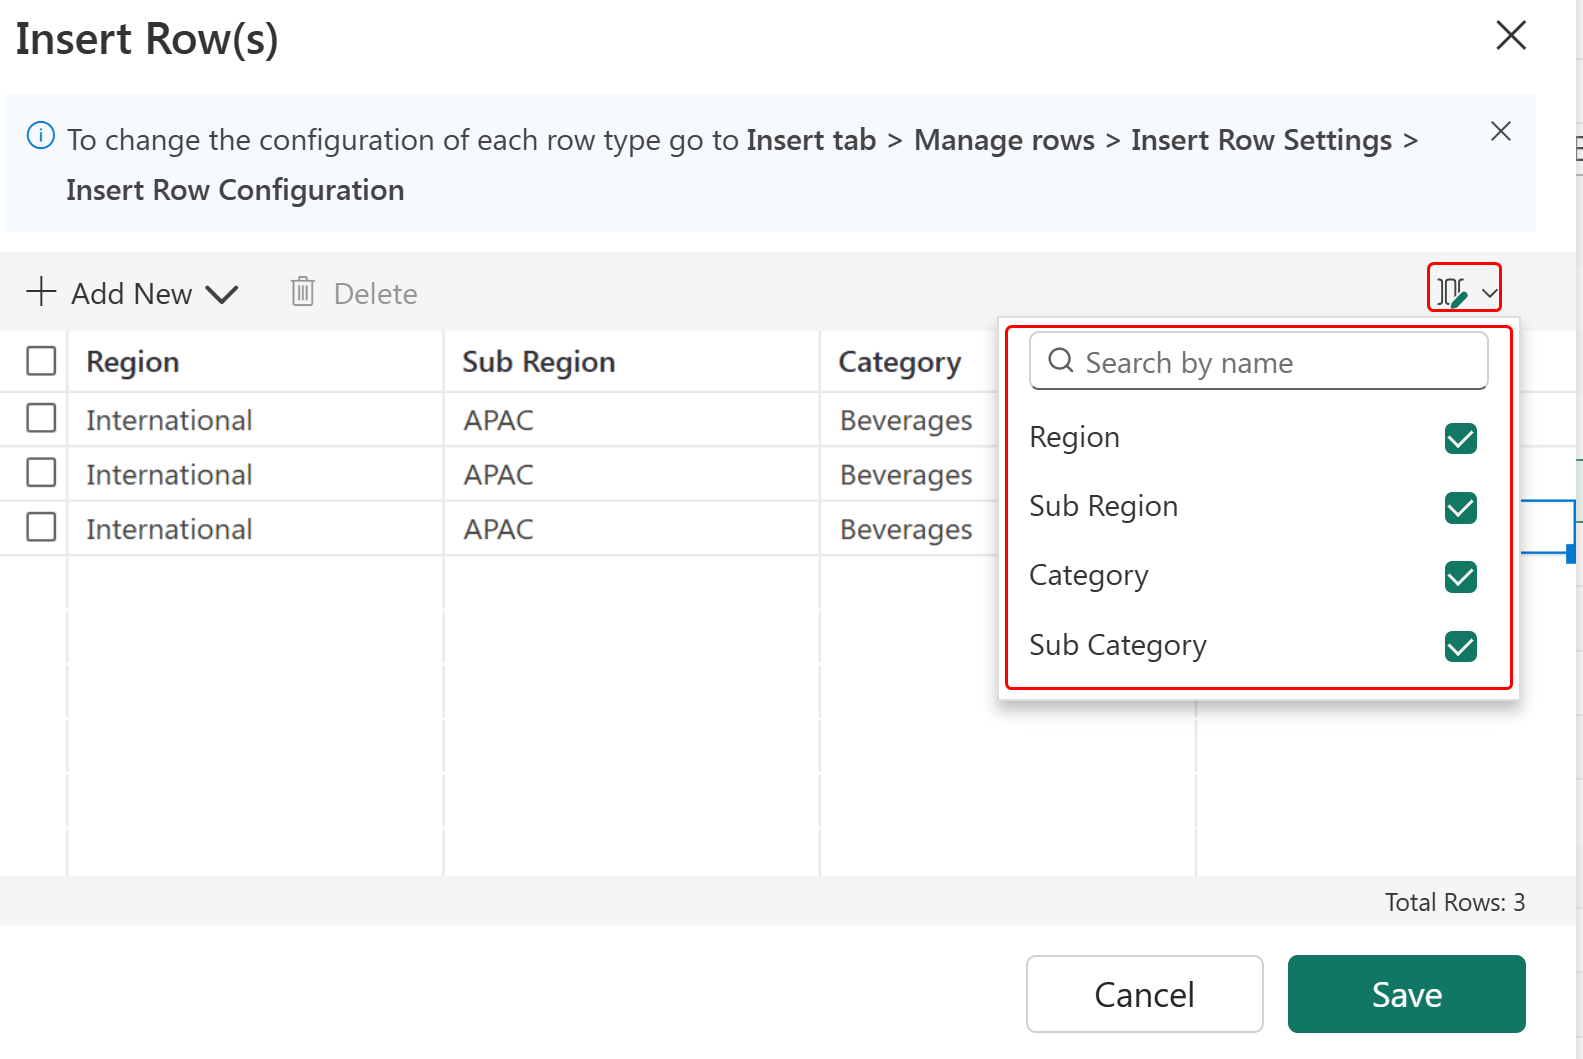
You can also specify row dimensions for the new rows by selecting the icon in the Insert Row(s) window.
Insert a row hierarchy
To insert a hierarchy of rows:
- Go to Insert Row(s) and select Add New.
- In the Insert Row(s) window, the parent row hierarchy is pre-filled with existing values. Overwrite these values to define the new row hierarchy.
- Select Save.
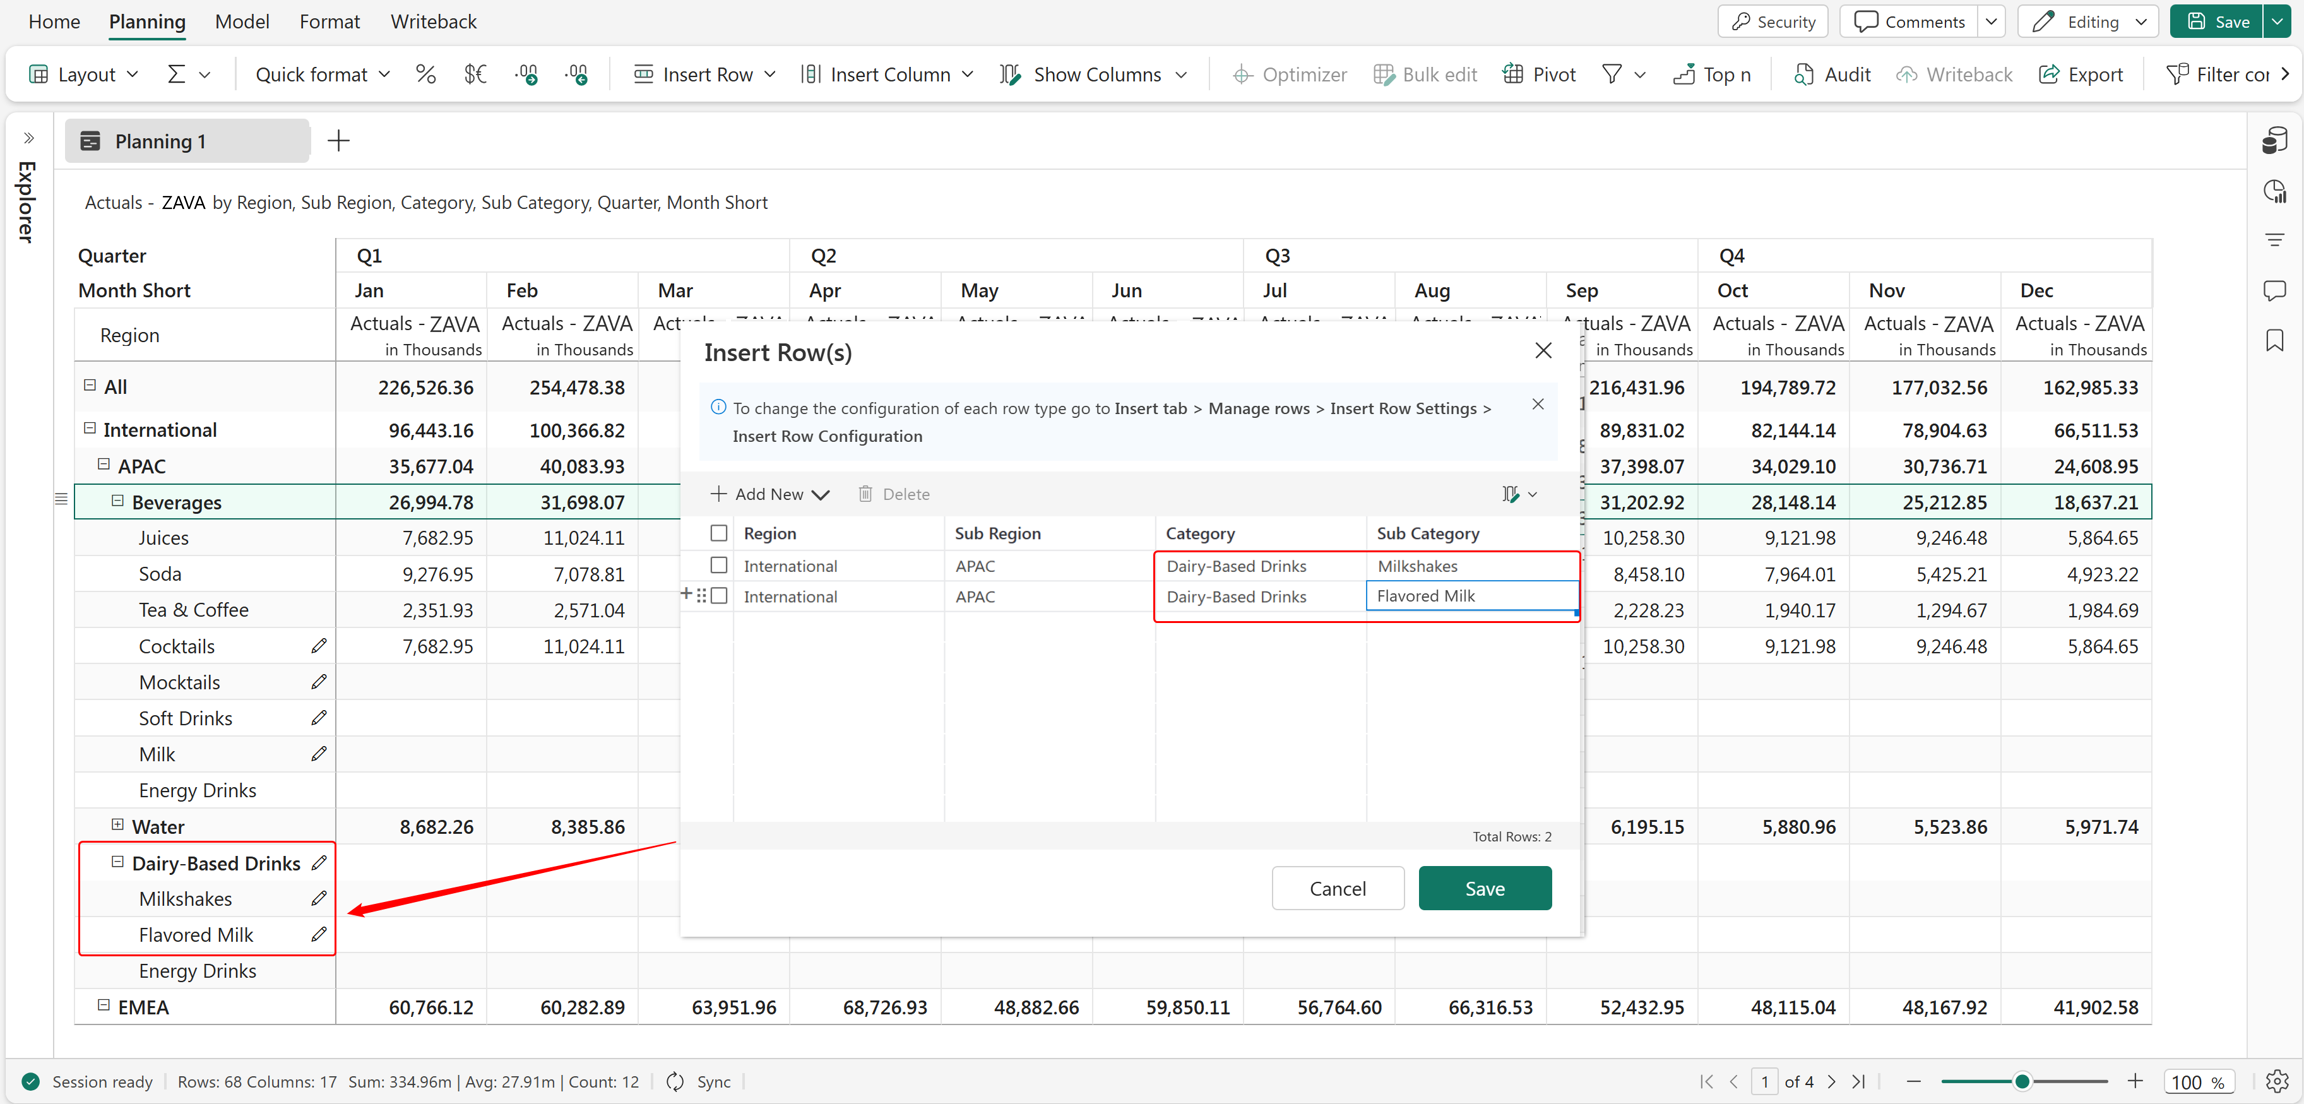
Overwriting is only allowed when the row type is set to Text in Insert Row > Manage Rows > Row Settings > Insert Row Configuration. For more information, see Insert Row Configuration.
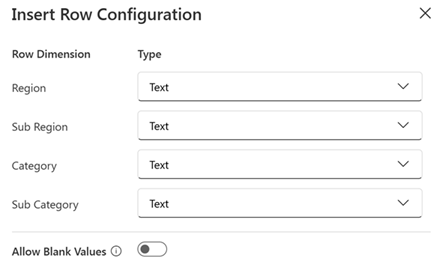
Allow blank values in categories
While inserting row hierarchies manually, enable the Allow Blank Values toggle if you expect blank row categories in the leaf nodes.
Navigate to Planning > Manage Rows > Row Settings > Insert Row Configuration.
Enable Allow Blank Values.
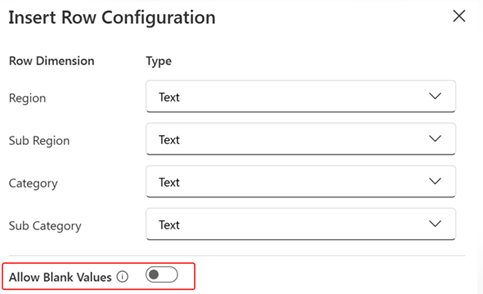
By default, this toggle is disabled. The blank categories are highlighted in a red error box, and you can't create rows with blank row categories.
By enabling this option, you can insert row hierarchies that contain blank leaf categories.
Note
You can't create a blank parent node if the child nodes contain values.
Disable row insertion
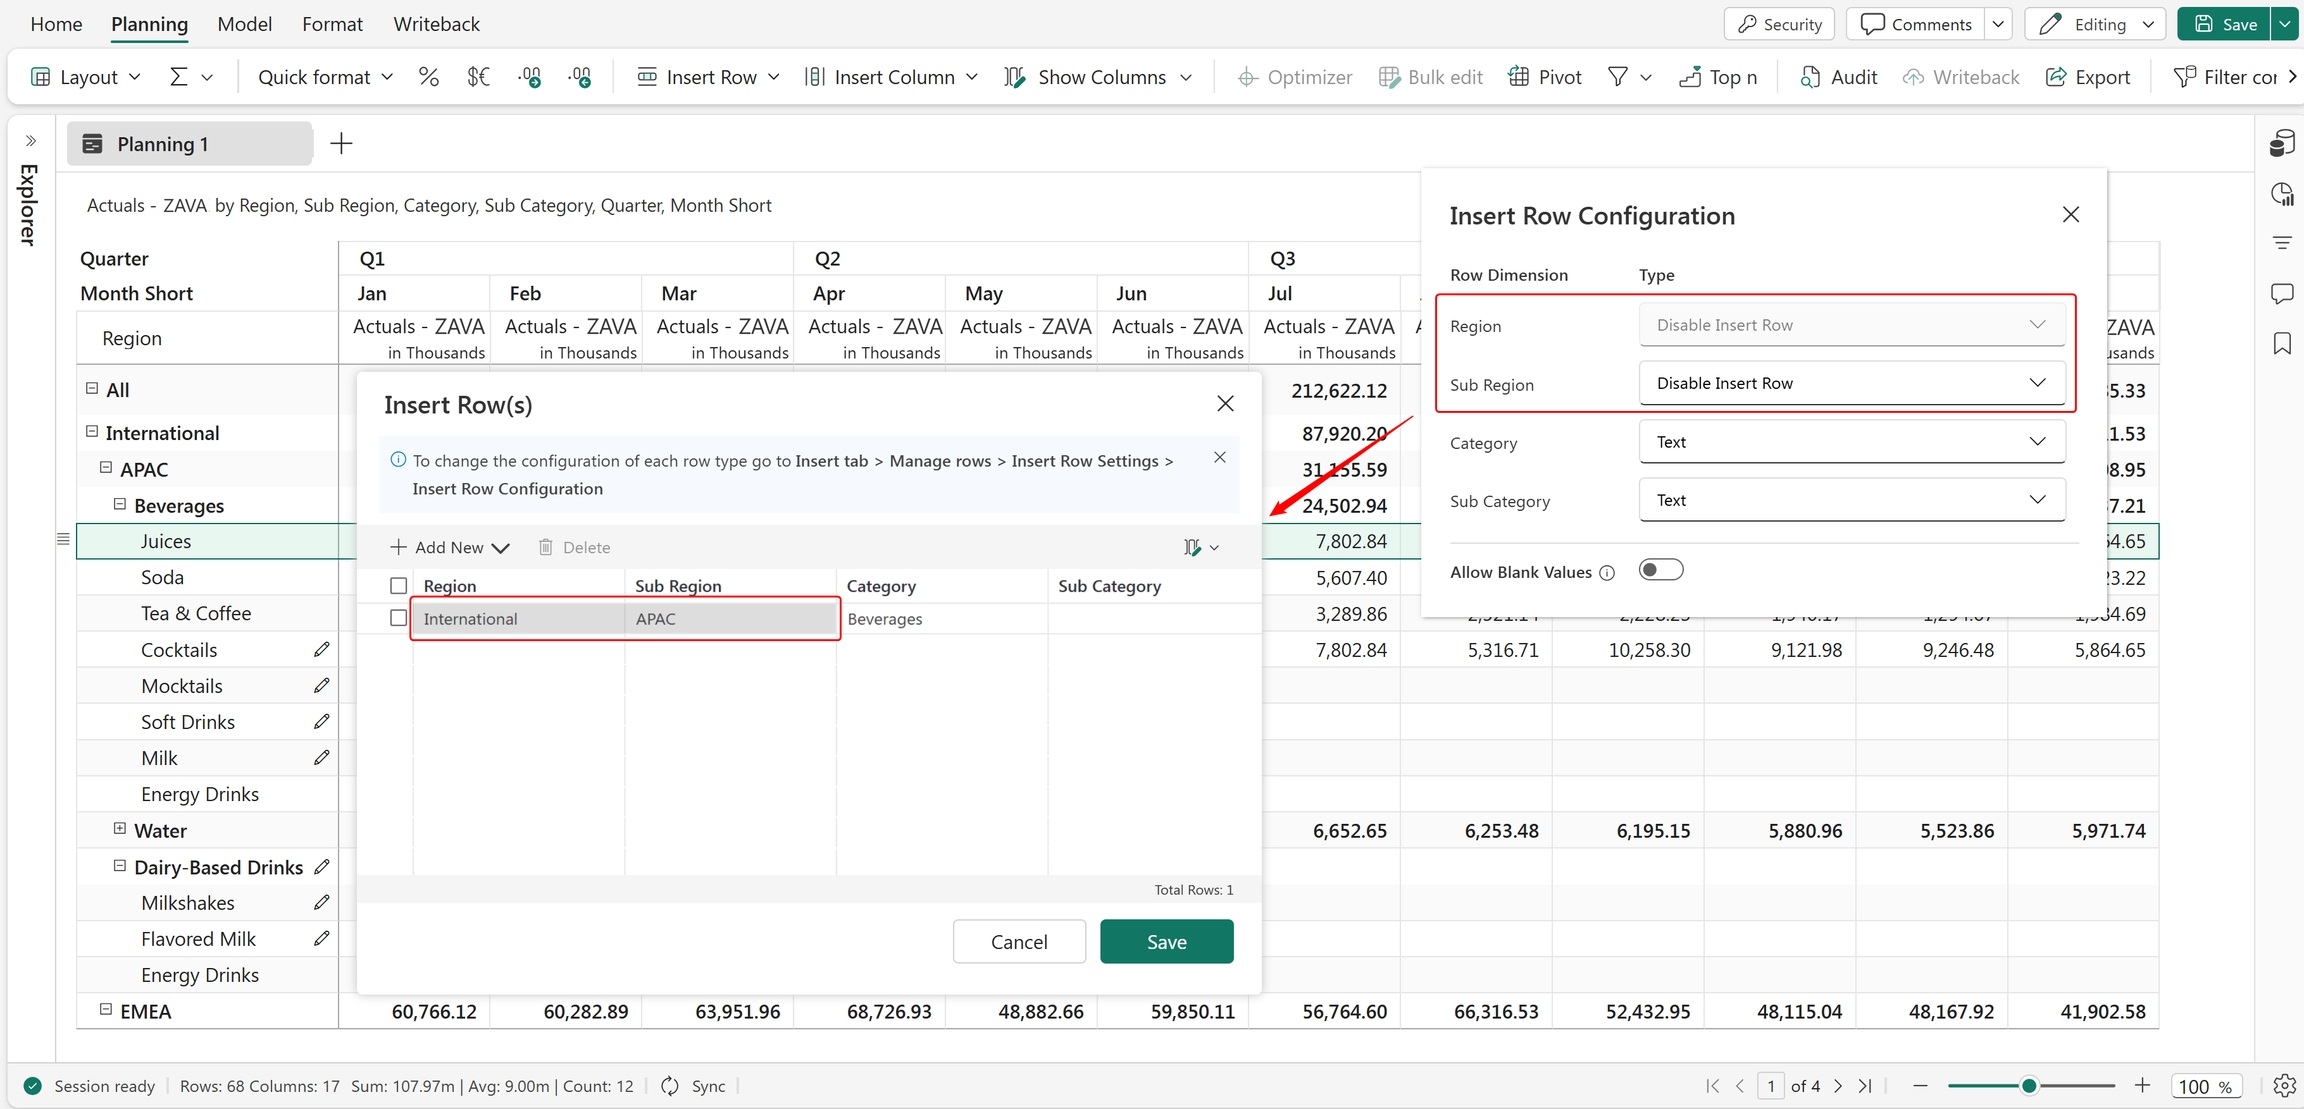
You can restrict row creation for a particular level to prevent users from creating new categories. To restrict row creation:
- Go to Insert Row > Manage Rows > Row Settings > Insert Row Configuration > Manage.
- Set Type to Disable Insert Row.
This action prevents row insertion at the selected level and all levels above it, while child levels still allow insertion.
Upload rows from Excel or CSV
You can also upload row categories from an Excel/CSV sheet, and map the respective columns in the configuration.
Go to Insert Row > Manage Rows > Row Settings > Insert Row Configuration > Manage and select Options list from CSV.
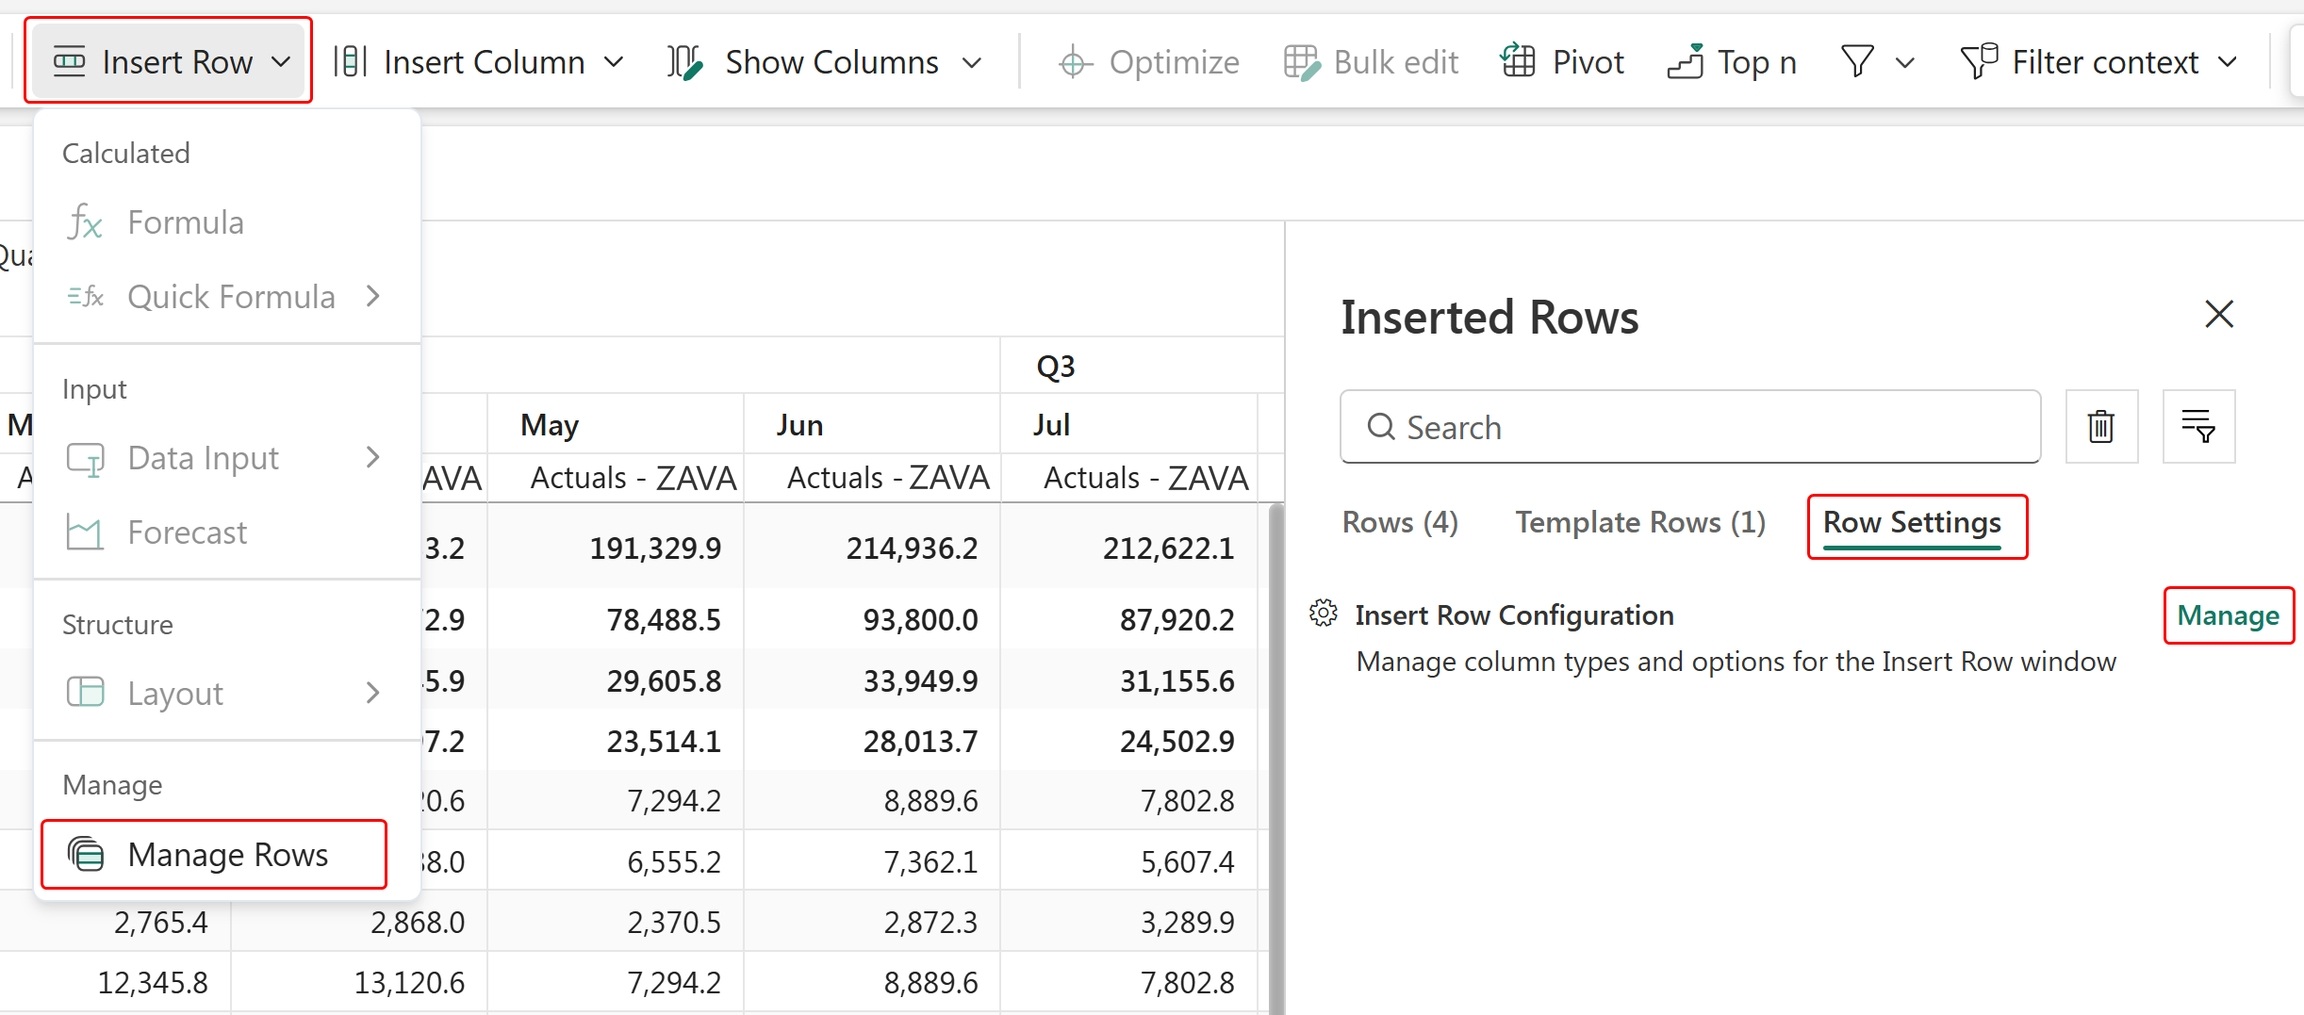
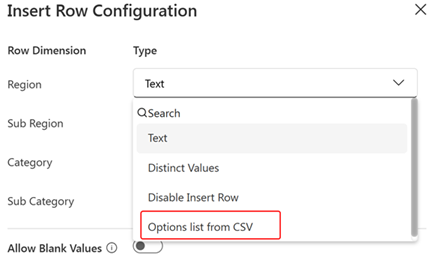
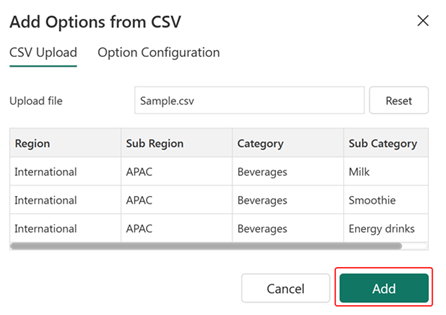
Select Upload and choose a CSV file from your system.
Preview the data and select Add.
Go to Option Configuration tab.
Map the column using Filter options by selecting Add New, then select Save.
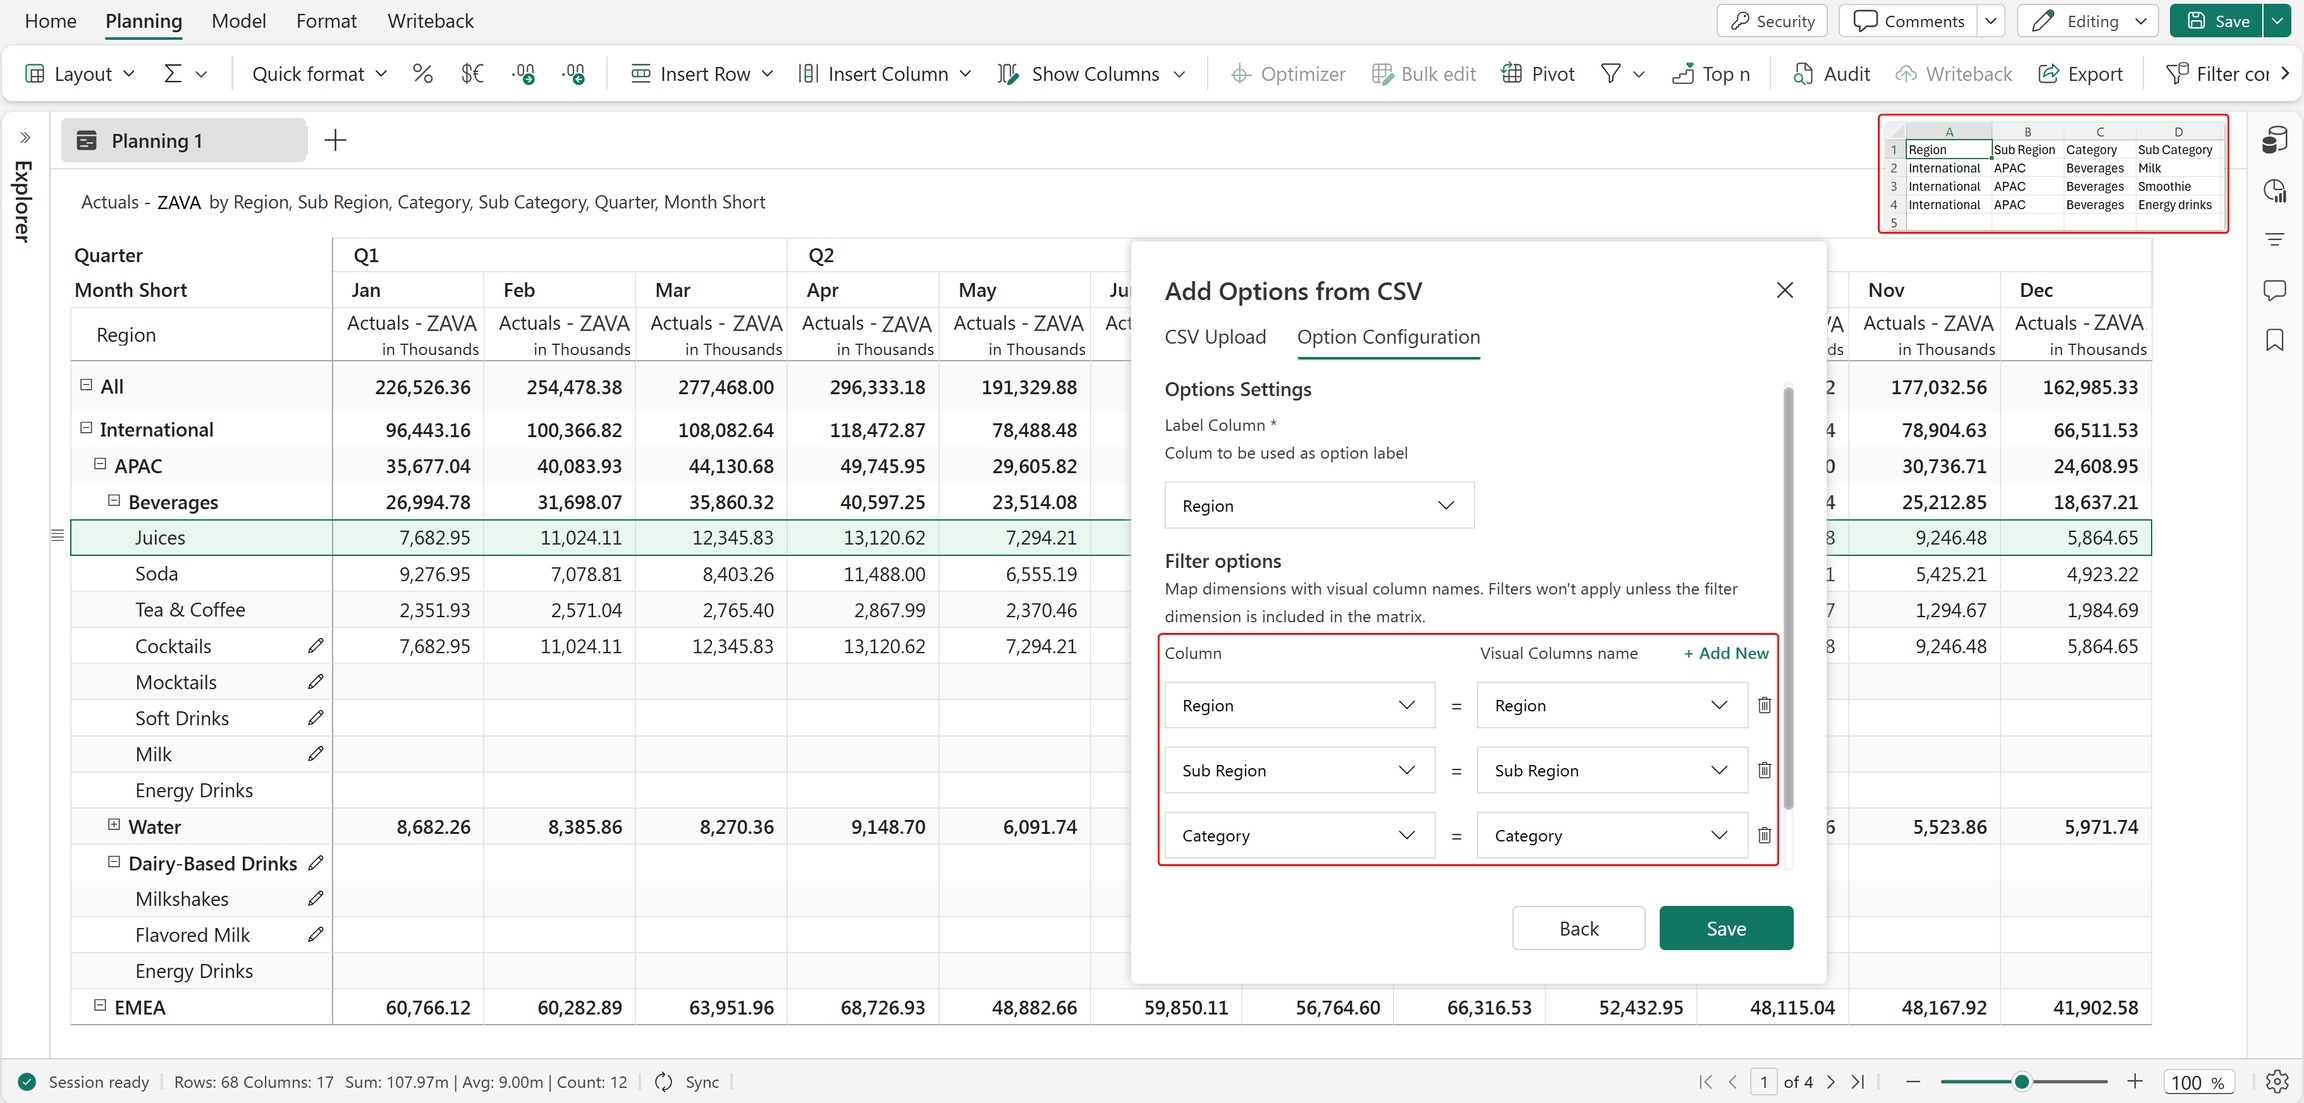
The uploaded values appear in the Insert Row window. Use standard insert steps to add them to the report.
Insert distinct values as rows
Select Distinct Values in the Insert Row configuration to work with unique values from a selected dimension.
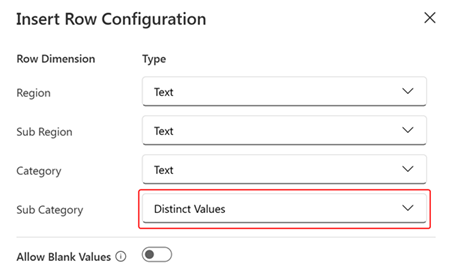
When this option is selected, you can:
- View only existing distinct (unique) values in the dropdown for the configured dimension in the Insert Row(s) window.
- Select and insert values directly as rows or row hierarchy from the dropdown, avoiding manual entry.
This approach helps streamline data entry by ensuring consistency and inserting rows within the existing row hierarchy by directly selecting the dimension value.