Configure SMB Storage Permissions
FSLogix works with SMB storage systems to store Profile or ODFC containers. SMB storage is used in standard configurations where VHDLocations holds the UNC path to the storage locations. SMB storage providers can also be used in Cloud Cache configurations where CCDLocations is used instead of VHDLocations.
SMB storage permissions rely on traditional NTFS Access Control Lists (ACL) applied at file or folder levels to ensure the proper security of the data that is stored. When used with Azure Files, you must enable an Active Directory (AD) source, then assign share-level permissions to the resource. There are two ways you can assign share-level permissions. You can assign them to specific Entra ID users/groups, and you can assign them to all authenticated identities as a default share-level permission.
Before you begin
Before configuring SMB storage permissions, you must first have the SMB storage provider created and properly associated with the correct identity authority for your organization and type of storage provider.
Important
You must understand the processes required to use Azure Files or Azure NetApp Files for SMB storage in your environment.
Azure Files
The outline provides the initial concepts necessary when using Azure Files as your SMB Storage provider. Regardless of the Active Directory configuration selected, it's recommended to configure the default share-level permission using Storage File Data SMB Share Contributor, which is assigned to all authenticated identities. To be able to set the Windows ACL(s), ensure you assign share-level permissions for specific Entra ID users or groups with the Storage File Data SMB Share Elevated Contributor role and reviewed Configure directory and file-level permissions over SMB.
Azure NetApp Files
Azure NetApp Files relies solely on Windows ACL(s).
- Create a NetApp account.
- Understand guidelines for Active Directory Domain Services site design and planning for Azure NetApp Files.
- Create a capacity pool for Azure NetApp Files.
- Create an SMB volume for Azure NetApp Files.
Configure Windows ACL(s)
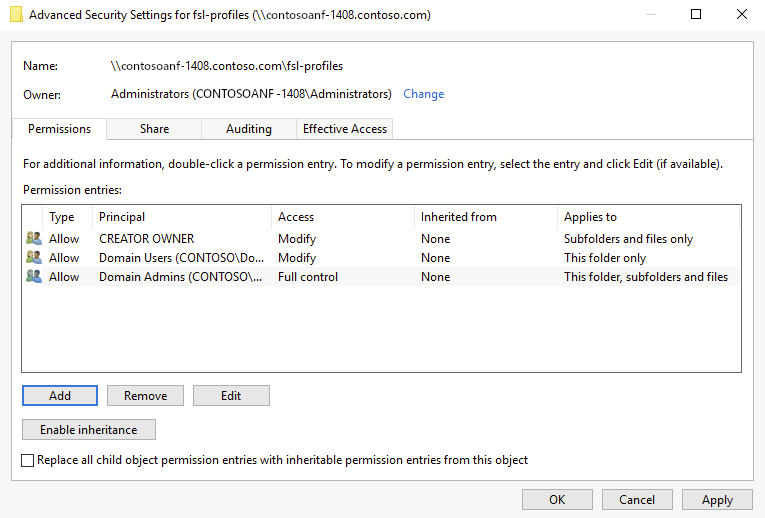
Windows ACL(s) are important to configure correctly so that only the user (CREATOR OWNER) has access to their profile directory or VHD(x) file. Additionally, you need to ensure any other administrative groups have 'Full Control' from an operational perspective. This concept is known as user-based access and is the recommended configuration.
Any SMB file share has a default set of ACL(s). These examples are the three (3) most common types of SMB file shares and their default ACL(s).

|

|

|
|---|---|---|
| File Server ACL(s) | Azure Files Share ACL(s) | Azure NetApp Files ACL(s) |
Important
Applying ACL(s) to Azure File Shares may require one (1) of two (2) methods:
- Provide a user or group with Storage File Data SMB Share Elevated Contributor role at the Storage Account or File Share Access Control (IAM).
- Mount the file share using the Storage Account key.
Because there are access checks at two levels (the share level and the file/directory level), applying ACL(s) is restricted. Only users who have the Storage File Data SMB Share Elevated Contributor role can assign permissions on the file share root or other files or directories without using the storage account key. All other file/directory permission assignment requires connecting to the share using the storage account key first.
Recommended ACL(s)
The table outlines the recommended ACL(s) to be configured.
| Principal | Access | Applies to | Description |
|---|---|---|---|
| CREATOR OWNER | Modify (Read / Write) | Subfolders and files only | Ensures the profile directory created by the user has the correct permissions only for that user. |
| CONTOSO\Domain Admins | Full Control | This folder, subfolders and files | Replace with your organizations group used for administrative purposes. |
| CONTOSO\Domain Users | Modify (Read / Write) | This folder only | Enables authorized users to create their profile directory. Replace with organizational users who need access to create profiles. |
Apply Windows ACL(s) using icacls
Use the following Windows command to set up the recommended permissions to all directories and files under the file share, including the root directory.
Note
Remember to replace the placeholder values in the example with your own values.
icacls \\contosoanf-1408.contoso.com\fsl-profiles /inheritance:r
icacls \\contosoanf-1408.contoso.com\fsl-profiles /grant:r "CREATOR OWNER":(OI)(CI)(IO)(M)
icacls \\contosoanf-1408.contoso.com\fsl-profiles /grant:r "CONTOSO\Domain Admins":(OI)(CI)(F)
icacls \\contosoanf-1408.contoso.com\fsl-profiles /grant:r "CONTOSO\Domain Users":(M)
For more information on how to use icacls to set Windows ACL(s) and on the different types of supported permissions, see the command-line reference for icacls.
Apply Windows ACL(s) using Windows Explorer
Use Windows File Explorer to apply the recommended permissions to all directories and files under the file share, including the root directory.
Open Windows File Explorer to the root of the file share.
Right-click in the open area on the right pane and select Properties.
Select the Security tab.
Select Advanced.
Select Disable inheritance.
Note
If prompted, removed inherited permissions instead of copying
Select Add.
Select 'Select a principal'.
Type "CREATOR OWNER" and Select Check Name, then OK.
For 'Applies to:', Select 'Subfolders and files only'.
For 'Basic permissions:', Select 'Modify'.
Select OK.
Repeat steps 6 - 11 based on the recommended ACL(s).
Select OK and OK again to finish applying the permissions.
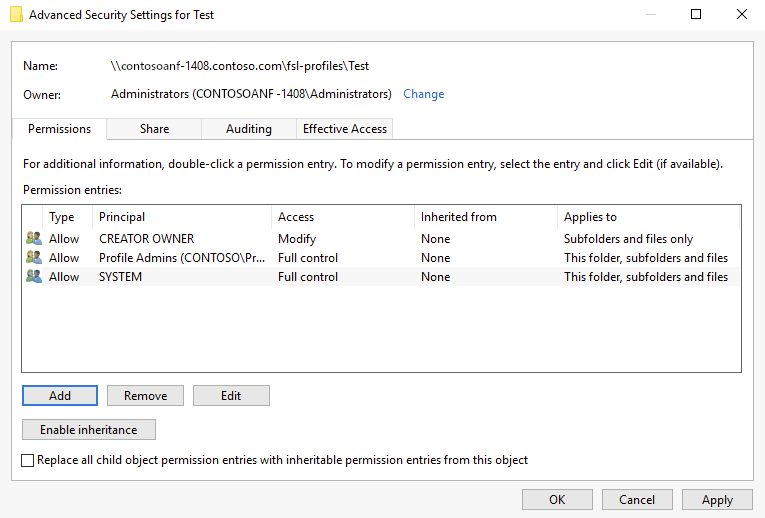
Apply Windows ACL(s) using SIDDirSDDL configuration
Alternatively, FSLogix provides a configuration setting that sets the Windows ACL(s) on the directory during the creation process. The SIDDirSDDL configuration setting accepts an SDDL string that defines the ACL(s) to apply to the directory upon its creation.
Create your SDDL string
Create a 'Test' folder on the SMB file share.

Modify the permissions to match your organization.
Open a PowerShell Terminal.
Type
Get-Acl -Path \\contosoanf-1408.contoso.com\fsl-profiles\Test | Select-Object Sddl.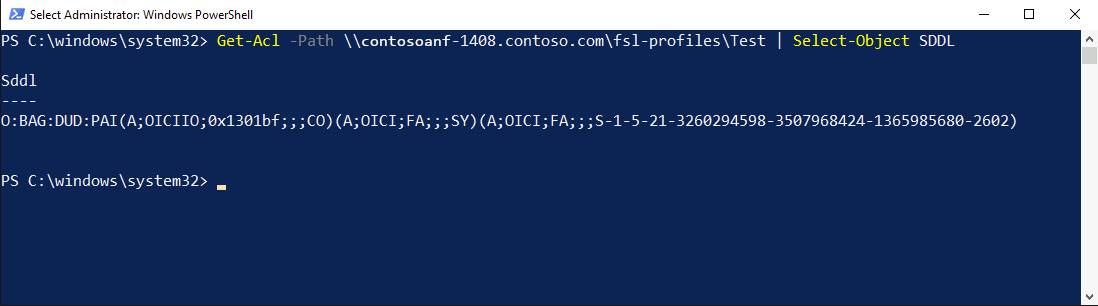
Copy the output to Notepad.
Replace
O:BAGwithO:%sid%(Sets the user's SID as the folder owner).Replace
(A;OICIIO;0x1301bf;;;CO)with(A;OICIIO;0x1301bf;;;%sid%)(Gives the user's SID modify rights to all items).In your FSLogix configuration, apply the SIDDirSDDL setting.
- Value Name: SIDDirSDDL
- Value Type: REG_SZ
- Value:
O:%sid%G:DUD:PAI(A;OICIIO;0x1301bf;;;%sid%)(A;OICI;FA;;;SY)(A;OICI;FA;;;S-1-5-21-3260294598-3507968424-1365985680-2602)
When user's sign-in for the first time, their directory is created with these permissions.