Note
Access to this page requires authorization. You can try signing in or changing directories.
Access to this page requires authorization. You can try changing directories.
What this Document Tells You
This document provides information about automated user management, called Org Sync. The Org Sync process involves adding your employee and/or student data to LinkedIn Learning and the automatic updating or modifying of that data in your HR system. The focus of the workflow is how to automate the uploading of CSV files via SFTP org sync.
Note
If you wish to continue managing users by manual CSV uploads, and you want to learn how to format your bulk CSV and license headers, please review our LinkedIn Learning data management documentation.
To learn how to add employee data to LinkedIn Learning via manual and automated methods, review our LinkedIn Learning Adding User Data Admin Guide.
Accessing the Account Center
In the LinkedIn Learning Account Center, you can manage learner data, curate content, and gain learner progress insights.
Benefits
LinkedIn Learning customers benefit from our automated org sync via SFTP in the following ways:
Save time: Org sync lets you spend less time on manual uploads to manage users and groups. This enhancement allows you to assign courses to custom groups and automatically revoke licenses when learners leave your organization.
Measure value: Org sync allows you to slice and dice reports based on employee/student attributes, and update attributes in real time. This functionality gives you enhanced abilities to tell your organization's ROI story to its stakeholders.
Drive engagement: Org sync gives you the power to drive engagement by sending you relevant content notifications and recommendations. You can notify colleagues when employees/students like, share, and complete courses and learning paths. You also can target learners by course relevance to department, team, job title, academic major, or graduation year.
Prerequisites
To automate org sync in your organization, you need the following:
- A HRIS or SIS system (the source of user data that allows you to assign and revoke licenses)
- Full LinkedIn Learning admin privileges
Automating Employee Data Integration
To automate employee/student data integration, take the following steps:
Upload your CSV over SFTP
Create an SFTP user
Warning
The SFTP user is bound to the Administrator account creating the user. If the Administrator who created the SFTP user loses their Full Administrator permissions or their license, the SFTP connection will no longer work.
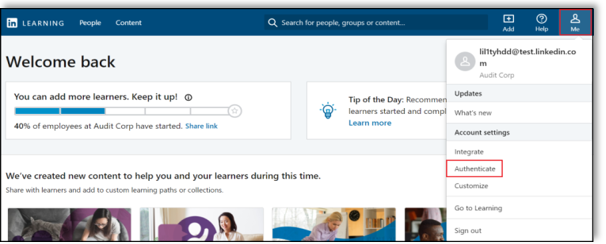
After you log in, if you are not already in the Admin screen, click Go to Admin, then select Me > Authenticate.
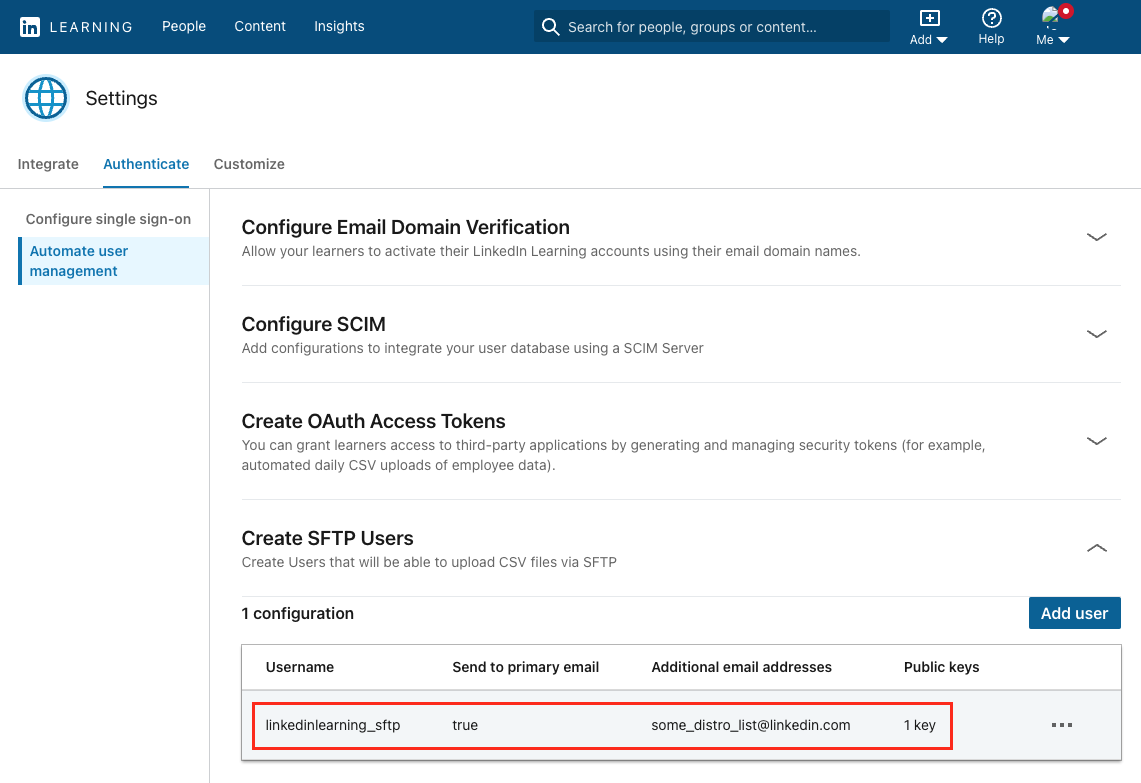
In the left-hand navigation menu, select Automate user management, then expand the Create SFTP Users panel.
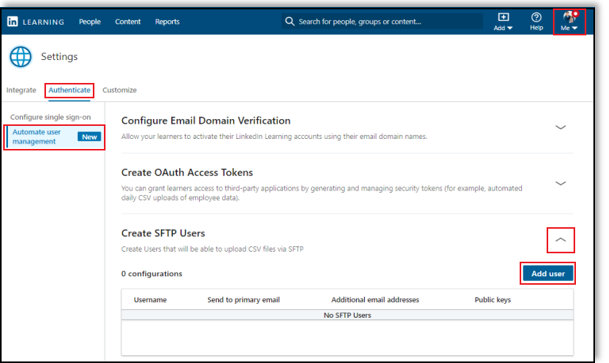
Click Add user.
In the Add User screen, enter the data in the appropriate fields and click Create user.

Please ensure your username is globally unique and does not contain spaces or special characters. (We suggest you append the account name to the SFTP user name).
Copy and paste your SSH key into the Public key box. It should start with
ssh-rsaorssh-dss.The new SFTP user now can upload CSV files via SFTP.
Connect to the SFTP server
LinkedIn Learning supports a variety of SFTP clients; however, we have created the following documentation for the SFTP client that ships with OpenSSH.
Note
LinkedIn Learning supports Port 22 as well as Port 2705.
In your terminal, run this command to connect to the SFTP server:
sftp -i ~/.ssh/<your_private_key> -P 2705 <username>@sftp.linkedin.comReplace
<your_private_key>with the name to the file of your private SSH key that matches the public one you provided in step one.Replace
<username>with the username you just provisioned in step one. You should see a response like this in your terminal. If you are asked if you want to continue connecting, enter "yes".
Are you sure you want to continue connecting (yes/no)? "yes" = Connected to sftp.linkedin.com. |
|---|
Upload your CSV file
To upload a file, run the following command in your terminal:
Put {Myfile}.csv
You should see the following response:
Uploading <Myfile>.csv to <Myfile>.csv <Myfile>.csv
100% 1458 1.4KB/s 00:00
This file is processed automatically and a new file <Myfile.csv>_resultReport.csv is also created.
- This new CSV file shows the result report.
- Check your directory contents to ensure it contains the command
ls.
You may have to wait a short period for the new file to be created:
sftp> ls <Myfile>.csv
<Myfile>.csv_resultReport.csv
Note
If you have a GUI SFTP application, you can connect to the server and upload your CSV by dragging and dropping your file into that application.
Download both CSV files to verify the content
Run the GET command to download the files:
sftp> get <Myfile>.csv
Fetching <Myfile>.csv to <yourfile>.csv <Myfile>.csv                  97% 1458 1.4KB/s 00:00 ETA
sftp> get <Myfile>.csv_resultReport.csv
Fetching <Myfile>.csv_resultReport.csv to <Myfile>.csv_resultReport.csv   98% 1727    1.7KB/s 00:00 ETA sftp>
Make sure you can download both files without errors, and verify they contain the expected content.
Congratulations! You now can add users to your LMS instance via SFTP.
Support
Use the following resources if you need assistance adding employee/student data to LinkedIn Learning:
Supporting Documentation
LinkedIn Security Contacts
If you have any security questions or you would like to report a security issue, please write to us.