Note
Access to this page requires authorization. You can try signing in or changing directories.
Access to this page requires authorization. You can try changing directories.
SSO Implementation Overview
The administrator for your organization's account can configure your organization's Identity Provider (IdP) to authenticate your employees into LinkedIn Learning using Single Sign-On.
Prerequisites
- LinkedIn Learning administrator privileges
- Identity Provider (IdP) administrator privileges
About Single Sign-On (SSO)
Enterprise Single Sign-On (SSO) allows your organization's learners to sign into LinkedIn Learning using their corporate credentials and allows organizations to determine who is authorized to access the application.
Using SSO and integrating with an Identity Provider is not required to use LinkedIn applications. If SSO is not configured, learners can log in using their current personal LinkedIn credentials or by creating a separate password for Linkedn Learning.
Why you Should Use Single Sign-On
- Leverage your existing company's authentication
- Enhanced security when employees use your organization's established password protocols
- Easier user management when employees join or leave your organization
Supported SSO Protocols
LinkedIn Learning currently supports SAML 2.0, LTI, and Google SSO.
Configure SAML Single Sign-On
To configure SAML SSO in LinkedIn Learning, take the following steps:
After you log in to LinkedIn Learning, if you are not already in the Admin screen, select Go to Admin, then click Authentication.

Select Configure single sign-on under Authentication and click Add new SSO.
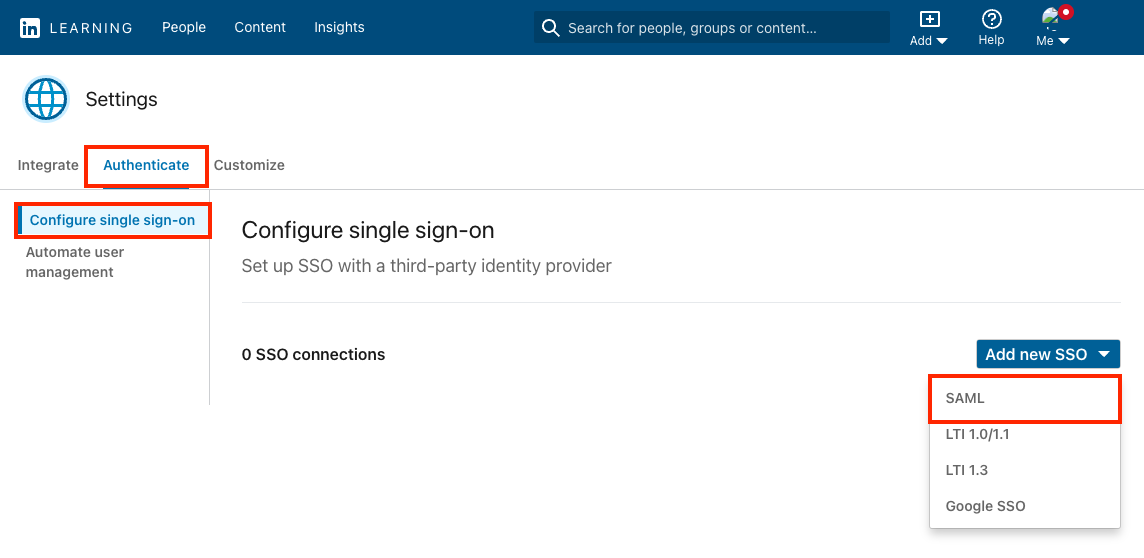
Select SAML from the Add new SSO drop down.
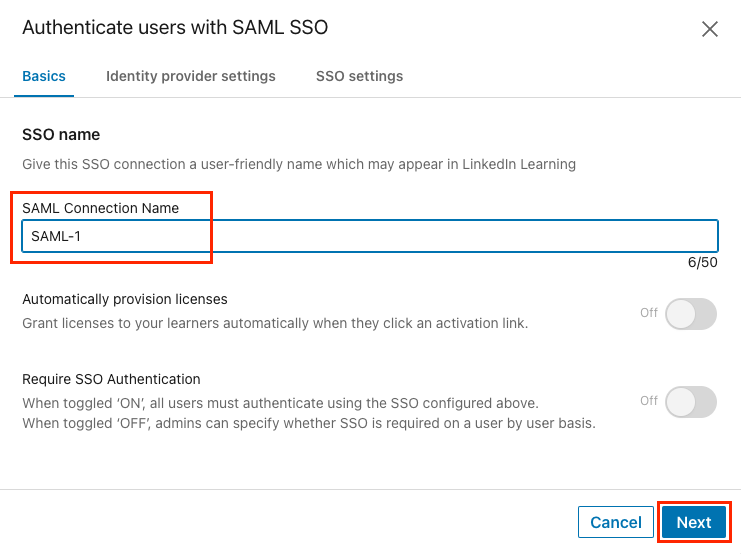
On the Basics tab, give your SSO connection a name (ex: Azure AD SSO) and click Next.
LinkedIn Learning Service-Provider Metadata
If your Identity Provider supports loading a metadata file, you can download the metadata file from LinkedIn Learning and provide or upload the file to your Identity Provider.
Determine if you can download a metadata file or if you need to work with individual fields, then follow one of the procedures in the next sections.
Download SP Metadata File
To configure your IdP via a metadata file, take the following steps:
From within the Identity provider settings tab, click Download file to download a metadata file you can use with your Identity Provider. The
metadata.xmlfile downloads to your computer.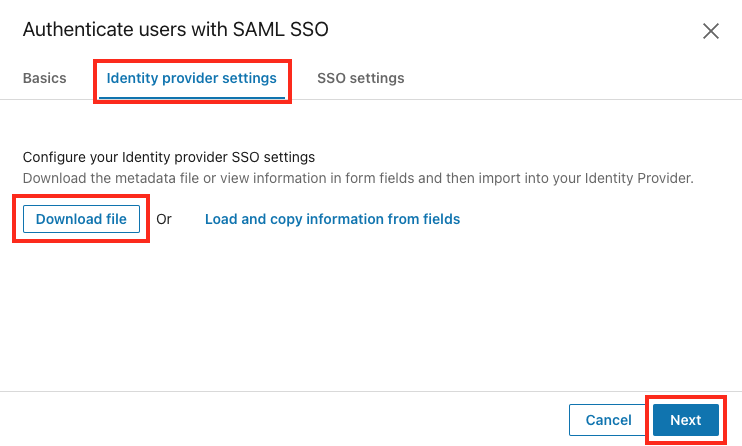
Click Next.
Copy Metadata Information from Fields
If your Identity Provider requires you to paste in the individual metadata values, take the following steps:
From the Identity provider settings tab, click Load and copy information from fields.
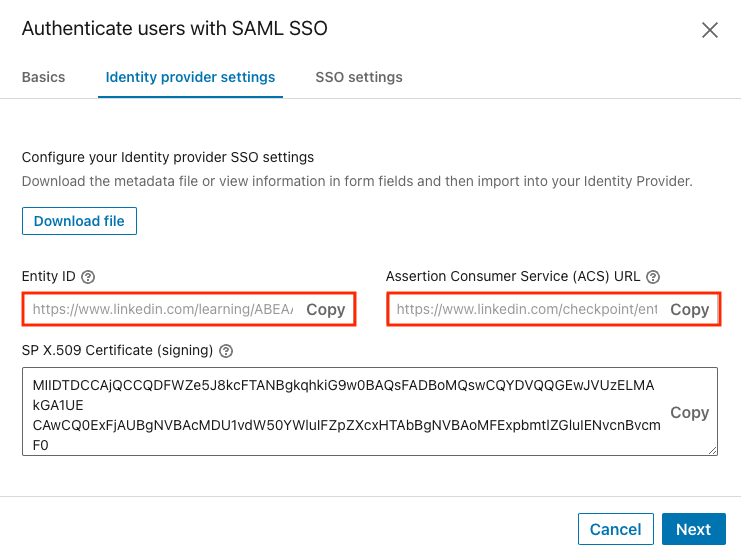
Copy the values you will need to paste into your Identity Provider.
Click Next.
Configure your Identity Provider
Using the SP metadata you obtained in the previous section, create a new LinkedIn Learning application in your Identity Provider.
Determine if you can download an IdP metadata file from your Identity Provider or if you need to enter values manually into LinkedIn Learning, then follow one of the procedures in the following sections.
If you exited the SSO configuration settings, see Configure SAML Single Sign-On to get back to the settings.
Upload Identity Provider Metadata File
To configure your SSO connection via a metadata XML file upload, take the following steps:
From the SSO settings tab, click Upload XML file to add the metadata file from your Identity Provider.
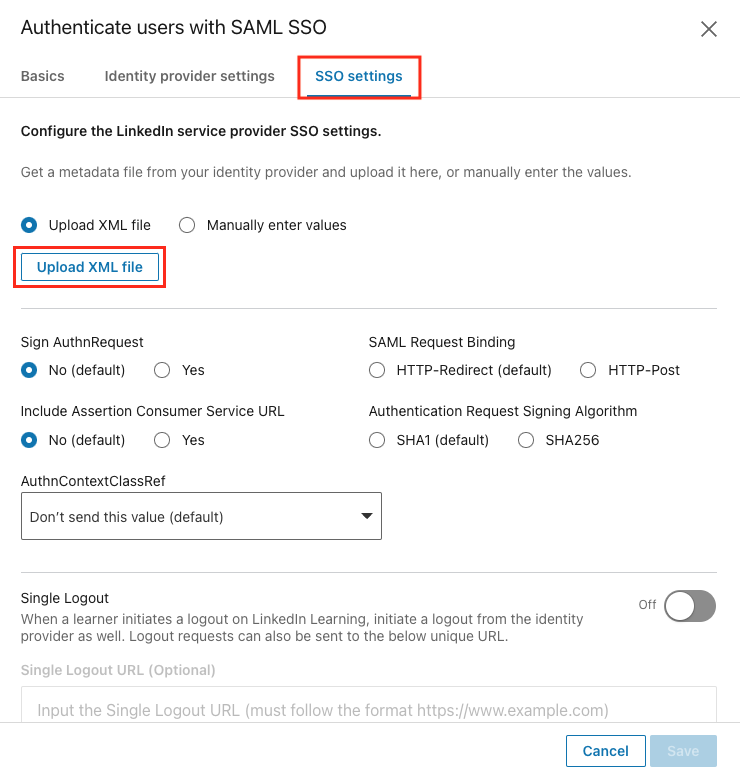
Navigate to the downloaded file, select it, and click Open.
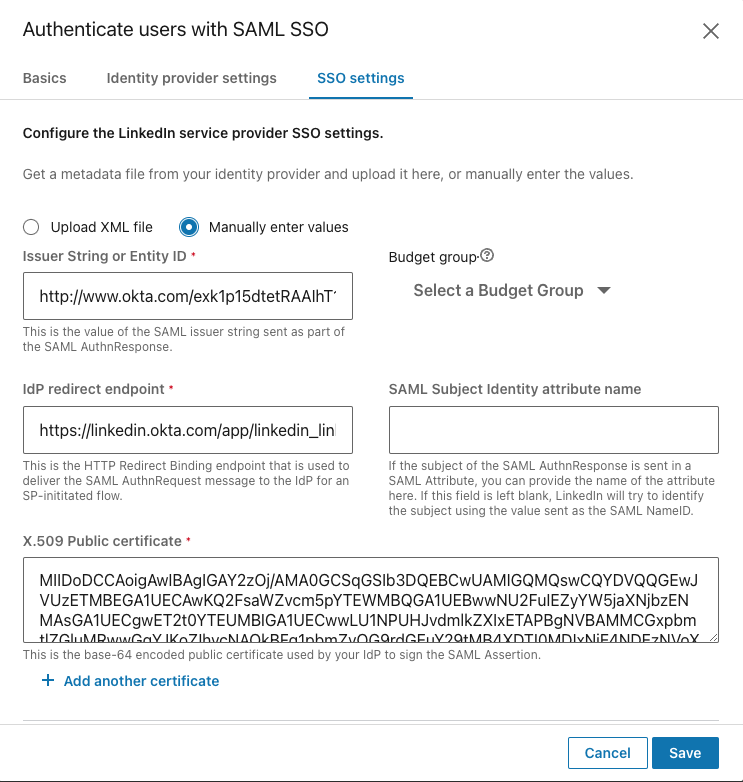
Enter Metadata Values Manually
To add your metadata values manually, take the following steps:
From within the SSO settings tab, select the Manually enter values radio button to manually add the data.
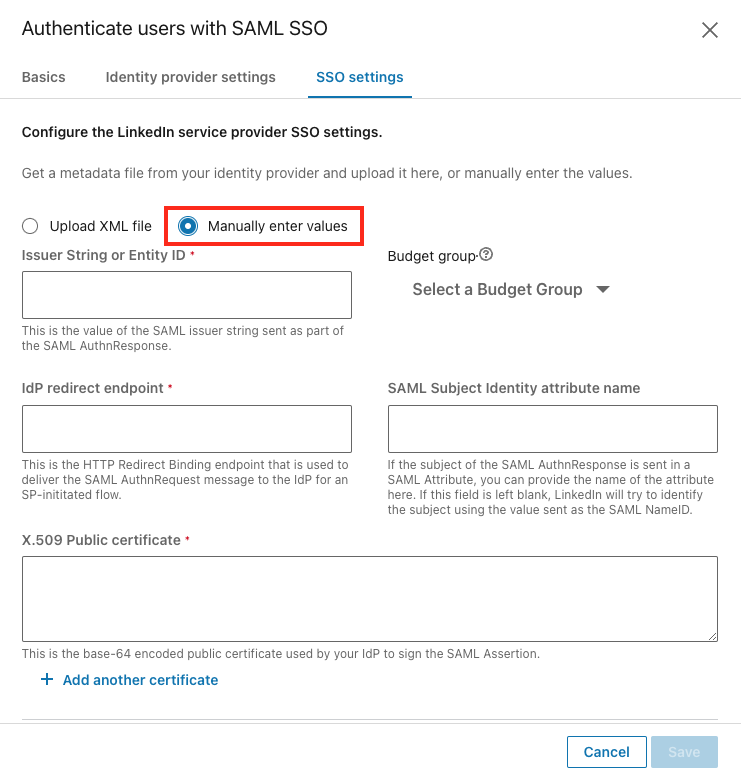
Enter the data in the following fields:
Issuer String or Entity ID
Budget group: Choose the default option or leave as-is.
IdP redirect endpoint
SAML Subject Identity attribute name: This is the attribute name in the SAML response used to identify the user if a NameId value is not present or should be ignored. Only use this field if you are sure you want to override the NameId value.
- If the SAML response provides a SAML assertion containing a set of attributes, you can provide the SAML attribute name of the attribute containing the employee's unique identifier in this field. For example, if an Employee ID value is sent in a SAML attribute named
employeeId, you could insert "employeeId" into the SAML Subject Identity attribute name field, and LinkedIn will use theemployeeIdattribute in each assertion to identify the user.
- If the SAML response provides a SAML assertion containing a set of attributes, you can provide the SAML attribute name of the attribute containing the employee's unique identifier in this field. For example, if an Employee ID value is sent in a SAML attribute named
X.509 Public certificate: LinkedIn verifies the validity of the SAML authentication response using the x.509 certificate provided by your Identity Provider. When pasting the certificate value, make sure to exclude spaces and line breaks.
SSO Settings
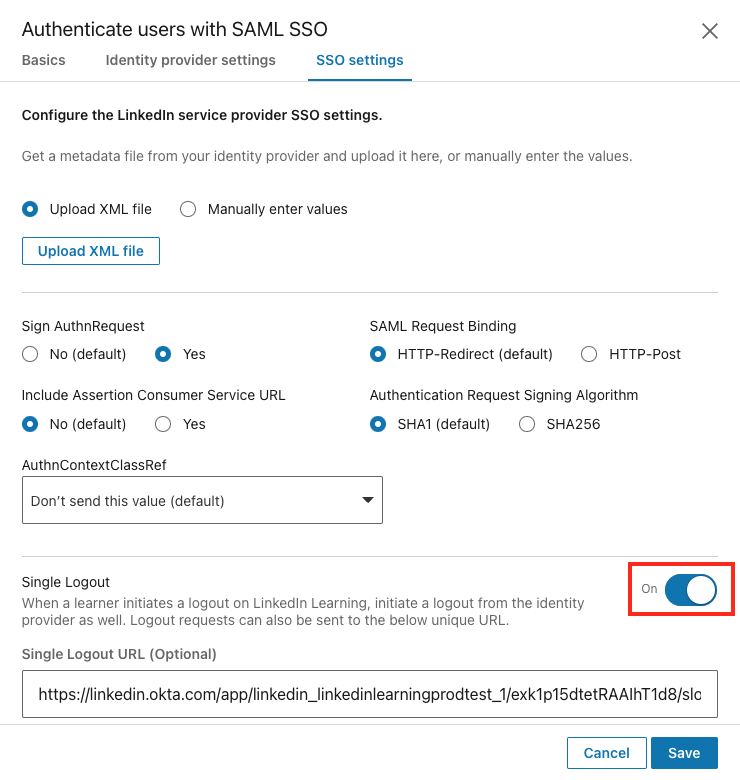
Once you have added your Identity Provider metadata, review the settings on the SSO settings tab and adjust as needed. Most customers do not need to make adjustments to these settings, so if you are not sure, leave the default settings as-is.
Single Logout
Single Logout allows users to be automatically logged out of their organization's Single Sign-On when they log out of LinkedIn Learning. Enabling this setting can be particularly helpful for organizations where learners may be using shared devices and ensures their accounts remain secure.
The Single Logout request is only triggered when a user actively logs out of LinkedIn Learning, not when their authentication session expires.
To enable Single Logout, take the following steps:
Flip the Single Logout toggle to On.
Add your Single Logout URL provided by your Identity Provider.
- If you enable Single Logout and leave this field blank, the logout request will be sent to the IdP Redirect Endpoint.
Click Save.
Enable Single Sign-On
After you have completed your configuration, enable SSO by selecting Active from the SSO Status drop-down. See the table below for information about when to use the available options.
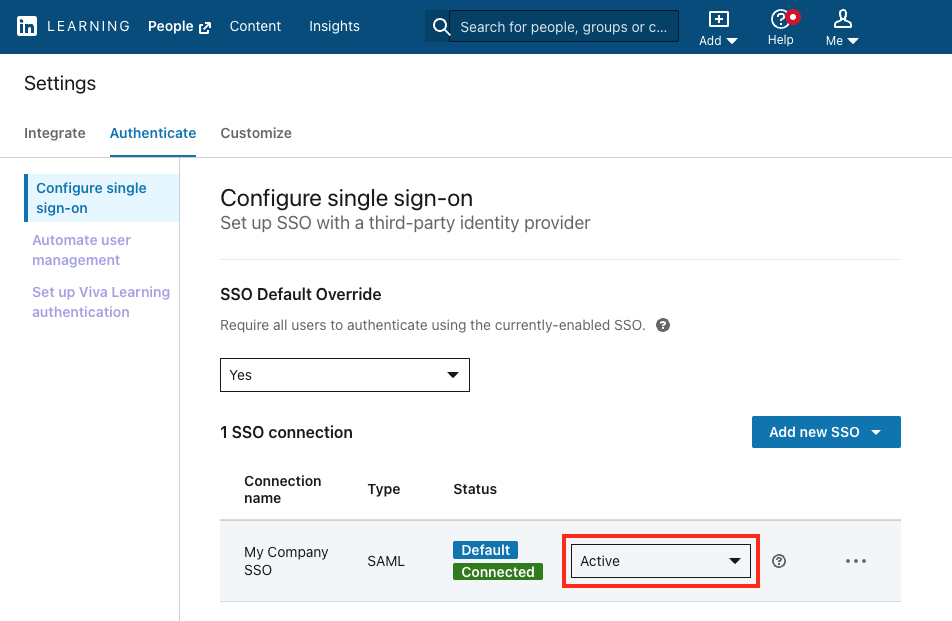
SSO Status Options
| Status | Description |
|---|---|
| Inactive | |
| Pilot mode (IdP only) | |
| Active |
- IdP-Initiated Flow: The user must launch the LinkedIn Learning app from within in their Identity Provider, and the IdP sends the authentication response directly to LinkedIn Learning.
- SP-Initiated Flow: The user can access LinkedIn Learning directly, utilize an activation link, or launch a course from a Learning Management system, and LinkedIn will send an authentication request to the Identity Provider for authentication.
Assigning Licenses
Once you have activated the SSO connection, you can enable Just-in-Time (JIT) provisioning by toggling Automatically provision licenses to On. When you enable this option, users are automatically granted a license when they are authenticated for the first time via SSO.
To automate license provisioning, take the following steps:
Click the "..." icon for your SSO connection and select Edit.
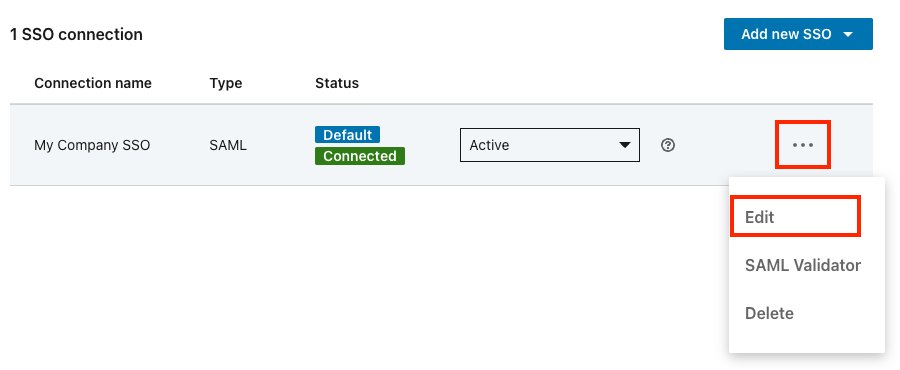
Set the Automatically provision licenses toggle to On.
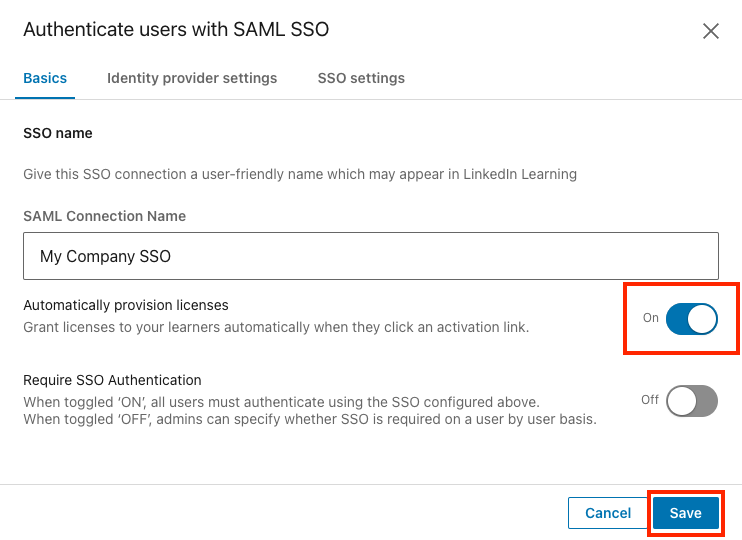
Click "Save".
Note
If this option is disabled, users must be provisioned before they can access LinkedIn Learning for the first time. This can be done manually by an admin in People Management, or it can be done automatically using SCIM, Org Sync or Activation Through Login.
User Attributes
One reason SAML 2.0 has become so popular is its flexibility when sending user information to the Service Provider. When an Identity Provider sends a SAML assertion, it includes attributes describing the user. These attributes allow LinkedIn to both identify the user and automatically provision new users. A few of the possible attributes are described in this section.
Unique User Identifier (Required)
By default, LinkedIn Learning uses the value sent in the SAML response's NameId field as a user's unique identifier. This value can be whatever value your Identity Provider typically uses and is usually an Employee ID or User Principal Name. While this can be any value, we always recommend using a unique, immutable value that will not change over time.
If you are planning to integrate a Learning Management System (LMS) with LinkedIn Learning, you may need to use a specific user identifier that matches your users' identifier in the LMS to allow reporting to sync between the two systems.
Email Address (Strongly Recommended)
Email Address is not a required SSO attribute, but it is strongly recommended to help with user management and to utilize some engagement features in LinkedIn Learning. Although email addresses are allowed as the users' unique user identifier, we do recommend you use an employee ID or some other unique, immutable value and include Email Address as an additional user attribute.
Identity Providers use different naming conventions, so LinkedIn looks for an email address in the following attribute names sequentially:
EmailAddressemailEmailMailemailAddressUser.email
If your identity provider uses a different naming convention, you can map the email address attribute as a custom attribute.
First Name (Optional)
LinkedIn automatically looks for a first name value in the following attribute names:
FirstNamefirst_namefirstnamefirstNameUser.FirstName
Last Name (Optional)
LinkedIn automatically looks for the last name in the following attribute names:
LastNamelast_namelastnamelastNameUser.LastName
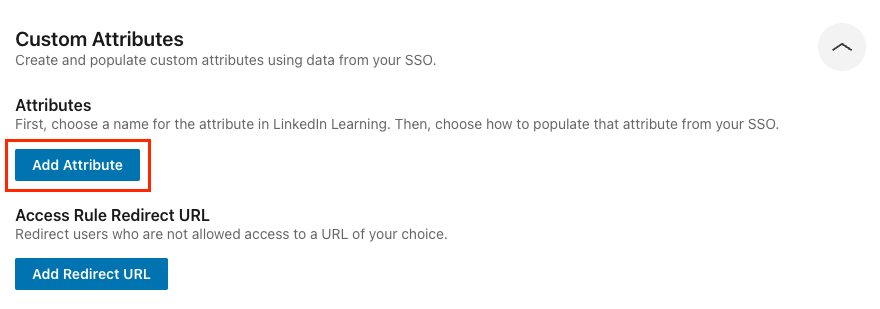
Custom Attributes
You can include any number of user attributes in the SAML response and map the values to a list of predefined attribute labels or create custom attribute labels.
To add custom attributes via SSO, take the following steps:
Go to Me > Authenticate > Automate user management.
Select Custom Attributes.
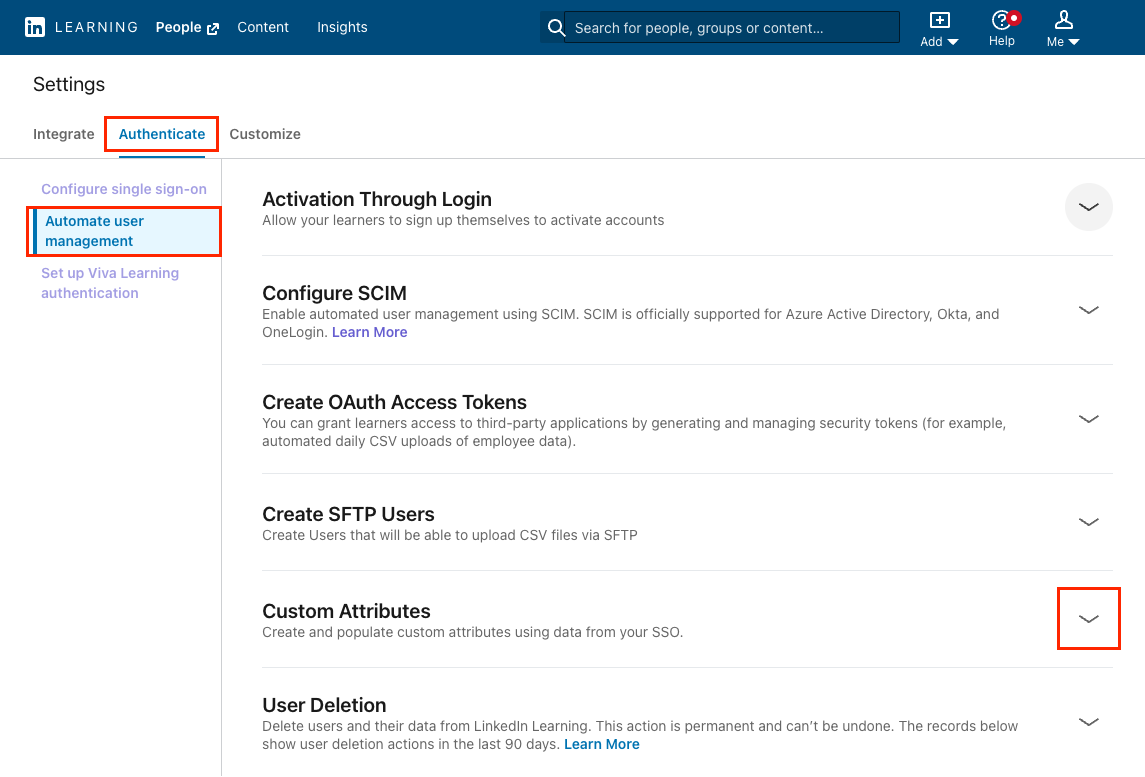
Click Add Attribute.
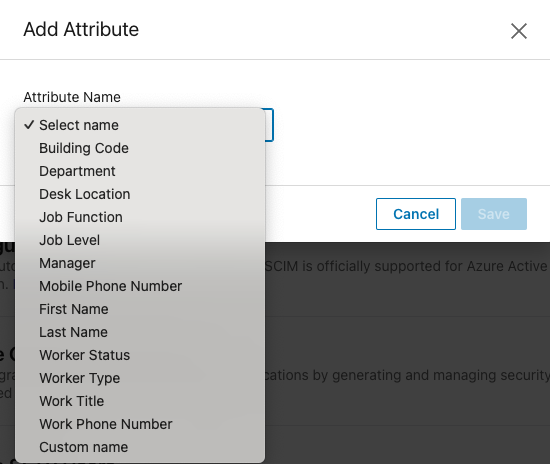
Select an appropriate attribute name from the Attribute Name menu or select Custom name and enter your own attribute name.
Note
To auto-group learners by the attribute name you selected, click the Assign groups checkbox.
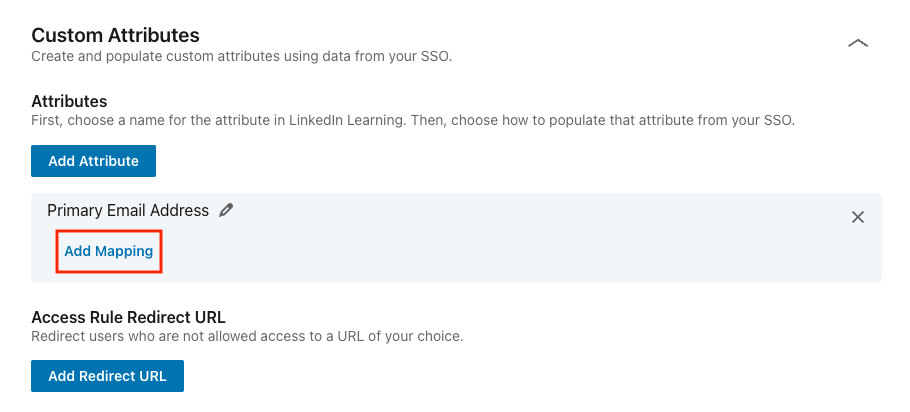
Click Save.
On the attribute you just created, click Add Mapping.
Select an SSO connection for the mapping.
Under Map to SSO attribute name, input the attribute name in your SAML response. Use the actual attribute name as it appears in the SAML response, not the friendly name.
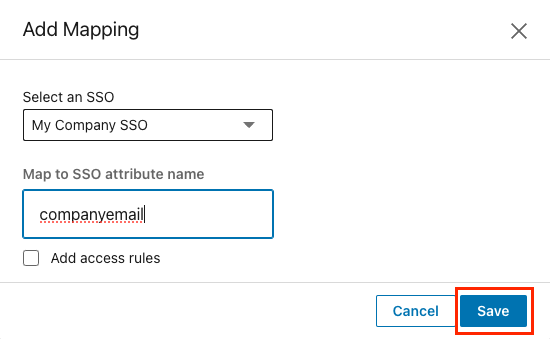
Click Save.
For more information on SSO custom attributes, click here.
Verify your Setup
Verify that you've correctly integrated with your Identity Provider and have the following in place:
SSO is enabled and set to Active.
A LinkedIn Learning application is configured in your Identity Provider as previously instructed.
The LinkedIn Learning application configured in your IdP has been provisioned to the appropriate users.
A SAML Subject NameID value is sent in the SAML response or a SAML Subject Identity has been defined in the Configure your Identity Provider section to use an alternate attribute name as the identifier.
Test using the following login flows:
Identity Provider-initiated login
- Navigate to your Identity Provider.
- If supported, launch the LinkedIn Learning application.
Service Provider-initiated login
Navigate to People Management.
Select Add new users > Add users by activation link.
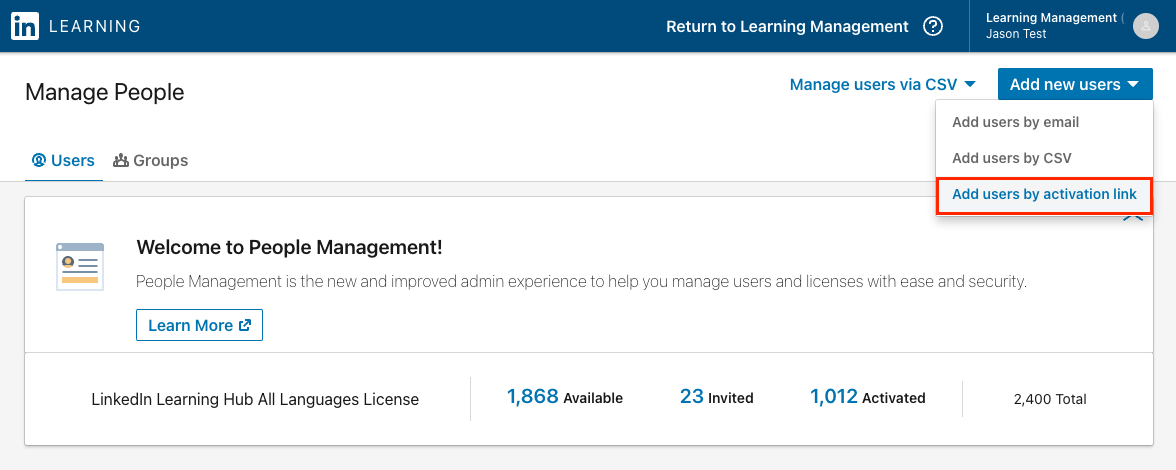
Copy the activation link and paste it into your browser. This will trigger a Service Provider-initiated authentication flow. This link can be sent to anyone who has been assigned the LinkedIn Learning application in your IdP.
Connecting your LinkedIn profile to Learning
LinkedIn Learning allows learners to connect their personal LinkedIn profile to their organization's LinkedIn Learning account. This step, known as profile binding, allows LinkedIn Learning to surface content that aligns with your learners' goals and interests.
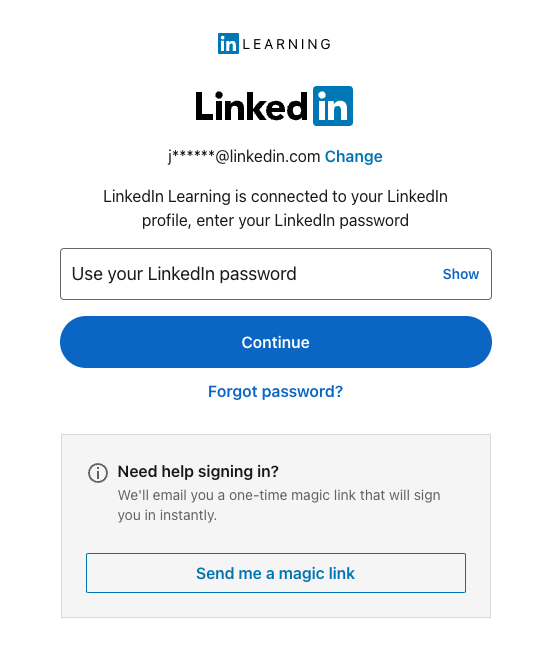
If you see the below login screen while testing SSO, it does not mean SSO is broken. It simply means you need to re-login to LinkedIn.com with your personal profile credentials, separate from your organization's SSO.
Congratulations! Your learners now can access LinkedIn Learning content through Single Sign-On (SSO).
Multiple Authentication Methods
LinkedIn Learning supports multiple authentication methods and multiple SSO connections for users. You can configure any number of SSO connections and specify the correct authentication method for individual users. For more information on configuring multiple authentication methods, please see the LinkedIn Learning SSO Multiple Authentication Guide
Support
Below you can find supporting documentation and other resources.
Supporting Documentation
Technical Issues
If you have technical issues with the SSO setup, contact your account team or application support team through the LinkedIn Learning Help Center.
LinkedIn's Privacy and Data Security Policy
https://www.linkedin.com/legal/privacy-policy
LinkedIn Security Contacts
If you have any security questions or you would like to report a security issue, write to us at security@linkedin.com.