Note
Access to this page requires authorization. You can try signing in or changing directories.
Access to this page requires authorization. You can try changing directories.
eSIM is an embedded SIM chip, and lets you connect to the Internet over a cellular data connection on an eSIM-capable device, such as the Surface LTE Pro. With an eSIM, you don't need to get a SIM card from your mobile operator. As a global traveler, you can also switch between mobile operators and data plans to always stay connected.
For example, you have a cellular data plan for work, and another data plan with a different mobile operator for personal use. When traveling, you can get Internet access by finding mobile operators with data plans in that area.
This feature applies to:
- Windows 11
- Windows 10
In Intune, you can bulk activate eSIM codes using the following options:
| Option | Platform support | Description |
|---|---|---|
| Import activation codes using a CSV file (this article) |
✅ Windows 11 (supported, but not recommended) - Use an eSIM download server instead ✅ Windows 10 |
In an eSIM policy, import one-time-use activation codes. The eSIM hardware uses the activation codes to contact the mobile operator, download the eSIM policy, and configure cellular activation. Requires individual activation codes given to you by the mobile operator. |
| eSIM download server | ✅ Windows 11 (recommended) ❌ Windows 10 |
In a settings catalog policy, add your mobile operator's download server FQDN. The device contacts the download server, authenticates, and receives eSIM connection info. No individual activation codes needed. |
This article describes how to import the activation codes in bulk, and then deploy these codes to your eSIM-capable devices. This feature is in public preview.
Note
You can create a custom OMA-URI profile using the eUICCs CSP. Be sure to deploy one custom profile for each device. The profile must include the device ICCID and matching activation code from the carrier for each device.
Prerequisites
To deploy eSIM to your devices using Intune, the following are needed:
- eSIM capable devices, like the Surface LTE. To determine if your Windows device supports eSIM, go to Use an eSIM to get a cellular data connection on your Windows PC. If you're unsure if your devices support eSIM, then you can also contact your device manufacturer.
- A Windows device running Windows 10 Fall creators update PC (1709 or later)
- Activation codes provided by your mobile operator. These one time-use activation codes are added to Intune, and deployed to your eSIM capable devices. Contact your mobile operator to acquire eSIM activation codes.
- The device must be enrolled and MDM managed by Intune. For information on the enrollment options for Windows devices, go to Windows enrollment guide for Microsoft Intune.
- To create the policy, at a minimum, sign into the Microsoft Intune admin center with an account that has the Policy and Profile Manager built-in role. For more information on the built-in roles, go to Role-based access control for Microsoft Intune.
Deploy eSIM to devices - overview
To deploy eSIM to devices, an Administrator completes the following tasks:
- Import activation codes provided by your mobile operator
- Create a Microsoft Entra device group that includes your eSIM capable devices
- Assign the Microsoft Entra group to your imported subscription pool
- Monitor the deployment
This article guides you through these steps.
Step 1 - Add cellular activation codes
Cellular activation codes are provided by your mobile operator in a comma-separated file (csv). When you have this file, add it to Intune using the following steps:
- Sign in to the Microsoft Intune admin center.
- Select Devices > Manage devices > eSIM cellular profiles > Add.
- Select the CSV file that has your activation codes.
- Select OK to save your changes.
CSV file requirements
When working with the csv file with the activation codes, be sure you or your mobile operator follows the requirements:
- The file must be in
csvformat (filename.csv). - The file structure must adhere to a strict format. Otherwise, the import fails. Intune checks the file on import, and fails if errors are found.
- Activation codes are used only once. It's not recommended to import activation codes that you previously imported, as it can cause problems when you deploy to the same or different device.
- Each file should be specific to a single mobile operator, and all activation codes specific to the same billing plan. Intune randomly distributes the activation codes to targeted devices. There isn't any guarantee which device gets a specific activation code.
- A maximum of 1,000 activation codes can be imported in one
csvfile.
CSV file example
The first row and first cell of the
csvis the URL of the mobile operator eSIM activation service, which is called SM-DP+ (Subscription Manager Data Preparation server). The URL should be a fully qualified domain name (FQDN) without any commas.The second and all later rows are unique one-time use activation codes that include two values:
First column is the unique ICCID (the identifier of the SIM chip)
Second column is the Matching ID with only a comma separating them (no comma at the end). See the following example:
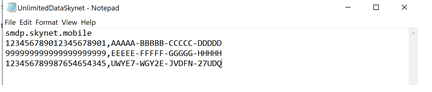
The cellular subscription becomes the first part of the SMDP of your mobile operator. For example, in the previous image, the first row includes the
smdp.skynet.mobileURL of the mobile operator. Intune names the cellular subscription pool name assmdp: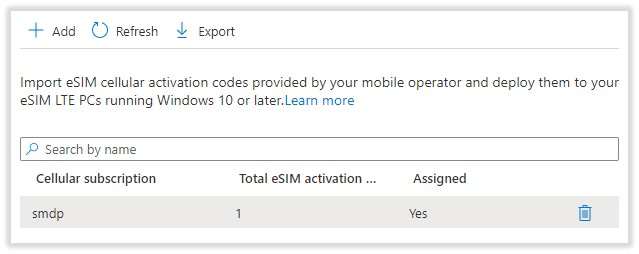
Important
You can't have two lists with the same provider. If you try to upload two lists with the same provider, you may get a The request is invalid error message.
To add more devices with the same provider or carrier, then you must:
- Remove the current
.csv. - Upload a new
.csvthat has all the old device/ICCID pairs and has the new devices you want to add.
Step 2 - Create a Microsoft Entra device group
Create a device group that includes the eSIM capable devices. Add groups lists the steps.
Note
- Only devices are targeted, users aren't targeted.
- We recommend creating a static Microsoft Entra device group that includes your eSIM devices. Using a group confirms you target only eSIM devices.
Step 3 - Assign eSIM activation codes to devices
Assign the profile to the Microsoft Entra group that includes your eSIM devices.
Sign in to the Microsoft Intune admin center.
Select Devices > Manage devices > eSIM cellular profiles.
In the list of profiles, select the eSIM cellular subscription pool you want to assign, and then select Assignments.
Choose to Include groups or Exclude groups, and then select the groups.
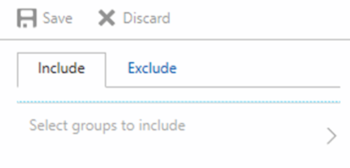
When you select your groups, you're choosing a Microsoft Entra group. To select multiple groups, use the Ctrl key, and select the groups.
When done, Save your changes.
eSIM activation codes are used once. After Intune installs an activation code on a device, the eSIM module contacts the mobile operator to download the cellular profile. This contact finishes registering the device with the mobile operator network.
Step 4 - Monitor deployment
Review the deployment status
After you assign the profile, you can monitor the deployment status of a subscription pool.
- Sign in to the Microsoft Intune admin center.
- Select Devices > Manage devices > eSIM cellular profiles. All of your existing eSIM cellular subscription pools are listed.
- Select a subscription, and review the Deployment Status.
Check the profile status
After you create your device profile, Intune provides graphical charts. These charts display the status of a profile, such as it being successfully assigned to devices, or if the profile shows a conflict.
Select Devices > Manage devices > eSIM cellular profiles > Select an existing subscription.
In the Overview tab, the top graphical chart shows the number of devices assigned to the specific eSIM cellular subscription pool deployment.
It also shows the number of devices for other platforms that are assigned the same device profile.
Intune shows the delivery and installation status for the activation code targeted to devices.
- Device not synced: The targeted device hasn't synced with the Intune service since the eSIM deployment policy was created. The device must check in with Intune to receive any policy.
- Activation pending: A transient state when Intune is actively installing the activation code on the device
- Active: Activation code installation successful
- Activation fail: Activation code installation failed; Go to Best practices & troubleshooting (in this article).
View the detailed device status
In Device Status, you can monitor and view a detailed list of devices you can view.
Select Devices > Manage devices > eSIM cellular profiles > Select an existing subscription.
Select Device Status. Intune shows more details about the device:
- Device Name: Name of the device that is targeted
- User: User of the enrolled device
- ICCID: Unique code provided by the mobile operate within the activation code installed on the device
- Activation Status: Intune delivery and installation status of the activation code on the device
- Cellular status: State provided by the mobile operator. Follow up with mobile operator to troubleshoot.
- Last Check-In: Date the device last communicated with Intune
Monitor eSIM profile details on the actual device
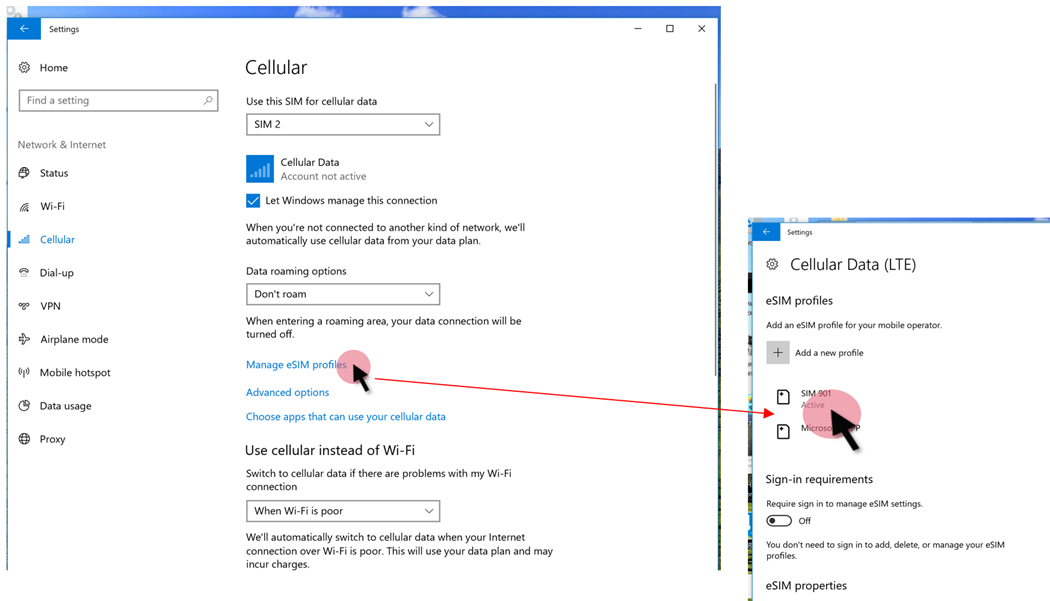
On your device, open Settings > go to Network & Internet.
Select Cellular > Manage eSIM profiles.
The eSIM profiles are listed:
Remove the eSIM profile from device
When you remove the device from the Microsoft Entra group, the eSIM profile is also removed. Be sure to:
- Confirm you're using the eSIM devices Microsoft Entra group.
- Go to the Microsoft Entra group, and remove the device from the group.
- When the removed device contacts Intune, the updated policy is evaluated, and the eSIM profile removed.
The eSIM profile is also removed when:
- The device is retired.
- The user unenrolls the device from Intune.
- The reset device remote action runs on the device.
Note
Removing the profile might not stop billing. Contact your mobile operator to check the billing status for your device.
Best practices & troubleshooting
Be sure your
.csvfile is properly formatted. Confirm the file doesn't include duplicate codes, doesn't include multiple mobile operators, or doesn't include different data plans. Remember, each file must be unique to a mobile operator and cellular data plan.Create a static device Microsoft Entra group that only includes the eSIM devices that are targeted.
If there's an issue with the deployment status, check the following settings:
- File format not proper: To properly format your file, go to Step 1 - Add cellular activation codes (in this article).
- Cellular activation failure, contact mobile operator: The activation code might not be activated within their network. Or, the profile download and cellular activation failed.