Multi-room sync (animations, timelines and video)
Overview
With Mesh, you can set up single-room or multi-room events. Your co-organizers who are hosting an event at showtime can then use the Control Panel to trigger video, audio, playables (timeline animations) and object visibility in a consistent way across all rooms.
Single-room sync vs. multi-room sync
By default, any scene changes triggered with visual scripts, cloud scripts, interactables or physics (for example, button presses, avatar triggers, grabbing and moving objects) will stay independent to the room where that change occurred. This is true even if a co-organizer is the one taking the action.
To sync changes across multiple rooms, a co-organizer will need to use the Control Panel to trigger a Controllable that you've added to your environment in Unity.
Controllables
The Mesh toolkit includes key components called Controllables that you use to tag a Video Player, PlayableDirector, AudioSource or other object in your scene so that event hosts can control it across all rooms of an event at showtime.
The list of Mesh Controllable components includes:
Unity Playable Controllable: For controlling a Unity PlayableDirector (timelines, animations)
Embedded Audio Controllable: For controlling a Unity AudioSource playing audio included in your environment's asset bundle
Embedded Video Controllable: For controlling a Unity Video Player playing video included in your environment's asset bundle
Streamed Video Controllable: For controlling a Unity Video Player playing video streamed from a URL
Object Controllable: For controlling the enabled/disabled state of any Unity GameObject
The following sections talk about how to add a Controllable component to various objects in your Unity scene. Each object you put a Controllable on will appear at showtime in Control Panel for event co-organizers to control.
Controlling a Timeline animation in an event
In Unity, a Timeline lets you sequence animations, audio and other content in your Unity scene. A Timeline is one kind of Playable, a Unity object that can be played, paused, looped, and stopped.
By adding a Unity Playable Controllable next to your Timeline or other Playable, an event host can control it from the Control Panel at showtime, synchronizing an animation across multiple rooms.
Co-organizers hosting an event can then select play to start your animation, pause it, and select play again to resume the animation. They can also select stop to reset the animation to the beginning or set your animation to loop.
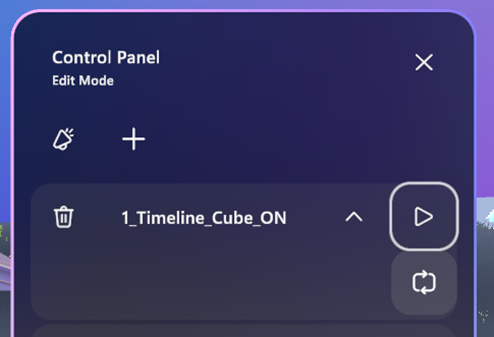
For example, if you have a door-opening animation, selecting the play button will open the door in your scene. Selecting stop will reset the animation back to its original position. A Playable will not animate in reverse; to do this, you'll need to create a different animation.
If you're unfamiliar with how Timelines work in Unity, we recommend that you watch this Unity Tutorial series on Timelines.
To learn more about the Unity Playables API in general, see Playables in the Unity Manual.
To create and control a Timeline for Mesh
In the Hierarchy, add an empty GameObject and then rename it "Timelines."
Add another empty GameObject, make it a child to Timelines, and then rename it "Timeline1."

Notes:
For an actual project you're working on, we suggest that you give this GameObject a more descriptive name---for example, 1_Entrance_Doors. For this learning scenario, we'll stick with the name "Timeline1."
A Playable will not animate in reverse. Let's say, for example, that you have a door-opening animation. Selecting the Play button will open the door in your scene, and selecting the Stop button will reset the animation back to its original position. To animate in reverse, you'll need to create a different animation.
IMPORTANT: Multiple timelines on a single GameObject will not work and will cause issues in events.
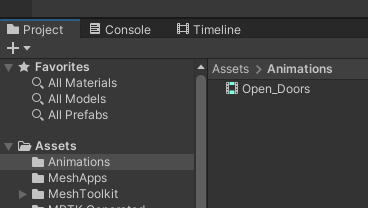
In the Project tab, navigate to the Assets folder and then create a new folder named Animations.
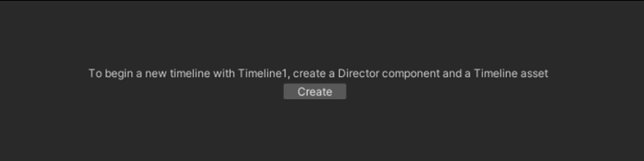
In the Hierarchy, select Timeline1, and then select Window > Sequencing > Timeline.
We recommend that you move the Timeline tab next to the Project and Console tabs. This allows you to view the Timeline and the Scene or Game windows simultaneously.

Select Create.
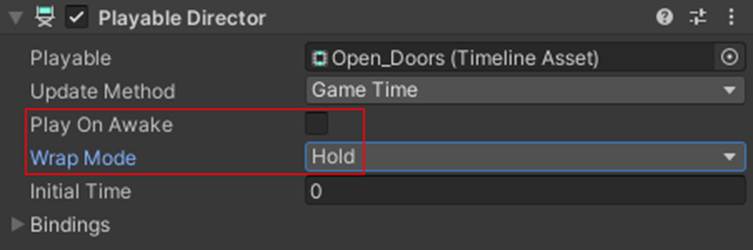
In the Save window, change the name of the Playable to Open_Doors and then save it to the Assets > Animations folder.
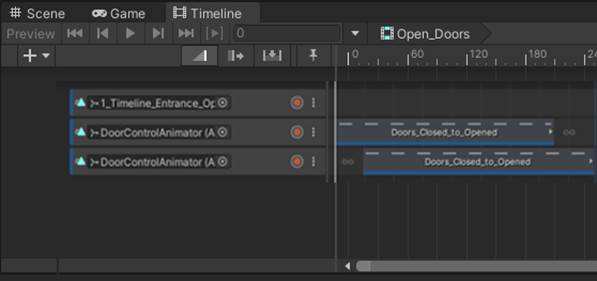
You can now animate or customize your Timeline---for example, add animation clips, activation clips, and more. To learn more about this, see the Timeline tutorial on the Unity Learn website.
A Timeline with several tracks might look something like this:
Once you're done animating, in the Hierarchy, select the Timeline1 GameObject, and then in the Inspector, navigate to the Playable Director component.
In most cases you'll want to choose these settings:
Play On Awake = not selected
The timeline will be active when you upload it.
Wrap Mode = Hold
The last frame of your animation will be on hold indefinitely; otherwise, your timeline will reset to the start. There's also a Wrap Mode option named Loop which you may want to use in some instances.
Finally, in the Inspector, use Add Component to add a Unity Playable Controllable component on the same object as the Playable Director.
Give this controllable the name Timeline1 and set its Director property to the Playable Director component on this object.
Once added, this timeline will appear in Control Panel for events and templates that use this environment. Hosts can then control this timeline in sync across all rooms.
Now you can upload your Environment to Mesh using the Mesh toolkit Uploader and then see how it looks in Mesh. To learn more, see Prepare content with the Control Panel.
Controlling a Video Player in an event
Synchronized video playback triggered by the Control Panel can be done using the Unity Video Player.
You'll first need to add a Video Player component in your Unity scene.
If using video embedded into your environment, assign that video to this component.
Then, in the Inspector, use Add Component to add either the Embedded Video Controllable or Streamed Video Controllable component to that same object.
Give this controllable the name you want to see in Control Panel and set its Video Player property to the Video Player component on this object.
If using streaming video, set the controllable's Default URL to the URL you want to play.
Once added, this video will appear in Control Panel for events and templates that use this environment. Hosts can then toggle it on/off or play/stop/seek in sync across all rooms.
To learn more about the Unity Video Player component, see Unity - Manual: Video Player component (unity3d.com).
Testing your controllables in Mesh
To try using the Control Panel to operate your controllables in a real event, you'll first need to publish your environment to Mesh. See Build and publish your environment for more information on uploading your environment.
Once your environment is uploaded, you can then customize a template or event to set up Control Panel. See Prepare content with the Control Panel for more information.
Save your work as a template
Once you create an Environment + Control Panel combination that you think organizers may want to repeat in the future, you can save the combination as a template. To learn more about templates, see Create event template.
Feedback
Coming soon: Throughout 2024 we will be phasing out GitHub Issues as the feedback mechanism for content and replacing it with a new feedback system. For more information see: https://aka.ms/ContentUserFeedback.
Submit and view feedback for