Note
Access to this page requires authorization. You can try signing in or changing directories.
Access to this page requires authorization. You can try changing directories.
The Microsoft Teams Electronic Health Record (EHR) connector Virtual Appointments report in the Microsoft Teams admin center gives you a quick and easy way to view Teams EHR-integrated virtual appointments usage in your organization.
To view the report, you must be a Teams Administrator, Global Reader, Reports Reader, or Global Administrator.
Important
Microsoft recommends that you use roles with the fewest permissions. This helps improve security for your organization. Global Administrator is a highly privileged role that should be limited to emergency scenarios when you can't use a less-privileged role.
View the report
There are two ways to access and view the report in the Teams admin center.
- Through the EHR connector Virtual Appointments card in the dashboard
- Directly by choosing EHR connector Virtual Appointments in Analytics & reports > Usage reports
The EHR connector Virtual Appointments card
In the dashboard of the Microsoft Teams admin center, go to the EHR connector Virtual Appointments card.
Here, you get an at-a-glance view of Teams EHR-integrated virtual appointment activity by month, including completed appointments, remaining allocation, and whether you exceeded the monthly limit (depending on the license you have).
Choose View details to view the report. To purchase more licenses, choose Buy more.
The Teams EHR connector Virtual Appointments report
In the left navigation of the Teams admin center, go to Analytics & reports > Usage reports.
On the View reports tab, choose EHR connector Virtual Appointments and a date range. Then, select Run report.
Interpret the report
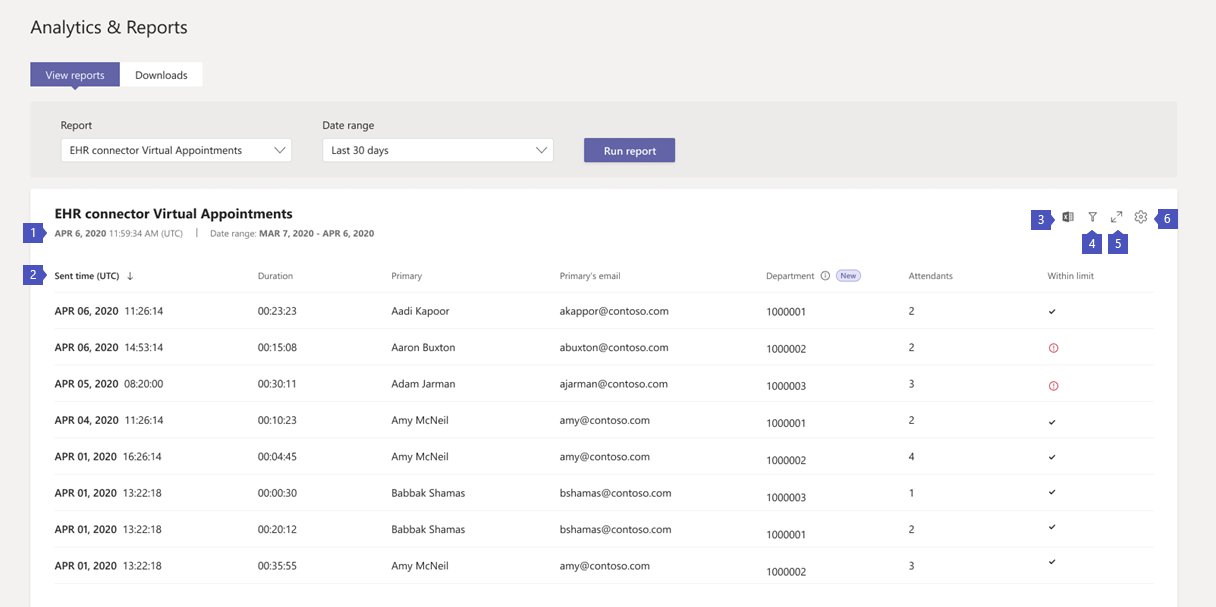
| Callout | Description |
|---|---|
| 1 | Each report shows the date for when the report was generated and the date range you chose. |
| 2 | The table gives you detailed information about each appointment that took place during the selected date range. Keep in mind that you won't see entries for appointments in which either a staff member or patient didn't join.
|
| 3 | You can export the report to a CSV file for offline analysis. Select Export to Excel to download the report. |
| 4 | Select Filter to filter the report details view. |
| 5 | Select Full screen to view the report in full screen mode. |
| 6 | Select Edit columns to add or remove columns in the table |
Note
For more analytics on Teams EHR-integrated virtual appointments, see Virtual Appointments usage report. With the Virtual Appointments usage report, you can view key metrics such as total appointments, lobby wait time, appointment duration, and no shows. Use this information to gain insight into usage trends to help you optimize Virtual Appointments to deliver better business outcomes.

