Virtual Appointments with Teams - Integration into Epic EHR
The Microsoft Teams Electronic Health Record (EHR) connector makes it easy for clinicians to launch a virtual patient appointment or consultation with another provider in Microsoft Teams directly from the Epic EHR system. Built on the Microsoft 365 cloud, Teams enables simple, secure collaboration and communication with chat, video, voice, and healthcare tools in a single hub that supports compliance with HIPAA, HITECH certification, and more.
The communication and collaboration platform of Teams makes it easy for clinicians to cut through the clutter of fragmented systems so they can focus on providing the best possible care. With the Teams EHR connector, you can:
- Launch Teams Virtual Appointments from your Epic EHR system with an integrated clinical workflow.
- Enable patients to join Teams Virtual Appointments from within the patient portal or through SMS.
- Support other scenarios including multi-participant, group visits, and interpreter services.
- Write metadata back to the EHR system about Teams Virtual Appointments to record when attendees connect, disconnect, and enable automatic auditing and record keeping.
- View consumption data reports and customizable Call Quality information for EHR-connected appointments.
This article describes how to set up and configure the Teams EHR connector to integrate with the Epic platform in your healthcare organization. It also gives you an overview of the Teams Virtual Appointments experience from the Epic EHR system.
Before you begin
Before you get started, there’s a few things to do to prepare for the integration.
Get familiar with the integration process
Review the following information to get an understanding of the overall integration process.

| Request app access | App enablement | Connector configuration | Epic configuration | Testing | |
|---|---|---|---|---|---|
| Duration | Approximately 7 business days | Approximately 7 business days | Approximately 7 business days | Approximately 7 business days | |
| Action | You request access to the Teams app. | We create a public and private key certificate and upload them to Epic. | You complete configuration steps in the EHR connector configuration portal. | You work with your Epic technical specialist to configure FDI records in Epic. | You complete testing in your test environment. |
| Outcome | We authorize your organization for testing. | Epic syncs the public key certificate. | You receive FDI records for Epic configuration. | Configuration completed. Ready to test. | Full validation of flows and decision to move to production. |
Request access to the Teams app
You'll need to request access to the Teams app.
- Request to download the Teams app in the Epic Connection Hub. Doing this triggers a request from Epic to the Microsoft EHR connector team.
- After you make your request, send an email to TeamsForHealthcare@service.microsoft.com with your organization name, tenant ID, and the email address of your Epic technical contact.
- The Microsoft EHR connector team will respond to your email with confirmation of enablement.
Review the Epic-Microsoft Teams Telehealth Integration guide
Review the Epic-Microsoft Teams Telehealth Integration Guide with your Epic technical specialist. Make sure that all prerequisites are met.
Prerequisites
- An active subscription to Microsoft Cloud for Healthcare or a subscription to Microsoft Teams EHR connector standalone offer (only enforced when testing in a production EHR environment).
- Epic version November 2018 or later.
- Users have an appropriate Microsoft 365 or Office 365 license that includes Teams meetings.
- Teams is adopted and used in your healthcare organization.
- Identified a person in your organization who is a Microsoft 365 Global Administrator with access to the Teams admin center.
- Your systems meet all software and browser requirements for Teams.
Important
Make sure you complete the pre-integration steps and all prerequisites are met before you move forward with the integration.
The integration steps are performed by the following people in your organization:
- Microsoft 365 Global Administrator: The main person who is responsible for the integration. The admin configures the connector, enables SMS (if needed), and adds the Epic customer analyst who will be approving the configuration.
- Epic customer analyst: A person in your organization who has login credentials to Epic. They approve the configuration settings entered by the admin and provide the configuration records to Epic.
The Microsoft 365 admin and Epic customer analyst can be the same person.
Set up the Teams EHR connector
The connector setup requires that you:
- Launch the EHR connector configuration portal
- Enter configuration information
- Enable SMS notifications (optional)
- Approve or view the configuration
- Review and finish the configuration
Launch the EHR connector configuration portal
To get started, your Microsoft 365 admin launches the EHR connector configuration portal and signs in using their Microsoft 365 credentials.
Your Microsoft 365 admin can configure a single organization or multiple organizations to test the integration. Configure the test and production URL in the configuration portal. Make sure to test the integration from the Epic test environment before moving to production.
Note
Your Microsoft 365 admin and Epic customer analyst must complete the integration steps in the configuration portal. For Epic configuration steps, contact the Epic technical specialist assigned to your organization.
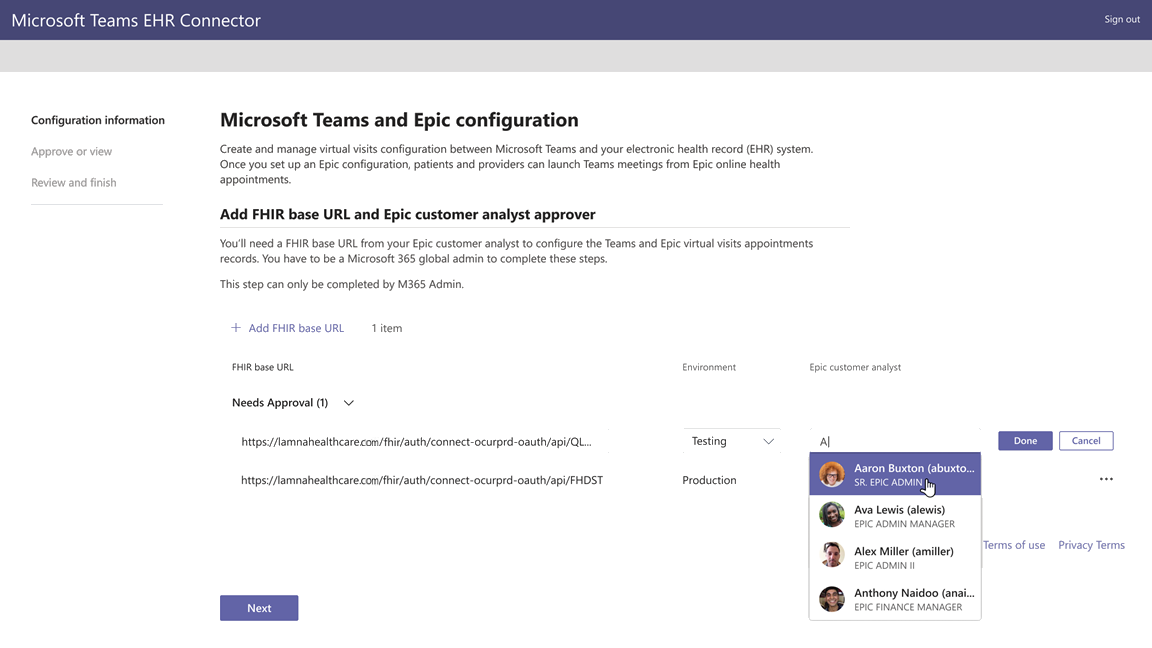
Enter configuration information
Next, to set up the integration, your Microsoft 365 admin completes following steps:
Adds a Fast Health Interoperability Resources (FHIR) base URL from your Epic technical specialist and specifies the environment. Configure as many FHIR base URLs as needed, depending on your organization’s needs and the environments you want to test.
The FHIR base URL is a static address that corresponds to your server FHIR API endpoint. An example URL is
https://lamnahealthcare.com/fhir/auth/connect-ocurprd-oauth/api/FHDST.You can set up the integration for test and production environments. For initial setup, we encourage you to configure the connector from a test environment before moving to production.
Adds the username of the Epic customer analyst who will be approving the configuration in a later step.

Enable SMS notifications (optional)
Note
SMS notifications is currently only available in the United States. We're working on making this feature available in other regions in future releases of Teams and will update this article when available.
Complete this step if your organization wants Microsoft to manage SMS notifications for your patients. When you enable SMS notifications, your patients will receive confirmation and reminder messages for scheduled appointments.
To enable SMS notifications, your Microsoft 365 admin completes the following steps:
On the SMS notifications page, select both consent checkboxes to:
- Allow Microsoft to send SMS notifications to patients on behalf of your organization.
- Acknowledge that you'll ensure attendees have consented to send and receive SMS messages.

Under Your phone numbers, select Generate a new phone number to generate a phone number for your organization. Doing this starts the process to request and generate a new phone number. This process might take up to 2 minutes to complete.
After the phone number is generated, it's displayed on the screen. This number is used to send SMS confirmations and reminders to your patients. The number has been provisioned but isn’t linked to the FHIR base URL yet. You do that in the next step.
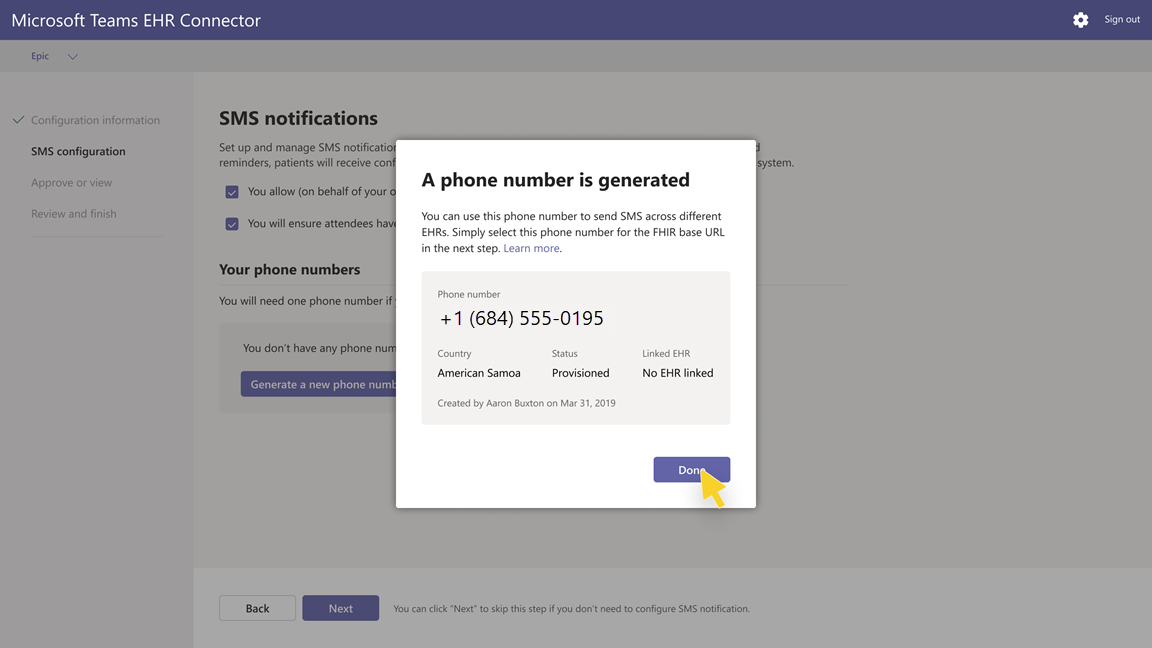
Choose Done, and then select Next.
Some telephone carriers now require unverified toll numbers to be verified. This requirement became effective October 1, 2022. Some carriers are following this more strictly than others.
You'll need to register your generated phone number in this form. This ensures none of your SMS messages will be blocked when sent to US phone numbers.
To link the phone number to a FHIR base URL, under Phone number in the SMS configuration section, select the number. Do this for each FHIR base URL for which you want to enable SMS notifications.
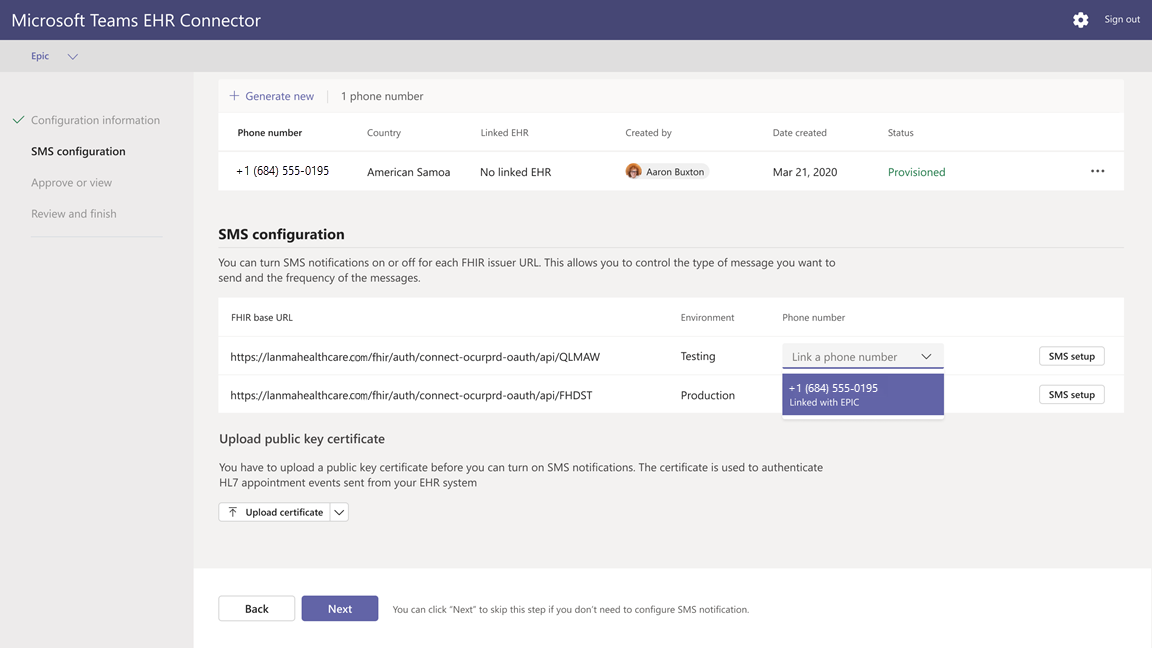
If you’re configuring the connector for the first time, you’ll see the FHIR base URL that was entered in the earlier step. The same phone number can be linked to multiple FHIR base URLs, which means that patients will receive SMS notifications from the same phone number for different organizations and/or departments.
Select SMS setup next to each FHIR base URL to set up the types of SMS notifications to send to your patients.
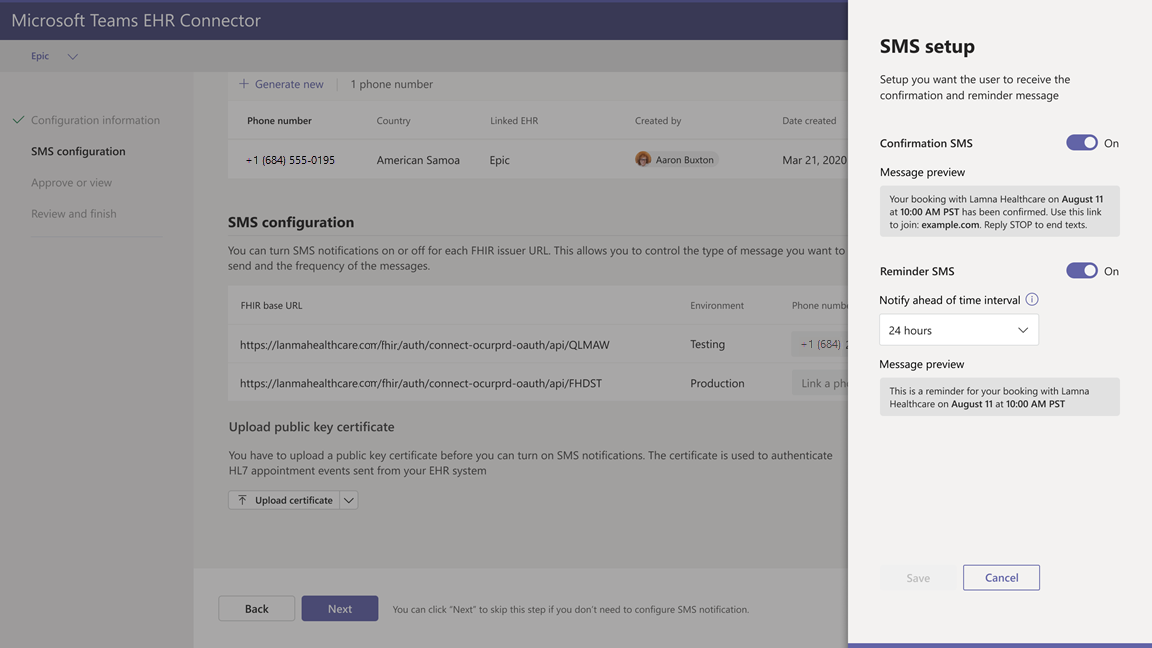
- Confirmation SMS: Notifications are sent to patients when an appointment is scheduled, updated, or canceled in the EHR system.
- Reminder SMS: Notifications are sent to patients according to the time interval you specify and the scheduled time of the appointment.
Choose Save.
Select Upload certificate to upload a public key certificate. You must upload a Base64 encoded (public key only) .cer certificate for each environment.
A public key certificate is required to receive appointment information for sending SMS notifications. The certificate is needed to verify that the incoming information is from a valid source.
When the connector is used to send SMS reminders, the patient’s phone number is sent by Epic in an HL7v2 payload when appointments are created in Epic. These numbers are stored for each appointment in your organization’s geography and are retained until the appointment takes place. To learn more about how to configure HL7v2 messages, see the Epic-Microsoft Teams Telehealth Integration Guide.
Choose Next.


Note
At any time, your Microsoft 365 admin can update any of the SMS settings. Keep in mind that changing settings might result in a stoppage of SMS service. For more information about how to view SMS reports, see Teams EHR connector Virtual Appointments report.
Approve or view the configuration
The Epic customer analyst in your organization who was added as approver launches the EHR connector configuration portal and signs in using their Microsoft 365 credentials. After successful validation, the approver is asked to sign in using their Epic credentials to validate the Epic organization.
Note
If the Microsoft 365 admin and Epic customer analyst are the same person, you'll still need to sign in to Epic to validate your access. The Epic sign-in is used only to validate your FHIR base URL. Microsoft won't store credentials or access EHR data with this sign-in.

After successful sign-in to Epic, the Epic customer analyst must approve the configuration. If the configuration isn't correct, your Microsoft 365 admin can sign in to the configuration portal and change the settings.

Review and finish the configuration
When the configuration information is approved by the Epic administrator, you'll be presented with integration records for patient and provider launch. The integration records include:
- Patient and provider records
- Direct SMS record
- SMS configuration record
- Device test configuration record
The context token for device test can be found in the patient integration record. The Epic customer analyst must provide these records to Epic to complete the virtual appointments configuration in Epic. For more information, see the Epic-Microsoft Teams Telehealth Integration Guide.
Note
At any time the Microsoft 365 or Epic customer analyst can sign in to the configuration portal to view integration records and change organization configuration, as needed.

Note
The Epic customer analyst must complete the approval process for each FHIR base URL that's configured by the Microsoft 365 admin.
Launch Teams Virtual Appointments
After completing the EHR connector steps and Epic configuration, your organization is ready to support video appointments with Teams.
Virtual Appointments prerequisites
Your systems must meet all software and browser requirements for Teams.
You completed the integration setup between the Epic organization and your Microsoft 365 organization.
Provider experience
Healthcare providers from your organization can join appointments using Teams from their Epic provider apps (Hyperspace, Haiku, Canto). The Begin virtual visit button is embedded in the provider flow.
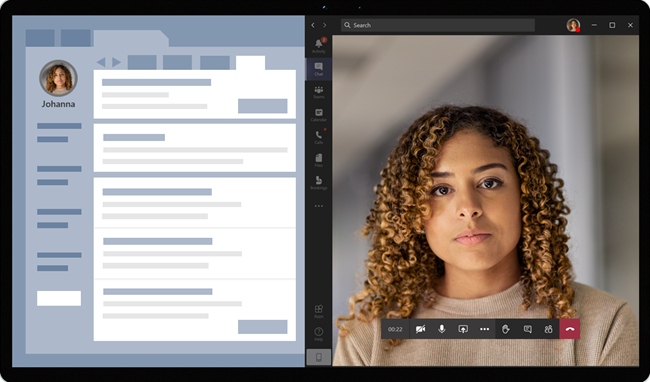
Key features of the provider experience:
Providers can join appointments using supported browsers or the Teams app.
Providers must do a one-time sign-in with their Microsoft 365 account when joining an appointment for the first time.
After the one-time sign-in, the provider is taken directly to the virtual appointment in Teams. (The provider must be signed in to Teams).
Providers can see real-time updates of participants connecting and disconnecting for a given appointment. Providers can see when the patient is connected to an appointment.
Note
Any information entered in the meeting chat that’s necessary for medical records continuity or retention purposes should be downloaded, copied, and notated by the healthcare provider. The chat doesn’t constitute a legal medical record or a designated record set. Messages from the chat are stored based on settings created by the Microsoft Teams admin.
Patient experience
The connector supports patients joining appointments through a link in the SMS text message, MyChart web, and mobile. At the time of the appointment, patients can start the appointment from MyChart using the Begin virtual visit button or by tapping the link in the SMS text message.
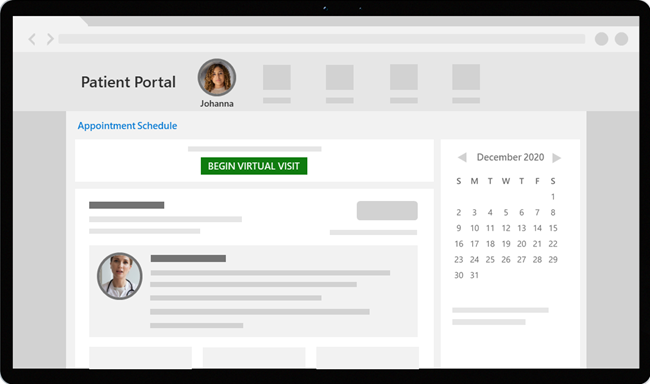
Key features of the patient experience:
Patients can join appointments from modern web browsers on desktop and mobile without having to install the Teams app.
Patients can test their device hardware and connection before joining an appointment.
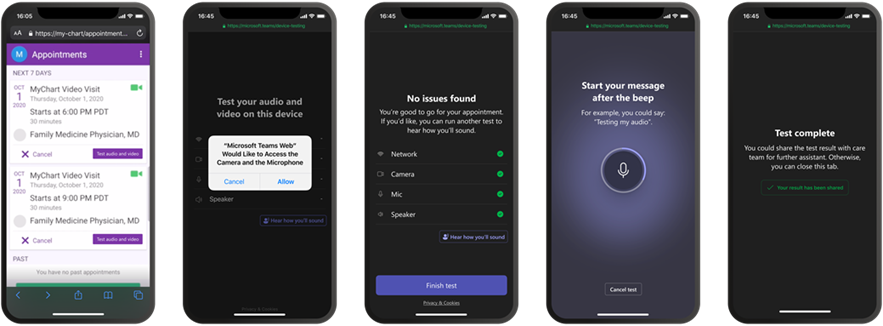
Device test capabilities:
- Patients can test their speaker, microphone, camera, and connection.
- Patients can complete a test call to fully validate their configuration.
- Results of the device test can be sent back to the EHR system.
Patients can join appointments with a single click and no other account or sign-in is required.
Patients aren't required to create a Microsoft account or sign in to launch an appointment.
Patients are placed in a lobby until the provider joins and admits them.
Patients can test their video and microphone in the lobby before they join the appointment.

Note
Epic, MyChart, Haiku, and Canto are trademarks of Epic Systems Corporation.
Troubleshoot Teams EHR connector setup and integration
If you're experiencing issues when setting up the integration, see Troubleshoot Teams EHR connector setup and configuration for guidance on how to resolve common setup and configuration issues.
Get insight into Virtual Appointments usage
The EHR connector Virtual Appointments report in the Teams admin center gives you an overview of EHR-integrated virtual appointment activity in your organization. You can view a breakdown of data for each appointment that took place for a given date range. The data includes the staff member who conducted the appointment, duration, the number of attendees, department, and whether the appointment was within the allocation limit.
Privacy and location of data
Teams integration into EHR systems optimizes the amount of data used and stored during integration and virtual appointment flows. The solution follows the overall Teams privacy and data management principles and guidelines outlined in Teams Privacy.
The Teams EHR connector doesn't store or transfer any identifiable personal data or any health records of patients or healthcare providers from the EHR system. The only data stored by the EHR connector is the EHR user’s unique ID, which is used during Teams meeting setup.
The EHR user’s unique ID is stored in one of the three geographic regions described in Where your Microsoft 365 customer data is stored. All chat, recordings, and other data shared in Teams by meeting participants are stored according to existing storage policies. To learn more about the location of data in Teams, see Location of data in Teams.