Note
Access to this page requires authorization. You can try signing in or changing directories.
Access to this page requires authorization. You can try changing directories.
When sharing files and folders with people outside your organization, there are various options to reduce the chances of accidentally sharing sensitive information. You can choose from the options in this article to best meet the needs of your organization.
Use best practices for Anyone links
If people in your organization need to do unauthenticated sharing, but you're concerned about unauthenticated people modifying content, read Best practices for unauthenticated sharing for guidance on how to work with unauthenticated sharing in your organization.
Turn off Anyone links
We recommend leaving Anyone links enabled for appropriate content because it's the easiest way to share and can help reduce the risk of users seeking other solutions that are outside the control of your IT department. Anyone links can be forwarded to others, but file access is only available to those who have the link.
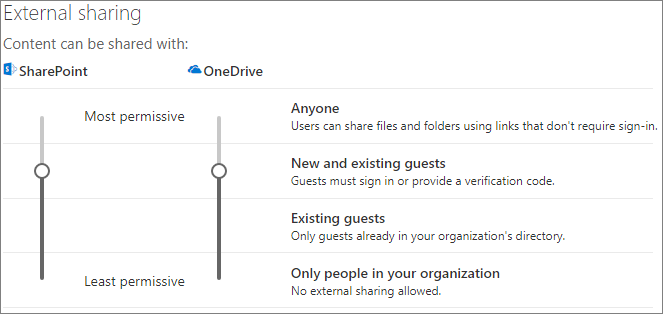
If you always want people outside your organization to authenticate when accessing content in SharePoint, Groups, or Teams, you can turn off Anyone sharing. This prevents users from unauthenticated sharing of content.
If you disable Anyone links, users can still easily share with guests using Specific people links. In this case, all people outside your organization are required to authenticate before they can access the shared content.
Depending on your needs, you can disable Anyone links for specific sites, or for your whole organization.
To turn off Anyone links for your organization
In the SharePoint admin center, under Policies, select Sharing.
Set the SharePoint and OneDrive external sharing settings to New and existing guests.

Select Save.
To turn off Anyone links for a site
In the SharePoint admin center, under Sites, select Active sites.
Select the site that you want to configure.
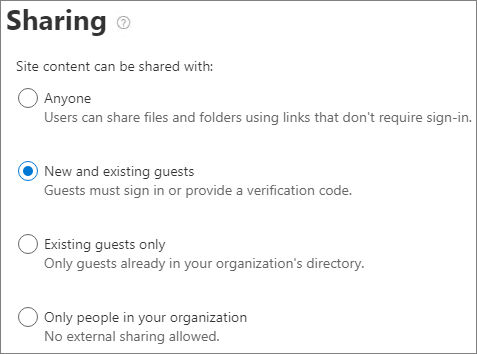
In the ribbon, select Sharing.
Ensure that sharing is set to New and existing guests.

If you made changes, select Save.
Domain filtering
You can use domain allow or denylists to specify which domains your users can use when sharing with people outside your organization.
With an allowlist, you can specify a list of domains where users in your organization can share with people outside your organization. Sharing with other domains is blocked. If your organization only collaborates with people from a list of specific domains, you can use this feature to prevent sharing with other domains.
With a denylist, you can specify a list of domains to which users in your organization can't share with people outside your organization. Sharing with the listed domains is blocked. This can be useful if you have competitors, for example, who you want to prevent from accessing content in your organization.
The allow and denylists only affect sharing with guests. Users can still share with people from prohibited domains by using Anyone links if you haven't disabled them. For best results with domain allow and denylists, consider disabling Anyone links as described above.
To set up a domain allow or denylist
In the SharePoint admin center, under Policies, select Sharing
Under More external sharing settings, select the Limit external sharing by domain check box.
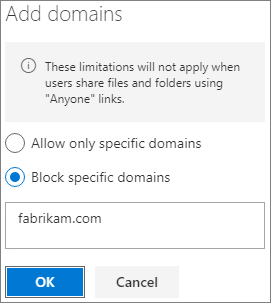
Select Add domains.
Select whether you want to block domains, type the domains, and select OK.

Select Save.
If you want to limit sharing by domain at a higher level than SharePoint and OneDrive, you can allow or block invitations to B2B users from specific organizations in Microsoft Entra ID. (You must configure the SharePoint and OneDrive integration with Microsoft Entra B2B for these settings to affect SharePoint and OneDrive.)
Limit sharing of files, folders, and sites with people outside your organization to specified security groups
You can restrict sharing of files, folders, and sites with people outside your organization to members of a specific security group. This is useful if you want to enable external sharing, but with an approval workflow or request process. Alternatively, you might require your users to complete a training course before they're added to the security group and are allowed to share externally.
To limit external sharing to members of a security group
In the SharePoint admin center, under Policies, select Sharing.
Under More external sharing settings, select Allow only users in specific security groups to share externally.
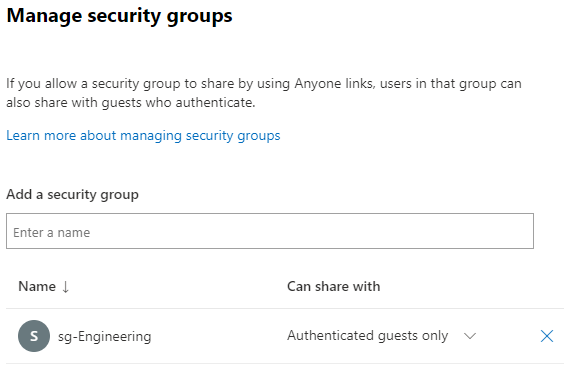
Select Manage security groups.

In the Add a security group box, search for and select the security group you want.
Next to the security group name, from the Can share with dropdown, select either:
- Authenticated guests only (default)
- Anyone
Select Save.
Note that this affects files, folders, and sites, but not Microsoft 365 groups or Teams. When members invite guests to a private Microsoft 365 group or a private team in Microsoft Teams, the invitation is sent to the group or team owner for approval.
You can also limit who can invite guests to your organization. For more information, see Limit who can invite guests.
See Also
Create a more secure guest sharing environment
Best practices for sharing files and folders with unauthenticated users